Frozen Desserts

Chocolate Tahini Banana “Soft Serve”

Chocolate Tahini Banana Soft Serve  |  Lemon & Mocha

Happy Friday, everyone! Today I’m sharing a chocolate-packed tasty treat with you all. This Chocolate Tahini Banana “Soft Serve” is creamy, smooth and topped with a quick chocolate magic shell. If the magic shell sounds familiar it’s because that’s what I used to top the Pistachio Semifreddo I posted last summer. It’s no secret that I love using tahini in the kitchen. I use it to make hummus, turn it into a dressing and drizzle it over lettuce wraps. However, I had only ever used it savory dishes and lately I’ve seen a lot of sweet recipes popping up with tahini listed as an ingredient.

Chocolate Tahini Banana Soft Serve  |  Lemon & Mocha

At first I thought using tahini in a sweet recipe sounded really strange. But then when I thought about it more, tahini is very similar to peanut butter. They’re both creamy, nutty and rich in flavor. Considering I love peanut butter in sweet desserts, it’s not too much of a stretch to think I might also enjoy tahini swapped in. Clearly, since I’m posting this recipe now, the verdict is that I enjoyed it very, very much!

Chocolate Tahini Banana Soft Serve  |  Lemon & Mocha

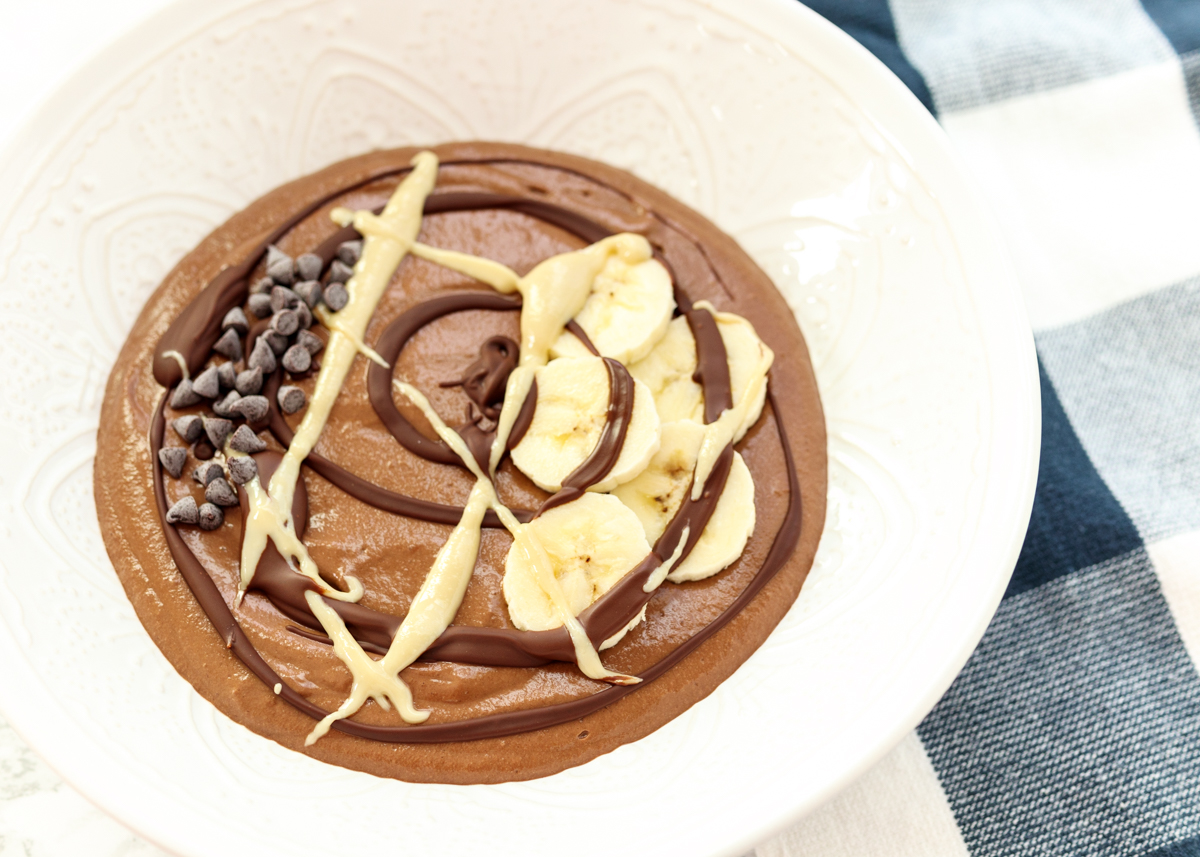
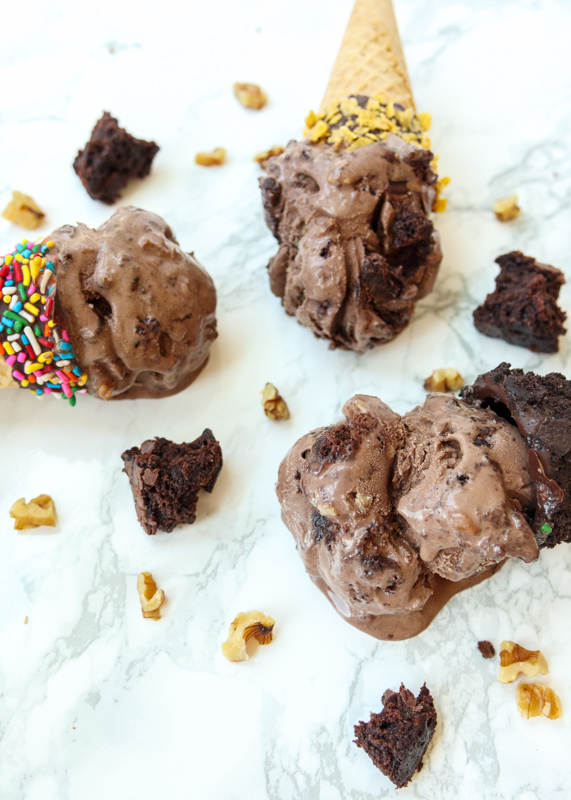
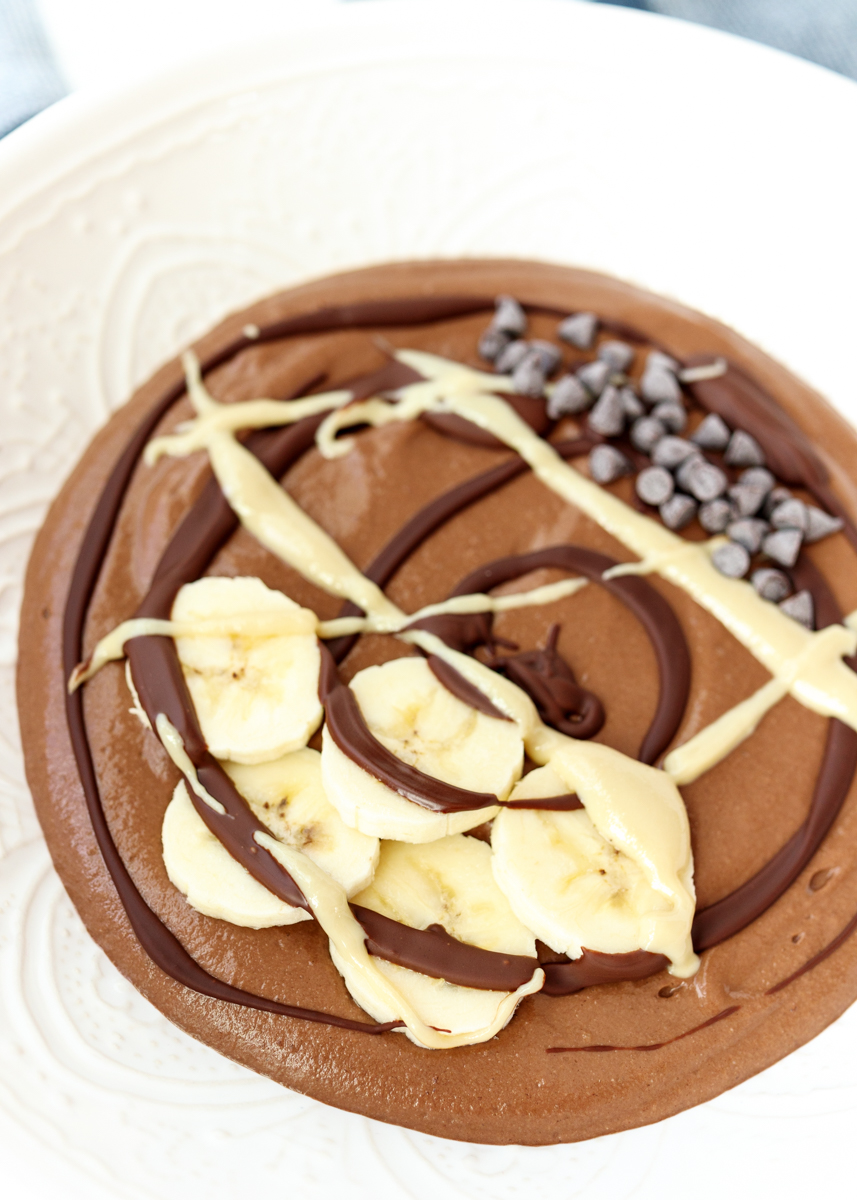
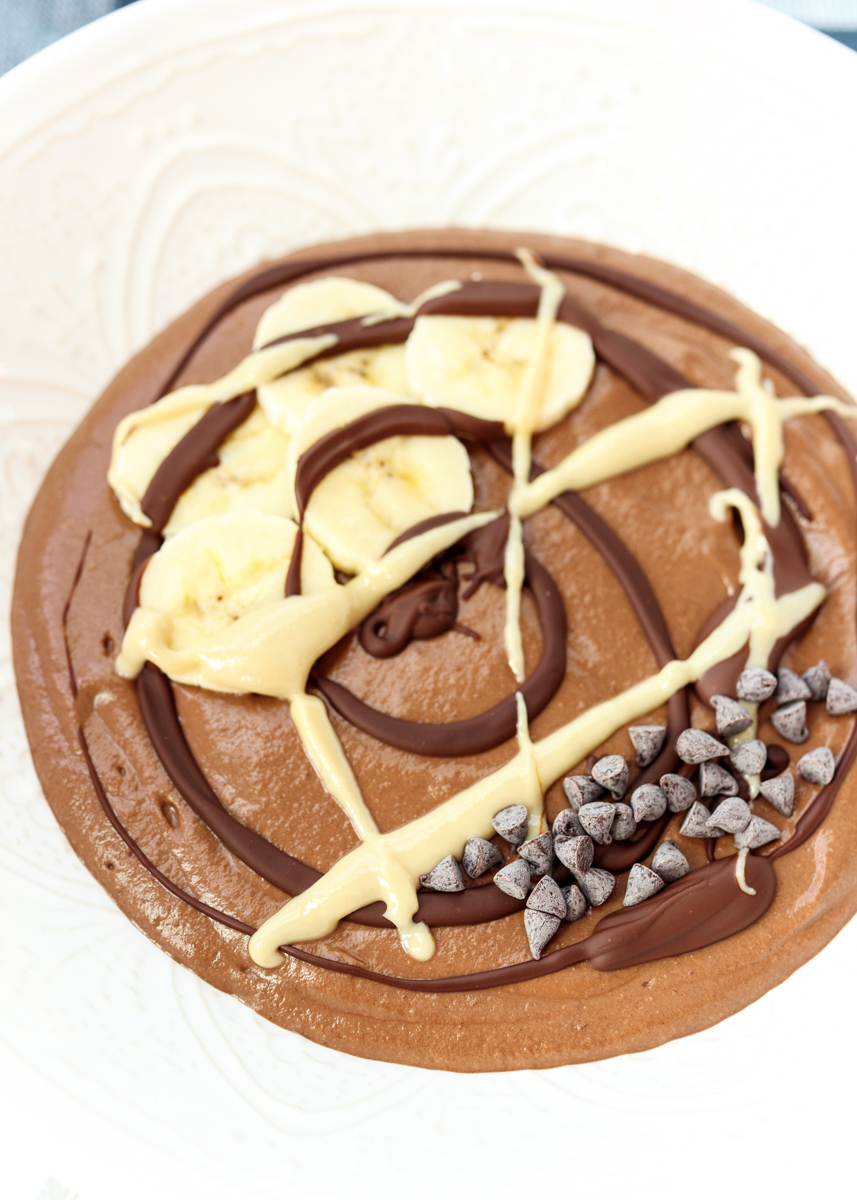
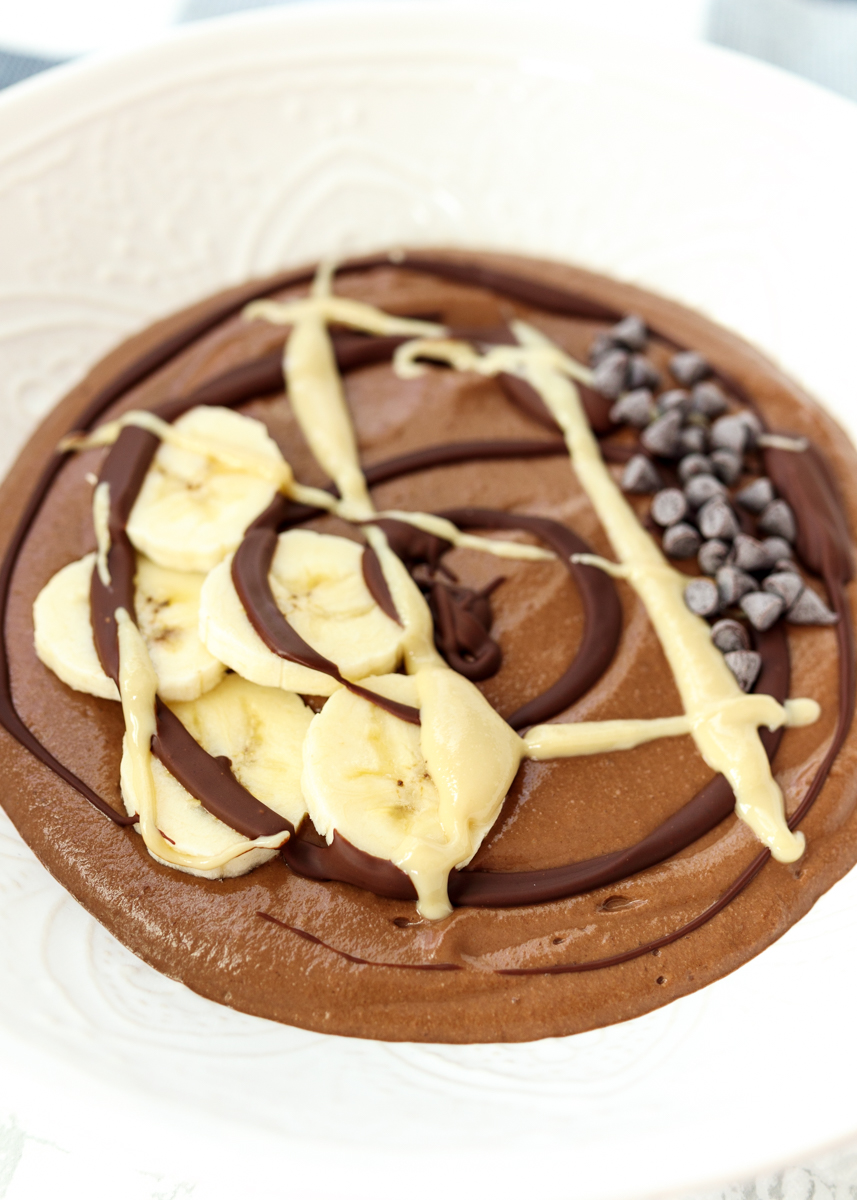
I swirled it into my chocolate banana “soft serve” and drizzled a little more on top for good measure. Have you ever had banana “soft serve?” I’ve also heard it called nice cream. There’s probably many different ways it’s described, but I think of it as a dessert smoothie bowl without the yogurt. It has the texture of partially melted ice cream and thanks to the cocoa powder it’s super chocolatey. You make it by blending frozen bananas, which bring the sweetness and that semi-frozen texture.

Chocolate Tahini Banana Soft Serve  |  Lemon & Mocha

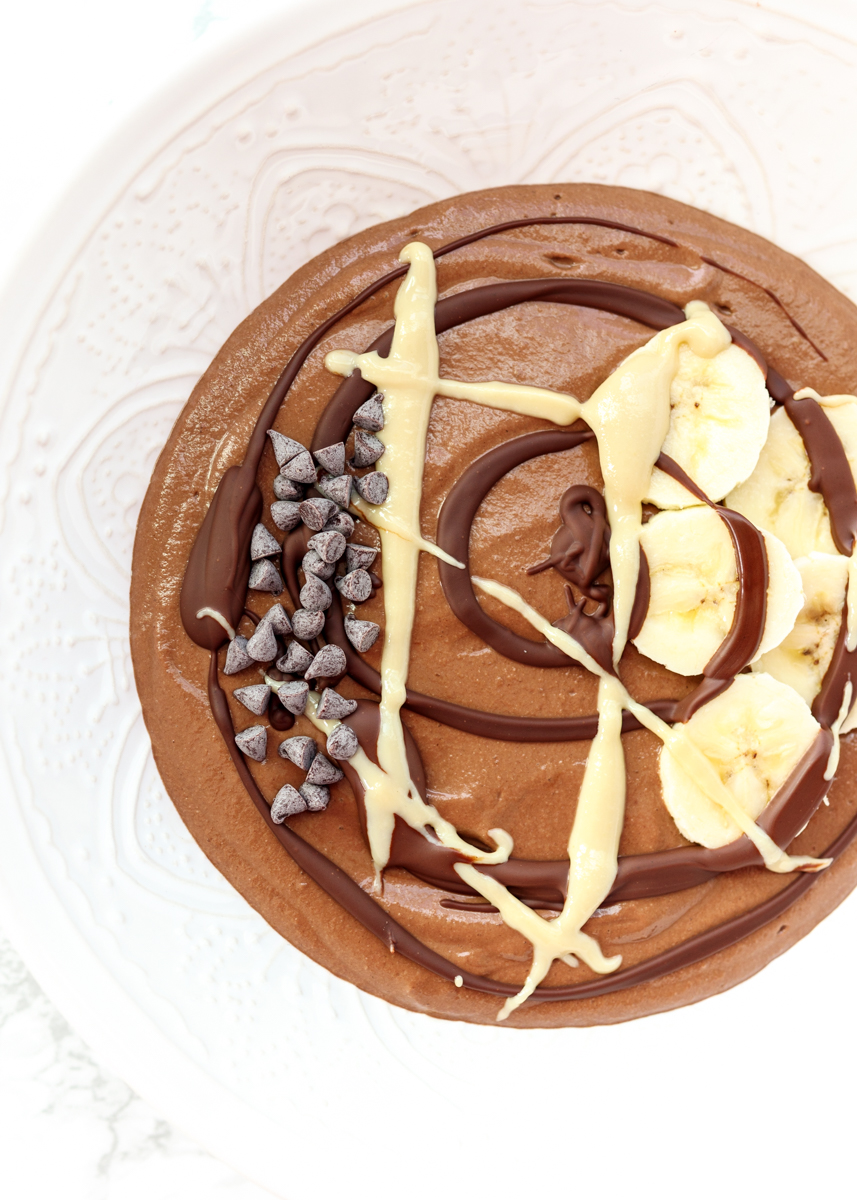
I added frozen cauliflower florets as an experiment and it was a big success! It didn’t change the flavor at all, but secretly added some veggies to this sweet treat. The creamy tahini added the right amount of nuttiness, which pairs so well with chocolate and banana. Of course it wouldn’t truly be a chocolate treat if I didn’t find a way to add chocolate on top of my chocolate so I drizzled some magic shell on top. You can make magic shell by melting chocolate chips with coconut oil then drizzling over something cold, like this Chocolate Tahini Banana “Soft Serve,” which makes it harden into fun chocolate swirls that you can crack with your spoon and eat with each bite.

Chocolate Tahini Banana Soft Serve  |  Lemon & Mocha

I love making this when I want to eat some dessert, but I don’t already have anything made. A few bursts in my high-speed blender and it’s time to eat!

Chocolate Tahini Banana Soft Serve  |  Lemon & Mocha

Chocolate Tahini Banana "Soft Serve"
 
Yield: 2 servings
Ingredients
  • 1½ cups frozen ripe banana slices (about 1½ bananas)
  • 1 cup frozen cauliflower florets
  • 3 tablespoons cocoa powder
  • 1 tablespoon agave
  • 1 teaspoon vanilla
  • 2 tablespoons chocolate chips
  • ½ teaspoon coconut oil
  • Sliced bananas and tahini, for topping
Directions
  1. Add the frozen banana slices, cauliflower florets, cocoa powder, agave and vanilla to a high-speed blender. Blend until smooth. Taste for sweetness and add more agave if needed. Divide the mixture between 2 bowls.
  2. Melt the chocolate chips and the coconut oil in a microwave safe bowl. Microwave for 30 seconds, then stir. Continue to microwave for 15 second increments, stirring after each, until melted and smooth. Carefully drizzle over the “soft serve” to harden and top with banana slices and a tahini drizzle.
Notes
I've also made this using 88 Acres Watermelon Seed Butter instead of tahini using a 1-1 substitution.


Pumpkin Pecan Ice Cream Pie

Pumpkin Pecan Ice Cream Pie  |  Lemon & Mocha

Pumpkin Pecan Ice Cream Pie went down in the Lemon & Mocha kitchen and it was as amazing as it sounds (and looks)! When I was brainstorming what desserts I wanted to share for Thanksgiving I knew I was going to make the Pumpkin Cheesecake Trifle, but I wasn’t sure about my second dessert. Usually for Thanksgiving everyone immediately thinks of pie and my pie-loving husband has converted me into a pie fan over the years. I don’t like to share recipes on Lemon & Mocha that I’m not 100% satisfied with and while I have made a bunch of really great tasting pies, I wouldn’t say I’ve perfected them yet. However, there is one type of pie I have perfected, if I say so myself, and that is ice cream pie.

Pumpkin Pecan Ice Cream Pie  |  Lemon & Mocha

I have made many, many ice cream pies over the years and I’ve shared a few on here as well, although not nearly enough! I’ll work that into the schedule for 2019. Graham crust, cookie crust, ganache-topped, candy filled, cake filled – you name it, I’ve whipped it up. I may have even eaten a slice or two. Clearly I’m kidding, many, many slices have been consumed, all in the pursuit of perfection though.

Pumpkin Pecan Ice Cream Pie  |  Lemon & Mocha

This Pumpkin Pecan Ice Cream Pie is a nice break from the traditional Thanksgiving dessert table and the big bonus is that it’s so easy. Like so easy I even waited until the week of Thanksgiving to share it because you barely need any time to put it together. Although it is quick to make, it does require at least eight hours of freezing time so definitely read the instructions all the way through and plan accordingly.

Pumpkin Pecan Ice Cream Pie  |  Lemon & Mocha

The base of this ice cream pie is a regular graham base with some cinnamon and ground ginger mixed in for that warm spiced holiday feel. Then we have pumpkin ice cream. You could certainly make your own and if you need a recipe I have had great success with all of David Lebovitz’s recipes from The Perfect Scoop. I had just come back from my vacation last week so I went the easy store-bought route, especially since so many brands have delicious-sounding pumpkin flavors right now. I bought the Talenti pumpkin gelato; it was really creamy, packed with rich pumpkin flavor and even had pie pieces in it – bonus!

Pumpkin Pecan Ice Cream Pie  |  Lemon & Mocha

On top with have whipped cream and homemade sugared pecans. These pecans are tossed in egg whites and pumpkin pie spices then baked. They are so addictive, especially when they’re warm, so it was really difficult saving them for this pie! I find that ice cream tends to be a universal crowd pleaser and I know from experience there’s a lot of ice cream crazed families out there so this is the perfect Thanksgiving dessert. Although I highly recommend pumpkin ice cream you could certainly substitute a different ice cream flavor of your choice, just don’t skip those candied pecans! Enjoy!

Pumpkin Pecan Ice Cream Pie  |  Lemon & Mocha

Pumpkin Pecan Ice Cream Pie
 
Yield: 8-10 servings
Ingredients
for the pie
  • 1½ cups graham cracker crumbs
  • 5 tablespoons butter, melted
  • 3 tablespoons granulated sugar
  • 1 teaspoon ground ginger
  • 2 teaspoons ground cinnamon, divided
  • 1 quart pumpkin ice cream or gelato
  • 2 cups whipped topping, such as Cool Whip (see note)
for the pecan topping
  • 1 tablespoon brown sugar
  • 1 tablespoon granulated sugar
  • ½ teaspoon ground cinnamon
  • ⅛ teaspoon ground cloves
  • 1 egg white
  • ½ teaspoon vanilla extract
  • 4 ounces pecan halves
Directions
for the pie
  1. You have two pan options here. The first is a spring form pan lined with plastic wrap. Sometimes I like doing it this way so it’s easy to pop it out and put the pie on a cutting board for a nice even cut or onto a platter. The second option is to make the pie directly in a glass pie pan. If you’re doing option two (directly in the pie pan) and want a firmer crust bake the graham crust at 350 degrees F for 5 minutes then let cool completely before adding the ice cream.
  2. In a medium mixing bowl, combine the graham cracker crumbs, melted butter, the granulated sugar, the ground ginger and 1 teaspoon of the cinnamon. Pour into the prepared pie dish and press down with your fingers or the bottom of a measuring cup to make an even crust layer, going slightly up the sides of the pie dish. Don't go too high up or the crust on the bottom won't be thick enough. Put in the fridge for 2 hours or the freezer for 1 hour before the next step.
  3. Scoop the pumpkin ice cream or gelato into the graham crust. If you want to make the ice cream easier to spread, beat it with a stand mixer for a minute. Spread the ice cream into an even layer then let set in the freezer for 8 hours or overnight.
  4. Combine the whipped topping with the remaining 1 teaspoon of ground cinnamon. Spread on the firm ice cream pie. When you’re ready to serve, top with the pecan topping.
for the pecan topping
  1. Preheat the oven to 250 degrees F. Line a baking sheet with parchment paper.
  2. In a small bowl, combine the brown sugar, granulated sugar, cinnamon and cloves.
  3. In a medium mixing bowl, beat the egg white and vanilla until frothy. Add the pecan halves then toss to coat. Add the sugar mixture and combine to coat. Place on the prepared baking sheet and spread out the pecans. Bake for 1 hour, tossing the pecans on the pan about every 15 minutes. Let cool before placing on top of the pie when ready to serve.
Notes
If you want to use homemade whipped cream, follow these instructions. In a cold metal bowl of a stand mixer or in a large cold metal mixing bowl with a hand mixer, use cold beaters to beat 1 cup cold heavy whipping cream, 2 tablespoons of granulated sugar and the remaining teaspoon of cinnamon until stiff peaks form. Do not top put on the ice cream pie until you’re ready to serve it. You can make the whipped cream a day or two ahead, just store it in the fridge until you’re ready to serve then lightly beat with a whisk before topping the pie.

Some of the links above are affiliate links, which means I may receive a small commission for my referral. This does not affect the retail cost of the item. Thank you for supporting Lemon & Mocha!

Hot Fudge Brownie Sundae Ice Cream Pie

Hot Fudge Brownie Sundae Ice Cream Pie  |  Lemon & Mocha

Happy Friday, friends! It is the last day of my self-proclaimed ice cream week and I have an epic grand finale for you. Hot Fudge Brownie Sundae Ice Cream Pie! I’ve turned the classic dessert into an ice cream pie because everyone needs more ice cream pie in their lives. Especially during the summer time. I love making ice cream pies year round though; it is my go-to dessert to make for someone’s birthday or any type of celebration. Usually my ice cream pies have four major components: cookie or graham base, ice cream, some sort of decadent topping and whipped cream. Well, five components if you include the cherries, candy or other goodies that get sprinkled on top.

Hot Fudge Brownie Sundae Ice Cream Pie  |  Lemon & Mocha

This pie uses Monday’s Chocolate Brownie Walnut Ice Cream in an unbelievable way. Or a criminal way, as my Dad said when he tried it. As in, “that ice cream pie was criminal – it should be outlawed!” Direct quote right there. The first layer of this pie is your standard no-bake Oreo crust. On top of the crust we have a layer of hot fudge, since we are trying to replicate the hot fudge brownie sundae after all. I was making so many other components of this pie that I went with store bought hot fudge, but you could definitely make your own if you have a go-to recipe. I don’t have a hot fudge recipe on Lemon & Mocha, but I’m adding it to my list to test for you all!

Hot Fudge Brownie Sundae Ice Cream Pie  |  Lemon & Mocha

Next we have the Chocolate Brownie Walnut Ice Cream. I debated whether I wanted to have an entire brownie layer or to put the brownie chunks in the ice cream, but I went with the latter. There’s just the right amount of brownie chunks and walnuts that you get some in every bite, adding the perfect fudgy and crunchy texture.

Hot Fudge Brownie Sundae Ice Cream Pie  |  Lemon & Mocha

I used a chocolate ice cream base because more chocolate makes everything better, but you could certainly use vanilla ice cream before folding in the brownies and walnuts. Simply follow my Vanilla Bean Ice Cream recipe up until the step where you’re about to put it in the ice cream maker, then follow the Chocolate Brownie Walnut Ice Cream recipe for brownie and walnut mix-in directions. Or, if you’re using the shortcut version I talked about in Monday’s post you would just mix the brownies and walnuts into your favorite store-bought vanilla ice cream. Finally, pile on the quick homemade whipped cream followed by plenty of cherries.

Hot Fudge Brownie Sundae Ice Cream Pie  |  Lemon & Mocha

Obviously I love eating ice cream pies because I’m ice cream obsessed, but the reason I love making them is because of the flexibility of the components. Feeling ambitious and like you want to show-off? Go full-on homemade with everything. Short on time? Pick up everything you need at the store. I usually fall somewhere in between. I like to have one or two components I can impress with and then take shortcuts on the rest to save time.

Hot Fudge Brownie Sundae Ice Cream Pie  |  Lemon & Mocha

I can’t wait for you all to try this Hot Fudge Brownie Sundae Pie soon since it is so crazy criminally delicious. I have been trying to eat really well, but I could not avoid this one when it was sitting in the freezer! So be sure to make it soon, especially if you feel like living dangerously! Ha!

Hot Fudge Brownie Sundae Ice Cream Pie  |  Lemon & Mocha

Brownie Fudge Sundae Ice Cream Pie
 
Yield: 8-12 servings
Ingredients
  • 24 Oreo cookies
  • 5 tablespoons melted unsalted butter
  • 1 tablespoon sugar
  • ¼ teaspoon salt
  • 1 cup hot fudge
  • 1 batch chocolate brownie walnut ice cream
  • 1 cup heavy cream
  • 2 tablespoons sugar
  • Cherries, for topping
Directions
  1. Line a pie dish or a springform pan with plastic wrap. Make sure plastic wrap is hanging over the sides. When the pie is done you will want to remove it from the pan so you can get a clean cut. If you don’t care about getting a clean cut, you can make the pie directly in the pie dish without any plastic wrap, but it will be hard to get out the first piece or two.
  2. Crush the Oreo cookies (filling and all) in a food processor or in a plastic bag with a rolling pin until they resemble fine crumbs. Add the melted butter, sugar and salt then pulse in the food processor until combined or stir together until combined in a mixing bowl. Press the cookie crumb mixture into the bottom of the prepared pie dish and chill in the refrigerator for at least 1 hour.
  3. Heat the hot fudge if it’s not pourable. Pour the hot fudge into the bottom of the chilled Oreo crust and put in the freezer until chilled.
  4. If you are using homemade ice cream, you can pour the ice cream straight from the ice cream machine into the chilled hot fudge Oreo crust. If you are using semi-homemade ice cream (see note), pour the softened ice cream with the walnuts and brownie pieces mixed in right into the chilled hot fudge Oreo crust. Lightly cover and freeze until firm, about 6-8 hours.
  5. Place the metal stand mixer bowl or a metal mixing bowl and the metal beater of your stand mixer or the metal beaters of your hand mixer in the freezer to chill for at least 15 minutes. Pour the cold heavy cream and the sugar into the chilled bowl then beat until you see stiff peaks form. Spread the whipped cream over the top of the ice cream pie. Top with the cherries before serving.
Notes
The pie will be best if you add the fresh whipped cream right before serving. Fresh whipped cream will also be okay in the fridge for a few hours so you could make the whipped cream and keep it in the fridge until you are ready to top and serve the pie. If you do freeze the pie with the whipped cream (we did this with the leftover pie) it will still be good, but it won’t be a light whipped cream topping; it will be frozen.
If you would prefer to use store-bought whipped topping, you will need 2 cups.

Get the Brownie Walnut Ice Cream recipe here.

Chocolate Dipped Ice Cream Cones

Chocolate Dipped Ice Cream Cones  |  Lemon & Mocha

July is National Ice Cream Month so I’m posting ice cream related recipes all this week! I would have posted ice cream recipes all month long, but you got to have balance, right? Also, my freezer is only so big so there’s that. Did you check out the outrageous dipped cones I had in Monday’s Chocolate Brownie Walnut Ice Cream post? If not, go check it out now!

Chocolate Dipped Ice Cream Cones  |  Lemon & Mocha

I love getting dipped cones when I go out for ice cream. The problem is usually the only dipped cones are the waffle cones. Those things fit SO much ice cream! So unless I’m feeling super ambitious it’s a plain cone for me. Then when I was thinking about ice cream month I realized that I could just make my own epic cones! It is actually so simple that I debated even posting it as a recipe, but they are so adorable how could I not share?

Chocolate Dipped Ice Cream Cones  |  Lemon & Mocha

The decoration and topping options are endless, and you all know how I feel about food variation possibilities! I limited myself to just six different varieties with ingredients I already had in my kitchen, but I could have easily kept going. I went with cookie crumbs, walnut pieces (had to pay homage to Monday’s post), crushed M&M’s, pretzel pieces, cornflakes cereal and of course, sprinkles! You could really do any candy, cereal, nut, cookie, or even salty snack. I’m thinking Reese’s Pieces, Fruit Loops, cashews, Chips Ahoy and potato chips – yum!

Chocolate Dipped Ice Cream Cones  |  Lemon & Mocha

The key, which I learned the hard way, is to keep the pieces small. And I mean very small, like almost crumbs, especially if the items are heavier. See my walnut cone and M&M cone? Those pieces were too big and they started sliding down the chocolate the minute I tried to sprinkle them on. The cookie crumbs and sprinkles worked the best because they were so small and light. That’s why I test it though, then you don’t have to make my same mistakes and can have yours come out perfectly!

Chocolate Dipped Ice Cream Cones  |  Lemon & Mocha

Once you have your toppings picked out and chopped you are ready to melt your chocolate. I like to use my liquid measuring cup because it’s microwave safe while also being narrow and deep. A deep and narrow bowl or cup is better because then you can dip your cone deeper without having to use more chocolate. The dipping bowl or cup only needs to be as wide as your cone. I melt the chocolate chips down in the microwave with a little coconut butter to help keep the chocolate shiny and smooth. I used to use vegetable oil, but now I use coconut butter because it’s healthier, but feel free to use whichever one you would prefer or already have in your kitchen. Once the chocolate is melted down you can start dipping. Dunk the whole mouth of the cone right into the chocolate then let all the excess drip off. And I do mean all the excess! You have to be a bit patient with it and let it drip, rotating and giving it a few shakes to help the dripping along. If you don’t let enough excess drip off then your toppings will be more likely to drip right off your cones.

Chocolate Dipped Ice Cream Cones  |  Lemon & Mocha

Then, sprinkle all over with the toppings! I would say this is the fun part, but we all know the real fun part is eating them with a scoop (or two) of ice cream! Simply place the topped cones, opening side down, on a wax paper lined small cookie sheet and place in the fridge for twenty minutes. Then time to eat! What toppings would you pick for your chocolate dipped cones?

Chocolate Dipped Ice Cream Cones  |  Lemon & Mocha

Chocolate Dipped Ice Cream Cones
 
Yield: 6 dipped cones
Ingredients
  • Toppings for dipping (see above for ideas)
  • ⅔ cup semisweet chocolate chips
  • 1 tablespoon coconut oil
  • 6 sugar cones
Directions
  1. Make sure your toppings are crushed small and are ready to go. Line a small baking sheet or sturdy cutting board with wax paper or parchment paper. Make sure the baking sheet or cutting board you choose will fit in your fridge with the cones upright.
  2. Pour the chocolate chips and the coconut oil in a microwavable liquid measuring cup or a deep and narrow bowl. Microwave for 30 seconds, stir. Microwave at 20 second intervals, stirring after each interval, until the chocolate is smooth and melted. Be sure not to over-heat.
  3. Dip the open end of your cone into the chocolate. I dipped mine about 1½ inches deep. Let the excess chocolate drip off, rotating and lightly shaking your cone. Be patient! Too much excess will lead to runaway toppings. After the excess chocolate is dripped off, sprinkle on your toppings. I held my cone sideways over a bowl and sprinkled the toppings over the chocolate dipped cone. Once you’ve added your toppings, stand the cone upright, opening faced down, on the prepared baking sheet or cutting board.
  4. Repeat for the remainder of the cones. You may need to tilt the liquid measuring cup as you dip the cones to get enough of the cone dipped. You will have some leftover dipping chocolate. Once all the cones have been dipped and topped, put the baking sheet or cutting board in the fridge for 20 minutes before filling with ice cream and eating. I stored these in the fridge, but if you weren’t worried about the chocolate getting melty you could store them at room temperature.
Notes
If you don’t have coconut oil or cannot use it for dietary reasons, you can substitute the same amount of vegetable oil


Chocolate Brownie Walnut Ice Cream

Chocolate Brownie Walnut Ice Cream  |  Lemon & Mocha

I can’t believe it’s almost August and I haven’t posted a single ice cream recipe this season! I’ve made ice cream a couple times this summer, but I never got around to photographing them for Lemon & Mocha. So today we are going into full ice cream mode! I am a chocolate person through and through and there’s no exception when it comes to ice cream. Chocolate ice cream is delicious on its own, but it’s even better if it has more chocolate in it!

Chocolate Brownie Walnut Ice Cream  |  Lemon & Mocha

Eating at Coldstone Creamery over the years has let me try basically every type of topping in ice cream so I knew brownie would be a perfect addition. Does anyone else put so many toppings in their Coldstone ice creams that they have to put your creation in the next size bowl because it got so big from all the toppings? I can’t be the only topping weirdo out there! Anyways, the brownie adds a chewy and fudge-like texture to the chocolate ice cream. I also love when ice creams have a bit of a crunch so I added in the walnuts as well. My stepmom always makes brownies with walnuts so I was thinking this ice cream is kind of like a play on those brownies. With all my toppings talk, I kept this Chocolate Brownie Walnut Ice Cream fairly simple, but it was still the perfect bite.

Chocolate Brownie Walnut Ice Cream  |  Lemon & Mocha

If you want to make this ice cream, but you don’t have an ice cream maker I definitely suggest you get one! They are relatively inexpensive (under $50) and I’ve had mine for over 14 years! This is the updated version of mine. However, if you wanted to make this ice cream, but didn’t want to wait for all the steps of a homemade custard based ice cream, you could simply fold brownie chunks and walnuts into your favorite chocolate ice cream! Beat the ice cream in the bowl of a stand mixer to make it softer without getting melty then beat or fold in the brownies and walnuts.

Chocolate Brownie Walnut Ice Cream  |  Lemon & Mocha

Did you know this is my 10th ice cream post on Lemon & Mocha? Here are my other ice cream posts if you’re looking for additional flavors: Honey Ice Cream with Pralined Almond Crumble, Orange-Vanilla Frozen Custard, Browned Butter Peach Ice Cream with a Graham Cracker Crumble, Coffee Ice Cream, Vanilla Bean Ice Cream, Double Chocolate Chip Ice Cream, Peanut Butter Cup Ice Cream, Straciatella Chocolate Hazelnut Gelato and Egg Nog Ice Cream.

Chocolate Brownie Walnut Ice Cream  |  Lemon & Mocha

P.S. How adorable are these ice cream cones? I have a fun post going up on Wednesday to show you how to make and customize your own cones. I also cannot wait for you all to see what I use this Chocolate Brownie Walnut Ice Cream for in my Friday post – prepare yourselves to take this chocolately deliciousness to the next level!

Chocolate Brownie Walnut Ice Cream  |  Lemon & Mocha

Chocolate Brownie Walnut Ice Cream
 
Yield: 1 quart
Ingredients
  • 2 cups heavy cream, divided
  • 3 tablespoons unsweetened Dutch-process cocoa powder
  • 5 ounces semisweet (or bittersweet) chocolate chips
  • 1 cup whole milk
  • ¾ cup sugar
  • Pinch of salt
  • 5 large egg yolks
  • ½ teaspoon vanilla extract
  • ⅔ cups chopped walnuts
  • 1⅓ cups brownie pieces
Directions
  1. In a medium saucepan over medium heat warm 1 cup of the cream with the cocoa powder. Whisk until the cocoa is blended then bring to a boil. Once boiling, reduce the heat to simmer for 30 seconds, whisking continuously.
  2. Remove the saucepan from the heat before adding the chopped chocolate and stirring until smooth. Add the remaining cup of cream, stir, then pour the whole mixture into a large bowl. Place a mesh strainer on top of the bowl.
  3. Using the same saucepan combine the milk, sugar and salt over medium heat until warm. In a medium bowl whisk the egg yolks then slowly pour the warm milk mixture into the egg yolks, whisking constantly, to temper the eggs. Pour the milk and egg mixture back into the saucepan. Constantly stir the mixture over medium heat with a heatproof spatula making sure to scrape the bottom and not let any clumps form. Continue stirring until the mixture is thick enough to coat the spatula.
  4. Remove the mixture from the heat and pour it through the mesh strainer into the large bowl with the chocolate mixture. Stir until combined then mix in the vanilla extract.
  5. Insert the bowl into an ice bath and continue stirring until cool.
  6. Chill the mixture in the fridge. Once cold, pour into your ice cream maker following the manufacturer's directions. During the last 5 minutes add the chopped walnuts and brownie pieces. Let firm in the freezer before scooping. If you are using this to make an ice cream pie, you can pour it right from the ice cream maker into your prepared pie crust.
Notes
I find it is easier to cut and incorporate the brownies into the ice cream if they’re already cold so I usually refrigerate a couple brownies before chopping them up and mixing them into the ice cream.
I prefer to use Ghiradelli chocolate.

Some of the links above are affiliate links, which means I may receive a small commission for my referral. This does not affect the retail cost of the item. Thank you for supporting Lemon & Mocha!