Frozen Desserts

Raspberry Sorbet and Frozen Chocolate Mousse Domes

Raspberry Sorbet and Frozen Chocolate Mousse Domes  |  Lemon & Mocha

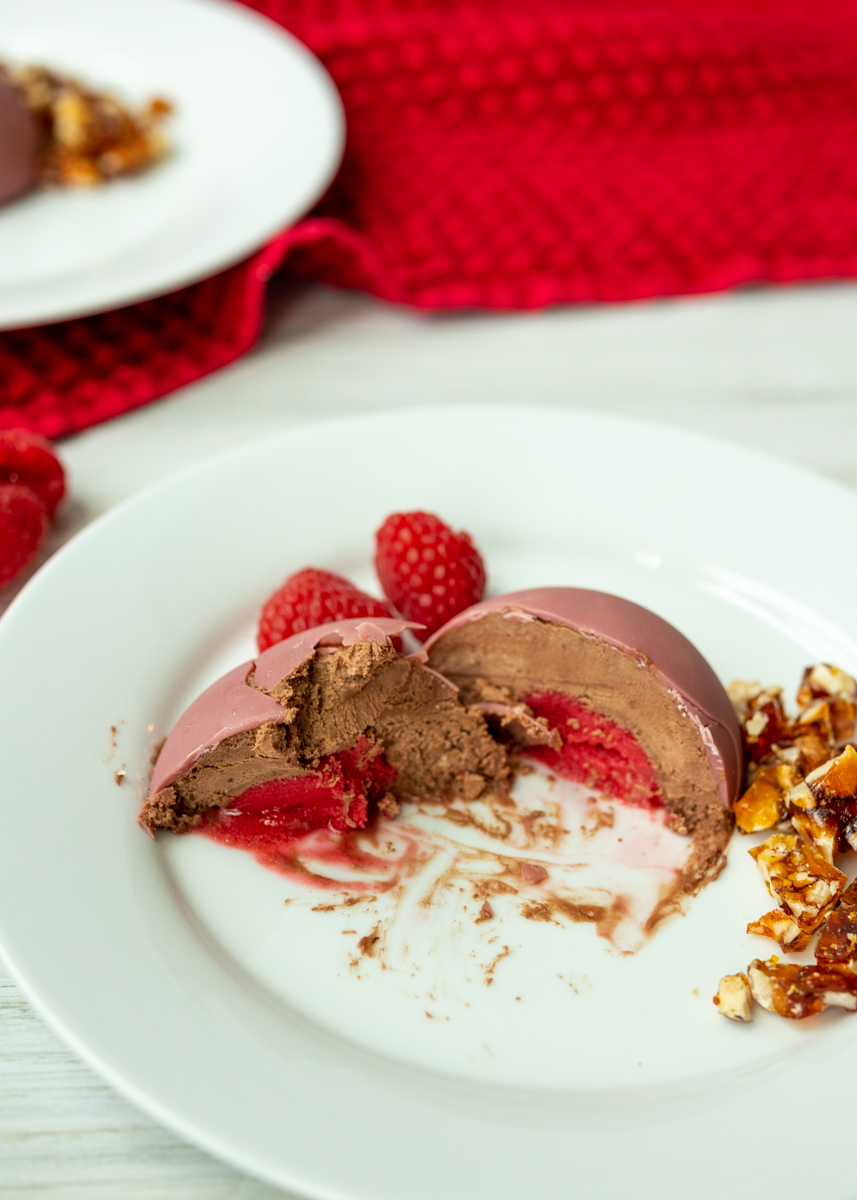
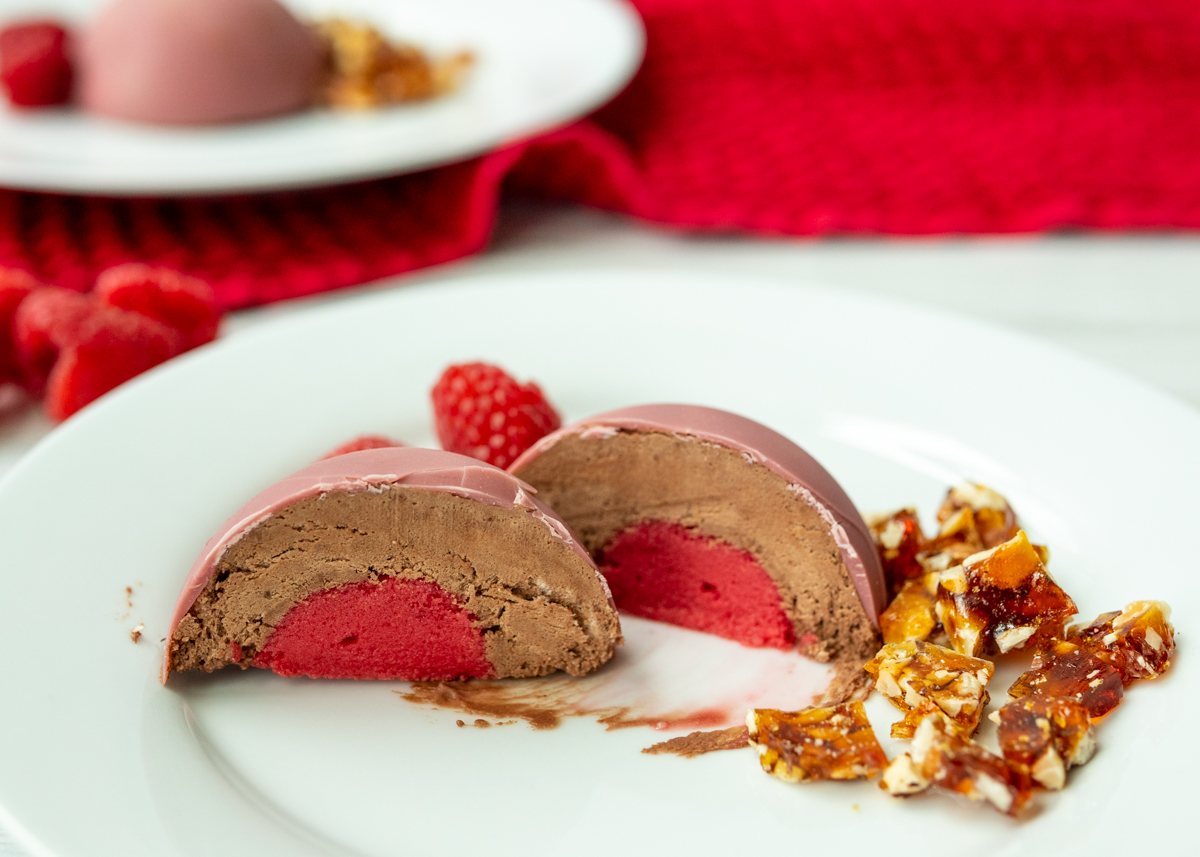
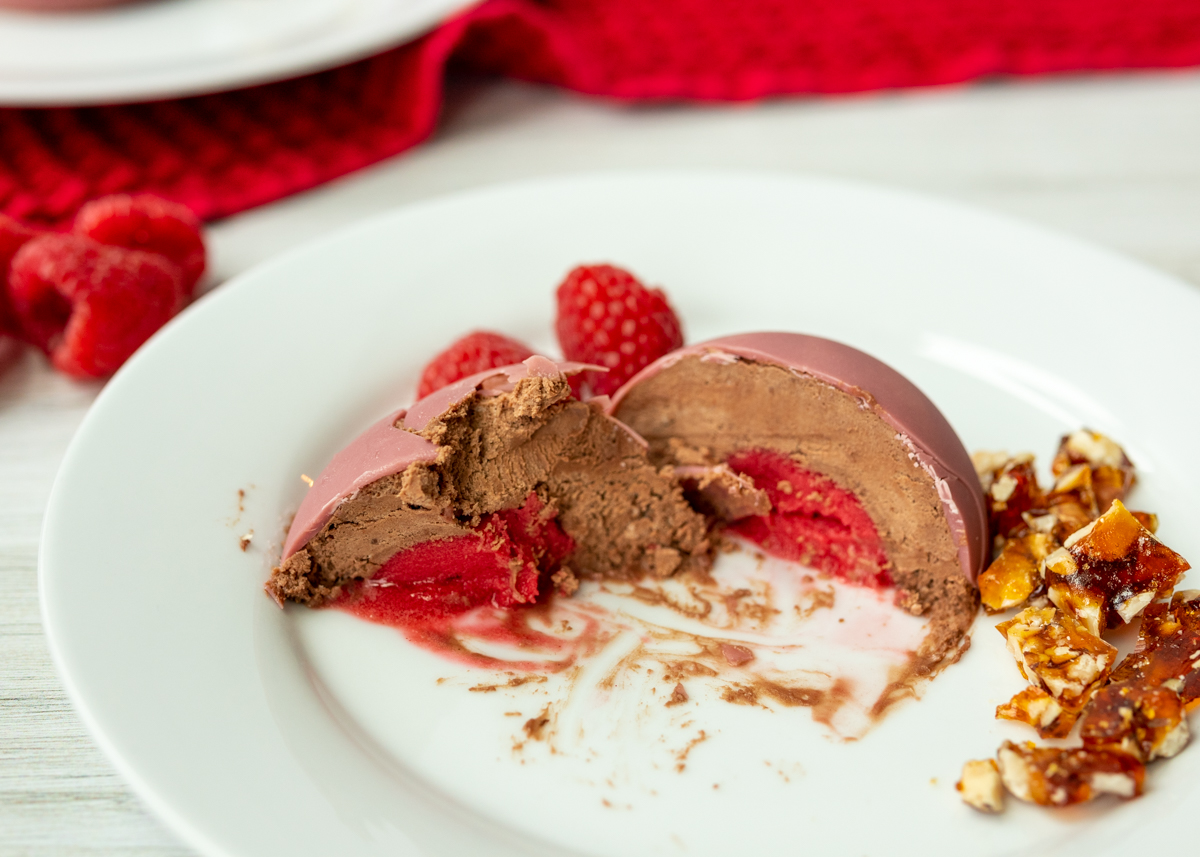
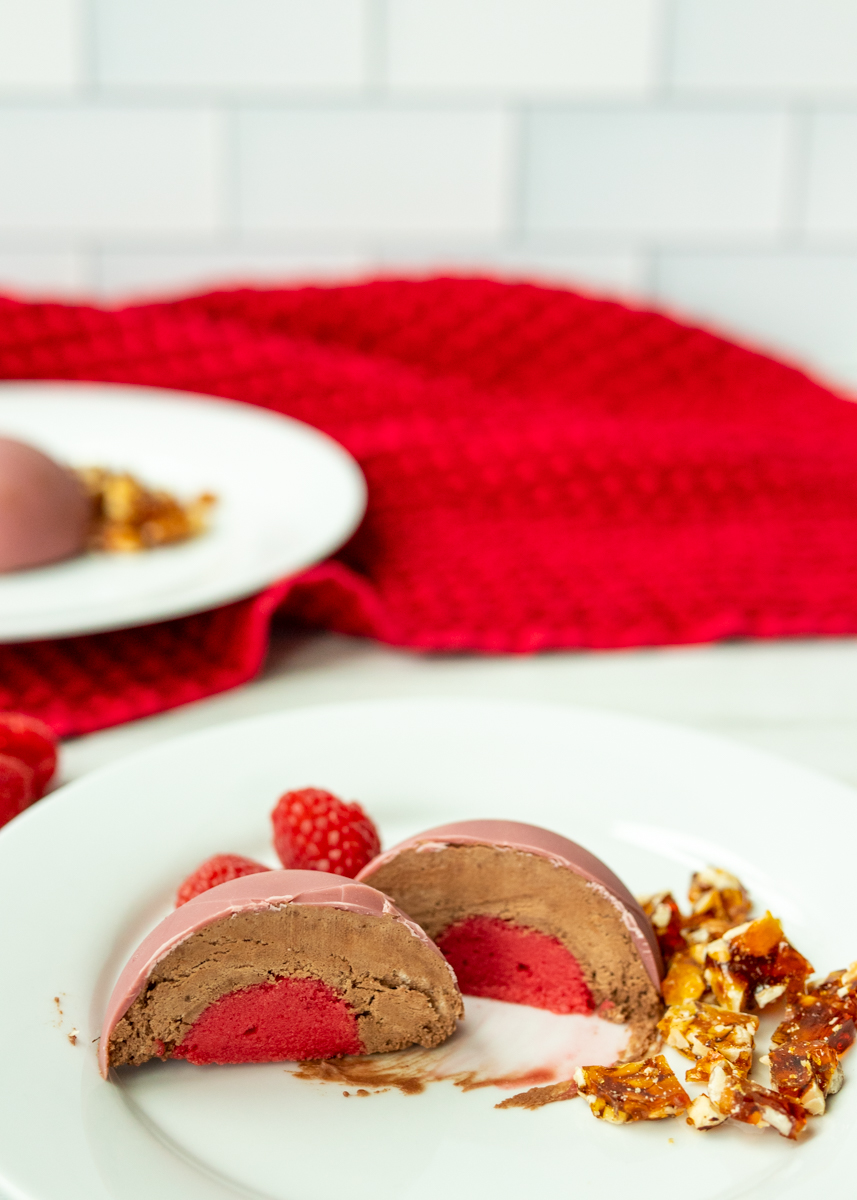
Today I am posting the best easy dessert to impress your valentine! Or to impress yourself and feel like you just nailed the confection round of Sugar Rush. Yes, I did use the word ‘easy!’ These Raspberry Sorbet and Frozen Chocolate Mousse Domes look fancy schmancy, but it’s really a few simple steps and the magic of silicone demi sphere molds. The dessert is the perfect balance of creamy, crunchy, decadent and tart. If you didn’t want to use molds you could make a deconstructed version that I’ll get into at the bottom of the post.

Raspberry Sorbet and Frozen Chocolate Mousse Domes  |  Lemon & Mocha

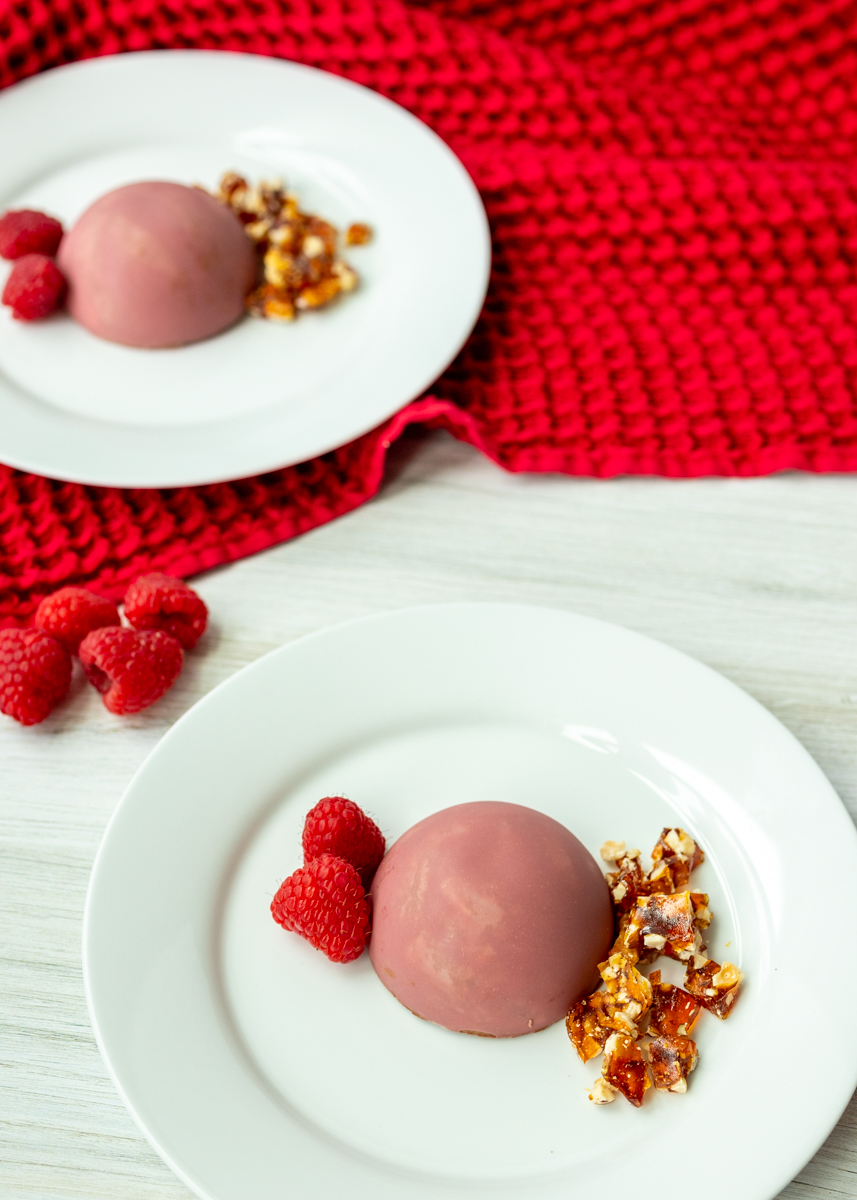
Ok, step one: spoon raspberry sorbet into the small mold and freeze until firm. Yep, that’s it! Step two: melt some ruby chocolate in the microwave then spoon it into the bigger mold and use your finger to spread it all around. Have you had ruby chocolate yet? It’s slightly fruity and so yummy! Plus it’s naturally a pretty pink color – perfect for Valentine’s Day! Trader Joe’s sells bags of it and a bunch of chocolate brands, like Chocolove, sell bars of it you could melt. Otherwise just use your favorite type of chocolate for the outside shell, but I highly recommend using ruby chocolate for this.

Raspberry Sorbet and Frozen Chocolate Mousse Domes  |  Lemon & Mocha

Step three: make the two ingredient chocolate mousse. I love this mousse recipe! Heat some heavy cream in the microwave then stir in chocolate chips until melted. While it’s cooling, beat some more heavy cream until stiff peaks form and gently fold into the chocolate mixture. See! Easy! Step four: assembly! Spoon the mousse into the ruby chocolate covered mold leaving a little room in the center to press in the raspberry sorbet half sphere. Smooth it out then pop in the freezer until you’re ready to serve.

Raspberry Sorbet and Frozen Chocolate Mousse Domes  |  Lemon & Mocha

Now initially I was planning on sharing this recipe and saying that the hazelnut crunch candy was an optional bonus, but after eating the finished dessert I want to stress to you that you need to make it! It adds the best textural crunch and flavor component, plus it’s also easy so why not?! Let water and sugar cook on your stovetop for eight minutes then pour over chopped toasted hazelnuts and let harden. Done!

Raspberry Sorbet and Frozen Chocolate Mousse Domes  |  Lemon & Mocha

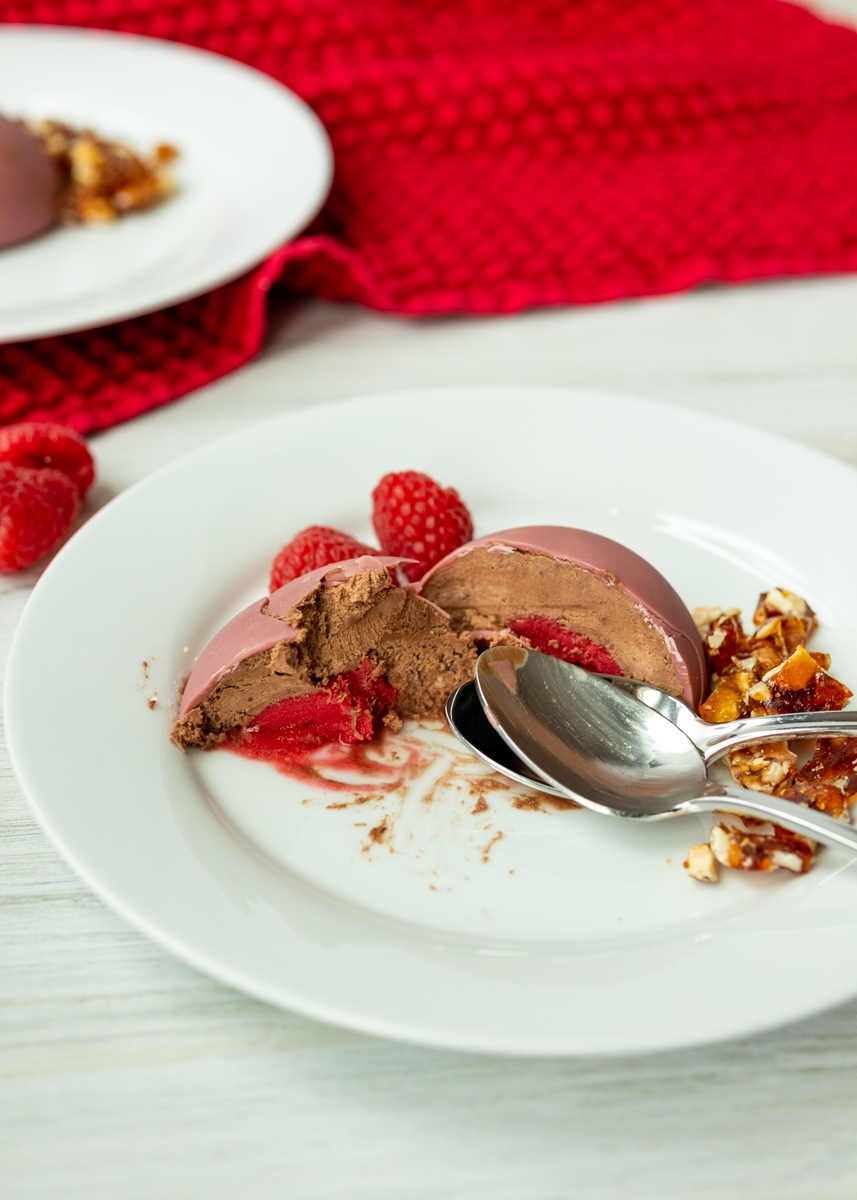
Now if you’re interested in the silicone molds I have this bigger one and I just got this smaller one. I love using the bigger one to make mousse and ice cream desserts look fancy for when we have friends and family over for dinner. If you don’t want to experiment with the molds you could totally still make this dessert and just serve the mousse straight from the fridge instead of frozen in individual dishes with the hazelnut crunch candy and a small scoop of raspberry sorbet on top. I might even need to make the mousse with the candy its own post. Okay, I really hope you all try this one so you can feel all chefy and proud of yourselves! Let me know if you do try it!

Raspberry Sorbet and Frozen Chocolate Mousse Domes  |  Lemon & Mocha

Raspberry Sorbet and Frozen Chocolate Mousse Domes
 
Yield: 6 mousse domes
Ingredients
  • 6 tablespoons raspberry sorbet
  • ¼ cup ruby chocolate wafers, or 1½ ounces of ruby chocolate broken into pieces
  • 1 teaspoon coconut oil or vegetable oil
  • 1½ cups heavy cream, divided
  • 1 cup semisweet chocolate chips (I recommend Ghiradelli, Guittard or Trader Joe’s)
  • ⅔ cup chopped toasted hazelnuts (see note)
  • ⅔ cup granulated sugar
  • ½ cup water
Directions
  1. Let the raspberry sorbet soften slightly then spoon into 6 cavities of the smaller mold (each cavity should hold about 1 tablespoon). Press into the mold then smooth with an offset spatula or the straight back of a knife. Cover with plastic wrap and place in the freezer until firm, at least 2½ hours. Tip: placing the silicone molds on small baking sheets makes it easier to move.
  2. Place the ruby chocolate and coconut oil (or vegetable oil) in a microwave safe bowl. Microwave for 30 seconds, stir, then continue to microwave in 15 second increments, stirring after each increment, until melted. Spoon a bit into one of the cavities of the larger mold. Use your finger to spread the chocolate and completely coat the inside of the demi sphere. It should be thick enough that you can’t see the silicone through, but not too thick. Repeat for 5 more cavities. Place in the fridge to firm up for at least 15 minutes.
  3. Heat ½ cup of the heavy cream in a large microwave safe mixing bowl for 45 seconds to 1 minute. Add the chocolate chips then stir. Let sit for 5 minutes. Whisk the mixture together until smooth then let cool. While the chocolate mixture is cooling, whip the remaining 1 cup of the cream. Using a mixture, whip the cold cream on medium speed, slowly increasing to medium high. Continue to whip until stiff peaks form, which means when you lift up the beater the peaks of the cream stay exactly in place. Tip: whip in a metal bowl and place both the bowl and the whisk in the freezer 5-10 minutes before whipping the cream. Gently fold the whipped cream into the chocolate mixture in 3 additions. It’s okay if there’s still some streaks. If you’re ready to assemble the mousse domes move to the next step, otherwise cover and place in the fridge until ready to use.
  4. Spoon the chocolate mousse into the ruby chocolate coated mold. Fill all the way to the top, leaving a bit of space in the center for the raspberry sorbet. One at a time, gently pop the raspberry sorbet out of the silicone mold and press into the center of the chocolate mousse, flat side facing up. It’s okay if the sorbet doesn’t pop out in a perfect demi sphere. Smooth the top with an offset spatula or the straight back of a knife. Place in the freezer until firm; I usually leave in overnight.
  5. To make the hazelnut crunch candy, place the chopped hazelnuts on a parchment lined baking sheet close together. Add the sugar and water to a small saucepan and heat over medium-high heat, stirring until the sugar dissolves. Once the sugar dissolves, stop stirring. Let come to a boil then cook until it reaches a light brown color, about 6-8 minutes. Remove from the heat and wait until it stops bubbling then pour over the chopped hazelnuts. Place in the fridge for 30 minutes then break the candy in pieces. Store at room temperature in an airtight container until ready to serve. When ready to serve the mousse domes, carefully pop them out of the silicone mold. Alternatively, you could pop them out of the molds ahead of time and just keep them in the freezer on a lined baking sheet covered in plastic wrap until ready to serve.
Notes
To toast the chopped hazelnuts, bake them in a 350 degree F oven for 3-4 minutes.

Some of the links above are affiliate links, which means I may receive a small commission for my referral if you purchase something. This does not affect the retail cost of the item. Thank you for supporting Lemon & Mocha!

Black Raspberry and Lemon Cream Pie Ice Cream Cake

Black Raspberry and Lemon Cream Pie Ice Cream Cake  |  Lemon & Mocha

Since I already posted the Classic Ice Cream Cake recipe this summer I wasn’t planning on posting another ice cream cake, but I got the urge to make it so here we are. This right here is a Black Raspberry and Lemon Cream Pie Ice Cream Cake. This cake is my absolute favorite non-chocolate ice cream cake I’ve ever made. It’s fruity, tart, sweet, creamy and so so so good.

Black Raspberry and Lemon Cream Pie Ice Cream Cake  |  Lemon & Mocha

Ice cream cakes are all about the layering so let’s dive in. On the bottom we have a layer of soft lady fingers. You could do a graham cracker layer instead, following directions from the Classic Ice Cream Cake, but I like having a little bit of cake texture with the lemon and black raspberry flavors. Next we have black raspberry ice cream followed by a layer of the Lemon Cream Pie Dip from Monday. The combination of these two together is crazy delicious!

Black Raspberry and Lemon Cream Pie Ice Cream Cake  |  Lemon & Mocha

I also added in a middle layer of graham cracker crunch to give the cake some texture and a little saltiness. Next up, a final layer of black raspberry ice cream and fresh whipped cream. Yum! You could make extra whipped cream and frost the sides, but I went the easier, pile-on-top route this time around.

Black Raspberry and Lemon Cream Pie Ice Cream Cake  |  Lemon & Mocha

I was initially going to try making this in a loaf pan so it would be a small cake. I took one look at all the different components and decided this needed to be full-sized to really get enough of each layer. I’m so glad I did because not having leftovers of this Black Raspberry and Lemon Cream Pie Ice Cream Cake would be a very sad day.

Black Raspberry and Lemon Cream Pie Ice Cream Cake  |  Lemon & Mocha

If you want additional tips for making a perfectly layered ice cream cake, head over to my Classic Ice Cream Cake post. Meanwhile, I’ll be over here trying to convince myself I shouldn’t immediately run out to get everything to make this cake all over again…

Black Raspberry and Lemon Cream Pie Ice Cream Cake  |  Lemon & Mocha

Black Raspberry and Lemon Cream Pie Ice Cream Cake
 
Yield: 8-10 servings
Ingredients
for the lemon cream cheesecake layer
  • 8 ounces cream cheese, softened (see note)
  • ¼ cup powdered sugar
  • 10 ounces lemon curd (usually found near jelly in the grocery store)
  • 8 ounces whipped topping, such as Cool Whip, thawed (see note)
for the ice cream cake
  • 12 soft lady fingers, halved lengthwise
  • 1½ quarts black raspberry ice cream
  • 1 tablespoon unsalted butter
  • 1 cup crushed graham crackers
  • 2 tablespoons brown sugar
  • ½ teaspoon salt
  • 1 cup heavy cream
  • ½ cup powdered sugar
  • ¾ teaspoon vanilla extract
  • Blackberries, for topping
Directions
for the lemon cream cheesecake layer
  1. Beat the cream cheese and powdered sugar in the bowl of a stand mixer or in a large bowl with a hand mixer until fluffy and smooth, about 2 minutes. Add the lemon curd and beat until combined. Gently fold in the whipped topping until blended. Keep in the fridge until ready to use.
for the ice cream cake
  1. Line a 9-inch springform pan with plastic wrap so it goes up and over the sides. I use 2 pieces. Use the lady fingers to make a single layer on the bottom of the pan, pressing down as you add them. You might need to rip some to fill up all the little spots.
  2. Scoop half the container of ice cream into the bowl of a stand mixer then beat with your paddle attachment until smooth and spreadable. Use a rubber spatula to spoon over the lady fingers and spread into an even layer. Put in the freezer.
  3. Melt the butter in a skillet over medium heat. Add the crushed graham crackers and sprinkle the brown sugar over top. Cook for about 5 minutes, until toasted and coated. Toss with the salt and set aside to cool. Once cool, remove the cake from the freezer and sprinkle a single layer of the graham crumbs over top, reserving a little to sprinkle over the finished cake. Use a spatula to spoon 4 cups of the lemon cream cheesecake over top (you will have some leftover) and spread into an even layer. Put in the freezer until just firm, about 1 hour.
  4. When the lemon cream cheesecake layer is firm enough to put on another layer, scoop the remaining half the container of ice cream into the bowl of a stand mixer then beat with your paddle attachment until smooth and spreadable. Use a rubber spatula to spoon over the lemon cream cheese layer and spread into an even layer. Put in the freezer.
  5. Make the whipped cream. Place a metal mixing bowl or the metal bowl of a stand mixer in the freezer along with the metal beaters or beater for 5-10 minutes. Remove and add the heavy cream (make sure your cream is cold), powdered sugar and vanilla. Beat on medium-high until stiff peaks form. Spoon over the top of the cake and return to the freezer for at least 2 hours or overnight. When ready to serve, open the ring of the springform pan. Use the plastic wrap to lift up the cake; carefully remove the plastic wrap and transfer the cake to a cake board or platter. Top with the remaining graham cracker crumble and some fresh blackberries. The cake can usually be cut right out of the freezer with a sharp knife.
Notes
You must use block cream cheese for the lemon cream cheesecake layer. You can substitute ⅓ less fat block cream cheese if you prefer.
If you want to use homemade whipped cream for the lemon cream cheesecake layer, follow these instructions: In a cold metal bowl of a stand mixer or in a large cold metal mixing bowl with a hand mixer, use cold beaters to beat 1½ cups cold heavy whipping cream, ¾ cup powdered sugar and 1 teaspoon vanilla extract until stiff peaks form. Also feel free to substitute Lite Cool Whip.


Classic Ice Cream Cake

Classic Ice Cream Cake  |  Lemon & Mocha

Classic Ice Cream Cake! Yes! This is the recipe that has been missing from Lemon & Mocha for far too long. As you all know, myself and my family are all obsessed with ice cream. And let’s be honest, most people are obsessed with ice cream. So when you tell people the cake you made is not just a cake, but an ice cream cake, you are guaranteed to get an overly enthusiastic response.

Classic Ice Cream Cake  |  Lemon & Mocha

Other than my Perfect Chocolate Chips Cookies and my Perfect Chocolate Cupcakes, ice cream cakes are the dessert I have made the most. I was debating titling this recipe Classic Birthday Ice Cream Cake, but this cake is too delicious and versatile to be relegated to only birthdays. Family cookouts, graduation parties, 4th of July, that random Tuesday when you got an ice cream cake craving – all valid celebrations for this cake.

Classic Ice Cream Cake  |  Lemon & Mocha

I’ve shared plenty of ice cream pie recipes on here before, from the decadent Hot Fudge Brownie Sundae Ice Cream Pie to the flavor-packed Pumpkin Pecan Ice Cream Pie to the fan favorite Stracciatella Chocolate Hazelnut Gelato Pie, and while those are all great specialty options, this recipe is for a full cake version and is called classic for a reason. We have a bottom crunch layer followed by two layers of ice cream that sandwich together another crunch layer and a sauce layer. The whole cake is then frosted with whipped cream, just like you would get at your neighborhood ice cream shop or Dairy Queen.

Classic Ice Cream Cake  |  Lemon & Mocha

The beauty of this cake, aside from it being a definite crowd-pleaser (although that might be a bad thing if you were expecting leftovers!), is that you can customize it to your favorite ice cream flavors, preferred crunch ingredient and ideal sauce component. My Dad had a big birthday over the weekend (70!) and since he is the ultimate ice cream fanatic I had to bust out this ice cream cake. I went fairly traditional, using Oreo cookie crumbs for the crunch layer, chocolate ganache for the sauce layer and chocolate and black raspberry ice cream. The combination was pure perfection! What is your ideal ice cream cake combination?

Classic Ice Cream Cake  |  Lemon & MochaWhat flavors of ice cream should I use?
Whatever flavors you prefer! You will need 1.5 quarts of each flavor. You could go traditional with vanilla and chocolate or mix it up with cookies and cream and peanut butter cup!

What should I use for the crunch layer?
Oreo cookie crumbs and graham cracker crumbs are my two favorites. I like to use Oreo cookie crumbs when I’m using chocolate in the cake and graham cracker crumbs when I’m having a more vanilla or fruit-forward flavored ice cream cake. Speculoos cookie crumbs, crushed pretzels and chocolate chip cookie crumbs are other great options. This is a great layer to adapt based on the season as well, such as gingersnap cookies in the fall or peppermint cookies in the winter. Whatever you use, make sure they are crumbs and not chunks.

What should I use for the sauce layer?
Chocolate ganache is my go-to since everyone loves it. It has a great fudgy texture in the ice cream cake. Ganache sounds fancy, but it’s easy to make: heat cream then stir in chocolate chips and butter until melted and smooth. You could make a peanut butter version by using peanut butter chips instead. Or go in a completely different direction and use marshmallow topping.

Classic Ice Cream Cake  |  Lemon & MochaWhat size pan should I use?
I use a 9-inch springform pan that I line with two pieces of plastic wrap to make it even easier to take the cake out. The springform pan is nice because it is deep and you’re able to take off the ring for easy removal; a regular 9-inch cake pan will not be deep enough. Alternatively if you use a 9-inch by 3-inch round cake pan then it should be deep enough.

How do I make the ice cream layers smooth?
I was making ice cream cakes for years before I stumbled on this little trick: beat your ice cream to make it spreadable without making it melty. I use the paddle attachment on my stand mixer. If you try to scoop right from the ice cream container into the cake pan you will get a combination of ice cream that is both too melted and too hard to be smoothed and packed in properly. You can certainly do it that way, I just wouldn’t recommend it. Beating the ice cream is the best way to ensure all the ice cream will fit in the pan and you will have smooth and packed ice layers when you cut into the cake.

How do I frost the cake with whipped cream?
Frosting with whipped cream can be a little fussy so I’ve taken special care to write up a detailed step-by-step in the recipe. It’s not complicated; I’ve just found there are certain steps you need to follow if you want it looking like the ice cream cakes you get at your local shop. After you do it once you will be a pro for life! I used a Wilton #22 star tip for the piping. If you don’t need it looking picture perfect you can skip all those steps and just pile a whole bunch of whipped cream on the top of your cake. It will still taste just as good!

Classic Ice Cream Cake  |  Lemon & Mocha

Classic Ice Cream Cake
 
Yield: 8-10 servings
Ingredients
  • 2⅓ cups Oreo cookie crumbs (about 18 Oreos)
  • 1½ quarts chocolate ice cream
  • 2½ cups heavy cream, divided
  • 1⅓ cups semisweet chocolate chips
  • 2 tablespoons butter
  • 1½ quarts black raspberry ice cream
  • 1 cup powdered sugar
  • 1½ teaspoons vanilla extract
  • Sprinkles, for decorating
Directions
  1. Line a 9-inch springform pan with plastic wrap so it goes up and over the sides. I use 2 pieces. Spread 1 cup of the Oreo cookie crumbs into the lined springform. Use the flat bottom of a small measuring cup to press down firmly into an even layer.
  2. Scoop the container of chocolate ice cream into the bowl of a stand mixer then beat with your paddle attachment until smooth and spreadable. Use a rubber spatula to spoon over the cookie crumb layer and spread into an even layer. Put in the freezer.
  3. Make the chocolate ganache. Heat ½ cup of the heavy cream in a small saucepan over medium heat until just steaming. Reduce heat to low and add the chocolate chips. Stir until melted then add the butter. Stir until the butter has melted and the ganache is smooth and shiny. Remove from the heat and let cool. Once the ganache has cooled (doesn’t need to be room temperature, just not too warm), take the ice cream cake from the freezer and add the remaining 1⅓ cups Oreo crumbs. Spread into an even layer, pressing down slightly. Pour the cooled chocolate ganache over top and return the cake to the freezer.
  4. Once the ganache has mostly set, scoop the container of black raspberry ice cream into the bowl of a stand mixer then beat with your paddle attachment until smooth and spreadable. Use a rubber spatula to spoon over the chocolate ganache layer and spread into an even layer. Put in the freezer and let set until firm, at least 2 hours or overnight.
  5. Make the whipped cream. Place a metal mixing bowl or the metal bowl of a stand mixer in the freezer along with the metal beaters or beater for 5-10 minutes. Remove and add the remaining 2 cups of heavy cream (make sure your cream is cold), powdered sugar and vanilla. Beat on medium-high until stiff peaks form. If you just want to frost the top of the cake, follow the directions in the note at the bottom of the recipe. If you want to frost the cake with the whipped cream like in the photos, keep reading.
  6. Take the cake out of the freezer and open the ring of the springform pan. Use the plastic wrap to lift up the cake; carefully remove the plastic wrap and transfer the cake to a cake board or platter (that will still fit in your freezer). Working quickly, cover the top and sides of the cake with a crumb coat of the whipped cream. This means you put a light layer all over the cake, but there will be ice cream and cookie crumbs in it. This will help give you a smooth surface for the next layer. Return to the freezer until mostly firm (and store the whipped cream, still in the metal bowl, in the fridge). When the crumb coat is firm, remove from the freezer and use an offset spatula to apply a second coat of the whipped cream on the top and sides, smoothing as you go. Return to the freezer. At this point you will probably need to re-whip your whipped cream in order for it to be stiff enough to pipe. Re-whip the whipped cream on medium-high speed until stiff peaks form. Add the whipped cream to a piping bag fit with your preferred piping tip. I used a Wilton #22 star tip. Take the cake from the freezer and pipe stars all along the top border. Then pipe a decorative line around the bottom edge of the cake where it meets the cake board or platter. Decorate with sprinkles and store in the freezer until ready to serve. The cake can usually be cut right out of the freezer with a sharp knife.
Notes
- This recipe calls for the entire Oreo cookie including the creme filling.
- You can make the ganache ahead of time if you prefer. Store in the fridge until ready to use and then gently heat in the microwave until smooth and pourable before using.
- If you just want to frost the top of the cake, follow these directions: Pile the whipped cream on top and leave in the freezer until ready to serve. When ready to serve, open the ring of the springform pan. Use the plastic wrap to lift up the cake; carefully remove the plastic wrap and transfer the cake to a cake board or platter.

Some of the links above are affiliate links, which means I may receive a small commission for my referral if you purchase something. This does not affect the retail cost of the item. Thank you for supporting Lemon & Mocha!

Chocolate Cherry Smoothie Bowl

Chocolate Cherry Smoothie Bowl  |  Lemon & Mocha

Ever since Matt and I went to Seattle in 2013 I’ve been a sucker for any chocolate cherry combination. While we were there on vacation we did a food tour of Pike Place Market and one of the vendors they introduced us to was Chukar Cherries. They source their cherries right in the state of Washington and make all kinds of cherry goodies. It began an instant love affair and Matt and I have ordered deliveries from them several times just to satisfy the occasional craving that still pops up six years later.

Chocolate Cherry Smoothie Bowl  |  Lemon & Mocha

Their chocolate covered cherry treats single-handedly converted me to a fan of the chocolate cherry flavor profile in all forms. Including this easy and healthy Chocolate Cherry Smoothie Bowl. The chocolate flavor hits you first, but then the fresh cherry flavor comes through and you’re in chocolate-cherry heaven. The texture is similar to the Chocolate Tahini Banana “Soft Serve” recipe I posted back in March, which is that it is like partially melted ice cream. This chocolate cherry version is more of a smoothie bowl because I included some nonfat milk, although you can use whichever milk fat or milk alternative you prefer.

Chocolate Cherry Smoothie Bowl  |  Lemon & Mocha

I stumbled upon this Chocolate Cherry Smoothie Bowl recipe last summer while I was trying out different desserts that would satisfy my after-dinner sweet tooth and chocolate craving, but that were still relatively healthy. During one hot week last summer I had it for dessert every night. You can use either a fresh or frozen banana, but I prefer using a fresh banana since it’s easier to blend in my blender, I never remember to put bananas in my freezer and I like the more melty texture of the smoothie bowl. Matt prefers the thicker texture of the smoothie bowl with the frozen banana so it’s totally up to you.

Chocolate Cherry Smoothie Bowl  |  Lemon & Mocha

The frozen cherries and the frozen cauliflower, which I snuck in there for some veggies, provide plenty of frozen goodness to the bowl. I figured this treat might be especially welcome after all the 4th of July hot dog and flag cake consumption so I hope you enjoy!

Chocolate Cherry Smoothie Bowl  |  Lemon & Mocha

Chocolate Cherry Smoothie Bowl
 
Yield: 2 servings
Ingredients
  • ⅔ cup nonfat milk (or milk of your preference)
  • 1 frozen banana (or unfrozen if you like it more melty)
  • 1 cup frozen cherries
  • ¼ cup frozen cauliflower florets
  • 3 tablespoons cocoa powder
  • 1 tablespoon agave (or honey)
  • Fresh pitted cherries, chocolate drizzle and granola, for topping
Directions
  1. Blend the milk, banana, cherries, cauliflower, cocoa powder and agave in a high-speed blender until smooth. Top with desired toppings and eat immediately.

Recipe adapted from Sprouting Zen.

Ice Cream Sandwich Stars

Ice Cream Sandwich Stars  |  Lemon & Mocha

Even though it’s still June I’m here sharing the Food Network Magazine July cookies because they are perfect for the Fourth of July. Like the May macarons I skipped, these cookies were slightly involved, but there’s also ice cream so of course I stuck it out.

Ice Cream Sandwich Stars  |  Lemon & Mocha

Have you ever made homemade ice cream sandwiches? I have a handful of times, but they can be difficult to get right because the texture of the cookies is so important. The cookies needs to be soft enough that they don’t get too hard in the freezer so you can actually bite through the ice cream treat. They also can’t be too soft that the cookie falls apart when you try to put the ice cream sandwich together.

Ice Cream Sandwich Stars  |  Lemon & Mocha

One thing the Food Network Magazine got right was definitely the texture of the cookies for these Ice Cream Sandwich Stars. I thought they were too soft and underdone when I baked them, but they ended up being just the right texture for ice cream sandwiches. The cookies have a malted milk vanilla flavor that isn’t too sweet, which is another reason they work well for making into ice cream sandwiches. I would not recommend baking and eating these cookies on their own; they seem specifically designed for consuming with creamy vanilla ice cream.

Ice Cream Sandwich Stars  |  Lemon & Mocha

If you get the Food Network Magazine then you know their version of these cookies are bright cherry red. I did run out of red gel food coloring so mine shown here only have half the amount the recipe below calls for, but even with the full amount I’m not sure how the cookies would ever be that color since the cookies get fairly browned by being baked in the top 1/3 of the oven. I’m curious to see if anyone else is able to get the ice cream sandwiches that bright red color or if it was all food styling and editing tricks.

Ice Cream Sandwich Stars  |  Lemon & Mocha

Either way, they still looked cute with all the Fourth of July red, white and blue sprinkles. I have an easy red, white and blue dessert I’ll be sharing next week right before the holiday so stay tuned!

Ice Cream Sandwich Stars  |  Lemon & Mocha

Ice Cream Sandwich Stars
 
Yield: 9 ice cream sandwiches
Ingredients
  • 4 tablespoons unsalted butter, at room temperature, plus more for the pan
  • 2 cups all-purpose flour, plus more for the pan
  • 2 teaspoons vanilla extract
  • 1½ teaspoons red gel food coloring
  • ½ cup whole milk
  • ½ cup malted milk powder (such as Carnation original)
  • ¾ teaspoon salt
  • ¼ teaspoon baking powder
  • ¼ teaspoon baking soda
  • ¼ cup vegetable shortening
  • ¾ cup granulated sugar
  • ¾ cup packed brown sugar
  • 3 large egg yolks
  • Red, white and blue nonpareils or 4th of July sprinkles, for decorating
  • 3 pints vanilla ice cream
Directions
  1. Preheat oven to 325 with the rack positioned in the upper third of the oven. Line a rimmed 13x18-inch baking sheet with parchment paper, buttering the pan so the parchment paper stays put. Butter and four the parchment, tapping out the excess flour.
  2. In a liquid measuring cup, stir together the vanilla, food coloring and milk. Set aside. In a medium bowl, sift together the flour, malted milk powder, salt, baking powder and baking soda.
  3. In the bowl of a stand mixer or in a large bowl with a hand mixer, beat the butter, shortening, sugar and brown sugar on low speed until combined. Beat on medium-high speed until fluffy, about 5 minutes. Add the egg yolks, beating after each addition, until combined, scraping down the sides as needed. Add the flour mixture then beat on low until just combined. Add the milk mixture and beat on medium until smooth. Pour the batter into the prepared pan and then spread until even. Sprinkle the nonpareils or sprinkles over top then bake for 25-30 minutes, or until a toothpick inserted in the center comes out clean and the cake is just set. Cool completely in the pan set on a wire cooling rack. Once cool, use a 3¼-inch star cookie cutter to cut out 18 stars. Let the cookie stars sit in the fridge to firm up until you are ready to sandwich then with the ice cream.
  4. While the cake is baking and cooling, cut out the ice cream stars. Line a baking sheet (that will fit in your freezer) with parchment paper. Take 1 pint of ice cream out of the freezer. Turn it on its side and cut into ½-inch thick slices, right through the cardboard and ice cream, starting with the wide end. You will get 3 to 4 slices out of the pint. Place the pint slices on the parchment and remove then cardboard wrapping then place the baking sheet in the fridge to firm up. Once the slices have firmed up, use a 3¼-inch star cookie cutter to cut the slices into stars, placing the ice cream scraps in a container for another use. Put back in the freezer then repeat with the remaining two pints.
  5. Once the ice cream stars are firm enough to handle, working with a few at a time sandwich the ice cream stars between 2 of the cookie stars. Return to the freezer until ready to eat. If not eating right away, wrap them in plastic wrap after they’ve had a chance to firm up.

 Recipe from January/February 2019 issue of Food Network Magazine.

Some of the links above are affiliate links, which means I may receive a small commission for my referral. This does not affect the retail cost of the item. Thank you for supporting Lemon & Mocha!