Dessert

Christmas Tree Cupcakes

aka Chocolate Cupcakes with Chocolate Almond Ganache Filling and Coconut Buttercream

Christmas Tree Cupcakes  |  Lemon & Mocha

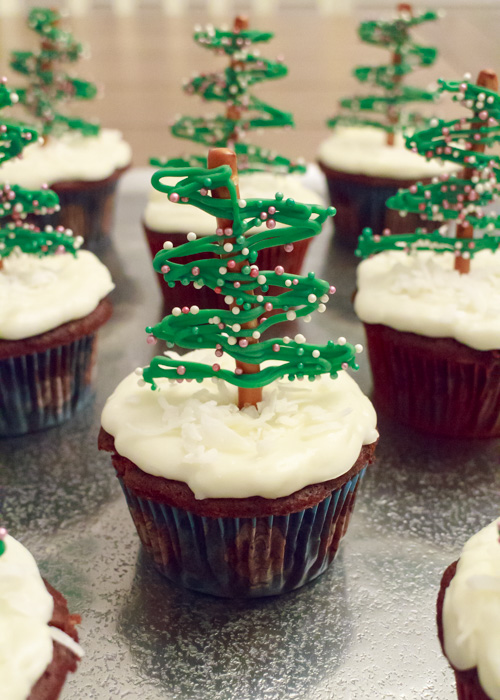
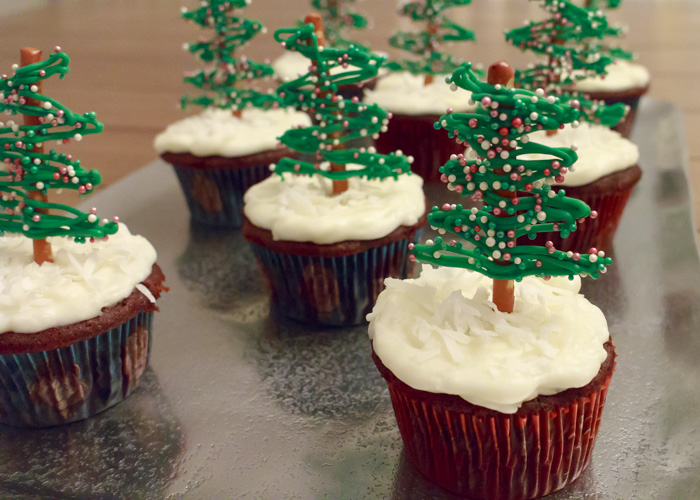
I can’t even with these cupcakes! Just look at their adorableness! Now I haven’t discussed it much on the blog, but I am not a decorator. I love to bake and I love to cook, which is mostly because I really, really (did I say really?) love to eat. But I do not like trying to make my food look pretty. If it ends up looking nice in the end that’s just an added bonus. I do not have the patience for it, although one day I would like to learn how to decorate and style my baked goods and dishes better.

Christmas Tree Cupcakes  |  Lemon & Mocha

In the meantime, I’m just a regular home baker trying to make the best tasting things I can dream up. Where I’m going with all this is that if I can make these cupcakes look this ridiculously adorable that means you can, too. As long as you’re armed with the right ingredients and the right tools then you will be good to go.

Christmas Tree Cupcakes  |  Lemon & Mocha

Now, I’ve been so busy talking about the cute tree decorations that I haven’t even gotten to how amazing the cupcake tastes. I am obsessed with my Perfect Chocolate Cupcakes and my Chocolate Ganache so adding almonds and a coconut buttercream seemed like a fitting and delicious enhancement. The texture of the coconut buttercream is light and fluffy, while still being rich enough to stand up to the chocolate cupcake. You can adjust the intensity of the coconut flavoring based on your personal preference. That chocolate almond ganache is its usual swoon-worthy self amped up with chopped almonds to be the perfect molten surprise. Now have a bit of everything all together and yippee! Damn that’s good!

Christmas Tree Cupcakes  |  Lemon & Mocha

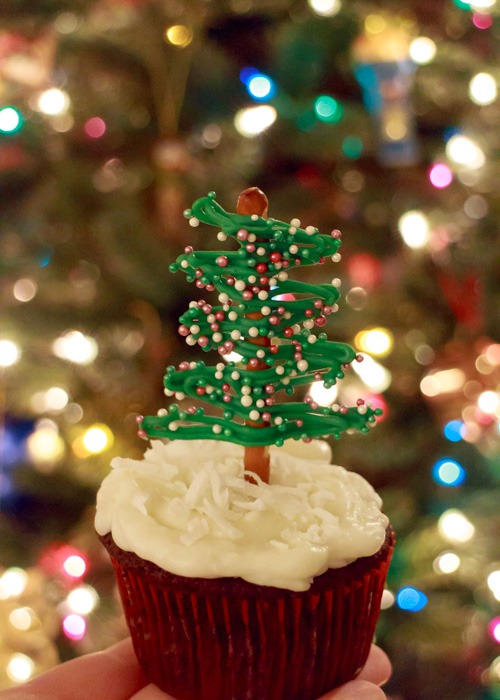
My favorite part about these cupcakes though are the reason I was inspired to make them: they remind me of my Babu. Everyone in my family has ceramic Christmas trees that my grandma painted. I know everyone in my family thinks about Babu everyday, but especially when they turn on their ceramic tree. They are decorated with little colored light “ornaments” and when they light up they remind me of everything that is wonderful and simple about Christmas. They make me think of family and tradition. I’m instantly transported to sitting with Babu at my parent’s house and putting in all the little lights while the smell of her cookies comes from the kitchen. Then suddenly we’re eating the cookies, making Christmas paper chains, putting ornaments on the tree, then snuggled in her bed reading our favorite Christmas stories. She even let me sing her Christmas carols and anyone who knows how, um, interesting, my singing voice is will know what a saint she was for that.

Christmas Tree Cupcakes  |  Lemon & Mocha

Although I loved, and very much miss, our crazy Christmas mornings with all my aunts, uncles and cousins, one of my favorite Christmas mornings with Babu was when I was older. We were at my parents’ house for Christmas morning and since it was just my brother and me, who were both in high school, everyone was sleeping in before present-opening. Babu and I are early risers so the two of us sat by the tree in the still, quiet house and opened a couple of our presents for each other having our very own private mini Christmas morning. It is a memory I will cherish forever. So happy holidays and merry Christmas to all my friends, family and fellow food lovers! Take a moment, or two, throughout all the craziness to enjoy the little things that will mean so much to you for years to come.

Christmas Tree Cupcakes  |  Lemon & Mocha

Christmas Tree Cupcakes
 
Yield: 24 cupcakes
Ingredients
for the cupcakes
for the chocolate almond ganache
  • ¾ cup heavy cream
  • 1- 12 ounce bag of bittersweet chocolate chips
  • 3 tablespoons unsalted butter, softened
  • 1 cup chopped almonds, more or less depending on preference
for the coconut buttercream
  • 2 sticks unsalted butter, room temperature
  • 6 cups powdered sugar
  • ½ cup milk
  • 1 teaspoon coconut extract
  • 1 cup sweetened shredded coconut, more or less depending on preference
  • Additional sweetened shredded coconut for decoration
for the tree decorations
  • 24 pretzel sticks
  • ½ bag green candy melts
  • Nonpareils
Directions
for the cupcakes
  1. Make the Perfect Chocolate Cupcakes according to the instructions then let cool.
for the chocolate almond ganache
  1. Heat the cream over medium heat until steaming, stirring constantly.
  2. Once steaming, remove the cream from the heat. Add the chocolate and stir then let sit for 5 minutes.
  3. Add the butter to the chocolate mixture then stir until smooth. You might have to return to the lowest heat possible while stirring to get it completely smooth.
  4. Add the chopped almonds and stir to combine. Let cool until only slightly warm (I'm not sure if the cooling is completely necessary, but I thought the hot ganache would seep into the cupcake).
for the coconut buttercream
  1. Beat the butter for 3-5 minutes, or until smooth and fluffy, with an electric mixer.
  2. On low speed carefully add the sugar, milk and coconut extract and mix. If the frosting looks too thin slowly add some more powdered sugar, but I didn't need to for this recipe. Add the shredded coconut and stir well to combine.
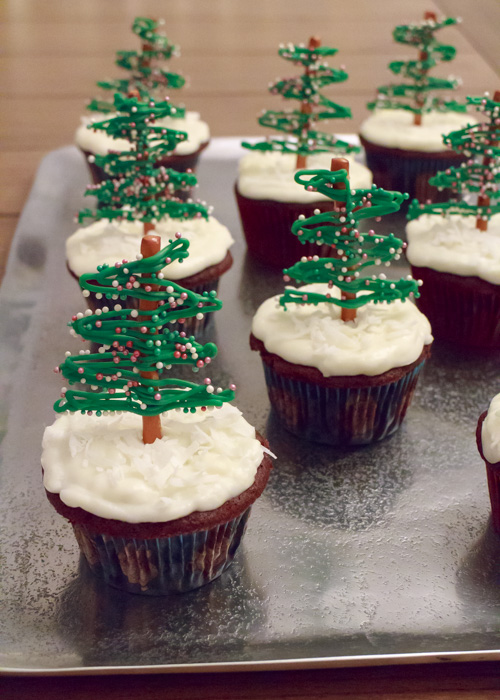
  3. Spread or pipe a thin layer onto the top of the cupcake. You might find piping easier because of the open hole with the ganache. Top with some shredded coconut for a "snow" effect.
for the tree decorations
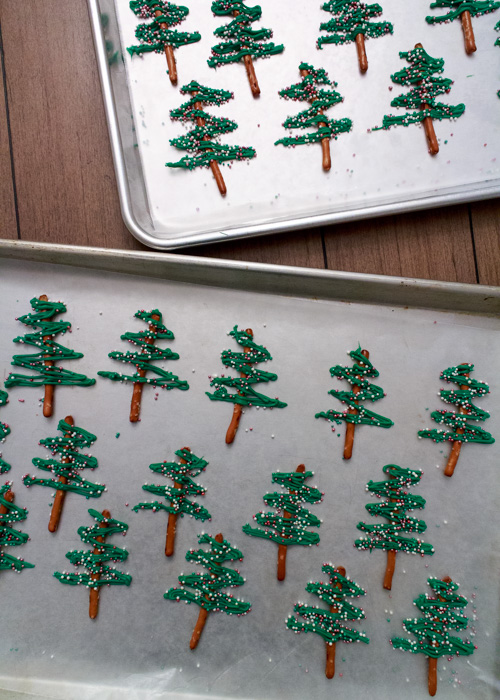
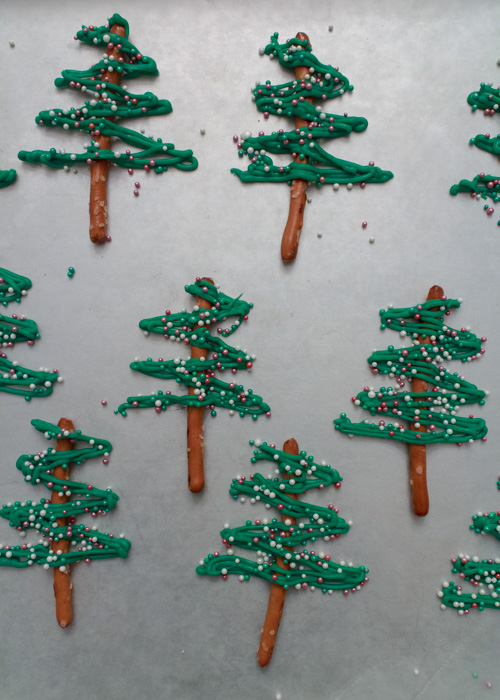
  1. Line two baking sheets with wax paper. Use a baking sheet with edges so the nonpareils don't go flying all over your kitchen. Place the pretzel sticks a few inches apart.
  2. Prep a pastry bag with a skinny round tip (I think I used a Wilton round tip #2). Heat the candy melts in a double boiler over medium-low heat, stirring occasionally, until completely melted and smooth. Be sure not to overheat so the chocolate doesn't seize up. Carefully transfer to the pastry bag.
  3. Pipe the chocolate over each pretzel stick in the shape of the a tree. I made single zig-zag lines then went over them two more times. Start up a bit from the base of the pretzel stick so there's room to press the decoration into the cupcake. Do a couple then top with nonpareils or have a sprinkle elf help and sprinkle after you pipe (thanks, Matt!). Let sit at room temperature until firm then carefully pop off the wax paper. To place in the cupcakes I found it easiest to hold and press from the little bit of pretzel at the top - the chocolate is fragile and will break if you press it.
Notes
You can typically find candy melts (sometimes called chocolate or candy wafers) at your local craft store, such as Michaels or A.C. Moore.
This recipe makes enough ganache and buttercream for about 35 cupcakes so you will have leftover unless you make a double batch of cupcakes or reduce the ganache and buttercream recipes.

Chocolate almond ganache adapted from The Curvy Carrot.
Coconut buttercream adapted from Martha Stewart.
Chocolate tree inspiration from Just a Taste.

Babu’s Coffee Cake

Babu's Coffee Cake  |  Lemon & Mocha

It is hard to believe that I am writing this post and it is even harder to write it. One month has passed since my family and I lost my grandma, Babu. For those of you who don’t know me personally or haven’t read my Vanilla Bean Ice Cream Mother’s Day post, Babu and I were incredibly close. These past few weeks without my best friend have felt surreal. As most people who have dealt with loss have experienced, the ache does not get smaller, you just get better at handling it.

Babu's Coffee Cake  |  Lemon & Mocha
Babu loved hearing about my cooking and the food blog. She would always ask me what I was making for dinner and would listen to me read her my latest posts over the phone. Several times I had prints made of the food photos I knew Babu would like and mailed them to her. Babu would share them with her friends in her building and report back to me with which ones everyone wanted to try the most. Not only did Babu encourage me to follow my food passions, but she also helped foster those passions by baking with me and of course our many, many lunch dates.

Babu's Coffee Cake  |  Lemon & Mocha
In my family it is hard to mention coffee cake and not think about Babu. When she lived with us she always made sure there were slices in the freezer. She would make a coffee cake, always waiting to let me help glaze it, then cut it into big slices, wrap them in plastic wrap and pop them in the freezer. I would come home from school, microwave a slice for 30 seconds and it would taste like it just came out of the oven. There would be one slice left and the next day the freezer would be stocked back up with a fresh cake.

Babu's Coffee Cake  |  Lemon & Mocha

After Babu moved back down to Delaware I came to look forward to having some every time I went to visit, especially when we would do our annual beach trip. Since I always knew I would have some on these trips, I never made this cake on my own. When I was thinking of what I could make that would help celebrate Babu on Lemon & Mocha, once beach week started approaching I knew it had to be her coffee cake.

Babu's Coffee Cake  |  Lemon & Mocha

It was difficult knowing I couldn’t ask Babu any questions before I started baking or knowing that this would be my first beach trip without her, but I know she was there with me the whole time- cheering with me when the cake came out of the Bundt pan perfectly and laughing with me when I totally left too much batter for the final layer. I hope that this simple cake can bring you as much joy as it has brought me over the years and that you can share it with someone special, too.

Babu's Coffee Cake  |  Lemon & Mocha

Babu's Coffee Cake
 
Yield: 10-12 servings
Ingredients
for the cake
  • 1 Duncan Hines yellow cake mix
  • 1 package instant vanilla pudding (3.4 ounce size)
  • 4 large eggs
  • ¾ cup vegetable oil
  • ¾ cup water
  • 2 teaspoons vanilla extract
  • ¼ cup sugar
  • 2 teaspoons ground cinnamon
for the glaze
  • 1 cup powdered sugar
  • 3 tablespoons milk
  • 1 teaspoon vanilla extract
Directions
for the cake
  1. Preheat the oven to 350 degrees F. Grease a Bundt pan and set aside.
  2. Combine the cake mix, pudding mix, eggs, vegetable oil, water and vanilla extract with a hand mixer or in the bowl of a stand mixer. Mix until well combined.
  3. In a small bowl, combine the sugar and ground cinnamon.
  4. Evenly pour ⅓ of the batter into the prepared Bundt pan. Use a spatula to even the layer. Sprinkle half of the cinnamon sugar mixture evenly over the batter. Repeat with ⅓ of the batter and the remaining cinnamon sugar. Top with the last ⅓ of batter.
  5. Bake for 40-50 minutes, or until a toothpick inserted in the cake comes out clean. Let cool in the pan for 10 minutes then transfer to a cooling rack. Apply the glaze while still warm, but not hot.
for the glaze
  1. Combine the powdered sugar, milk and vanilla extract until smooth. Spoon or pastry brush the glaze over the warm cake.


No-Bake Red, White & Blue Lemonade Cheesecake Pie

No-bake Red, White & Blue Lemonade Cheesecake Pie  |  Lemon & Mocha

This summer has been slipping away! I had a recipe all planned to share with you for the Fourth of July, but suddenly it was the week before the holiday weekend and I hadn’t cooked or photographed it yet.

No-bake Red, White & Blue Lemonade Cheesecake Pie  |  Lemon & Mocha

I knew I couldn’t let the week pass by without providing some holiday-worthy red, white and blue inspiration so I grabbed everything I needed, whipped it together and snapped some photos. All for you. Don’t you feel special?

No-bake Red, White & Blue Lemonade Cheesecake Pie  |  Lemon & Mocha

I first made this No-bake Red, White and Blue Lemonade Cheesecake Pie back in college. The recipe was actually in a Kraft ad in my Food Network magazine that summer and with my newly discovered lemon obsession I knew I had to make it for Matt and I.

No-bake Red, White & Blue Lemonade Cheesecake Pie  |  Lemon & Mocha

The pie was light, refreshing and super simple to put together.

No-bake Red, White & Blue Lemonade Cheesecake Pie  |  Lemon & Mocha

Somehow I forgot all about it until I was racking my brain for a creative red, white and blue dessert idea.

No-bake Red, White & Blue Lemonade Cheesecake Pie  |  Lemon & Mocha

If you remember my Summer Berry Trifle blog post from the other year I am always looking for new spins on the traditional flag Fourth of July cake I used to make every year with my grandma.

No-bake Red, White & Blue Lemonade Cheesecake Pie  |  Lemon & Mocha

This No-bake Red, White and Blue Lemonade Cheesecake Pie is perfect and will make you the hero of your barbecue! Plus, did I mention that there’s only 8 ingredients and NO BAKING? Enjoy!

No-bake Red, White & Blue Lemonade Cheesecake Pie  |  Lemon & Mocha

No-bake Red, White & Blue Lemonade Cheesecake Pie
 
Yield: 8-10 servings
Ingredients
  • 10 graham cracker squares, crushed into crumbs (about 1.5 cups of graham cracker crumbs
  • ⅓ cup sugar
  • 6 tablespoons unsalted butter, melted
  • 8 ounces cream cheese, softened
  • ½ cup frozen lemonade concentrate, thawed
  • 8 ounces Cool Whip, thawed
  • Halved strawberries, for topping
  • Blueberries, for topping
Directions
  1. Combine the graham cracker crumbs, sugar and melted butter in a medium mixing bowl until they come together and resemble coarse crumbs. Press into the bottom and sides of a lightly greased 9-inch pie pan. Use the bottom of a measuring cup to make sure the crumbs are packed down tightly. Refrigerate for 2 hours before using.
  2. In a medium bowl or the bowl of a stand mixer, beat the cream cheese until whipped and creamy.
  3. Slowly add the ½ cup of lemonade concentrate (be sure not to add the whole can!) and beat after each addition. Once well combined, fold in two cups of the Cool Whip. Pour the mixture into the crust and refrigerate for four hours.
  4. When ready to serve, top with the remaining Cool Whip, strawberries and blueberries. You could top with the fruit beforehand, but the red juice from the strawberries might run on the Cool Whip.
Notes
If you want to skip the first step simply use a pre-made graham cracker crust. I use light cream cheese and light Cool Whip, but regular or light works for this recipe. This pie (and crust) both freeze well.

Recipe slightly adapted from Kraft Recipes.

Chocolate Covered Strawberry Frozen Yogurt

Chocolate Covered Strawberry Frozen Yogurt  |  Lemon & Mocha

Happy Valentine’s Day! I have a delicious sweet treat for you today. Chocolate covered strawberry frozen yogurt. Also known as strawberry frozen yogurt with stracciatella. This frozen dessert is bursting with strawberry flavor and since it’s on Lemon & Mocha, it is of course also chocolatefied.

Chocolate Covered Strawberry Frozen Yogurt  |  Lemon & Mocha

Valentine’s Day weekend is always especially meaningful for Matt and I because our anniversary is on the 15th! Tomorrow will mark 7 years since we starting dating, woo-wee! I’m going to keep it short and simple today so my Valentine’s Day present to you all sweet readers is this recipe and a bunch of drool-worthy photos. Enjoy!

Chocolate Covered Strawberry Frozen Yogurt  |  Lemon & MochaChocolate Covered Strawberry Frozen Yogurt  |  Lemon & MochaChocolate Covered Strawberry Frozen Yogurt  |  Lemon & MochaChocolate Covered Strawberry Frozen Yogurt  |  Lemon & Mocha

Chocolate Covered Strawberry Frozen Yogurt
 
Yield: 1 quart
Ingredients
  • 1 pound fresh strawberries, rinsed and hulled
  • ⅔ cup sugar
  • 1 cup plain whole-milk yogurt
  • 1 teaspoon lemon juice
  • 5 ounces bittersweet chocolate, chopped
  • Chocolate covered strawberries, for garnish, optional
Directions
  1. Slice the strawberries then toss in a medium bowl with the sugar. Stir until the sugar begins to dissolve then cover and let sit at room temperature for 1 hour. Stir occasionally.
  2. Using a blender or food processor puree the entire contents of the strawberry bowl, the yogurt and the lemon juice. If you would like to get rid of any seeds push the mixture through a mesh strainer.
  3. Refrigerate the mixture for 1 hour then pour into your ice cream maker according to the manufacturer's directions.
  4. While the mixture is in the ice cream maker, melt the bittersweet chocolate over a double boiler and stir until it's smooth. Transfer the chocolate into a measuring cup with a pouring spout.
  5. During the last couple minutes of churning in the ice cream maker pour the melted chocolate into the ice cream maker in a thin stream to create the stracciatella swirl.
Notes
Although this is a frozen yogurt, to me it had more of a sorbet texture. It is still delicious, but just wanted to give a heads up so you weren't surprised by the texture.

Frozen yogurt recipe from The Perfect Scoop.

Red Velvet Oreo Truffle Chocolate Crunch Brownies

Red Velvet Oreo Truffle Chocolate Crunch Brownies  |  Lemon & Mocha

Remember way back when I promised the fifth, final and most outrageous installment of the Lemon & Mocha brownie series just in time for Valentine’s Day? Ta-da! Here it is:  Red Velvet Oreo Truffle Chocolate Crunch Brownies. I am very sorry for keeping these from you for so long,  but aren’t they perfect for Valentine’s Day?

Red Velvet Oreo Truffle Chocolate Crunch Brownies  |  Lemon & Mocha

These brownies are the king of all brownies and they are utterly amazing. Lets go layer by layer to give you time to process the amazingness.

Red Velvet Oreo Truffle Chocolate Crunch Brownies  |  Lemon & Mocha

Layer one:  homemade red velvet brownies. Fudgey, moist and with just a hint of chocolate flavoring that red velvet is known for, this is the perfect base.

Red Velvet Oreo Truffle Chocolate Crunch Brownies  |  Lemon & Mocha

Next up, layer two:  Oreo truffle. If these layers were children the Oreo truffle layer would be that favorite child. Have you ever made Oreo truffle balls? This layer is the inside of those truffles. Crushed Oreos and cream cheese are whipped together to create the most perfect balance of sweet, creamy and chocolatey.

Red Velvet Oreo Truffle Chocolate Crunch Brownies  |  Lemon & Mocha

Finally, layer three:  chocolate crunch. Chocolate is melted over the top of the Oreo truffle layer to create a hardened chocolate topping, but oh no, even that is not enough. Before the chocolate has time to harden, mini chocolate chips are sprinkled allover to create chocolate chunks in the hunk of chocolate.

Red Velvet Oreo Truffle Chocolate Crunch Brownies  |  Lemon & Mocha

Yes, I promise you that this is real life and you can actually go make these brownies right now. They are an ultimate texture overload. Fudgey base, creamy Oreo middle and hard crunchy topping come together to make you eat a second, or a third, or a fourth, or a….

Red Velvet Oreo Truffle Chocolate Crunch Brownies  |  Lemon & Mocha

Red Velvet Oreo Truffle Chocolate Crunch Brownies
 
Yield: 32 brownies
Ingredients
for the red velvet brownie layer
  • 2 sticks unsalted butter (1 cup), room temperature
  • 1½ cups sugar
  • 1½ cups brown sugar
  • 4 large eggs, room temperature
  • 1-2 ounces red food coloring
  • 4 teaspoons vanilla extract
  • 2½ cups all-purpose flour
  • 6 tablespoons unsweetened cocoa powder
  • ½ teaspoons salt
for the Oreo truffle layer
  • 1 package Oreos
  • 8 ounces cream cheese, room temperature
for the chocolate crunch layer
  • 1½ cups semisweet chocolate chips
  • 2 teaspoons vegetable oil
  • 1 cup mini chocolate chips
Directions
for the red velvet brownie layer
  1. Preheat oven to 350 degrees F. Grease and flour a 9 x 13 pan and set aside.
  2. Beat the butter, sugar and brown sugar together with the paddle attachment of a stand mixer for 2 minutes, or until fluffy. Add the eggs, one at a time, mixing after each egg is added. Add the food coloring and vanilla extract until the color is completely incorporating and is the desired color.
  3. In a separate medium bowl combine the flour, cocoa powder and salt. Carefully add the flour mixture to the wet ingredients being sure to incorporate completely while trying not to over-mix the batter. The batter will be very thick, but make sure the batter is a uniform color.
  4. Pour the batter into the prepared baking pan and smooth the top. Bake for 35 minutes, or until crunchy on top and gooey underneath. Let cool completely. Once cool you can either leave in the pan or very carefully flip the brownies out onto a large clean surface. I flipped my over onto a clean cutting board that easily fits in my fridge so it would be easier for later refrigerating and cutting.
for the Oreo truffle layer
  1. Turn the entire package of Oreos into crumbs using a food processor or crushing in a large plastic bag. Combine with the cream cheese until blended.
  2. Dollop the Oreo mixture onto the cooled brownies then carefully use your hands and a rubber spatula to create a smooth even layer covering the brownies all the way to the edges. If you try to simply spread you might tear the brownies.
for the chocolate crunch layer
  1. Melt the chocolate chips with the vegetable oil in the microwave. Microwave for 30 seconds, stir, then continue to microwave in 10 second intervals, stirring after each, until melted and smooth. Carefully pour over the Oreo truffle layer and smooth with a rubber spatula. Sprinkle with the mini chocolate chips then refrigerate until the chocolate crunch layer has hardened.

Red velvet brownies from Newlyweds.
Bar recipe from Pizzazzerie.