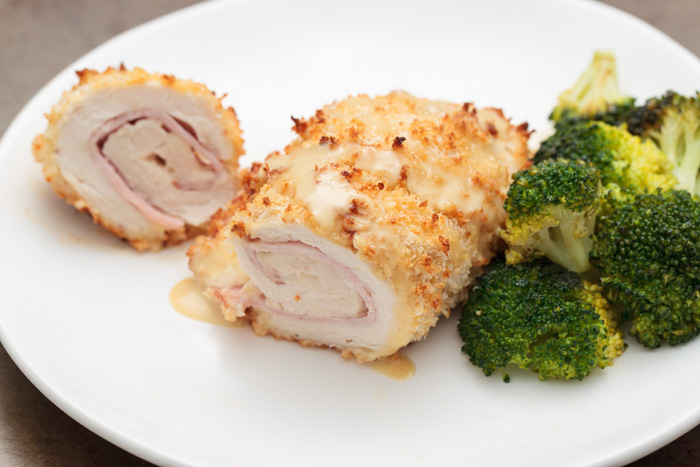
Re-do of the Chicken Cordon Bleu with Honey Mustard Sauce

Chicken Cordon Bleu with Honey Mustard Sauce  |  Lemon & Mocha

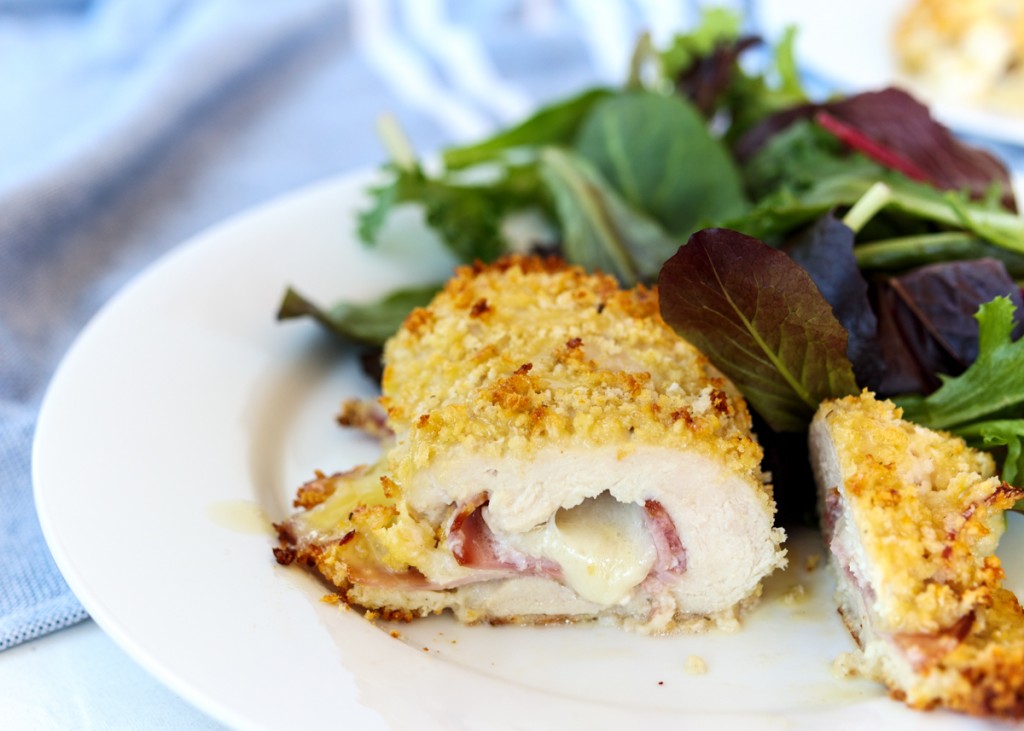
Chicken Cordon Bleu with Honey Mustard Sauce is one of my all-time favorite recipes and all you Lemon & Mocha readers agree! It is one of the top ten most popular posts on Lemon & Mocha so I figured it was long overdue for a post refresh. The post has been updated with new photos, updated content and some slight recipe tweaks. This healthy dinner dish may look fancy, but it’s secretly quick enough for a weeknight. Check out the updated recipe here! Below is one of the original photos posted in January 2015. Back then I was still trying to figure out this whole food photography thing – and I still am working more on it every day! The chicken looks good, but the photo is missing contrast and the lighting isn’t great. Also, the chicken looks so lonely on that big plate! I am loving the new photos on the updated post and I hope you all do, too!

Chicken Cordon Bleu with Honey Mustard Sauce  |  Lemon & Mocha

Breakfast Bulgur with Warm Berries

Breakfast Bulgur with Warm Berries  |  Lemon & Mocha

Happy Friday, everyone! I don’t know about you, but this has been a long week. Both Matt and I were sick and all the snow, ice and cold didn’t help. Having lived in New England my whole life I’m never surprised when we get bad winter weather, but that doesn’t mean we can’t complain about it, right?! This healthy breakfast dish is perfect for those cold winter mornings because it’s warm and full of bright berry flavors.

Breakfast Bulgur with Warm Berries  |  Lemon & Mocha

I’m always on the hunt for warm breakfast ideas since I am allergic to oats so oatmeal is out. A while back I stumbled across a recipe in Giada’s Feel Good Food cookbook for a breakfast bulgur. Bulgur wheat is a whole grain that is a smaller grain than rolled oats, but it has a similar chewy texture. I cook it up with some vanilla and cinnamon then pour berries that have been cooked down with maple syrup over top.

Breakfast Bulgur with Warm Berries  |  Lemon & Mocha

As with most of the recipes on Lemon & Mocha, this breakfast bulgur is ideal as a make-ahead meal. Usually I make a big batch of the bulgur and the berries then divide it all between eight small reusable containers. That way Matt and I can each just microwave our little container for one minute for a quick and healthy breakfast without having to guess at the serving size.

Breakfast Bulgur with Warm Berries  |  Lemon & Mocha

I’ve also frozen the little containers once when we were going to be away and they still tasted good when we defrosted and ate them the next week. If you didn’t want to make quite so much you could easily halve the recipe. I’ve been wanting to try other variations of bulgur wheat for breakfast, but I’m so hooked on this original berry version that in the few years I’ve been making it I have yet to try it any other way. Do you ever have bulgur for breakfast? What’s your favorite way to eat it?

Breakfast Bulgur with Warm Berries  |  Lemon & Mocha

Also, in case you are new to bulgur and are looking for a visual for when you’re at the grocery store, I buy this Bob’s Red Mill version. Whole Foods also sells it in the bulk bins if you wanted to try it first; that’s what I did when I first made it before I graduated to buying the Bob’s Red Mill bags in bulk from Amazon!

Breakfast Bulgur with Warm Berries  |  Lemon & Mocha

Breakfast Bulgur with Warm Berries
 
Yield: 8 servings
Ingredients
for the bulgur
  • 2 cups golden bulgur wheat
  • 1 teaspoon vanilla extract
  • 1 teaspoon ground cinnamon
  • ¼ teaspoon salt
for the berries
  • 10 ounces frozen strawberries
  • 16 ounces frozen mixed berries
  • 6 ounces fresh blackberries
  • 2 tablespoons maple syrup
  • ¼ teaspoon ground cinnamon
Directions
for the bulgur
  1. Add 4 cups of water, the bulgur, vanilla, cinnamon and salt to a medium saucepan. Bring to a boil then cover, reduce heat to low and simmer for 12 minutes. Stir together; the water should be absorbed.
for the berries
  1. Heat all the frozen berries over medium heat in a medium saucepan. Let cook for 8 minutes, or until the berries are almost thawed. All the fresh berries, maple syrup and the cinnamon. Bring to a boil then reduce heat to low and let simmer for 8 to 10 minutes, stirring occasionally and lightly smashing the strawberries as you stir. Remove from the heat and eat over the bulgur.

Recipe slightly adapted from Giada’s Feel Good Food.
Some of the links above are affiliate links, which means I may receive a small commission for my referral. This does not affect the retail cost of the item. Thank you for supporting Lemon & Mocha!

Roasted Acorn Squash with a Thai Peanut Sauce

Roasted Acorn Squash with a Thai Peanut Sauce  |  Lemon & Mocha

Are you guys peanut butter fanatics like I am? Most days I just look around the kitchen to see what would be a good vessel for my peanut butter snack. Pretzels? Check. Carrot sticks? Yup. Pancakes? Yes, please. Spoon? Sure, why not?

Roasted Acorn Squash with a Thai Peanut Sauce  |  Lemon & Mocha

Sometimes when I’m coming up with recipes I think the same way. I quickly discovered that roasted acorn squash makes an excellent peanut butter vessel. Especially when the peanut butter is combined with coconut milk, lime juice, coconut aminos (or soy sauce) and maple syrup to make a rich, tangy, salty and slightly sweet sauce. Add some chopped crunchy peanuts and savory scallions and you have absolute veggie perfection.

Roasted Acorn Squash with a Thai Peanut Sauce  |  Lemon & Mocha

Have you ever used coconut aminos? I bought a bottle at Trader Joe’s and this was my first time using it. Many people use it as a substitute for soy sauce since it tastes similar, although slightly sweeter. Coconut aminos is lower in sodium and contains no soy. If you would rather use low sodium soy sauce because that’s what you already have in your fridge you might need to adjust the sauce to taste a little since it’s not a direct substitution.

Roasted Acorn Squash with a Thai Peanut Sauce  |  Lemon & Mocha

I love pretty much all roasted vegetables and acorn squash is no exception. The slices get tender, a little crispy and caramelized. Plus, how fancy do they look all laid out on the platter? You definitely need a very sharp knife to cut through the squash. If you’re finding the squash too difficult to cut through, cut a few slits in the skin of the squash then microwave for three minutes to help soften the skin.

Roasted Acorn Squash with a Thai Peanut Sauce  |  Lemon & Mocha

Looking for more peanut vessel inspiration? Check out my Thai Peanut Chicken Tacos, Sesame Peanut Noodles with Chicken or Apple Nachos. Or if you want something a little sweeter, the Chocolate Drizzled Peanut Butter Crunch Chocolate Brownies and the Peanut Butter Apple Bars are both loaded with peanut butter. Yum!

Roasted Acorn Squash with a Thai Peanut Sauce  |  Lemon & Mocha

Roasted Acorn Squash with a Thai Peanut Sauce
 
Yield: 4-6 servings
Ingredients
  • 2 acorn squash
  • ¼ cup creamy peanut butter (I used Jif)
  • 2 tablespoons coconut aminos
  • 2 tablespoons light coconut milk
  • 1 tablespoon maple syrup
  • 1 tablespoon lime juice
  • ¼ teaspoon ground ginger
  • ⅛ teaspoon red pepper flakes, or more to taste
  • ¼ cup chopped peanuts
  • ¼ cup chopped scallions
  • Cooking spray
  • Salt and pepper
Directions
  1. Preheat the oven to 400 degrees F. Line a baking sheet with aluminum foil or parchment paper and spray with cooking spray. Set aside.
  2. Cut the acorn squashes into ½-inch slices. Use a small round biscuit cutter or a knife to remove the center of each slice to leave you with acorn squash rings. Lay the squash slices in a single layer on the prepared baking sheet. Spray with nonstick cooking spray then season with salt and pepper. Roast until tender, about 25 minutes.
  3. While the squash is roasting, make the peanut sauce. Whisk the peanut butter, coconut aminos, light coconut milk, maple syrup, lime juice, ground ginger and red pepper flakes in a small mixing bowl until well combined.
  4. When the squash is done, layer on a serving dish. Drizzle the peanut sauce over top then top with the chopped peanuts and scallions. Serve warm.
Notes
Substitutions: If you can’t use coconut aminos, you can try swapping in low sodium soy sauce. You might need to increase the amount of maple syrup. If you can’t use light coconut milk, substitute water.
Leave the acorn squash unpeeled. When you cut the slices you want the squash positioned so the stem end is facing your left hand and the bottom end of the squash is facing your right hand (if you are going to be cutting with your right hand).


Skinny Chicken Broccoli Rice Casserole

Skinny Chicken Broccoli Rice Casserole  |  Lemon & Mocha

Skinny Chicken Broccoli Rice Casserole, my heart you have stole! Your greatness rivals a crispy egg roll. When eating you for dinner I lose self control! Sadly, after the last bite I was hard to console. Sorry for that, but I’m so excited about this dish that the only way I could express myself was through song. That’s normal right?

Skinny Chicken Broccoli Rice Casserole  |  Lemon & Mocha

I first made this Skinny Chicken Broccoli Rice Casserole just last week and Matt and I were hooked after one bite. It’s creamy, cheesy and full of comforting flavors. Plus, this healthy dinner dish is guilt-free! I swapped all the rice for a combination of half brown rice and half riced cauliflower. This half and half mix is great because you still get the hearty and chewy texture of the rice, while adding more vegetables and lightness with the tender riced cauliflower. You could always do all cauliflower rice or all brown rice if you prefer.

Skinny Chicken Broccoli Rice Casserole  |  Lemon & Mocha

The broccoli has been doubled, which is perfect since Matt and I love broccoli. Each serving gives you a full cup of broccoli meaning you get some tender broccoli bits in every cheesy bite. The dish has also been lightened with nonfat milk and low-fat sour cream, although you can use Greek yogurt instead of the sour cream if you would like.

Skinny Chicken Broccoli Rice Casserole  |  Lemon & Mocha

Every night Matt kept questioning if I was making up that it was a healthier dish since it’s so creamy and delicious! It’s incredible how cheesy it tastes, even though there’s only 1/4 cup of cheddar per serving.

Skinny Chicken Broccoli Rice Casserole  |  Lemon & Mocha

I’m sure this freezes well, although we never got around to trying it since we gobbled it all up! I did, however, sauté the chicken pieces ahead of time then freeze them so when I knew I wanted to make this dish I put the cooked chicken pieces in the fridge overnight to thaw and they were ready to pop into the casserole. I can imagine kids loving this dish so I’m sure this will be a family favorite for years and years to come. Enjoy!

Skinny Chicken Broccoli Rice Casserole  |  Lemon & Mocha

Skinny Chicken Broccoli Rice Casserole
 
Yield: 8 servings
Ingredients
  • 2 cups chicken broth
  • 1 cup brown jasmine rice
  • 2 heads broccoli florets, about 8 cups
  • 16 ounces boneless skinless chicken breasts, cut into bite size pieces
  • 3 cups riced cauliflower
  • 2 cups nonfat milk
  • 1½ tablespoons all-purpose flour
  • 8 ounces shredded sharp cheddar cheese, about 2 cups
  • ⅓ cup light sour cream
  • ¼ teaspoon salt
  • ¼ teaspoon fresh ground black pepper
  • ¼ teaspoon garlic powder
  • 2 scallions, chopped
  • Salt and pepper for seasoning
  • Cooking spray
Directions
  1. If you have a rice cooker with a steamer basket, see note. Otherwise, bring broth to a boil in a large pot (big enough to fit all the broccoli eventually). Add the rice, cover, reduce heat to low and let simmer for 30-35 minutes or until rice is tender. When the rice is 5 minutes away from being done, put the broccoli in the pot and cover to steam. Try not to let too much steam out while you’re doing this or the broccoli will need to stay in there longer. Once the broccoli is tender, remove pot from the heat and add the contents to a large mixing bowl. Rinse and wipe the pot.
  2. Spray a skillet with cooking spray then heat over medium-high heat. Add the chicken and season with salt and pepper. Cook for 5-7 minutes, turning and flipping occasionally. When they’ve reached an internal temperature of 165 degrees F, add the chicken to the large mixing bowl and wipe the skillet. Lightly spray the skillet with cooking spray again and cook the cauliflower rice until tender. It should only take a couple minutes; if you are using frozen riced cauliflower it usually says to sauté until there’s no more liquid. Remove from the skillet and add to the large mixing bowl.
  3. Heat the milk in the pot from the rice over medium heat until warm then whisk in the flour. Continue to whisk occasionally until thick, about 7-10 minutes, then remove from the heat. Add ¾ of the shredded cheese (about 1½ cups) and whisk until melted. Add the sour cream, ¼ teaspoon salt, ¼ teaspoon black pepper, ¼ teaspoon garlic seasoning and whisk until smooth. Pour into the large mixing bowl. Add the chopped scallions to the mixing bowl then stir until well combined.
  4. Lightly spray a 9x13” pan with cooking spray. Add the contents of the mixing bowl and spread to an even layer. Sprinkle the remaining cheese (about ½ cup) on top. Broil until the cheese is melted; watch carefully because it melts very quickly. Let sit 5 minutes before serving.
Notes
Substitutions: You can use any fat percentage of milk you prefer. You can substitute plain nonfat or low-fat Greek yogurt for the sour cream.
Rice and Broccoli: I made it the way specified above for testing purposes since not everyone has a rice cooker, but for all future times I make this I will just use my Breville Risotto Plus to cook the rice and steam the broccoli at the same time since it’s quicker and the rice comes out perfect every time.

Recipe adapted from Iowa Girl Eats.

Healthy Spinach, Goat Cheese and Quinoa Egg Muffins

Healthy Spinach, Goat Cheese and Quinoa Egg Muffins  |  Lemon & Mocha

Welcome to another healthy breakfast Friday! You may have noticed that a lot of the meals this month can either be partially or completely made ahead. Well, I’ve been posting some of our favorite go-to meals and in addition to liking healthy dishes, we’re also big fans of meals that can be made ahead. When hunger suddenly strikes we have no patience so make-ahead is key! Does anyone else have this issue?!

Healthy Spinach, Goat Cheese and Quinoa Egg Muffins  |  Lemon & Mocha

One of my favorite make-ahead breakfasts is egg muffins or mini quiches. My Mini Broccoli, Ham and Cheddar Quiches are the best breakfast for busy weekdays or mornings with house guests, but I wanted to make a lightened up version.

Healthy Spinach, Goat Cheese and Quinoa Egg Muffins  |  Lemon & Mocha

The original mini quiches use flour and are loaded with cheese and ham so instead we’re keeping them vegetarian and using cooked quinoa, a small amount of goat cheese and plenty of spinach. Between the eggs, quinoa and goat cheese, there’s plenty of protein in these little muffins to keep you full.

Healthy Spinach, Goat Cheese and Quinoa Egg Muffins  |  Lemon & Mocha

My favorite part about these egg muffins is that just like the mini quiches, all you have to do is bake them in a muffin pan sprayed with nonstick cooking spray. When they’re warm out of the oven, the goat cheese is gooey and the quinoa provides a great texture throughout the egg muffin.

Healthy Spinach, Goat Cheese and Quinoa Egg Muffins  |  Lemon & Mocha

Matt and I have to get going early tomorrow morning and these Healthy Spinach, Goat Cheese and Quinoa Egg Muffins are the perfect quick breakfast. We’re headed to New York City with Matt’s family to see Wicked and celebrate my mother-in-law’s, Theresa’s, birthday! I hope you all have a fabulous weekend!

Healthy Spinach, Goat Cheese and Quinoa Egg Muffins  |  Lemon & Mocha

Healthy Spinach, Goat Cheese and Quinoa Egg Muffins
 
Yield: 6 servings
Ingredients
  • 6 eggs
  • ½ cup nonfat milk
  • 10 ounces spinach, steamed, strained and water squeezed out
  • 3 ounces goat cheese
  • 1 cup cooked quinoa
  • ½ teaspoon garlic powder
  • ¼ teaspoon salt
  • ¼ teaspoon ground black pepper
  • Cooking spray
Directions
  1. Preheat the oven to 400 degrees F. Spray a 12-cup muffin pan with nonstick cooking spray.
  2. In a large mixing bowl, whisk together the eggs and milk until frothy. Add all the remaining ingredients and stir to combine. Divide the egg mixture between the 12 muffin cups. There might be a little leftover - do not overfill. Then bake for 24-27 minutes, or until a toothpick comes out clean and the eggs are cooked through.