Rainbow Slice-and-Bake Cookies

Rainbow Slice-and-Bake Cookies  |  Lemon & Mocha

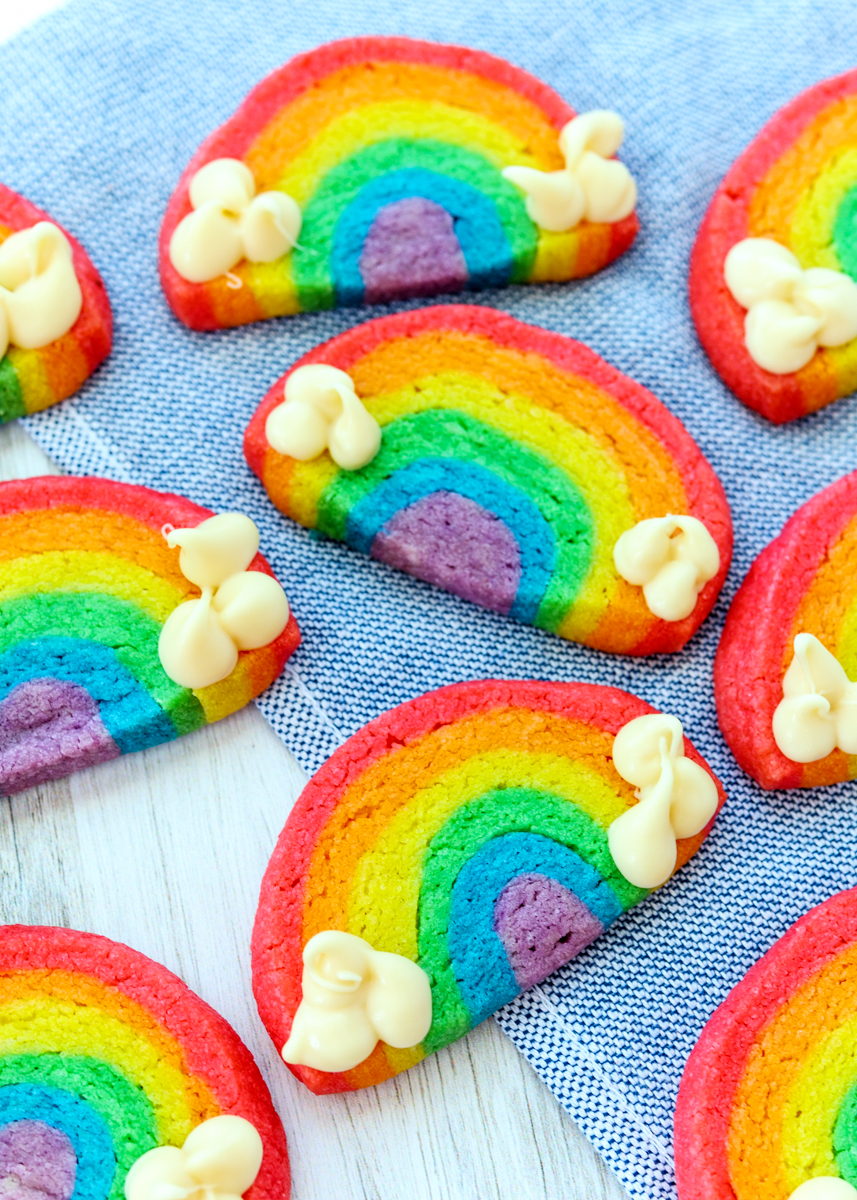
I have to admit that I was completely dreading these March cookies from the Food Network Magazine. The photos looked incredibly intimidating, especially since it’s a magazine so of course the rainbow cookies in the photograph was absolute perfection. Then I looked at the recipe and saw it involved tinting the cookie dough six, yes, six, different colors and these weird instructions for rolling, measuring and wrapping the dough that somehow gives you these cool rainbow cookies. I’m committed to completing this monthly cookie challenge so I rolled my sleeves up and dove in.

Rainbow Slice-and-Bake Cookies  |  Lemon & Mocha

The actual cookie dough is a very simple, buttery cookie recipe. You then divide the dough into six pieces so you’re going to want to make sure you have a lot of bowls ready! I used my kitchen scale to divide the dough since the recipe specified the amounts in ounces. Side note: if you don’t already have a kitchen scale, I highly recommend one if you do a lot of baking. They are fairly inexpensive (under twenty dollars) and are necessary for many baking recipes. Particularly for when you are baking something with layers, for example I make Matt those Italian tricolor cookies every Christmas and it is definitely key to make sure each of those thin layers has an exactly even amount of batter.

Rainbow Slice-and-Bake Cookies  |  Lemon & Mocha

Anyways, back to these crazy rainbow cookies! So once you have your dough divided up you tint each section with gel food coloring. Food coloring typically comes in a pack of red, yellow, green and blue. You could combine colors to make the orange and purple, but I used the same neon gel food coloring that I used for my Chocolate Marshmallow Monster Cookie Sandwiches, which ended up being a lot easier and didn’t use up all of the red food gel. Now, I bet you’re wishing I would stop babbling about food coloring and are wondering how to get that cool layered rainbow shape!

Rainbow Slice-and-Bake Cookies  |  Lemon & Mocha

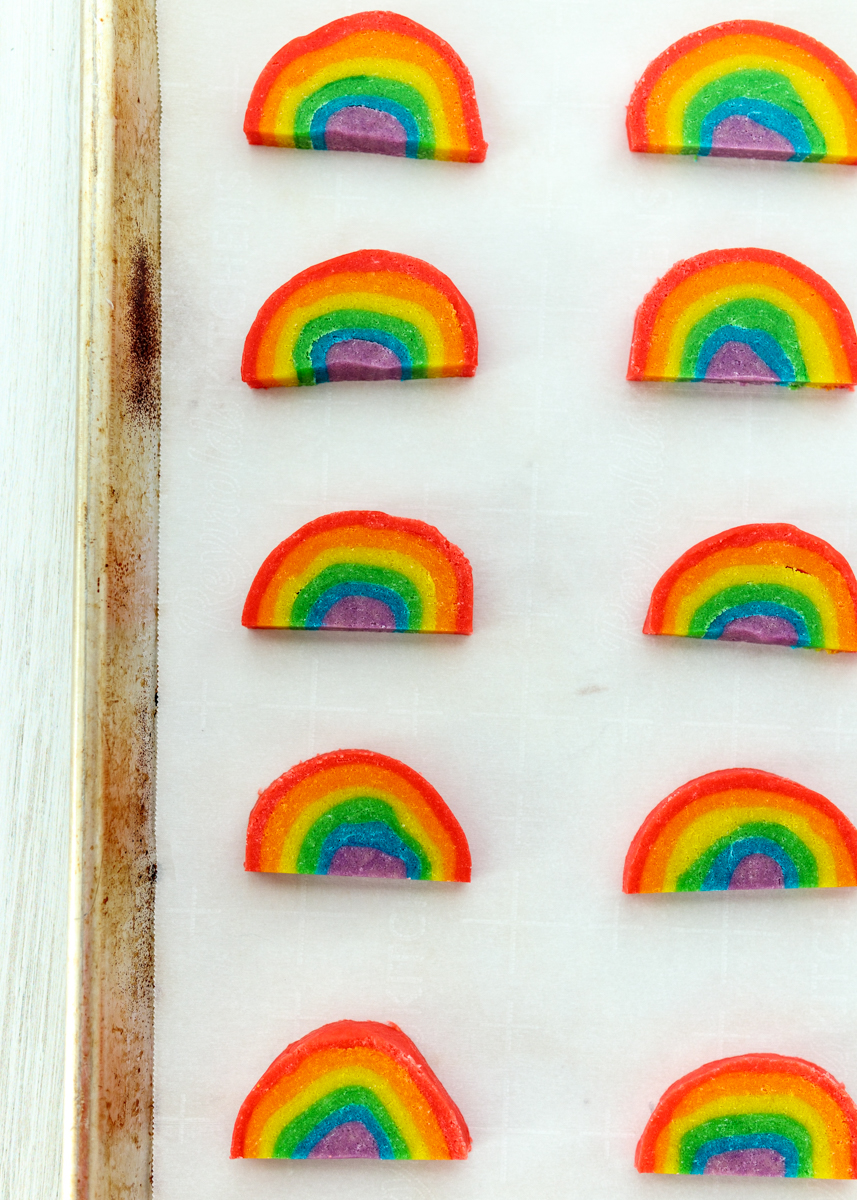
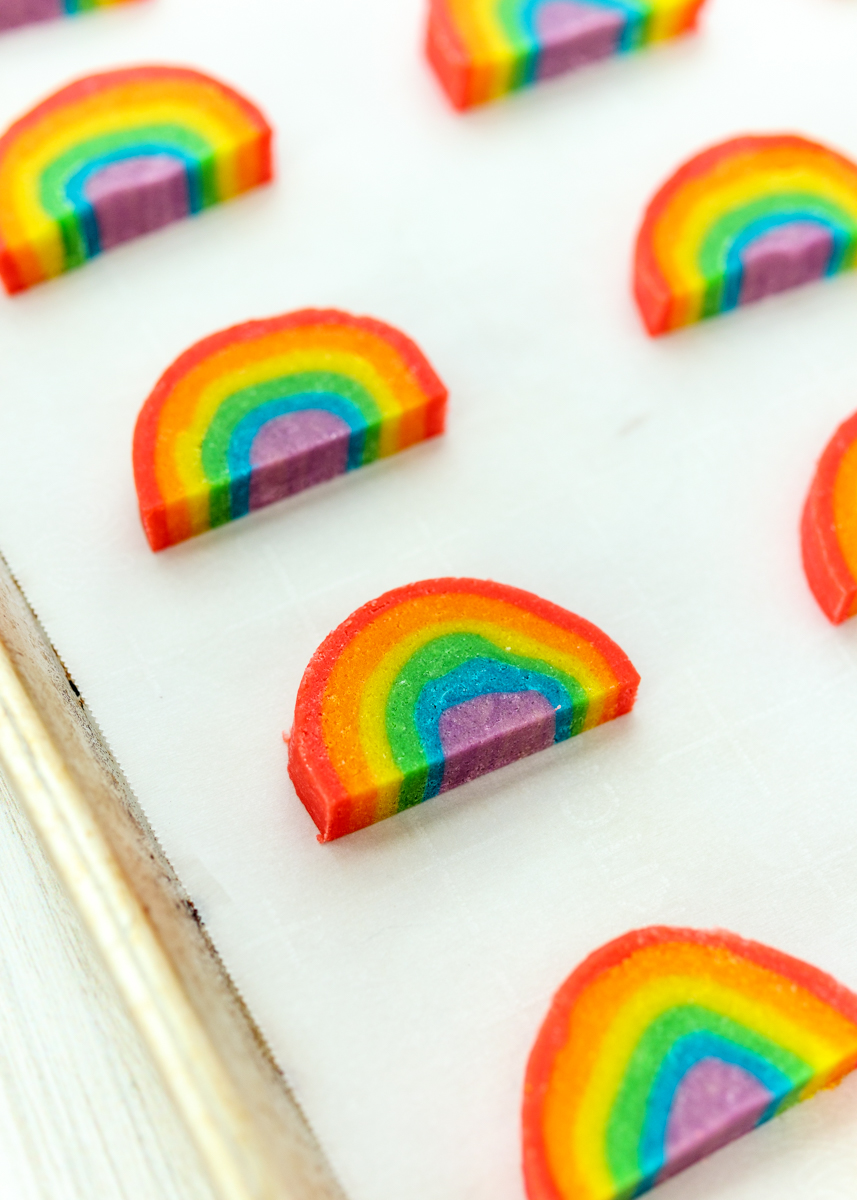
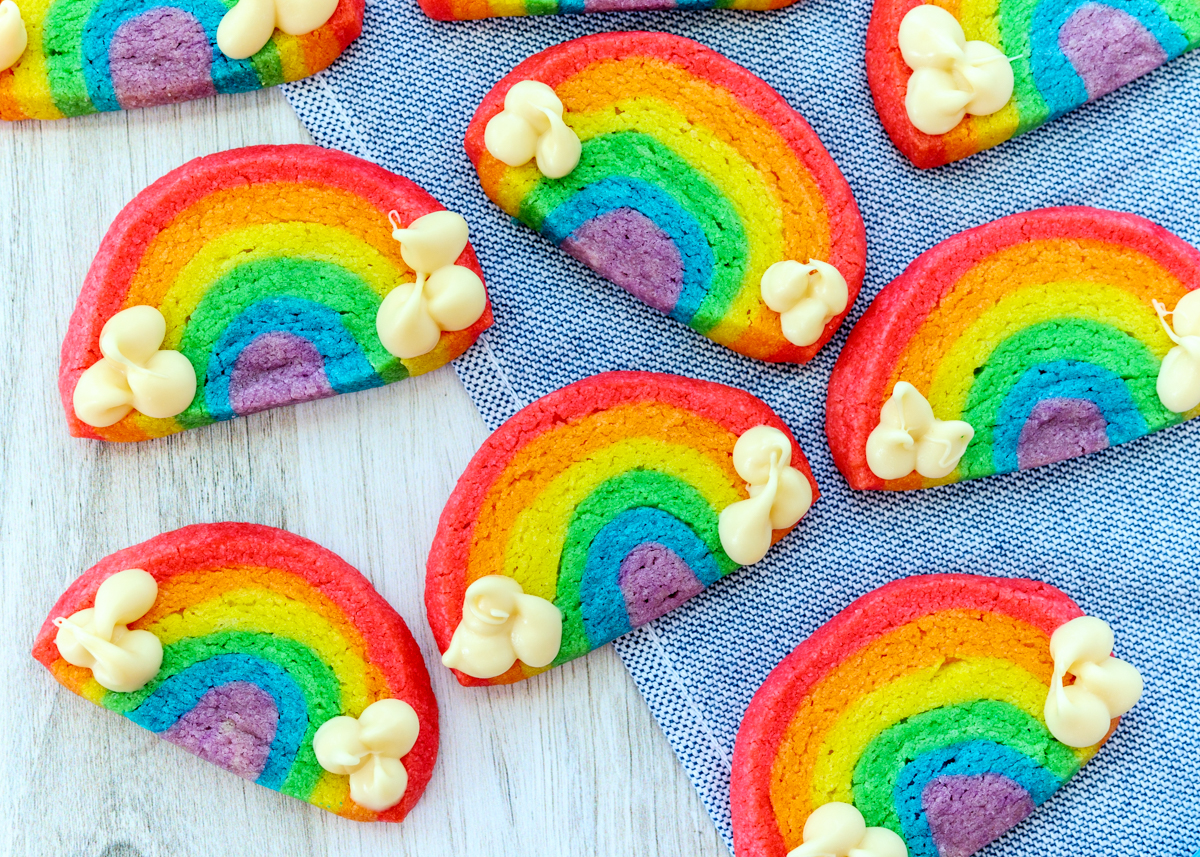
The gist of it is that the purple section gets rolled into a log. The blue section then gets rolled into a rectangle that wraps around the log, then the green section gets rolled into a slightly larger rectangle that wraps around the now larger log and so on until you have a big roll of cookie dough. After the dough log has had a chance to chill, you slice rounds, like a classic slice-and-bake cookie, then cut each round in half to get that rainbow half-circle shape. Voila!

Rainbow Slice-and-Bake Cookies  |  Lemon & Mocha

I was relieved to discover that making these cookies wasn’t as bad as I anticipated, but if I ever had a desperate need for rainbow cookies in the future I would most likely just pipe rainbow frosting on top since mixing gel food coloring into cookie dough – six times – takes far too long to make it worth it in my opinion. What do you think? Would you give these pretty Rainbow Slice-and-Bake Cookies a shot?

Rainbow Slice-and-Bake Cookies  |  Lemon & Mocha

Rainbow Slice-and-Bake Cookies
 
Yield: about 36 cookies
Ingredients
  • 2½ cups all-purpose flour
  • ½ teaspoon baking powder
  • ¼ teaspoon salt
  • 1 cup unsalted butter (2 sticks) at room temperature
  • ¾ cup granulated sugar
  • ¾ cup powdered sugar
  • 2 large egg yolks
  • 2 teaspoons vanilla extract
  • ¼ teaspoon each red, orange, yellow, green, blue and purple gel food coloring
  • 1 cup white candy melts
Directions
  1. In a medium bowl, sift together the flour, baking powder and salt. In the bowl of a stand mixer or in a large bowl with a hand mixer, beat the butter, granulated sugar and powdered sugar on medium-high speed for 2 minutes, or until light and fluffy. Add the egg yolks and vanilla then beat to combine. Gradually add the flour mixture on low speed until just combined.
  2. Divide the dough: 2 large pieces (about 7 ounces each), 2 medium pieces (about 5 ounces each) and 2 small pieces (about 3 ounces each). Tint 1 of the large pieces of dough red and tint the other one orange. Use a rubber spatula (so it doesn’t stain) to work the food coloring into the dough. Repeat with yellow and green for the 2 medium pieces of dough. Repeat with blue and purple for the 2 small pieces of dough.
  3. Lay a piece of plastic wrap, about 12 inches long, on a clean work surface. Take a large piece of wax paper, about 12 inches long, and lightly flour it. Put on gloves so you won’t get food coloring on your hands and so you can easily move from one color to the next. On the floured wax paper, roll the purple dough into a 7-inch log. It will be about ¾-inch thick. Set aside on the plastic wrap. Brush any purple dough off your gloved hands or the wax paper; dust with more flour if needed.
  4. Use a rolling pin to roll out the blue dough on the wax paper into a rectangle, roughly 3½ inches by 7 inches. Place the purple log on the edge of the blue rectangle and use the wax paper to help you tightly roll it around the purple log, lightly pinching the seam where the 2 long blue edges meet. Set the log back aside on the plastic wrap. Brush any blue dough off your gloved hands, the wax paper or the rolling pin; dust the wax paper with more flour if needed. Repeat for the remaining colors, in these sizes and in this order: green 5 inches by 7½ inches; yellow 6 inches by 8 inches; orange 7 inches by 8½ inches; red 8 inches by 9 inches. Wrap the plastic wrap around the whole log then refrigerate for 8 hours or overnight or place in the freezer for 1 hour.
  5. Preheat the oven to 375 degrees F. Line 2 baking sheets with parchment paper and set aside.
  6. Cut the ends off of the log. Slice into ⅜-inch thick rounds then slice each round in half. If any of the cookies have a slight gap between the layers in spots just gently press them together. Place the rainbow cookies about 1 inch apart on the prepared baking sheets then place them in the fridge for at least 15 minutes. This helps prevent spreading when they bake.
  7. Take one pan out of the fridge and bake the cookies for 10-13 minutes. The cookies will be just set around the edges. When you take them out of the oven, if the bottoms of the rainbow have puffed out a little, carefully use a spatula to help press the bottom of the cookie to be flat. You have to do this while they’re right out of the oven because once they cool their shape will be set. Let the cookies cool on the pan for 5 minutes then transfer to a wire cooling rack to cool completely. Remove the second baking sheet from the fridge and repeat the baking and cooling instructions.
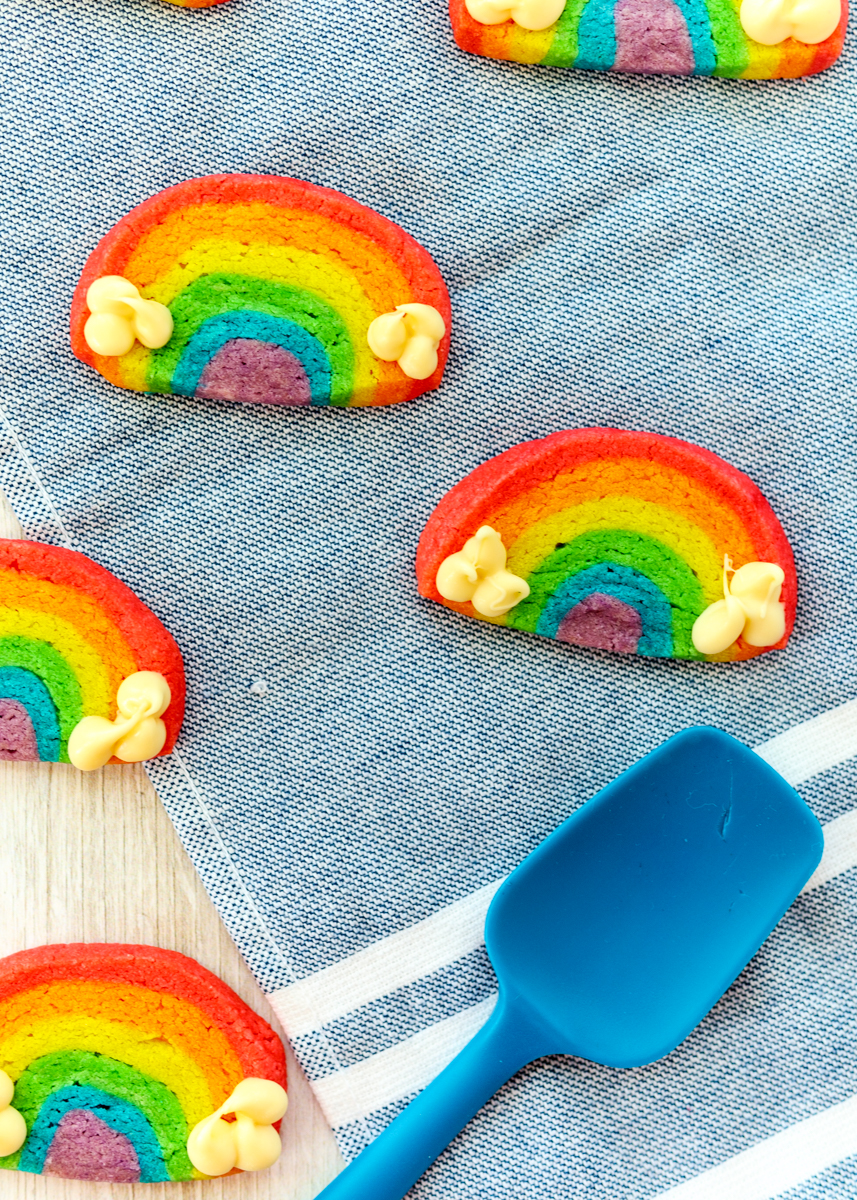
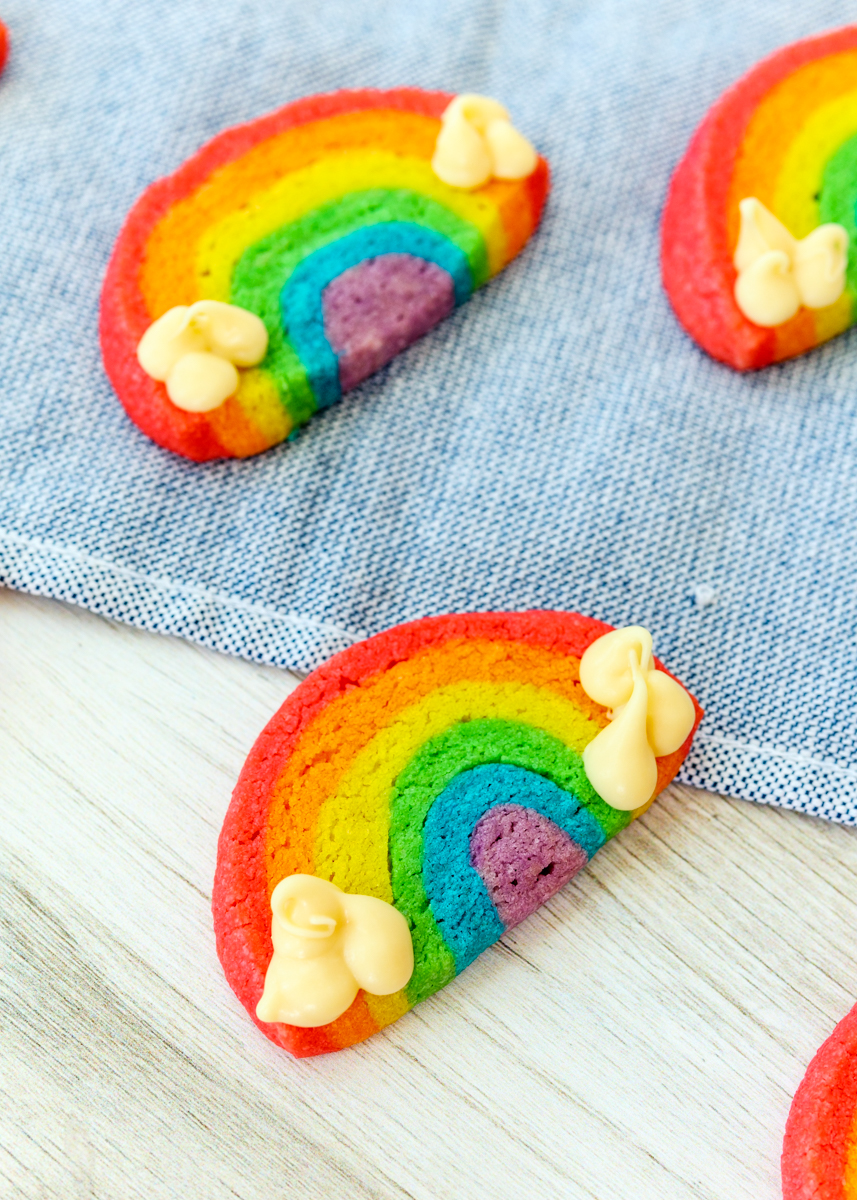
  8. Once the cookies are completely cooled, melt the candy melts in a microwave safe bowl for 30 seconds, stir, then continue microwave and stirring in 20 second intervals until smooth. Place the melted candy melts into a pastry bag fitted with a small round tip or in a resealable plastic bag with the corner snipped. Pipe the little clouds on the ends of each rainbow cookie then let set for at least 5 minutes.

 Recipe from January/February 2019 issue of Food Network Magazine.

Some of the links above are affiliate links, which means I may receive a small commission for my referral. This does not affect the retail cost of the item. Thank you for supporting Lemon & Mocha!

Hummus and Roasted Veggie Flatbread Pizza

Hummus and Roasted Veggie Flatbread Pizza  |  Lemon & Mocha

Now this, my friends, is how to truly enjoy hummus. I thought I had a love for hummus, but this Hummus and Roasted Veggie Flatbread Pizza just deepened my love ten-fold. Pita chips dipped into hummus is great. Warm, soft pita wedges dipped into hummus is even better. But a toasted pizza crust topped with warm hummus, roasted vegetables and slightly melted goat cheese is the hands-down winner.

Hummus and Roasted Veggie Flatbread Pizza  |  Lemon & Mocha

I used Monday’s Caramelized Onion Hummus to make this flatbread pizza and the rich flavor balanced with the roasted zucchini and broccoli was perfect. The beauty of this dish is you can really customize it any way you would like. Swap out the hummus flavor, your favorite veggies or even add some additional protein, like some grilled chicken.

Hummus and Roasted Veggie Flatbread Pizza  |  Lemon & Mocha

Or just make it with whatever is in your fridge because once you get the thought of a hummus pizza in your head nothing will matter until you are blissfully taking bites of the warm and crispy hummus-slathered flatbread.

Hummus and Roasted Veggie Flatbread Pizza  |  Lemon & Mocha

I found these new pre-made rectangular pizza crusts at Trader Joe’s. They were giving out samples of them covered in pesto and gooey mozzarella so of course I got a few to stock up. They were super long so I cut them in half and popped them in my freezer. I would definitely recommend them, although naan bread, pita bread or any other type of pre-made flatbread would work well for this hummus pizza.

Hummus and Roasted Veggie Flatbread Pizza  |  Lemon & Mocha

One key recipe step that I want to point out is that you have to spread the hummus on the pizza before putting the flatbread in the oven. Hummus spread on a warm pita is one thing, but hummus baked on a pizza crust is an entirely different experience. The hummus gets warm and bakes onto the crust. So good! Have you ever had a hummus pizza?

Hummus and Roasted Veggie Flatbread Pizza  |  Lemon & Mocha

Hummus and Roasted Veggie Flatbread Pizza
 
Yield: 2 personal sized flatbreads
Ingredients
  • 1½ cups small broccoli florets
  • 1 zucchini, sliced into rounds then halved
  • Cooking spray
  • Salt, pepper, garlic powder, Italian seasoning
  • 2 flatbreads, about 8” by 6” each
  • ½ cup hummus
  • ¼ cup shredded raw beets
  • 2 ounces goat cheese crumbles
Directions
  1. Preheat oven to 400 degrees F. Line a baking sheet with nonstick aluminum foil or parchment paper. Place the broccoli florets and zucchini pieces in a single layer on the baking sheet. Lightly spray with cooking spray. Season the veggies with salt, ground black pepper, garlic powder and Italian seasoning. Roast for 20 minutes, or until tender and lightly charred.
  2. Divide the hummus between the 2 flatbreads and spread in an even layer. Divide the roasted veggies, raw beets and goat cheese crumbles between the flatbreads. Bake at 400 degrees for 5-7 minutes, or toast in your toaster oven, until the flatbread is warm and the goat cheese is slightly melted.


Caramelized Onion Hummus

Caramelized Onion Hummus  |  Lemon & Mocha

I hope you all had a great weekend! Mine was unusually event-packed with a Kelly Clarkson concert, skiing and a Shin Lim show, who was the magician who won last season of America’s Got Talent. He also won the most recent America’s Got Talent Championship season, which I didn’t watch, but it was apparently a mix of returning winners and runner-ups. Anyways, Shin Lim does close-up magic and if you haven’t seen him perform before you should go watch some clips of him on YouTube. Seeing it in person was even crazier; every trick literally left me speechless, except for “How did he do that?!”

Caramelized Onion Hummus  |  Lemon & Mocha

This Caramelized Onion Hummus might be not quite as mind-blowing, but it’s still crazy delicious. We all have those times where you get a product at the grocery store and are instantly hooked. That was what Wegman’s Caramelized Onion Hummus was for Matt and me.

Caramelized Onion Hummus  |  Lemon & Mocha

After buying it a few weeks in a row I decided to recreate it at home, especially since I was planning on making caramelized onions for the Barbecue Meatloaf Sandwiches. Caramelized onions add a whole level of richness and sweetness to hummus.

Caramelized Onion Hummus  |  Lemon & Mocha

The hummus is really creamy and gets just the right amount of acidity from some lemon juice and apple cider vinegar. I served the hummus topped with caramelized onions, crispy chickpeas and some Everything But the Bagel Seasoning from Trader Joe’s to add some extra savory flavor. We ate ours with pita chips and veggie slices, but I also love hummus spread on sandwiches or in a salad.

Caramelized Onion Hummus  |  Lemon & Mocha

I tried something new with the hummus this time as well and it turned out so good that I’ll be sharing it with you on Wednesday! And so good that I made it three nights in a row last week for Matt and I to snack on before dinner. So stay tuned!

Caramelized Onion Hummus  |  Lemon & Mocha

Caramelized Onion Hummus
 
Ingredients
  • 1⅓ cup caramelized onions
  • 1 15-ounce can of chickpeas, drained and rinsed
  • 1 clove garlic
  • ⅓ cup tahini
  • ⅓ cup olive oil
  • 1 teaspoon lemon juice
  • ½ teaspoon apple cider vinegar
  • ½ teaspoon salt
Directions
  1. Blend everything together in a food processor until smooth and creamy. Top with caramelized onions, roasted chickpeas and everything but the bagel seasoning before serving.

 
Caramelized Onions
 
Ingredients
  • 4 medium onions, halved then sliced
  • 1 tablespoon plus 1 teaspoon olive oil
  • Salt
Directions
  1. Heat the oil in a large saucepan over medium-low heat. Add the onion slices then toss to coat. Season with salt. Cook the onions, stirring every few minutes for 35-40 minutes. Towards the last 20 minutes if they start getting burnt in spots add a little more water (no more than a tablespoon at a time). If you want them really caramelized, you can continue cooking for an additional 10 minutes, but you will want to stir very frequently to make sure they don’t burn. Remove from the heat when done.


Chocolate Tahini Banana “Soft Serve”

Chocolate Tahini Banana Soft Serve  |  Lemon & Mocha

Happy Friday, everyone! Today I’m sharing a chocolate-packed tasty treat with you all. This Chocolate Tahini Banana “Soft Serve” is creamy, smooth and topped with a quick chocolate magic shell. If the magic shell sounds familiar it’s because that’s what I used to top the Pistachio Semifreddo I posted last summer. It’s no secret that I love using tahini in the kitchen. I use it to make hummus, turn it into a dressing and drizzle it over lettuce wraps. However, I had only ever used it savory dishes and lately I’ve seen a lot of sweet recipes popping up with tahini listed as an ingredient.

Chocolate Tahini Banana Soft Serve  |  Lemon & Mocha

At first I thought using tahini in a sweet recipe sounded really strange. But then when I thought about it more, tahini is very similar to peanut butter. They’re both creamy, nutty and rich in flavor. Considering I love peanut butter in sweet desserts, it’s not too much of a stretch to think I might also enjoy tahini swapped in. Clearly, since I’m posting this recipe now, the verdict is that I enjoyed it very, very much!

Chocolate Tahini Banana Soft Serve  |  Lemon & Mocha

I swirled it into my chocolate banana “soft serve” and drizzled a little more on top for good measure. Have you ever had banana “soft serve?” I’ve also heard it called nice cream. There’s probably many different ways it’s described, but I think of it as a dessert smoothie bowl without the yogurt. It has the texture of partially melted ice cream and thanks to the cocoa powder it’s super chocolatey. You make it by blending frozen bananas, which bring the sweetness and that semi-frozen texture.

Chocolate Tahini Banana Soft Serve  |  Lemon & Mocha

I added frozen cauliflower florets as an experiment and it was a big success! It didn’t change the flavor at all, but secretly added some veggies to this sweet treat. The creamy tahini added the right amount of nuttiness, which pairs so well with chocolate and banana. Of course it wouldn’t truly be a chocolate treat if I didn’t find a way to add chocolate on top of my chocolate so I drizzled some magic shell on top. You can make magic shell by melting chocolate chips with coconut oil then drizzling over something cold, like this Chocolate Tahini Banana “Soft Serve,” which makes it harden into fun chocolate swirls that you can crack with your spoon and eat with each bite.

Chocolate Tahini Banana Soft Serve  |  Lemon & Mocha

I love making this when I want to eat some dessert, but I don’t already have anything made. A few bursts in my high-speed blender and it’s time to eat!

Chocolate Tahini Banana Soft Serve  |  Lemon & Mocha

Chocolate Tahini Banana "Soft Serve"
 
Yield: 2 servings
Ingredients
  • 1½ cups frozen ripe banana slices (about 1½ bananas)
  • 1 cup frozen cauliflower florets
  • 3 tablespoons cocoa powder
  • 1 tablespoon agave
  • 1 teaspoon vanilla
  • 2 tablespoons chocolate chips
  • ½ teaspoon coconut oil
  • Sliced bananas and tahini, for topping
Directions
  1. Add the frozen banana slices, cauliflower florets, cocoa powder, agave and vanilla to a high-speed blender. Blend until smooth. Taste for sweetness and add more agave if needed. Divide the mixture between 2 bowls.
  2. Melt the chocolate chips and the coconut oil in a microwave safe bowl. Microwave for 30 seconds, then stir. Continue to microwave for 15 second increments, stirring after each, until melted and smooth. Carefully drizzle over the “soft serve” to harden and top with banana slices and a tahini drizzle.
Notes
I've also made this using 88 Acres Watermelon Seed Butter instead of tahini using a 1-1 substitution.


Parmesan Crusted Brussels Sprouts

Parmesan Crusted Brussels Sprouts  |  Lemon & Mocha

Sometimes a dish is so incredibly simple you’re shocked you didn’t think of it before. That’s how I felt with these Parmesan Crusted Brussels Sprouts. Grating some fresh Parmesan over roasted Brussels sprouts wasn’t something new for me, but grating it before baking the Brussels so they each get a crispy Parmesan cheese skirt? Genius!

Parmesan Crusted Brussels Sprouts  |  Lemon & Mocha

If you’ve never heard of a cheese skirt it’s usually in reference to a burger and it’s when the cheese oozes out the side and gets crispy on the pan or griddle. Apparently a burger restaurant from California, Squeeze Burger, is the originator of the phrase. I like using it for all situations involving melted cheese that gets crispy including these Brussels sprouts.

Parmesan Crusted Brussels Sprouts  |  Lemon & Mocha

I’m not sure where the idea for this quick side dish came from since I found “grate Parmesan on baking sheet before roasting Brussels” as a note in my phone. It could have been something I was watching on TV or something I saw in a magazine, but either way I’m so glad I finally listened to my phone note. I never liked Brussels sprouts growing up, but that’s because I had only ever had them steamed whole. Please promise to never, ever serve your kids steamed whole Brussels sprouts! Especially when you can make these tender, crispy and cheesy roasted Brussels sprouts in twenty minutes.

Parmesan Crusted Brussels Sprouts  |  Lemon & Mocha

If you’re looking for more Brussels sprouts recipes I’ve also posted these citrus Orange Glazed Brussels Sprouts and the decadent Roasted Brussels Sprouts with Pomegranate Molasses and Vanilla Pecan Butter. It’s impossible to pick a favorite because they all are so different and I promise none of them will scare your children away from Brussels sprouts for life. Are you a Brussels sprouts fan? What’s your favorite way to eat them?

Parmesan Crusted Brussels Sprouts  |  Lemon & Mocha

Parmesan Crusted Brussels Sprouts
 
Yield: 4 servings
Ingredients
  • Cooking spray
  • ½ cup fresh grated Parmesan
  • 1 pound Brussels sprouts, trimmed, dark leaves removed and cut in half
  • 1 tablespoon olive oil
  • ½ teaspoon garlic powder
  • ¼ teaspoon ground black pepper
  • ⅛ teaspoon salt
Directions
  1. Preheat oven to 400 degrees F.
  2. Line a quarter sheet sheet with parchment paper. Lightly spray with cooking spray then sprinkle the Parmesan cheese over top.
  3. Toss the Brussels sprouts with the olive oil in a mixing bowl to coat then toss with the garlic powder, pepper and salt. Place the Brussels sprouts cut side down on the Parmesan cheese. Bake for 18-20 minutes, or until the Brussels and tender and crispy.