Recipes

Frozen Peanut Butter Banana Pie

Frozen Peanut Butter Banana Pie  |  Lemon & Mocha

How is it already the end of August? I feel like I say this every summer, but this has definitely been the quickest one yet. The past three months have been a complete whirlwind, but of course there was plenty of time for epic desserts.

Frozen Peanut Butter Banana Pie  |  Lemon & Mocha

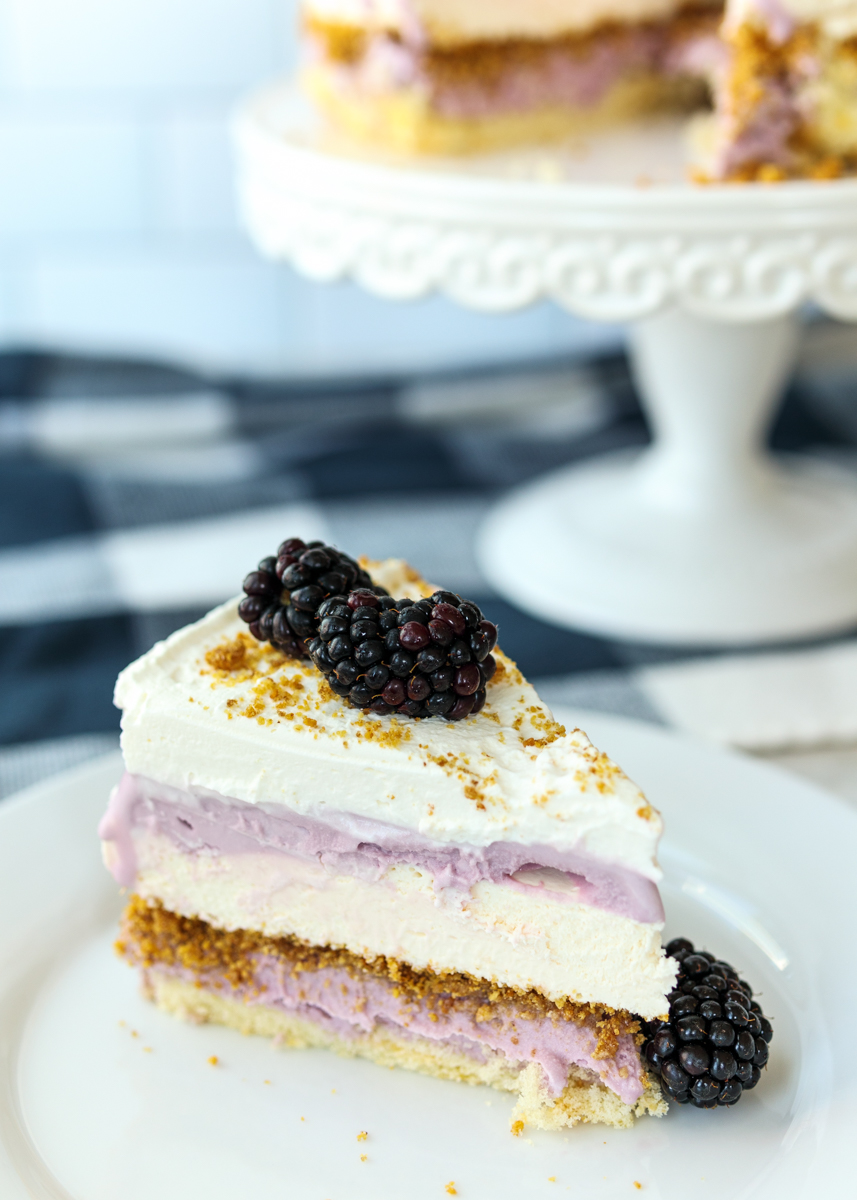
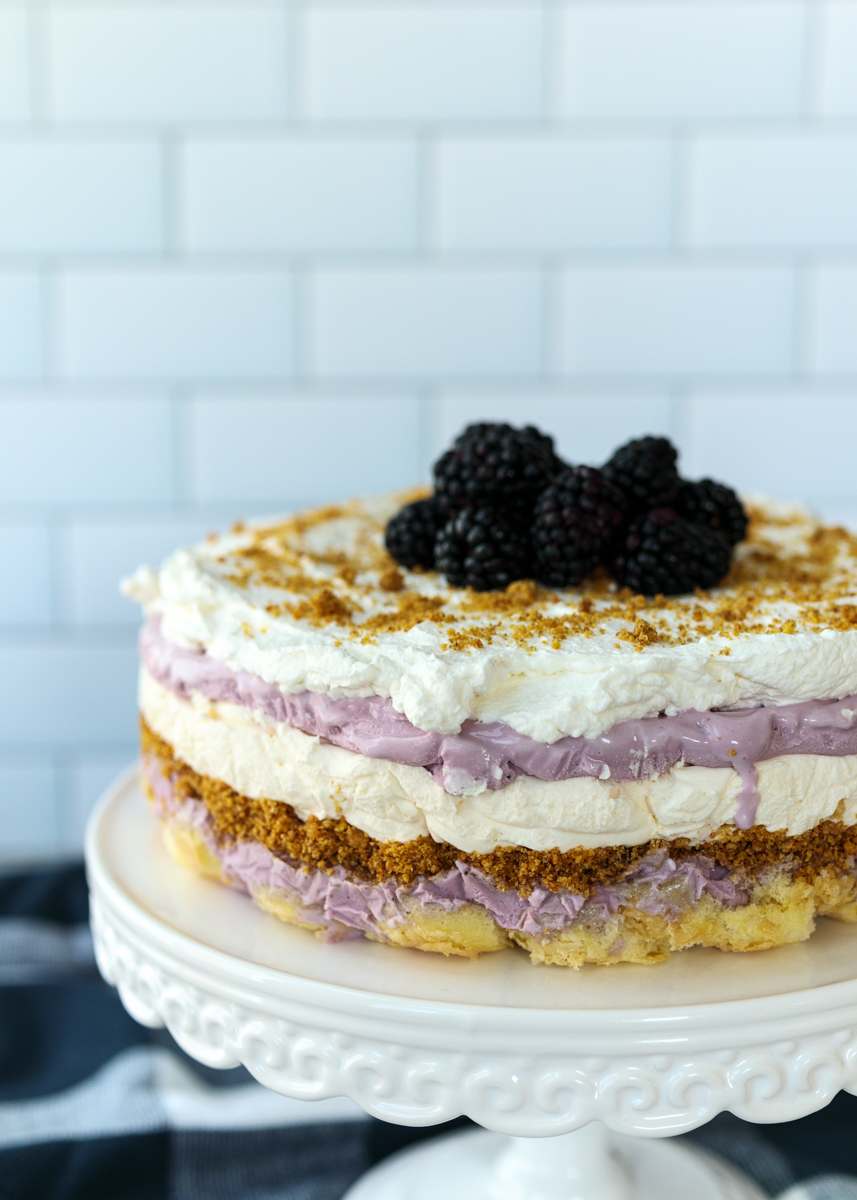
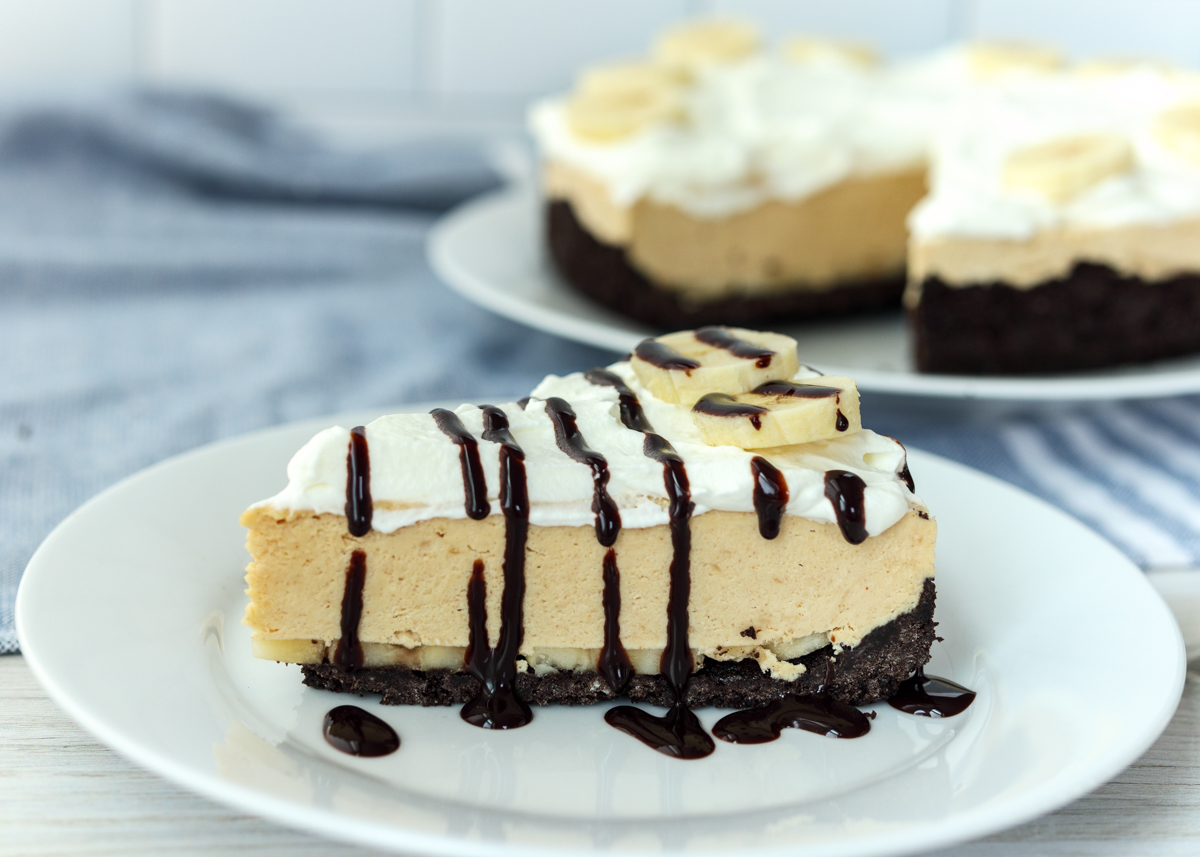
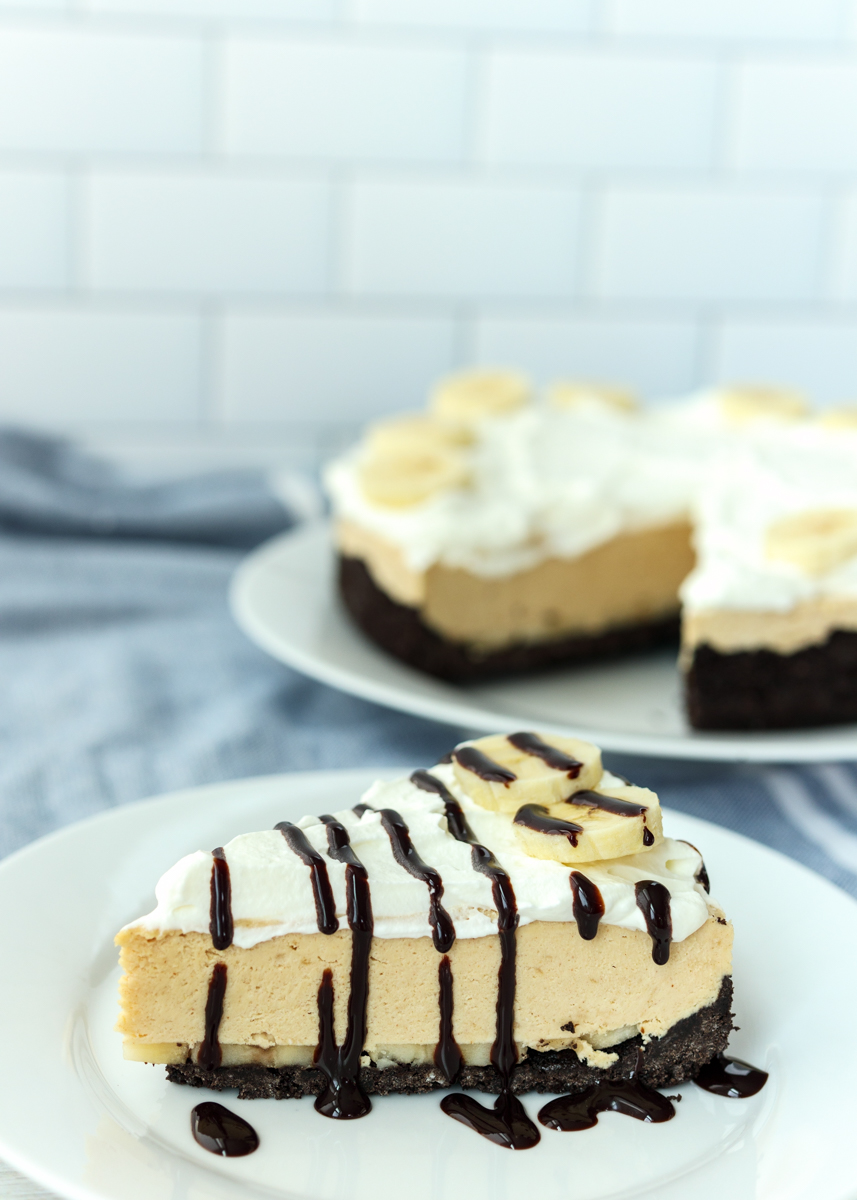
It would be impossible to pick a favorite, but this Frozen Peanut Butter Banana Pie that I’m sneaking in right at the end here would definitely be a contender. There’s been a lot of dessert making going on in our house so I was hesitant to load Matt and I up with even more, but I couldn’t let the summer go by without sharing this outrageous Frozen Peanut Butter Banana Pie I discovered about six months ago from my Sally’s Baking Addiction cookbook.

Frozen Peanut Butter Banana Pie  |  Lemon & Mocha

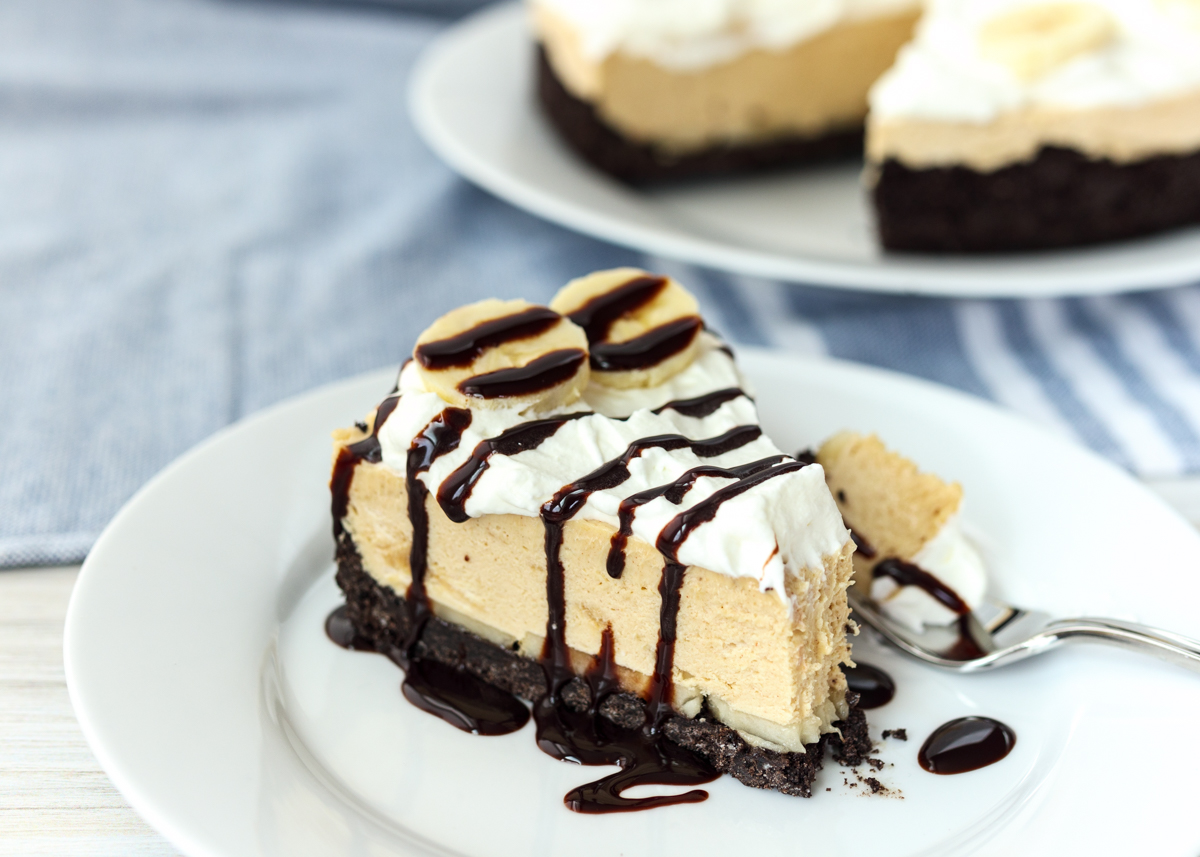
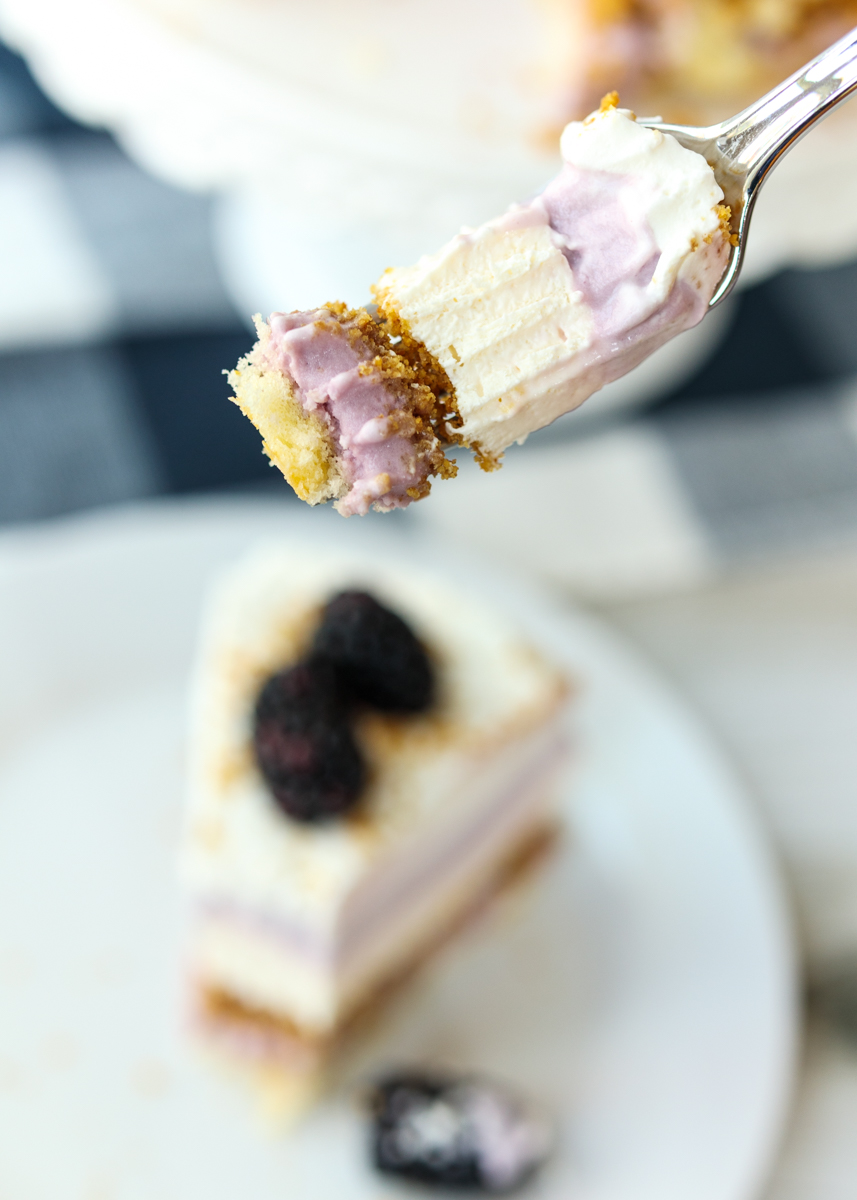
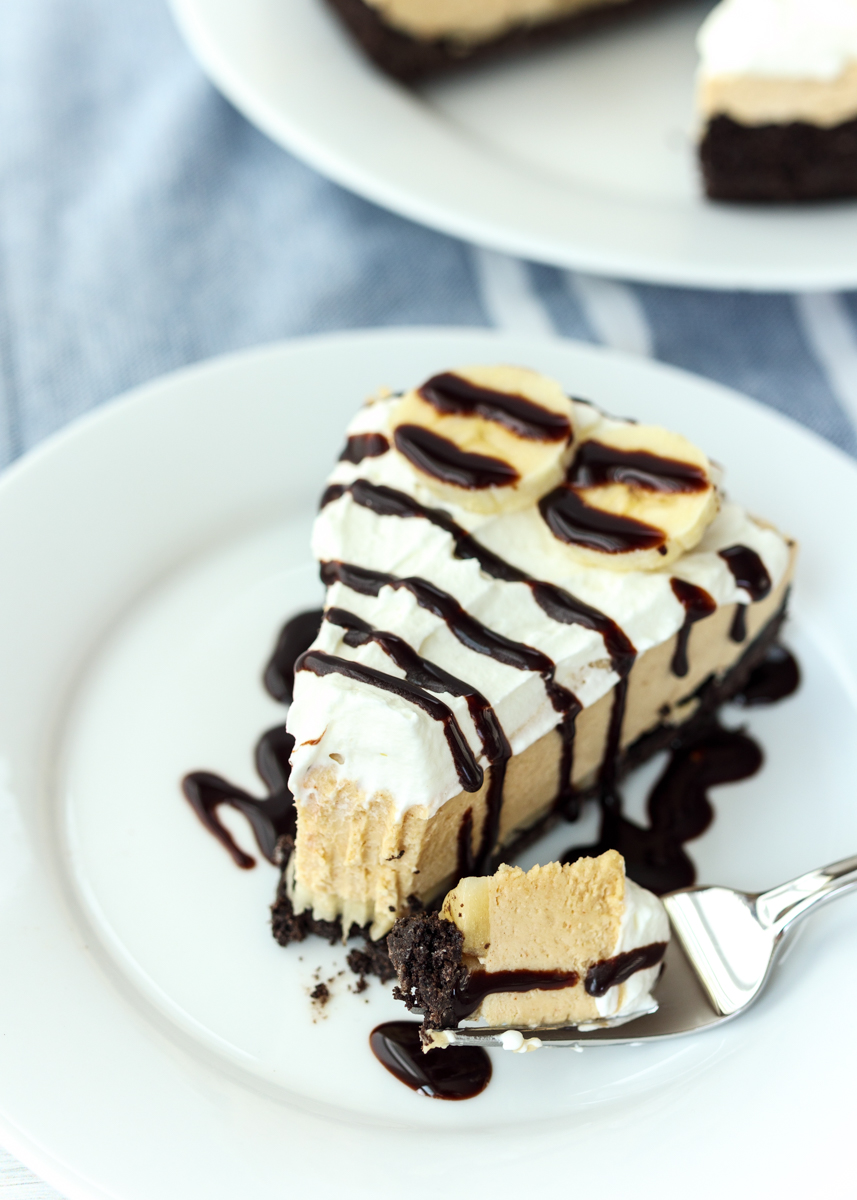
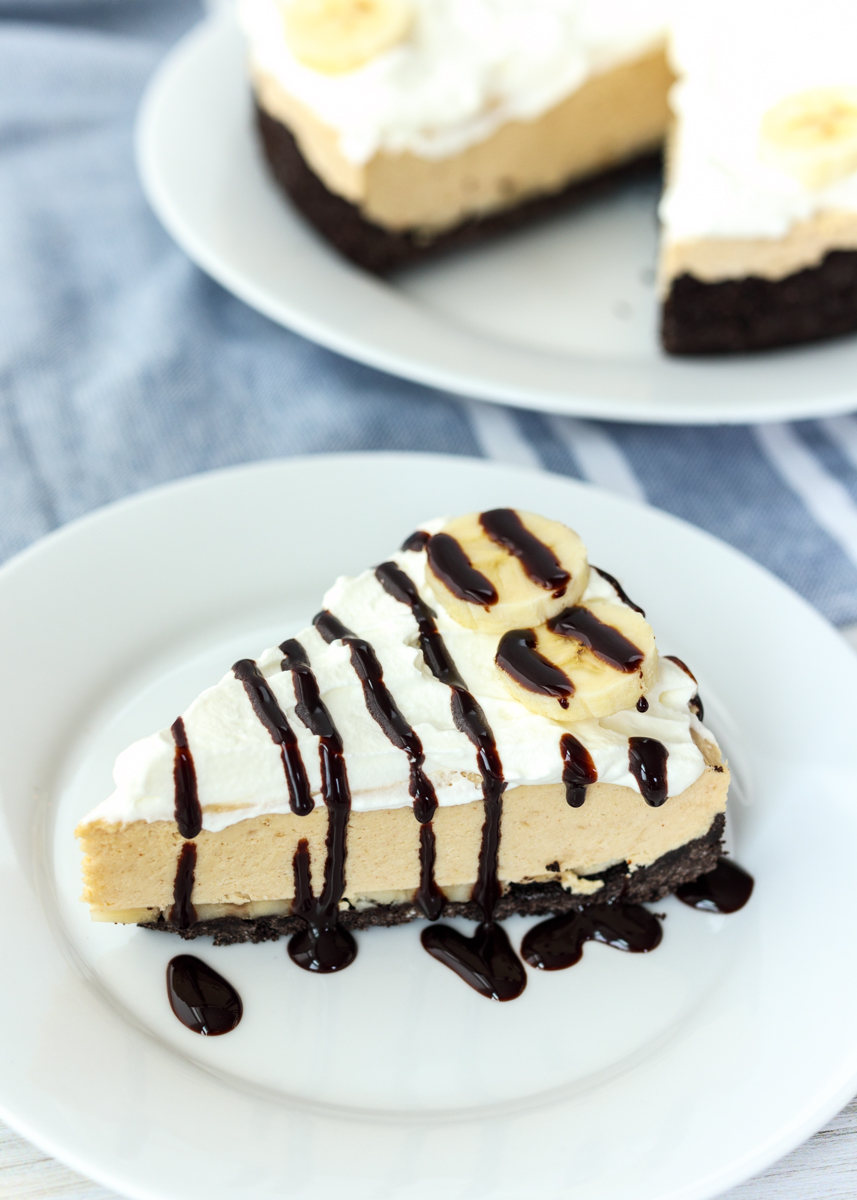
The base of this no-bake pie is a classic Oreo crust because the only thing better than peanut butter is chocolate and peanut butter. Then there’s a layer of fresh banana slices that get covered with a creamy peanut butter filling. The whole pie is frozen and topped with fresh whipped cream so that each bite is light and balanced.

Frozen Peanut Butter Banana Pie  |  Lemon & Mocha

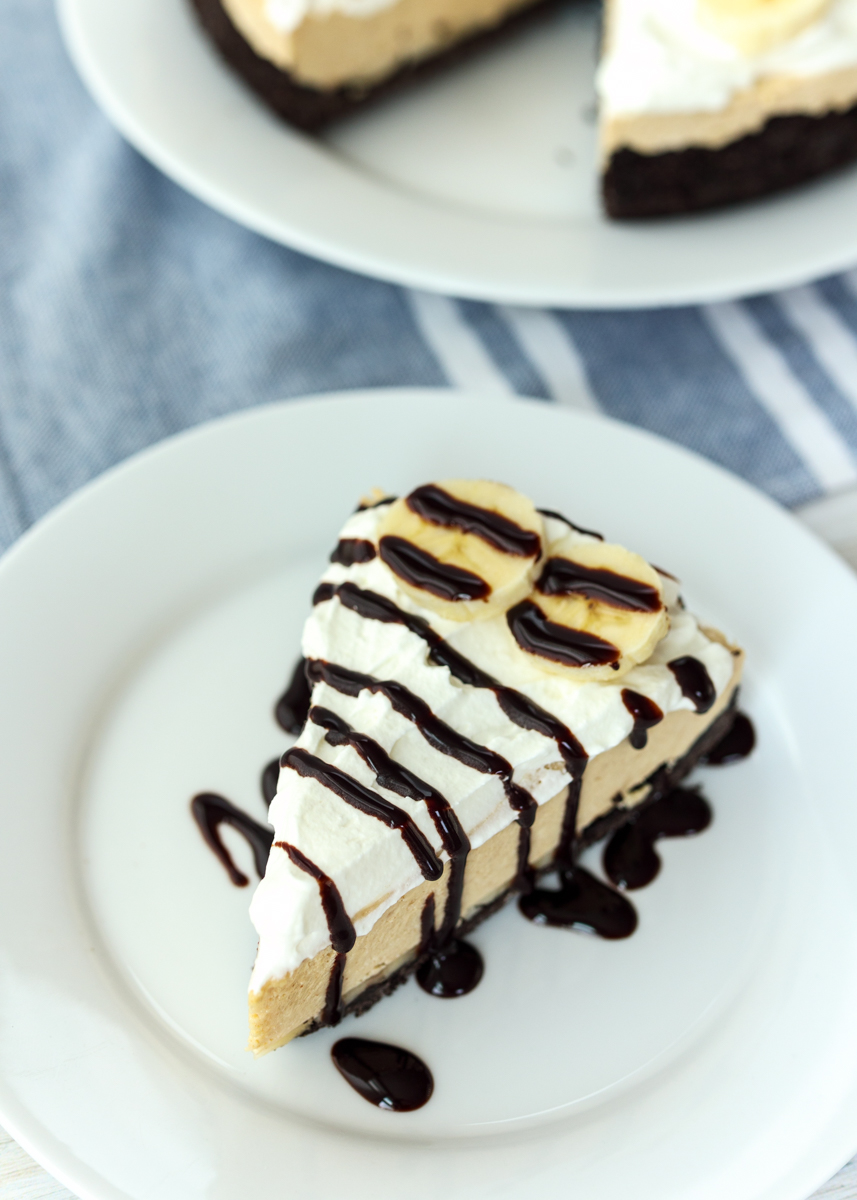
I’ve always loved bananas, but other than banana splits I hadn’t really eaten too many desserts incorporating banana. This Frozen Peanut Butter Banana Pie has the perfect amount of banana flavor. It’s secondary to the peanut butter and chocolate Oreos and adds a great freshness to the pie.

Frozen Peanut Butter Banana Pie  |  Lemon & Mocha

As with most no-bake pies, this one is incredibly easy to make, which is both a great thing and a dangerous thing. You’ve been warned! Enjoy!

Frozen Peanut Butter Banana Pie  |  Lemon & Mocha

Frozen Peanut Butter Banana Pie
 
Yield: 8-10 servings
Ingredients
  • 28 Oreo cookies, crushed into crumbs (do not remove cream filling)
  • 5 tablespoons unsalted butter, melted
  • ¼ teaspoon salt
  • 2 large bananas, thinly sliced, plus more for decoration if desired
  • 2 cups heavy cream, divided
  • 8 ounces full-fat cream cheese
  • 1 cup creamy peanut butter (not natural peanut butter)
  • ½ cup granulated sugar
  • 1 tablespoon plus ¾ teaspoon vanilla extract, divided
  • ½ cup powdered sugar
Directions
  1. Make the base of the pie. In a medium mixing bowl, combine the Oreo crumbs with the melted butter and salt. Use the flat bottom of a measuring cup and your fingers to press the mixture into the bottom and up the sides of a 9-inch springform pan. Place the banana slices in an even layer on the bottom of the crust and set aside.
  2. Make the filling. Place a metal mixing bowl or the metal bowl of a stand mixer in the freezer along with the metal beaters or beater for 5-10 minutes. Remove and add 1 cup of the heavy cream (make sure your cream is cold) and beat on high speed until stiff peaks form, about 4-5 minutes.
  3. In the bowl of a stand mixer or in a large bowl with a hand-held mixer, use the paddle attachment to beat the cream cheese and peanut butter together until creamy and smooth. Add the granulated sugar and 1 tablespoon of the vanilla extract then beat until combined. Use a spatula and gently fold in the whipped cream from the previous step. Spread the peanut butter filling into the springform pan on top of the banana slices.
  4. Make the whipped cream. Place the metal mixing bowl or the metal bowl of a stand mixer back in the freezer along with the metal beaters or beater for 5-10 minutes. Remove and add the remaining cup of the heavy cream (make sure your cream is cold), powdered sugar and the remaining ¾ teaspoon of vanilla extract. Beat on medium-high until stiff peaks form. Spoon over the top of the pie, cover and freeze until firm, about 6 hours. Let pie sit at room temperature for 10 minutes before serving and top with additional banana slices if desired.

Recipe adapted from Sally’s Baking Addiction.
Some of the links above are affiliate links, which means I may receive a small commission for my referral. This does not affect the retail cost of the item. Thank you for supporting Lemon & Mocha!

Cheesy Broccoli Stuffed Chicken

Cheesy Broccoli Stuffed Chicken  |  Lemon & Mocha

Do you have one specific protein that you eat a lot at your house? For us it’s chicken, much to Matt’s dismay. Not that he doesn’t like it, it’s just that we do have it for dinner a lot.

Cheesy Broccoli Stuffed Chicken  |  Lemon & Mocha

Unless I’m cooking a specific recipe I tend to gravitate towards chicken. It’s healthy, fairly inexpensive and versatile. Since it’s easy to get stuck in the baked chicken rut I’m always on the lookout for new chicken recipes.

Cheesy Broccoli Stuffed Chicken  |  Lemon & Mocha

When I saw this Cheesy Broccoli Stuffed Chicken in my Food Network Magazine binder I figured it was worth a shot since it combined two of our dinner go-tos: chicken and broccoli. The cheesiness in this chicken comes from the garlic and herb cheese spread. Love that stuff! You can use Boursin; I usually use Alouette.

Cheesy Broccoli Stuffed Chicken  |  Lemon & Mocha

I’ve never stuffed a chicken by cutting slits in the top, but it worked really well. The chicken stayed nice and moist while the cheesy broccoli filling got a little crisped on the top parts.

Cheesy Broccoli Stuffed Chicken  |  Lemon & Mocha

Serve this Cheesy Broccoli Stuffed Chicken alongside some roasted veggies and potatoes or some salad and rice for a perfect dinner meal!

Cheesy Broccoli Stuffed Chicken  |  Lemon & Mocha

Cheesy Broccoli Stuffed Chicken
 
Yield: 4 servings
Ingredients
  • 1 cup finely chopped broccoli florets and stalks
  • ⅓ cup garlic and herb cheese spread (such as Boursin or Alouette)
  • ½ teaspoon lemon zest
  • 1 tablespoon olive oil, divided
  • 4 small skinless boneless chicken breasts (6-8 ounces each)
  • ½ teaspoon paprika
  • Salt and pepper
Directions
  1. Preheat the oven to 450 degrees F. Line a baking sheet with nonstick aluminum foil and set aside.
  2. In a small bowl, combine the broccoli, cheese spread, lemon zest and 1 teaspoon of the olive oil. Season with salt and pepper.
  3. Place the chicken breasts on the prepared baking sheet. Cut 3 deep slits into the top of each chicken breast, being sure not to cut all the way through. Drizzle the chicken with the remaining 2 teaspoons of olive oil then season with the paprika, salt and pepper. Use a spoon to stuff the broccoli mixture into the slits of the chicken. Cook the chicken in the oven until it registers 165 degrees F, about 13-15 minutes.

 Recipe from Food Network Magazine.

Some of the links above are affiliate links, which means I may receive a small commission for my referral. This does not affect the retail cost of the item. Thank you for supporting Lemon & Mocha!

Creamy Corn Pasta with Basil

Creamy Corn Pasta with Basil  |  Lemon & Mocha

Sometimes I see a recipe shared on Instagram and I need to make it instantly. That’s what happened with this Creamy Corn Pasta with Basil. The NY Times Cooking account shared a photo of this summery and fresh pasta dish and revealed the most intriguing part: there is no cream in this luscious dish, just pureed corn.

Creamy Corn Pasta with Basil  |  Lemon & Mocha

I’ve shared a bunch of recipes here that have been very successful using pureed cauliflower instead of cream so I was excited to try a similar technique with corn. Matt and I were blown away when we tried this Creamy Corn Pasta with Basil!

Creamy Corn Pasta with Basil  |  Lemon & Mocha

The dish uses such simple ingredients, but it’s packed with flavor giving it that can’t-stop-eating-it quality. Unlike using pureed cauliflower to get the cream texture without the cauliflower flavor, pureeing part of the sautéed corn amplified the corn flavor so that sweet corn taste is really coating every single farfalle noodle.

Creamy Corn Pasta with Basil  |  Lemon & Mocha

Zucchini and corn is a classic summer pairing so I included some sautéed zucchini to add some more veggies and texture to the dish. Additional ingredients, such as the fresh basil, parsley, Parmesan and jalapeño really make the pasta pop.

Creamy Corn Pasta with Basil  |  Lemon & Mocha

I’m so excited I didn’t wait around to make this Creamy Corn Pasta with Basil so now I can make it again and again. I hope you all make this one soon!

Creamy Corn Pasta with Basil  |  Lemon & Mocha

Creamy Corn Pasta with Basil
 
Yield: 3 servings
Ingredients
  • 12 ounces orecchiette or farfalle
  • 1 tablespoon olive oil, plus more for drizzling
  • 6-8 scallions, trimmed and thinly sliced (keep the whites and greens separate)
  • 2 large ears of corn, shucked and kernels removed (about 2 cups kernels)
  • ¼ teaspoon ground black pepper
  • ¼ teaspoon salt
  • 3 tablespoons unsalted butter
  • 1 zucchini, halved lengthwise then cut into half-moon rounds
  • ½ cup grated fresh Parmesan cheese, plus more for serving
  • ⅓ cup roughly chopped basil, plus more for serving
  • ¼ teaspoon red pepper flakes, or to taste
Directions
  1. Cook pasta to al dente, according to the package directions. Drain, making sure to reserve ½ cup of pasta water.
  2. Meanwhile, heat the olive oil over medium heat in a large sauté pan. Add the whites of the scallions, season with salt, and cook for 3 minutes. Add all the corn except keep ¼ cup of the corn aside and add ¼ cup water. Let simmer for 3-5 minutes. Add the pepper and salt then transfer to a blender (or blend with an immersion blender) and puree until smooth.
  3. Return the sauté pan to medium-high heat to melt the butter. Add the zucchini and cook for 3 minutes, stirring occasionally. Add the remaining ¼ cup of corn kernels, season with salt and pepper, and cook for 1-2 minutes. Add the corn puree and cook for 30 seconds.
  4. Reduce the heat to medium and add the cooked pasta and reserved pasta water. Toss to coat and cook for 1 minute then add almost all the scallion greens and Parmesan. Season with red pepper flakes and additional salt and pepper to taste. Serve the pasta hot garnished with a little drizzle of olive oil, chopped scallion greens and Parmesan.

Recipe slightly adapted from NY Times.

Cornbread Cheddar Waffles with Scrambled Eggs

Cornbread Cheddar Waffles with Scrambled Eggs  |  Lemon & Mocha

Tomorrow is National Waffle Day! I know I’ve been mentioning a lot of these national food holidays around here, but it’s hard to ignore a day that celebrates waffles!

Cornbread Cheddar Waffles with Scrambled Eggs  |  Lemon & Mocha

Waffles hold a special place in my heart because a) they are delicious, b) they remind me of breakfasts with my Dad and, c) they make me think of Shrek, which seeing that in theaters is a whole other classic family memory that I won’t get into right now.

Cornbread Cheddar Waffles with Scrambled Eggs  |  Lemon & Mocha

Waffles are usually sweet and if that’s what you’re in the mood for I have my Triple Berry Waffles and Churro Waffles with Raspberry Sauce recipes posted on the blog. However, savory waffles are equally as delicious, as I discovered with my eggs benedict cheddar scallion waffles. Since I’ve been busy making a lot of dessert recipes lately I figured Matt and I should celebrate National Waffle Day with something savory. I dug into my Food Network Magazine binder archives and found the recipe for these Cornbread Cheddar Waffles with Scrambled Eggs from Kelsey Nixon.

Cornbread Cheddar Waffles with Scrambled Eggs  |  Lemon & Mocha

I love the addition of cornmeal in these waffles! It’s so smart and such a perfect way to help waffles cross over into the savory category. I’m even thinking of going back to my eggs benedict waffle recipe and experimenting with adding cornmeal. The cornmeal also adds a nice texture to the waffles. Sharp cheddar gets mixed into the waffle batter as well, although we are setting aside some for the top of the waffle to get all melted and gooey under the scrambled eggs.

Cornbread Cheddar Waffles with Scrambled Eggs  |  Lemon & Mocha

The scrambled eggs are soft with scallions cooked in to give them some extra flavor. I also like to add a little milk or cream cheese when I’m scrambling eggs to keep them moist and fluffy. If you have never had eggs piled high on a savory waffle then you are missing out! What’s your favorite way to eat waffles?

Cornbread Cheddar Waffles with Scrambled Eggs  |  Lemon & Mocha

Cornbread Cheddar Waffles with Scrambled Eggs
 
Yield: 4 servings
Ingredients
  • 1 cup all-purpose flour
  • 1 cup cornmeal
  • 1 tablespoon sugar
  • 1 tablespoon baking powder
  • ½ teaspoon salt
  • 2 cups grated sharp cheddar cheese, divided
  • 10 large eggs
  • 1¼ cups buttermilk (see note)
  • ¼ cup vegetable oil
  • 1 tablespoon milk or cream cheese, optional
  • 1 tablespoon unsalted butter
  • 1 scallion, thinly sliced
  • Salt and pepper
  • Cooking spray
Directions
  1. In a large mixing bowl, sift together the flour, cornmeal, sugar, baking powder and salt. Mix in 1 cup of the cheddar cheese. In a medium mixing bowl, beat 2 of the eggs until small bubbles form. Whisk in the buttermilk and vegetable oil. Add the wet ingredients to the large mixing bowl with the flour and stir until just combined.
  2. Coat waffle iron with cooking spray and preheat. Pour enough batter to fill the waffle iron without it overflowing and cook until golden brown. Repeat with the remaining batter. Place cooked waffles on a wire cooling rack so they don’t get soggy.
  3. When the waffles are almost done, make the scrambled eggs. Whisk the remaining eggs in a large bowl until small bubbles form. Whisk in the milk or cream cheese, if using. Melt the butter in a large nonstick skillet over medium-low heat. Add the beaten eggs and the scallions. Season with salt and pepper. Cook, stir and flip with a spatula until just set. Remove from the heat and cover to keep warm.
  4. When the waffles are done, preheat the broiler. Place the waffles on a baking sheet then scatter the remaining cheddar cheese over top. Broil until the cheese melts, about 1 minute. Remove from the oven and top with the scrambled eggs. Serve warm.

 Recipe from September 2017 issue of Food Network Magazine.

Some of the links above are affiliate links, which means I may receive a small commission for my referral. This does not affect the retail cost of the item. Thank you for supporting Lemon & Mocha!

Black Raspberry and Lemon Cream Pie Ice Cream Cake

Black Raspberry and Lemon Cream Pie Ice Cream Cake  |  Lemon & Mocha

Since I already posted the Classic Ice Cream Cake recipe this summer I wasn’t planning on posting another ice cream cake, but I got the urge to make it so here we are. This right here is a Black Raspberry and Lemon Cream Pie Ice Cream Cake. This cake is my absolute favorite non-chocolate ice cream cake I’ve ever made. It’s fruity, tart, sweet, creamy and so so so good.

Black Raspberry and Lemon Cream Pie Ice Cream Cake  |  Lemon & Mocha

Ice cream cakes are all about the layering so let’s dive in. On the bottom we have a layer of soft lady fingers. You could do a graham cracker layer instead, following directions from the Classic Ice Cream Cake, but I like having a little bit of cake texture with the lemon and black raspberry flavors. Next we have black raspberry ice cream followed by a layer of the Lemon Cream Pie Dip from Monday. The combination of these two together is crazy delicious!

Black Raspberry and Lemon Cream Pie Ice Cream Cake  |  Lemon & Mocha

I also added in a middle layer of graham cracker crunch to give the cake some texture and a little saltiness. Next up, a final layer of black raspberry ice cream and fresh whipped cream. Yum! You could make extra whipped cream and frost the sides, but I went the easier, pile-on-top route this time around.

Black Raspberry and Lemon Cream Pie Ice Cream Cake  |  Lemon & Mocha

I was initially going to try making this in a loaf pan so it would be a small cake. I took one look at all the different components and decided this needed to be full-sized to really get enough of each layer. I’m so glad I did because not having leftovers of this Black Raspberry and Lemon Cream Pie Ice Cream Cake would be a very sad day.

Black Raspberry and Lemon Cream Pie Ice Cream Cake  |  Lemon & Mocha

If you want additional tips for making a perfectly layered ice cream cake, head over to my Classic Ice Cream Cake post. Meanwhile, I’ll be over here trying to convince myself I shouldn’t immediately run out to get everything to make this cake all over again…

Black Raspberry and Lemon Cream Pie Ice Cream Cake  |  Lemon & Mocha

Black Raspberry and Lemon Cream Pie Ice Cream Cake
 
Yield: 8-10 servings
Ingredients
for the lemon cream cheesecake layer
  • 8 ounces cream cheese, softened (see note)
  • ¼ cup powdered sugar
  • 10 ounces lemon curd (usually found near jelly in the grocery store)
  • 8 ounces whipped topping, such as Cool Whip, thawed (see note)
for the ice cream cake
  • 12 soft lady fingers, halved lengthwise
  • 1½ quarts black raspberry ice cream
  • 1 tablespoon unsalted butter
  • 1 cup crushed graham crackers
  • 2 tablespoons brown sugar
  • ½ teaspoon salt
  • 1 cup heavy cream
  • ½ cup powdered sugar
  • ¾ teaspoon vanilla extract
  • Blackberries, for topping
Directions
for the lemon cream cheesecake layer
  1. Beat the cream cheese and powdered sugar in the bowl of a stand mixer or in a large bowl with a hand mixer until fluffy and smooth, about 2 minutes. Add the lemon curd and beat until combined. Gently fold in the whipped topping until blended. Keep in the fridge until ready to use.
for the ice cream cake
  1. Line a 9-inch springform pan with plastic wrap so it goes up and over the sides. I use 2 pieces. Use the lady fingers to make a single layer on the bottom of the pan, pressing down as you add them. You might need to rip some to fill up all the little spots.
  2. Scoop half the container of ice cream into the bowl of a stand mixer then beat with your paddle attachment until smooth and spreadable. Use a rubber spatula to spoon over the lady fingers and spread into an even layer. Put in the freezer.
  3. Melt the butter in a skillet over medium heat. Add the crushed graham crackers and sprinkle the brown sugar over top. Cook for about 5 minutes, until toasted and coated. Toss with the salt and set aside to cool. Once cool, remove the cake from the freezer and sprinkle a single layer of the graham crumbs over top, reserving a little to sprinkle over the finished cake. Use a spatula to spoon 4 cups of the lemon cream cheesecake over top (you will have some leftover) and spread into an even layer. Put in the freezer until just firm, about 1 hour.
  4. When the lemon cream cheesecake layer is firm enough to put on another layer, scoop the remaining half the container of ice cream into the bowl of a stand mixer then beat with your paddle attachment until smooth and spreadable. Use a rubber spatula to spoon over the lemon cream cheese layer and spread into an even layer. Put in the freezer.
  5. Make the whipped cream. Place a metal mixing bowl or the metal bowl of a stand mixer in the freezer along with the metal beaters or beater for 5-10 minutes. Remove and add the heavy cream (make sure your cream is cold), powdered sugar and vanilla. Beat on medium-high until stiff peaks form. Spoon over the top of the cake and return to the freezer for at least 2 hours or overnight. When ready to serve, open the ring of the springform pan. Use the plastic wrap to lift up the cake; carefully remove the plastic wrap and transfer the cake to a cake board or platter. Top with the remaining graham cracker crumble and some fresh blackberries. The cake can usually be cut right out of the freezer with a sharp knife.
Notes
You must use block cream cheese for the lemon cream cheesecake layer. You can substitute ⅓ less fat block cream cheese if you prefer.
If you want to use homemade whipped cream for the lemon cream cheesecake layer, follow these instructions: In a cold metal bowl of a stand mixer or in a large cold metal mixing bowl with a hand mixer, use cold beaters to beat 1½ cups cold heavy whipping cream, ¾ cup powdered sugar and 1 teaspoon vanilla extract until stiff peaks form. Also feel free to substitute Lite Cool Whip.