Main Dishes

Chicken Caesar Salad Meatballs

Chicken Caesar Salad Meatballs  |  Lemon & Mocha

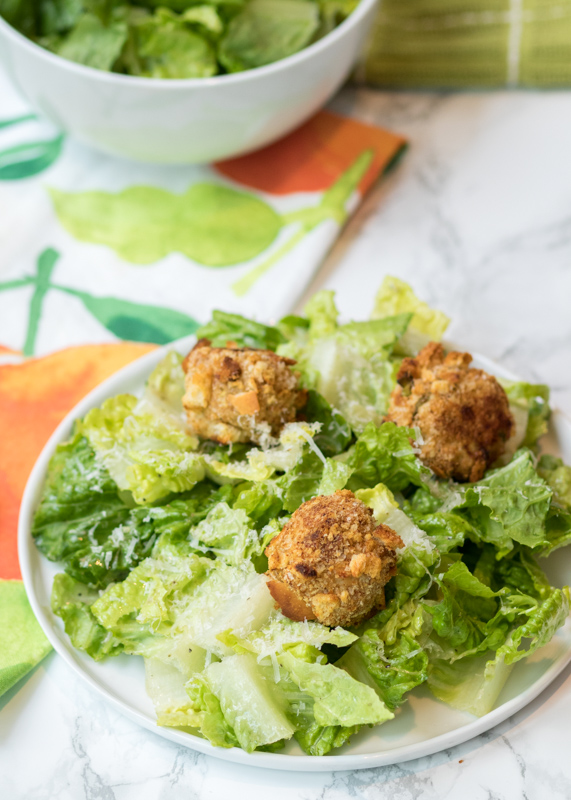
I don’t remember how I stumbled across this recipe, but I am so glad I did. When I first saw it I knew I needed to make it immediately. The whole concept of Chicken Caesar Salad Meatballs is genius! Basically the crunchy chicken meatballs take the place of both the croutons and the protein in this Caesar salad. What?! I know, I’m boggling your mind right now.

Chicken Caesar Salad Meatballs  |  Lemon & Mocha

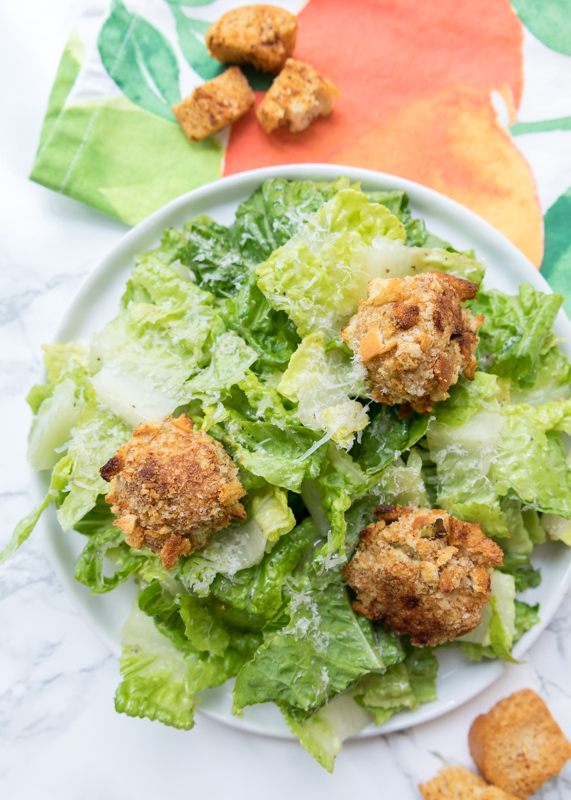
The chicken meatballs are rolled in crushed croutons before they are baked so they are crispy and full of crouton-y goodness. These are anything but ordinary chicken meatballs. In addition to the crispy exterior, the meatballs are loaded with all the makings of a delicious Caesar salad. Instead of breadcrumbs we use more crushed croutons and instead of egg or oil we use Caesar dressing. There’s also Parmesan and scallions involved.

Chicken Caesar Salad Meatballs  |  Lemon & Mocha

If you can’t find ground chicken you can use ground turkey instead. I’ve made it both ways numerous times and it’s always delicious. If you want to talk about a tried and true recipe, this is it. I’ve been making this dish regularly since 2009; that’s almost 10 years of Chicken Caesar Salad Meatball perfection! I first made it for my roommates and we all devoured it. After college, it was immediately put on Matt’s and my regular dinner rotation and has stayed that way ever since. I especially love this salad when the weather is warm like this and now that we have a big toaster oven I just make them in there instead of heating up the whole kitchen with the oven.

Chicken Caesar Salad Meatballs  |  Lemon & Mocha

If you’re having leftovers you can eat them cold, but I always heat the meatballs a little before putting them on top of the salad so you get a nice mix of the warm crunchy meatballs and the cold Caesar salad. Since you are using crouton crumbs both in the meatball and on the outside tasty croutons are key for this recipe. I love the Trader Joe’s cheese and garlic croutons. They are so addictive! When I crush the croutons I like to keep a few bigger chunks since they add to the texture of the crispy outside. You might have noticed from the photos, but the Caesar dressing I usually use isn’t the thick and creamy one you normally see, although you can certainly use that. These were made with the Trader Joe’s Caesar dressing, which is a more oil-based Caesar dressing. Either way, I know they will be delicious!

Chicken Caesar Salad Meatballs  |  Lemon & Mocha

Chicken Caesar Salad Meatballs
 
Yield: 4 servings
Ingredients
for the chicken caesar meatballs
  • 1 lb lean ground chicken
  • 1⅓ cup crushed croutons, divided
  • ⅓ cup grated parmesan cheese
  • 3 tablespoons caesar dressing
  • 2 scallions, sliced
  • ⅛ teaspoon salt
  • ⅛ teaspoon ground black pepper
for the salad
  • Romaine lettuce
  • Caesar dressing
  • Additional fresh grated Parmesan cheese
Directions
for the chicken caesar meatballs
  1. Preheat the oven to 400°F. Line a baking sheet with aluminum foil and coat with cooking spray. Set aside. Place 1 cup of the crushed croutons in a small bowl and set aside.
  2. In a large mixing bowl, combine the ground chicken, the remaining ⅓ cup of the crushed croutons, scallions, parmesan cheese, olive oil, salt and pepper, being sure not to overmix.
  3. Divide the meat mixture into 4 sections. Use each section to roll out 3 chicken meatballs. Roll each meatball in the bowl of crushed croutons before placing on the baking sheet. Repeat until you have 12 chicken meatballs. They are big!
  4. Bake the chicken meatballs for 15 minutes. Turn the meatballs over and bake for another 15 minutes.
  5. While the meatballs are cooking, prepare the caesar salad. Cut and wash the lettuce then toss with the caesar dressing and extra parmesan cheese. I usually plan on 4 cups of romaine lettuce per person. The amount of dressing and additional Parmesan is up to you!
  6. When the chicken meatballs are cooked, let them cool for 5-7 minutes before serving on top of the caesar salad.

Recipe adapted from blog Canaderican, which no longer exists.

Barbecue Chicken Stuffed Sweet Potatoes

Meal Prep Barbecue Chicken Stuffed Sweet Potatoes  |  Lemon & Mocha

I am so excited to share this healthy meal prep lunch with you! It is also great as dinner, but Matt and I love having these Barbecue Chicken Stuffed Sweet Potatoes for make-ahead lunches. Since I usually cook dinner the last thing I want to do is make lunch a big production. Quick and easy are key lunch qualities. I also don’t like having the same salad or sandwich for weeks on end and bonus points if the meal is hot! Something about a hot meal at lunch makes me look forward to it so much more. Anyone else? It’s okay, I’m probably the only weird one.

Meal Prep Barbecue Chicken Stuffed Sweet Potatoes  |  Lemon & Mocha

Although you can certainly use store-bought barbecue sauce to make this even easier, I am obsessed with the quick and tasty barbecue sauce I came up with for these stuffed sweet potatoes. I am always looking for ways to make lunch healthier so I figured a homemade barbecue sauce would be a great way to control the sugar, sodium and preservatives going into this dish.

Meal Prep Barbecue Chicken Stuffed Sweet Potatoes  |  Lemon & Mocha

To make the homemade barbecue sauce, everything is brought to a boil then simmered for fifteen minutes. That’s it! The sweetness comes from molasses and maple syrup so there is no refined sugar involved. Wanting to eliminate refined sugar and reduce sodium is also why I made the bulk of the sauce with tomato paste and water instead of ketchup. Don’t worry, between the added Worcestershire and other seasonings I promise you would never know it isn’t store-bought barbecue sauce. In fact it’s so easy and delicious you will definitely find yourself seeking out recipes that use barbecue sauce just so you can eat some more.

Meal Prep Barbecue Chicken Stuffed Sweet Potatoes  |  Lemon & Mocha

The sweet and tangy barbecue sauce gets tossed in with the shredded chicken before being stuffed into tender roasted sweet potatoes. A little sprinkling of mozzarella cheese and some chopped red onion and you have arrived at lunch perfection. These Barbecue Chicken Stuffed Sweet Potatoes are very filling and keep me stuffed until dinnertime, pun definitely intended. I cannot wait for you to try this recipe, especially the healthy homemade barbecue sauce!

Meal Prep Barbecue Chicken Stuffed Sweet Potatoes  |  Lemon & Mocha

On a side note, I love these new meal prep containers I got on Amazon. They are really secure – Matt commutes to work on public transportation and brings his lunch to work in his bag so they get tossed around and have never spilled. They are a great size for lunches or make-ahead dinners and they are dishwasher safe, which is key in my house. They also are freezer-safe and you can’t see this because I didn’t post a picture of the lid, but they have a little microwave vent at the top. Also, they look awesome for my photos! You can buy them here.

Meal Prep Barbecue Chicken Stuffed Sweet Potatoes  |  Lemon & Mocha

Barbecue Chicken Stuffed Sweet Potatoes
 
Yield: 4 servings
Ingredients
for the barbecue sauce
  • 1 small can tomato paste, about 6 ounces
  • 1 cup water
  • 2 tablespoons apple cider vinegar
  • 4 teaspoons molasses
  • 4 teaspoons Worcestershire sauce
  • 4 teaspoons maple syrup
  • 2 teaspoons dijon mustard
  • 1 teaspoon onion powder
  • 1 teaspoon garlic powder
  • ½ teaspoon paprika
  • ¼ teaspoon salt
  • ¼ teaspoon ground black pepper
for the chicken & sweet potatoes
  • 4 sweet potatoes, scrubbed and dried well
  • 1 pound boneless skinless chicken breasts, cooked and shredded
  • 4 tablespoons shredded cheddar or mozzarella
  • 1½ tablespoons finely chopped red onion
  • Chopped parsley for garnish, optional
Directions
for the barbecue sauce
  1. Combine all the ingredients in a small saucepan. Bring to a boil then reduce to low heat, cover and simmer for 15 minutes, stirring occasionally. Remove from the heat.
for the chicken & sweet potatoes
  1. Preheat the oven to 400 degrees F. Line a small baking pan with nonstick aluminum foil and set aside.
  2. Pierce the sweet potatoes 5-6 times each with a fork. Lightly rub the sweet potatoes with oil (I use olive oil and a paper towel) then bake until tender, about 45 minutes. Let cool slightly before carefully cutting a slit in the top of the potatoes.
  3. Toss the shredded chicken in the small saucepan with the barbecue sauce to coat. Divide the sauced chicken between the four potatoes and stuff in the center. Top each potato with 1 tablespoon of the shredded cheese and some of the red onion and parsley, if using. I cook these for make-ahead meals so the cheese gets melted when I microwave them, but if you are making and eating right away you could toss them under the broiler for a minute or 2 to melt the mozzarella.
Notes
I leave my shredded chicken pretty chunky instead of shredding super fine. It’s less time consuming and I like having larger chunks of chicken so it doesn’t taste like all sauce.

Some of the links above are affiliate links, which means I may receive a small commission for my referral. This does not affect the retail cost of the item. Thank you for supporting Lemon & Mocha!

Hawaiian Barbecue Slow Cooker Pulled Pork

Hawaiian Barbecue Slow Cooker Pulled Pork  |  Lemon & Mocha

Oftentimes I will make a dish that’s really good, but because I have so many different recipes that I want to try I won’t make the dish again for a year or more. This is not one of those times. Even though I’m like a squirrel when it comes to recipes and meal ideas, constantly getting distracted by the next delicious thing, there are a few recipes out there that get our attention so much they end up on our exclusive rotation. This Hawaiian Barbecue Slow Cooker Pulled Pork is on that short list.

Hawaiian Barbecue Slow Cooker Pulled Pork  |  Lemon & Mocha

It’s savory, succulent and sweet. The savory umami-ness of the pork comes from the soy sauce and rich beef broth. The pork is slow cooked with lots of liquid ingredients making it incredibly moist and tender. I love when pork has a little sweetness to it and we get that with the pineapple juice, brown sugar and ketchup.

Hawaiian Barbecue Slow Cooker Pulled Pork  |  Lemon & Mocha

My favorite part about the pork is the thick sauce that gets drizzled on top. After combining the pineapple mixture you pour half over the pork while it cooks, while the other half gets cooked down separately on the stovetop along with some garlic and ginger to make a concentrated savory-sweet explosion of a sauce.

Hawaiian Barbecue Slow Cooker Pulled Pork  |  Lemon & Mocha

Other than being lick-your-fingers delicious, the other reason this Hawaiian Barbecue Slow Cooker Pulled Pork made the list is because it’s very easy to make (hello, slow cooker!) and other than the pork and pineapple juice I always have everything already in my kitchen. Sometimes Matt and I will eat the BBQ pulled pork with the Hawaiian rolls, like in these photos, but usually we will just eat it with the Asian Pineapple Slaw and Grilled Asparagus with Chimichurri sides I’m going to share later this week as our attempt to keep it “low-carb”.

Hawaiian Barbecue Slow Cooker Pulled Pork  |  Lemon & Mocha

We usually get a few nights out of it and then freeze the rest. If you don’t eat pork, I’ve made this with boneless skinless chicken breasts before and it tasted really good. Not as good as the pork, because it’s pork vs a chicken breast, but still good. If you really want to get into the island mood, pair this dish with the Pineapple Mojitos from last week!

Hawaiian Barbecue Slow Cooker Pulled Pork  |  Lemon & Mocha

Hawaiian Barbecue Slow Cooker Pulled Pork
 
Yield: 6 servings
Ingredients
for the dry rub
  • 2 tablespoons brown sugar
  • 1 tablespoon paprika
  • 1 teaspoon salt
  • 1 teaspoon ground black pepper
  • 1 teaspoon ground ginger
for the pulled pork and sauce
  • 1 6-ounce can pineapple juice
  • ⅓ cup beef broth
  • ⅔ cup ketchup
  • ⅓ cup brown sugar
  • 3 tablespoons soy sauce
  • 3 tablespoons hot sauce
  • ½ medium onion, chopped
  • 1 carrot, peeled and chopped
  • 2 ½ pounds boneless pork shoulder or pork butt
  • 2 teaspoons canola oil
  • 1 clove garlic, minced
  • 1 ½ teaspoons grated ginger
  • King Hawaiian rolls for serving, if desired
Directions
for the dry rub
  1. In a small bowl, mix together the brown sugar, paprika, salt, black pepper and ground ginger. Set aside.
for the pulled pork and sauce
  1. In a medium bowl, whisk together the pineapple juice, beef broth, ketchup, brown sugar, soy sauce and hot sauce. Set aside.
  2. Place the chopped onion and carrots in the bottom of the slow cooker. Coat the pork completely with the dry rub and continue to rub it into the pork until it has all been used up. Place the pork on top of the onion and carrots. Pour half of the pineapple juice mixture over the pork. Cover the remaining reserved half and place in the fridge. Cover and slow cook the pork on low for 7-8 hours.
  3. Remove the pork from the slow cooker and place on a large cutting board. The meat should be falling apart. Shred the pork using two forks. Place the pork in a serving bowl or storage container and add a few tablespoons of liquid from the slow cooker, stirring to combine.
  4. Heat the canola oil in a small saucepan over medium heat. Add the minced garlic and grated ginger and sauté for about 2 minutes. Add the other half of the pineapple mixture and stir to combine. Bring to a boil then reduce to low and let simmer for 10 minutes. Remove from the heat and serve drizzled over the pulled pork.

Recipe adapted from Sandra Lee.

Some of the links above are affiliate links, which means I may receive a small commission for my referral. This does not affect the retail cost of the item. Thank you for supporting Lemon & Mocha!

Breakfast Salad Bowls with Grapefruit & Avocado

Breakfast Salad Bowls with Grapefruit & Avocado  |  Lemon & Mocha

I never thought I would see the words breakfast and salad together, unless we were talking about a fruit salad or it was opposite day and breakfast actually meant dinner. However, the day has come and I am not talking about a fruit salad, although there is fruit in this salad, and it is not opposite day, at least the last time I checked. No, today we are legitimately talking about a salad for breakfast. I often find myself stuck in a breakfast rut. Lately it’s been a banana and a Greek yogurt every. single. morning. Anyone else? Then I started seeing breakfast salads popping up all over Instagram. You would think with my salad aversion I would have kept scrolling, but the possibilities for combinations of toppings drew me in. Salads for breakfast are actually awesome and don’t let anyone tell you otherwise!

Breakfast Salad Bowls with Grapefruit & Avocado  |  Lemon & Mocha

Here are three reasons I think salads for breakfast are pretty cool: 1. Salads are quick and easy to make, especially when almost everything is prepped ahead of time. This checks a serious box for weekday breakfast approved.

Breakfast Salad Bowls with Grapefruit & Avocado  |  Lemon & Mocha

2. The topping ideas are endless! If you wake up craving something sweet then you could load it up with some fresh berries. Feeling savory? Throw in some chicken sausage.

Breakfast Salad Bowls with Grapefruit & Avocado  |  Lemon & Mocha

3. This is the most boring reason, but a very important one. I find breakfast to be a hard meal to sneak veggies into and a breakfast salad is a perfect way to get more vegetables into the first meal of the day. For the first Lemon & Mocha breakfast salad bowl I went with a grapefruit and avocado pairing along with a runny egg, of course, because the runny yolk mixed with the dressing takes it to a whole new flavor dimension. The dressing is my favorite quick shallot vinaigrette. It’s flavorful, has the right amount of acid and beautifully complements these breakfast salad bowls.

Breakfast Salad Bowls with Grapefruit & Avocado  |  Lemon & Mocha

Although there are no grains in the photos, when I usually make this dish I add quinoa. I forgot it when I was rushing to take my photos, but it adds some heartiness to the dish and soaks up the yolk really well. Farro or barley would both be good substitutions as well. So, do you think you’re going to try a breakfast salad bowl soon?

Breakfast Salad Bowls with Grapefruit & Avocado  |  Lemon & Mocha

Breakfast Salad Bowls with Grapefruit & Avocado
 
Yield: 4 salads
Ingredients
for the salad
  • 12 cups salad greens
  • 1 grapefruit, segmented and seeds removed
  • 1 avocado, sliced
  • 1 cup cooked quinoa, optional (see note)
  • 4 eggs, poached or fried over-easy
  • 1 teaspoon everything bagel seasoning
for the dressing
  • ¼ cup olive oil
  • 1 tablespoon white wine vinegar
  • 1 tablespoon lemon juice
  • 2 teaspoons honey
  • 1 tablespoon minced shallot
  • Salt and pepper to taste
Directions
for the salad
  1. Place 3 cups of the washed salad greens in 4 shallow bowls. Divide the grapefruit segments, avocado slices and eggs between each bowl. If you are using quinoa add it now. Sprinkle the everything bagel seasoning over the avocado slices. Top with the dressing and enjoy.
for the dressing
  1. Whisk all ingredients together. Salt and pepper according to taste.
Notes
I included the quinoa in the recipe because that was my original vision for this breakfast salad, but I forgot when I made it to take photos - oops! The grains go nicely with the salad, especially to soak up the egg, and make it more filling. If you don’t want to use quinoa, farro or barley would both be good substitutes.


Sweet & Salty Salmon

Sweet & Salty Salmon  |  Lemon & Mocha

I don’t cook salmon often so when I finally do I want it to taste unbelievably good. The main reason we don’t have salmon in our regular rotation is because Matt is not a fan. So anything that can mask the “salmony-ness” as Matt puts it is an instant winner in our house.

Sweet & Salty Salmon  |  Lemon & Mocha

Both Matt and I devoured this Sweet and Salty Salmon. The salmon is marinated and then baked in the marinade, which keeps the fish super moist and tender. The sweet and salty marinade also imparts a ton of flavor on the salmon. The marinade is mostly brown sugar, soy sauce and lime juice. Add in the ginger, jalapeño and cilantro (or parsley if you’re like us and don’t like cilantro), and you have a total Asian-Mexican fusion happening in your kitchen.

Sweet & Salty Salmon  |  Lemon & Mocha

I found this recipe in one of my absolute favorite cookbooks – Pati’s Mexican Table. I bought it on a whim and made seven recipes out of it for Matt’s Mexican food themed birthday weekend last year. You would think with seven recipes there would be at least a couple that were just okay, but every single one was so amazingly delicious. After that, I am fully confident to cook anything from the book and know the dish will be a winner, and this salmon proved that even more for me the other week. I was nervous about buying a Mexican cookbook since I am so intolerant to spicy food, but I have not had any issues. If you are looking for some delicious meals that have a totally different flavor profile than what you are used to cooking I very highly recommend this cookbook. Just like the Mexican Street Corn Pasta Salad, if you remove the seeds and pith from the jalapeño it will not make the marinade spicy. However, still be careful with how you cut the jalapeño or any chili pepper!

Sweet & Salty Salmon  |  Lemon & Mocha

I had an unfortunate incident while making this dish. On photo shoot days I’m so busy cooking and photographing that I don’t have time to sit down and eat so I was multitasking by eating a piece of toast while preparing this marinade. I thought I was being careful about not using my hand that had touched the jalapeño seeds, but I must have switched hands and used my jalapeño hand for the toast. Instant searing pain on the outside of my lip ensued, forcing me to guzzle milk and frantically Google hot pepper burn remedies. This resulted in one so-so solution, which was very carefully washing the outside of my lip with dish soap, and one fantastic solution – peanut butter! I smeared it on my lip and felt instant relief. I also ate some for good measure. I let it sit on my lip for about an hour just to make sure I was in the clear and I was completely pain-free! So, the point of all the dramatics is to be careful when you are using hot peppers, even a mild one like jalapeño. And if you do get a burn, grab that jar of Jif!

Sweet & Salty Salmon  |  Lemon & Mocha

Also, in case you were wondering, these are the seven recipes I made from the cookbook for Matt’s birthday last year! I will be posting the green rice recipe on Wednesday, but let me know in the comments below if there’s another recipe you would like me to make again and post!
– Charred Tomato Salsa (salsa roja)
– Cooked Green Salsa (salsa verde)
– Creamless Cream of Zucchini Soup (crema de calabacita)
– Oaxaca-Style Mushrooms and Cheese Quesadillas
– Blissful Corn Torte
– Creamy Poblano Rajas (rajas con crema)
My Favorite Green Rice (arroz verde)

Sweet & Salty Salmon  |  Lemon & Mocha

Sweet & Salty Salmon
 
Yield: 6 servings
Ingredients
  • 1 cup packed dark brown sugar
  • ½ cup soy sauce
  • ¼ cup lime juice
  • 1 jalapeño, seeds and pith removed, minced
  • 1½ tablespoons grated fresh ginger
  • 1 clove garlic, minced
  • 6 salmon filets, 4-6 ounces each, skin-on
  • 2 tablespoons chopped parsley or cilantro leaves
  • 2 scallions, stems removed and sliced
  • Salt and pepper, to taste
Directions
  1. In a medium saucepan over medium heat, combine the brown sugar, soy sauce, lime juice, jalapeño, ginger, garlic and salt and pepper to taste. Cook for a few minutes while stirring until the brown sugar has dissolved. Remove from the heat and let cool.
  2. In a baking dish large enough for the salmon to be in a single layer, place the salmon then pour the marinade on top. Carefully flip the salmon to completely coat in the marinade before leaving the salmon skin-side down. Cover and refrigerate the salmon for at least 30 minutes or up to 4 hours. Several times while it’s marinating spoon the marinade over the salmon.
  3. Preheat the oven to 375 degrees F. Remove the salmon from the fridge 10 minutes before cooking. Bake the fish for 15-18 minutes or until it flakes easily with a fork. Carefully remove the skin before serving and garnish with the parsley and scallions.

Recipe from Pati’s Mexican Table.

Some of the links above are affiliate links, which means I may receive a small commission for my referral. This does not affect the retail cost of the item. Thank you for supporting Lemon & Mocha!