Pumpkin Pecan Ice Cream Pie

Pumpkin Pecan Ice Cream Pie  |  Lemon & Mocha

Pumpkin Pecan Ice Cream Pie went down in the Lemon & Mocha kitchen and it was as amazing as it sounds (and looks)! When I was brainstorming what desserts I wanted to share for Thanksgiving I knew I was going to make the Pumpkin Cheesecake Trifle, but I wasn’t sure about my second dessert. Usually for Thanksgiving everyone immediately thinks of pie and my pie-loving husband has converted me into a pie fan over the years. I don’t like to share recipes on Lemon & Mocha that I’m not 100% satisfied with and while I have made a bunch of really great tasting pies, I wouldn’t say I’ve perfected them yet. However, there is one type of pie I have perfected, if I say so myself, and that is ice cream pie.

Pumpkin Pecan Ice Cream Pie  |  Lemon & Mocha

I have made many, many ice cream pies over the years and I’ve shared a few on here as well, although not nearly enough! I’ll work that into the schedule for 2019. Graham crust, cookie crust, ganache-topped, candy filled, cake filled – you name it, I’ve whipped it up. I may have even eaten a slice or two. Clearly I’m kidding, many, many slices have been consumed, all in the pursuit of perfection though.

Pumpkin Pecan Ice Cream Pie  |  Lemon & Mocha

This Pumpkin Pecan Ice Cream Pie is a nice break from the traditional Thanksgiving dessert table and the big bonus is that it’s so easy. Like so easy I even waited until the week of Thanksgiving to share it because you barely need any time to put it together. Although it is quick to make, it does require at least eight hours of freezing time so definitely read the instructions all the way through and plan accordingly.

Pumpkin Pecan Ice Cream Pie  |  Lemon & Mocha

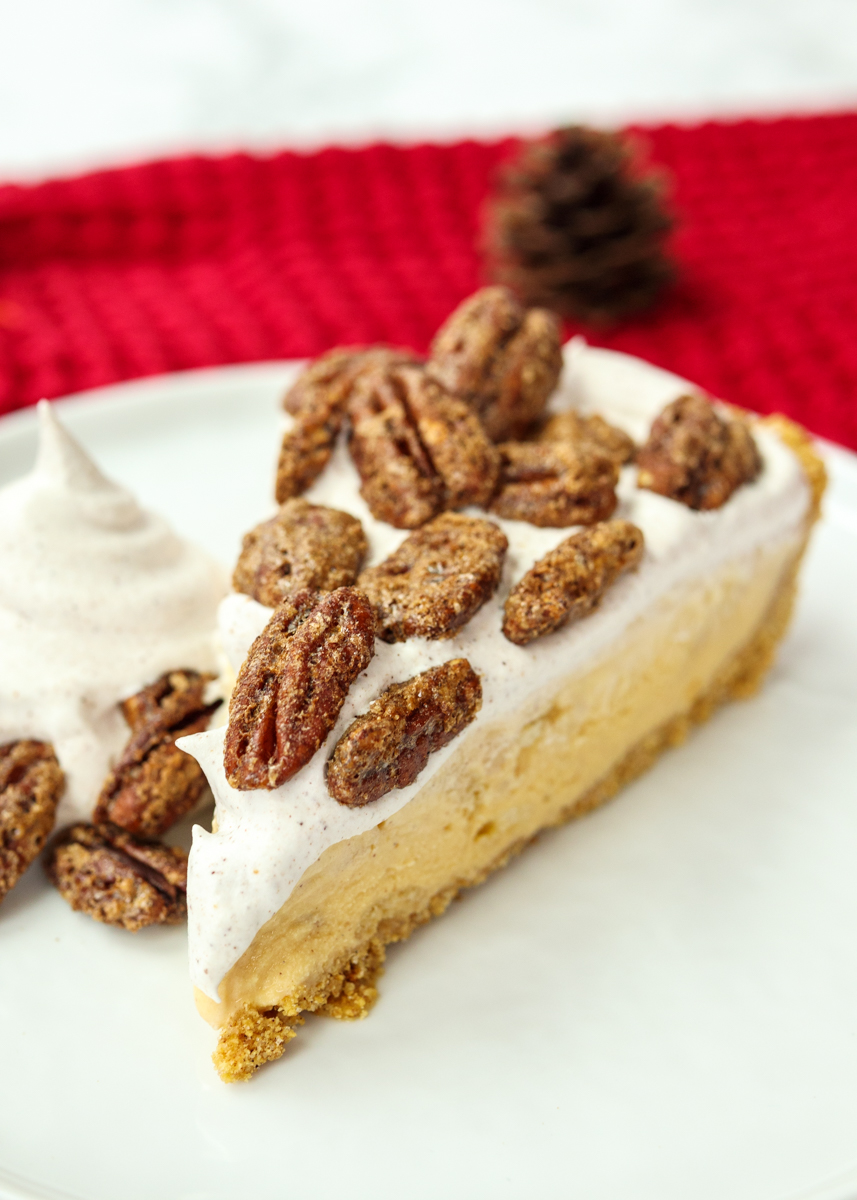
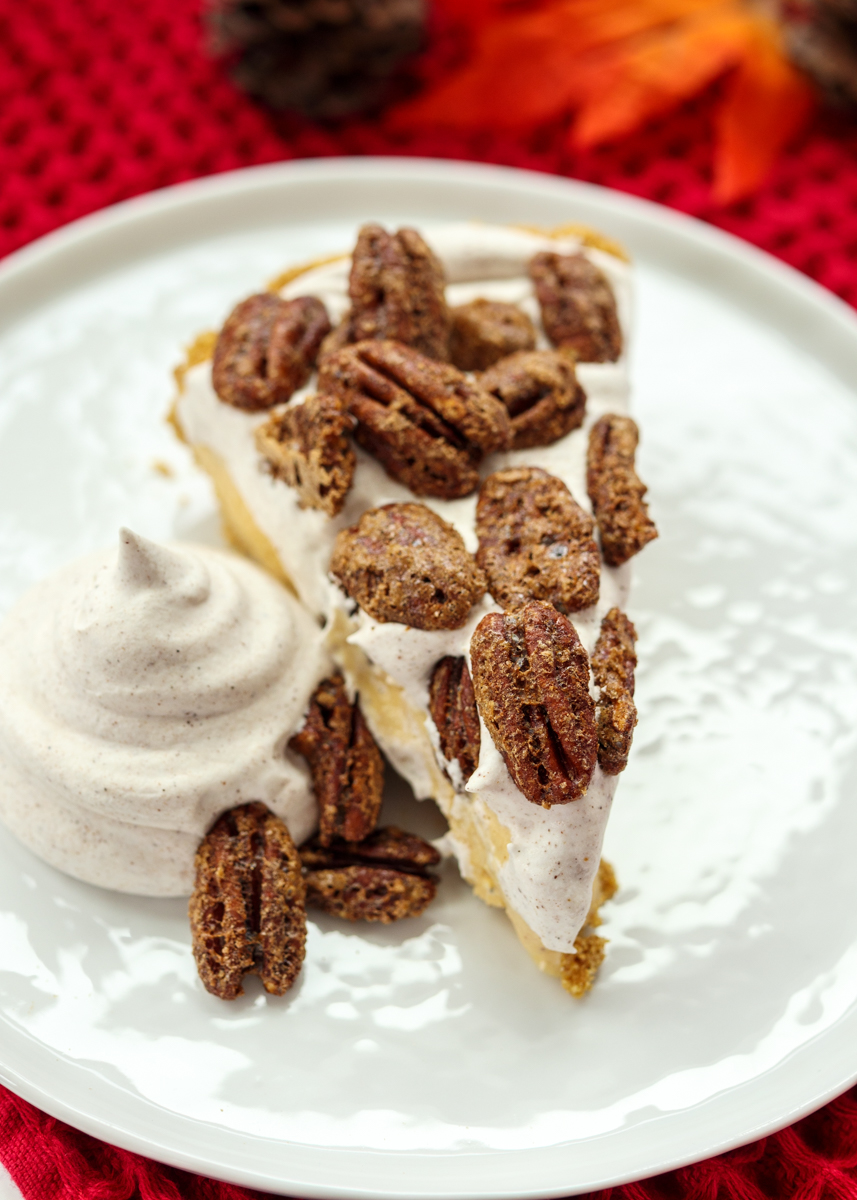
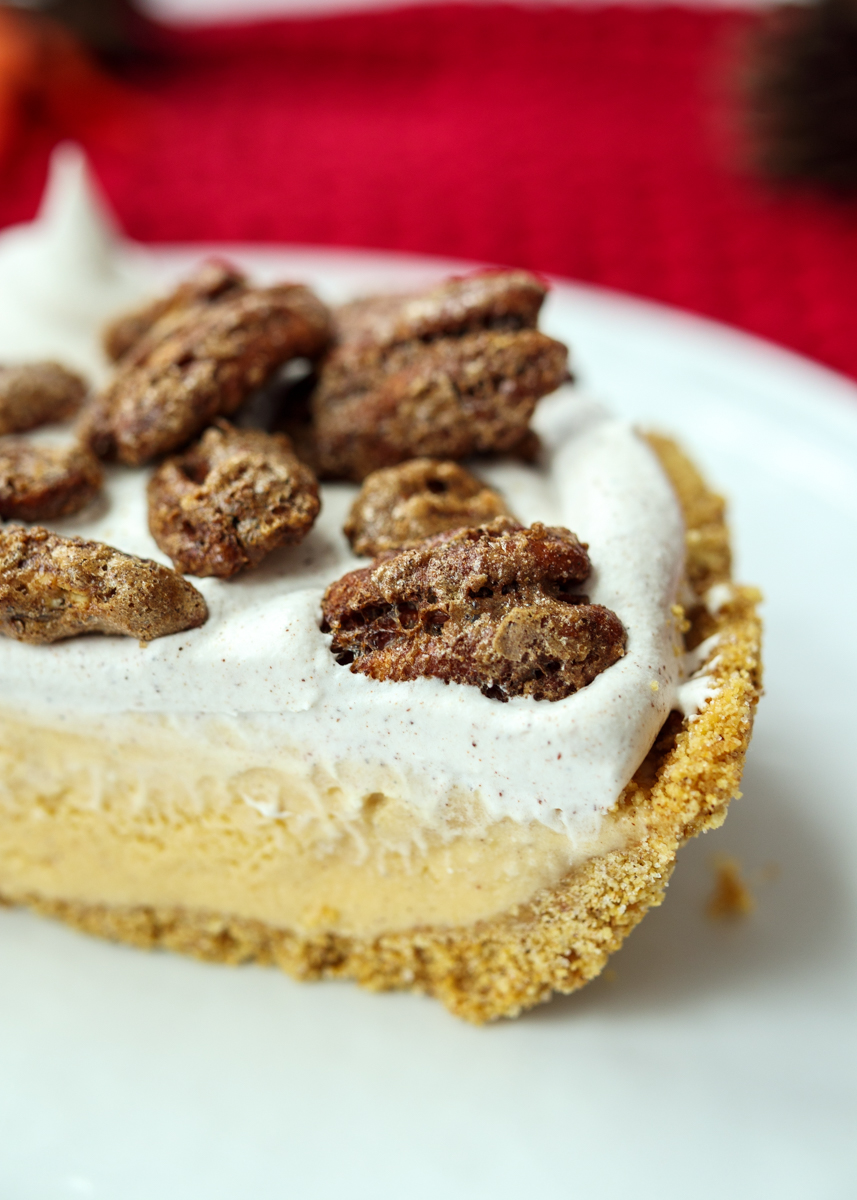
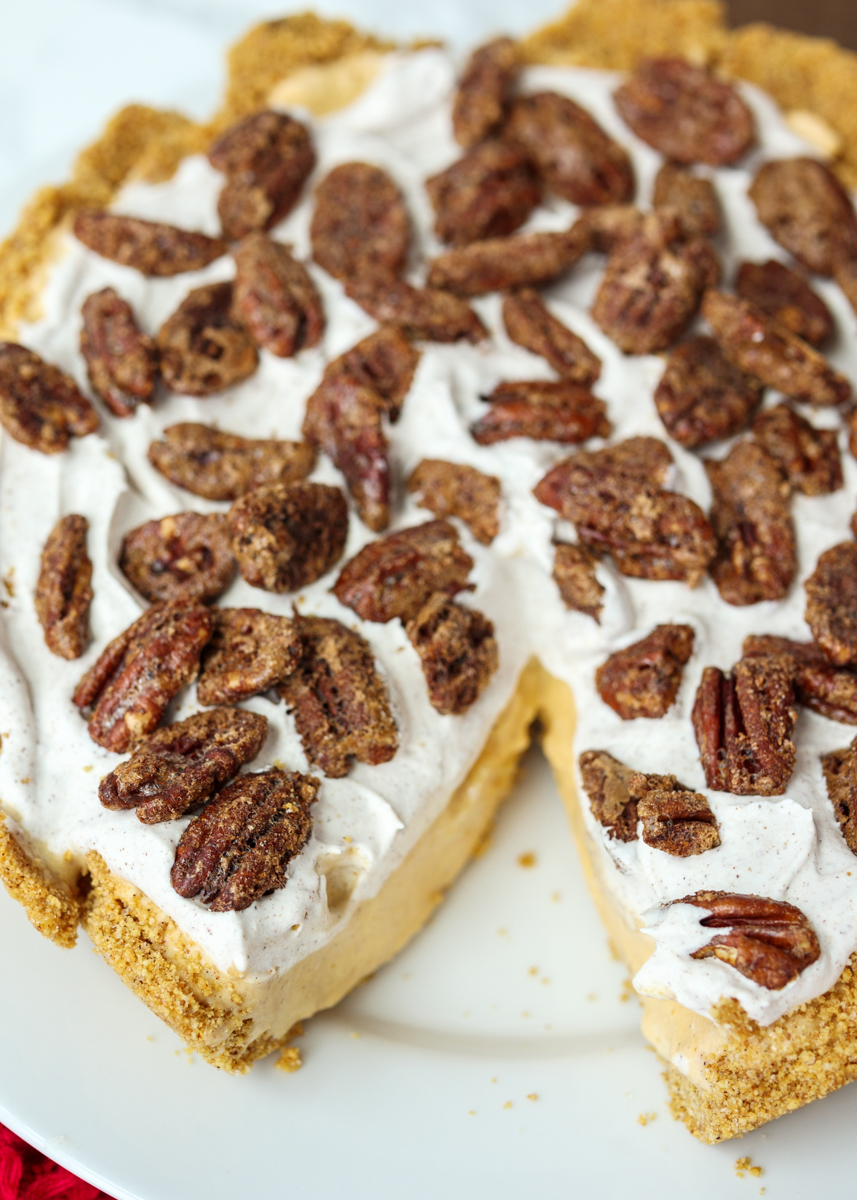
The base of this ice cream pie is a regular graham base with some cinnamon and ground ginger mixed in for that warm spiced holiday feel. Then we have pumpkin ice cream. You could certainly make your own and if you need a recipe I have had great success with all of David Lebovitz’s recipes from The Perfect Scoop. I had just come back from my vacation last week so I went the easy store-bought route, especially since so many brands have delicious-sounding pumpkin flavors right now. I bought the Talenti pumpkin gelato; it was really creamy, packed with rich pumpkin flavor and even had pie pieces in it – bonus!

Pumpkin Pecan Ice Cream Pie  |  Lemon & Mocha

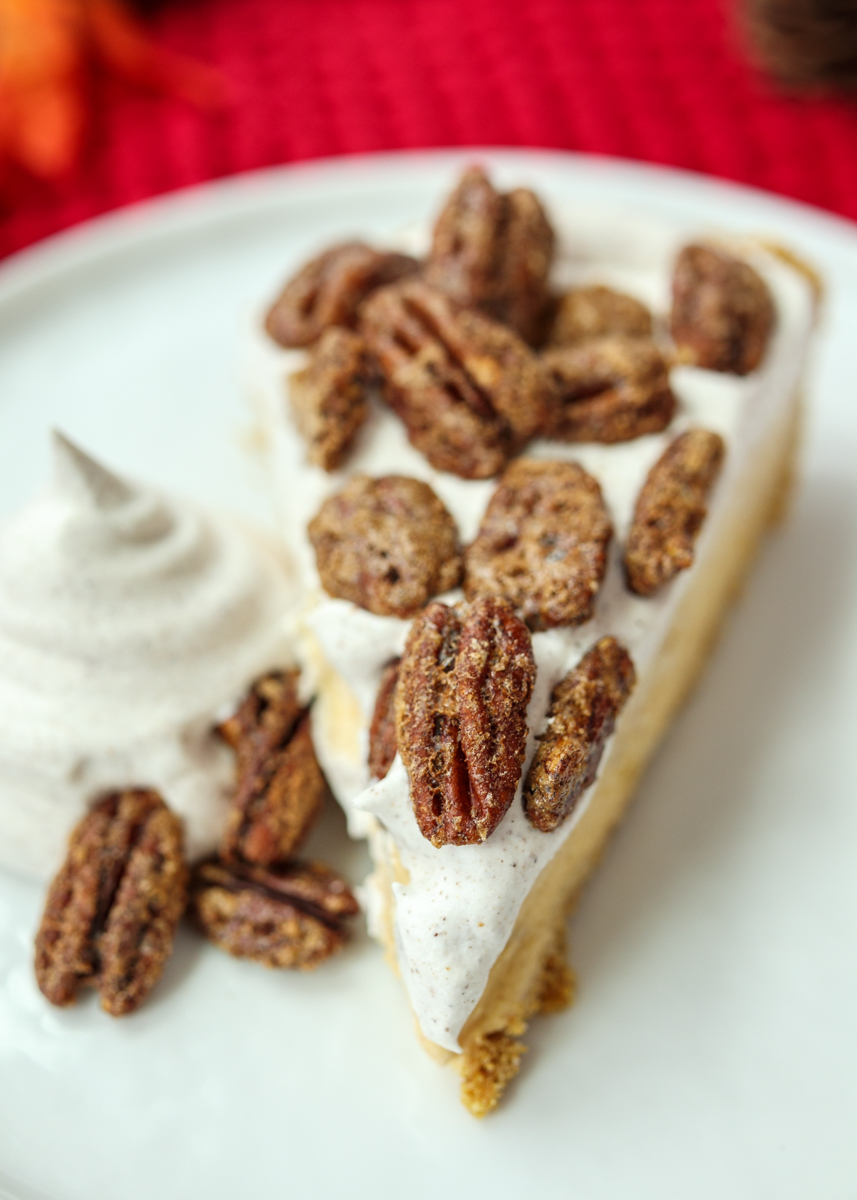
On top with have whipped cream and homemade sugared pecans. These pecans are tossed in egg whites and pumpkin pie spices then baked. They are so addictive, especially when they’re warm, so it was really difficult saving them for this pie! I find that ice cream tends to be a universal crowd pleaser and I know from experience there’s a lot of ice cream crazed families out there so this is the perfect Thanksgiving dessert. Although I highly recommend pumpkin ice cream you could certainly substitute a different ice cream flavor of your choice, just don’t skip those candied pecans! Enjoy!

Pumpkin Pecan Ice Cream Pie  |  Lemon & Mocha

Pumpkin Pecan Ice Cream Pie
 
Yield: 8-10 servings
Ingredients
for the pie
  • 1½ cups graham cracker crumbs
  • 5 tablespoons butter, melted
  • 3 tablespoons granulated sugar
  • 1 teaspoon ground ginger
  • 2 teaspoons ground cinnamon, divided
  • 1 quart pumpkin ice cream or gelato
  • 2 cups whipped topping, such as Cool Whip (see note)
for the pecan topping
  • 1 tablespoon brown sugar
  • 1 tablespoon granulated sugar
  • ½ teaspoon ground cinnamon
  • ⅛ teaspoon ground cloves
  • 1 egg white
  • ½ teaspoon vanilla extract
  • 4 ounces pecan halves
Directions
for the pie
  1. You have two pan options here. The first is a spring form pan lined with plastic wrap. Sometimes I like doing it this way so it’s easy to pop it out and put the pie on a cutting board for a nice even cut or onto a platter. The second option is to make the pie directly in a glass pie pan. If you’re doing option two (directly in the pie pan) and want a firmer crust bake the graham crust at 350 degrees F for 5 minutes then let cool completely before adding the ice cream.
  2. In a medium mixing bowl, combine the graham cracker crumbs, melted butter, the granulated sugar, the ground ginger and 1 teaspoon of the cinnamon. Pour into the prepared pie dish and press down with your fingers or the bottom of a measuring cup to make an even crust layer, going slightly up the sides of the pie dish. Don't go too high up or the crust on the bottom won't be thick enough. Put in the fridge for 2 hours or the freezer for 1 hour before the next step.
  3. Scoop the pumpkin ice cream or gelato into the graham crust. If you want to make the ice cream easier to spread, beat it with a stand mixer for a minute. Spread the ice cream into an even layer then let set in the freezer for 8 hours or overnight.
  4. Combine the whipped topping with the remaining 1 teaspoon of ground cinnamon. Spread on the firm ice cream pie. When you’re ready to serve, top with the pecan topping.
for the pecan topping
  1. Preheat the oven to 250 degrees F. Line a baking sheet with parchment paper.
  2. In a small bowl, combine the brown sugar, granulated sugar, cinnamon and cloves.
  3. In a medium mixing bowl, beat the egg white and vanilla until frothy. Add the pecan halves then toss to coat. Add the sugar mixture and combine to coat. Place on the prepared baking sheet and spread out the pecans. Bake for 1 hour, tossing the pecans on the pan about every 15 minutes. Let cool before placing on top of the pie when ready to serve.
Notes
If you want to use homemade whipped cream, follow these instructions. In a cold metal bowl of a stand mixer or in a large cold metal mixing bowl with a hand mixer, use cold beaters to beat 1 cup cold heavy whipping cream, 2 tablespoons of granulated sugar and the remaining teaspoon of cinnamon until stiff peaks form. Do not top put on the ice cream pie until you’re ready to serve it. You can make the whipped cream a day or two ahead, just store it in the fridge until you’re ready to serve then lightly beat with a whisk before topping the pie.

Some of the links above are affiliate links, which means I may receive a small commission for my referral. This does not affect the retail cost of the item. Thank you for supporting Lemon & Mocha!

Leftover Turkey Pull-apart Sliders with a Maple Mayo and Cranberry Barbecue Sauce

Leftover Turkey Pull-apart Sliders with a Maple Mayo and Cranberry Barbecue Sauce  |  Lemon & Mocha

Hi everyone! Matt and I got back from our Japan vacation early Sunday morning. I’m a few days behind, but I’m finally checking in with you all! We had an amazing time – the sites were unreal and the food was beyond delicious! I am planning to eventually put together a food guide so I’m looking forward to sharing more of our trip with you all. In the meantime, I’m going to be posting a few pictures on Instagram over the next few weeks so make sure you’re following me! Now, let’s dive into today’s recipe in preparation for the day after Thanksgiving.

Leftover Turkey Pull-apart Sliders with a Maple Mayo and Cranberry Barbecue Sauce  |  Lemon & Mocha

These, my friends, are Leftover Turkey Pull-apart Sliders with a Maple Mayo and Cranberry Barbecue Sauce. Fluffy potato rolls are stuffed with leftover turkey, tangy cranberry barbecue sauce, a quick maple mayo and gooey cheese. You bake them in the oven so the tops get golden with just a bit of crispy cheese on top. I may have made these sliders with Thanksgiving in mind, but they would also be perfect for tailgating, Super Bowl parties or an everyday Friday night.

Leftover Turkey Pull-apart Sliders with a Maple Mayo and Cranberry Barbecue Sauce  |  Lemon & Mocha

Have you made pull-apart sliders before? They are one of my favorite ways to serve an easy, casual meal. You cut a set of rolls open and lay them flat in a baking pan. Then you add your toppings like it is one big piece of bread before adding the top half of the roll set. They get baked away and then it’s time to eat! I usually let them cool for a minute then cut them in the pan so the sliders are easier to actually pull-apart without the filling getting yanked out every time someone grabs one.

Leftover Turkey Pull-apart Sliders with a Maple Mayo and Cranberry Barbecue Sauce  |  Lemon & Mocha

These are designed to use up you leftover Thanksgiving turkey and cranberry sauce since having those two dishes meal after meal can get a little boring. Gooey, cheesy sliders are definitely not boring and the sweetness of the maple mayo with the tanginess of the cranberry sauce balances perfectly. You can really use any kind of rolls for these, but I love potato rolls since they are so buttery and fluffy. I was only going to eat one or two of these sliders, but I couldn’t help gobbling them up with Matt over the next couple days.

Leftover Turkey Pull-apart Sliders with a Maple Mayo and Cranberry Barbecue Sauce  |  Lemon & Mocha

I hope you enjoy these sliders! What Thanksgiving leftovers are you looking forward to the most?

Leftover Turkey Pull-apart Sliders with a Maple Mayo and Cranberry Barbecue Sauce  |  Lemon & Mocha

Leftover Turkey Pull-apart Sliders with a Maple Mayo and Cranberry Barbecue Sauce
 
Yield: 9 sliders
Ingredients
  • 2 tablespoons mayonnaise
  • 1 teaspoon maple syrup
  • 2 tablespoons barbecue sauce
  • 2 tablespoons cranberry sauce
  • 9 dinner rolls, cut in half
  • 1½ cups roasted turkey pieces
  • ¾ cup shredded mozzarella, plus more for topping
  • 1 tablespoon butter
Directions
  1. Preheat the oven to 350 degrees F.
  2. In a small bowl, combine the mayonnaise and maple syrup. Set aside.
  3. In another small bowl, combine the barbecue sauce and cranberry sauce. Set aside.
  4. Place the bottom halves of the dinner rolls into an 8 x 8” square baking pan. Evenly spread on the maple mayo. Top with the turkey pieces, then the shredded mozzarella. Spoon the cranberry barbecue sauce over top. Put the top half of the rolls on.
  5. Melt the butter. Spread the butter over the tops of the rolls then sprinkle some extra shredded mozzarella on top. Bake in the oven for 15 minutes, or until the tops are golden brown and the cheese is melted.


Roasted Butternut Squash and Broccoli

Roasted Butternut Squash and Broccoli  |  Lemon & Mocha

I am all about the veggies this Thanksgiving! There’s so many in season vegetables waiting to be made into scrumptious holiday side dishes. Then you can fill up guilt-free and save plenty of room for pie!

Roasted Butternut Squash and Broccoli  |  Lemon & Mocha

I love brussels sprouts for the holidays, but not everyone likes them and they require a fair amount of prep time. Broccoli could not be easier to prep, which is why it’s a weekday go-to at our house, so I figured why not swap it in for the holidays. Usually I steam or steam-sauté broccoli, but when you roast it the broccoli florets get tender and slightly charred.

Roasted Butternut Squash and Broccoli  |  Lemon & Mocha

Let’s not forget that sweet caramelized butternut squash, though! Butternut squash involves a bit more preparation, but most stores sell halved or diced butternut squash bringing you that much closer to vegetable deliciousness. If I buy the pre-diced butternut squash and the cubes are really big I always cut them down a little smaller to even them out. Once we have everything cut down to size, the broccoli florets and diced butternut squash get tossed in some olive oil, salt, garlic powder, ground cumin and black pepper before being roasted until tender and slightly charred. I love using a little ground cumin because it gives the veggies just a hint of nuttiness and earthiness. And yes, I know we discovered with the Autumn Harvest Chili Stuffed Butternut Squash recipe that butternut squash is technically a fruit, but we’re “using it as a vegetable” so let’s all just go with it.

Roasted Butternut Squash and Broccoli  |  Lemon & Mocha

I have another holiday vegetable side dish to share with you next week for even more healthy Thanksgiving inspiration. I know Thanksgiving is next week, but this next one is just as easy, if not easier! What are some of your favorite vegetables to serve (or eat!) for Thanksgiving?

Roasted Butternut Squash and Broccoli  |  Lemon & Mocha

Roasted Butternut Squash and Broccoli
 
Yield: 4 servings
Ingredients
  • 1 head broccoli, cut into florets
  • 4 cups large diced butternut squash, about 20 ounces cut butternut squash
  • 1-2 tablespoons olive oil
  • ¼ teaspoon salt
  • ¼ teaspoon garlic powder
  • ¼ teaspoon ground cumin
  • Few grounds fresh black pepper
Directions
  1. Preheat the oven to 400 degrees F. Line a large baking sheet with nonstick aluminum foil and set aside.
  2. In a large bowl, toss the broccoli and butternut squash with the olive oil, salt, garlic powder, cumin and some ground black pepper. Spread the broccoli and squash out on the baking sheet and bake for 35-40 minutes, or until tender and slightly charred. Toss once during cooking.


Apple, Brie and Bacon Bread

Apple, Bacon and Brie Bread  |  Lemon & Mocha

Yes! The day is finally here! I made and photographed this life-changing Apple, Brie and Bacon Bread in August and I finally get to share it with you! Of course the reason I kept from posting it was my neurotic schedule I have planned months in advance, but now it will be fresh on your mind for the holiday season so it was worth the wait.

Apple, Bacon and Brie Bread  |  Lemon & Mocha

I don’t even think I need to describe the bread for you to grasp how crazy delicious it is; I’m sure the title alone does it all, but let me dive in anyways. Remember my Cheesy Pesto Bread with Crispy Prosciutto? This is the same idea, just with a different flavor profile – and one that could not be more perfect for fall.

Apple, Bacon and Brie Bread  |  Lemon & Mocha

The base of the bread is a quick homemade honey mustard sauce. It’s creamy, a little tangy and a little sweet. Next we have some crispy cooked bacon. Bacon makes everything better. Then we have some brie cheese that gets a little gooey. Gooey-ness is cheese perfection and brie melts really well. Brie is a creamy and more mild cheese that I love pairing with some sweet elements. Remember my Honey Walnut Baked Brie? Pure heaven. That’s why the brie goes so well with the honey mustard sauce and the apple.

Apple, Bacon and Brie Bread  |  Lemon & Mocha

I used a granny smith apple to bring in some tartness as well as sweetness and I love the texture it has in the bread. The apple is very thinly sliced so that it almost cooks through in the bread.

Apple, Bacon and Brie Bread  |  Lemon & Mocha

I’ve already been requested to make this Apple, Brie and Bacon Bread again and I’m sure I’ll be making it for plenty of gatherings for the next foreseeable future. I am totally, definitely on board with that. I love this bread because like the Cheesy Pesto Bread with Crispy Prosciutto you can make it ahead of time and reheat it to serve as an appetizer or snack. I have even more variations of this bread planned so get excited for more deliciousness!

Apple, Bacon and Brie Bread  |  Lemon & Mocha

Apple, Bacon and Brie Bread
 
Yield: 1 loaf
Ingredients
  • 1 tablespoon honey
  • 3 tablespoons mayonnaise
  • 1 teaspoon Dijon mustard
  • 16 ounces pizza dough
  • 4 slices bacon, cooked
  • 4 ounces sliced brie cheese
  • ½ granny smith apple, peeled and thinly sliced
  • 1 egg
Directions
  1. Set the dough out to come to room temperature. Preheat the oven to 350 degrees F. Line a baking sheet with nonstick aluminum foil or spray with cooking spray and set aside.
  2. In a small bowl, whisk together the honey, mayonnaise and mustard until combined to make the honey mustard.
  3. Using flour so it doesn’t stick, roll out the dough on a clean surface until it is roughly the shape of an 11” x 14” rectangle. I usually hold it then let gravity stretch the dough to get it started. Leaving a 1” border, evenly spread the honey mustard on the dough. Next, evenly lay the cooked bacon. Top with the sliced brie and sliced apple.
  4. Beat the egg in a small bowl. Lightly brush the egg on the border you left. Gently fold the short edges in then, working carefully, tightly roll the dough up lengthwise. You want to be rolling from long edge to the other long edge, being sure to tuck in the short edge sides as needed. When you’re done rolling, pinch the dough at the seam to seal it. I like to pinch it twice to make sure it’s really tight. Carefully place the bread roll seam side down on the prepared baking sheet. Lightly brush the egg on all exposed top and sides of the roll.
  5. Bake for 22-25 minutes, or until the top is golden brown. Let cool slightly then cut into slices and serve.


Warm Mushroom Barley Salad

Warm Mushroom Barley Salad  |  Lemon & Mocha

Every time I make a dish with mushrooms in it, it immediately becomes one of Matt’s new favorite dishes. I’m also mushroom obsessed, but Matt is on a whole other level. When I ask him what he wants me to make, his answer is always “that <insert name of food here> with the mushrooms.” This Warm Mushroom Barley Salad was no exception. The reason I’m telling you all this is because I was distracted with getting ready for our Japan trip and I couldn’t think of what to write for this recipe so Matt said, “just tell them that I love it.” Haha! That would be my shortest post ever – Matt loves this dish. The end.

Warm Mushroom Barley Salad  |  Lemon & Mocha

I love cooking with different grains and was excited to discover how much I liked pearled barley a few years ago. It has a nice chewy texture and a slightly nutty taste that pairs really well with the sautéed mixed mushrooms. You can use any mushrooms you want for this, but since it’s the star ingredient I recommend a mix of a few that are maybe a bit different from your usual cremini or white mushrooms. I used a combination of cremini, shiitake and oyster mushrooms.

Warm Mushroom Barley Salad  |  Lemon & Mocha

The Warm Mushroom Barley Salad is a simple dish, but simple is good. Especially around the holidays, then simple is really good. You can make this dish ahead of time and warm it in the microwave or serve it right from the stove-top without using any precious holiday oven space.

Warm Mushroom Barley Salad  |  Lemon & Mocha

Since it’s simple, feel free to jazz it up further with some of your own obsession ingredients. It would taste so good with some caramelized onions, some kale or even some garlicky chicken sausage – yum! Or just keep it as is and enjoy!

Warm Mushroom Barley Salad  |  Lemon & Mocha

Warm Mushroom Barley Salad
 
Yield: 4-6 servings
Ingredients
  • 1 cup pearled barley
  • 4 tablespoons olive oil, divided
  • 1 pound mixed mushrooms, chopped
  • 1 clove garlic, minced
  • 2 tablespoons lemon juice
  • 1 tablespoon chopped fresh parsley
Directions
  1. Bring a medium saucepan of water to a boil. Add the pearled barley then cook for 30 minutes, drain.
  2. Heat 1 tablespoon of olive oil in a large skillet over medium-high heat. Cook half the mushrooms for 5 minutes, until tender, seasoning with salt and pepper while they’re cooking. Then remove the mushrooms to a large mixing bowl. Reheat the skillet over medium-high heat with another tablespoon of olive oil. Add the garlic and the other half of the mushrooms, cook for 5 minutes, until tender, seasoning with salt and pepper while they’re cooking. Remove the mushrooms to a large mixing bowl.
  3. To the mushrooms add the drained barley, the lemon juice, parsley and the remaining 2 tablespoons of olive oil. Season with salt and pepper to taste. Don’t be afraid to salt! Serve warm or room temperature.

Recipe slightly adapted from Food & Wine.