About Lauren

Posts by Lauren :

Ultimate Foodie Weekend in NYC – Where to Eat in NYC Part 1

Last fall Matt and I ventured to New York City to visit my cousin, Sarah, my brother-in-law, Nick, and of course TO EAT ALL THE FOOD. New York City has so many over-the-top food creations and I was dying to check some off my enormous bucket list. I’m not sure what it says about me that my food bucket list is bigger than my actual bucket list… I’m going to go with it means I need to eat more!

Of course there is so much more to explore in the NYC food scene that this is just the tip of the iceberg, but read on for NYC’s must try food trends, restaurants and outrageous sweet treats.
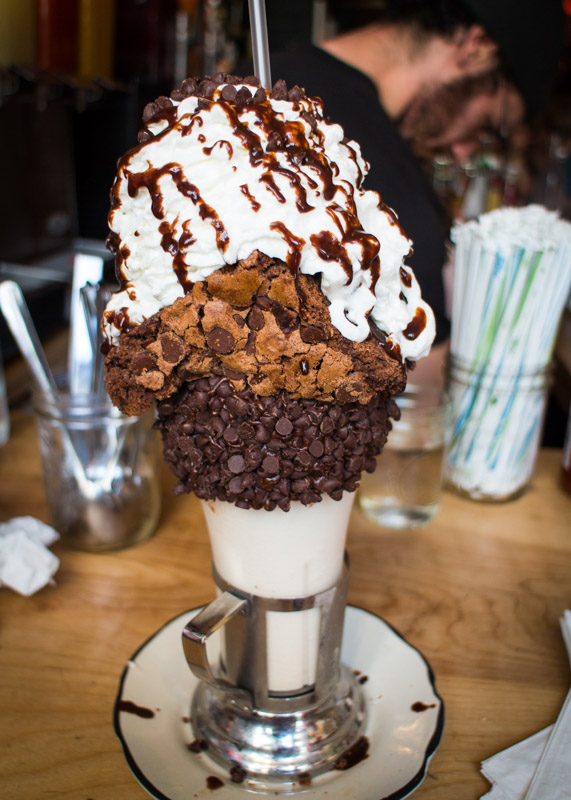
Ultimate Foodie Weekend in NYC  |  Lemon & Mocha

Black Tap NYC

Calling all chocolate lovers! This right here is the Brooklyn Blackout Shake from Black Tap NYC! The milkshake glass has a thick rim of mini chocolate chips nestled into chocolate frosting topped with a chocolate chip brownie, whipped cream and a chocolate drizzle. Black Tap has eight different milkshake flavors and you can substitute any flavor you want to accompany the crazy milkshake topping.

Ultimate Foodie Weekend in NYC  |  Lemon & Mocha

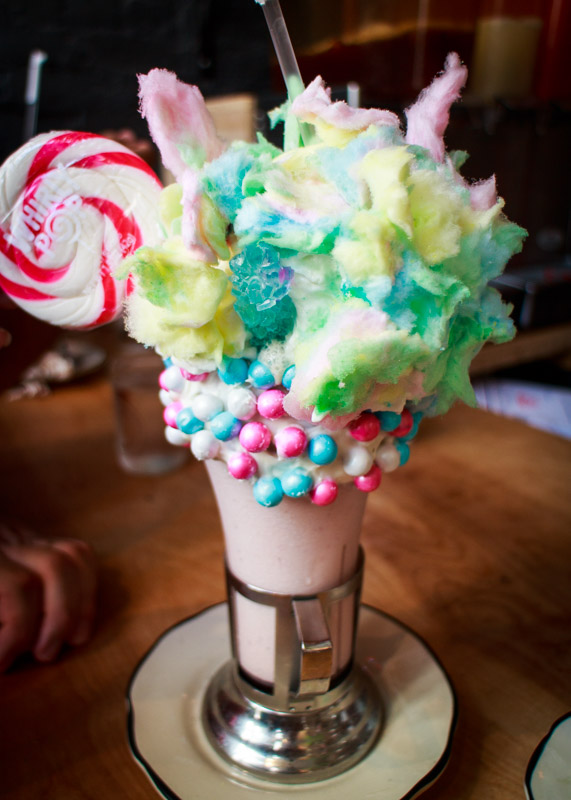
Woah! Yes, my friends, this is a milkshake. Say hello to the Cotton Candy Shake: strawberry milkshake, rock candy, whipped cream, cotton candy and rimmed with colorful chocolate pearls pressed into vanilla frosting. And a lollipop. Obvi. The actual milkshake glass is normal-sized so if you were hungry and just coming for the shakes you could definitely down the whole thing yourself. It will set you back $15 though!

Ultimate Foodie Weekend in NYC  |  Lemon & Mocha

The Cookie Shake! At the recommendation of our waiter we combined the Cookie Shake with the Nutella shake flavor. It’s hard to see with all the melting, but cookie crumb coated vanilla frosting make up the rim followed crumbled cookies, chocolate chips, whipped cream and chocolate drizzle. Oh, and an entire cookiewich. Did I forget that part? The melting seen here is what we call the non-sexy ice cream drip, but we love it all the same (for sexy version see here). Also, if it’s 90 degrees outside with little to no air conditioning in the restaurant and you order a crazy milkshake expect the whole top to fall off within 1 minute 24 seconds. Good thing Matt was there to catch it like a softball and plop it back on top so I could take this photo!

Ultimate Foodie Weekend in NYC  |  Lemon & Mocha

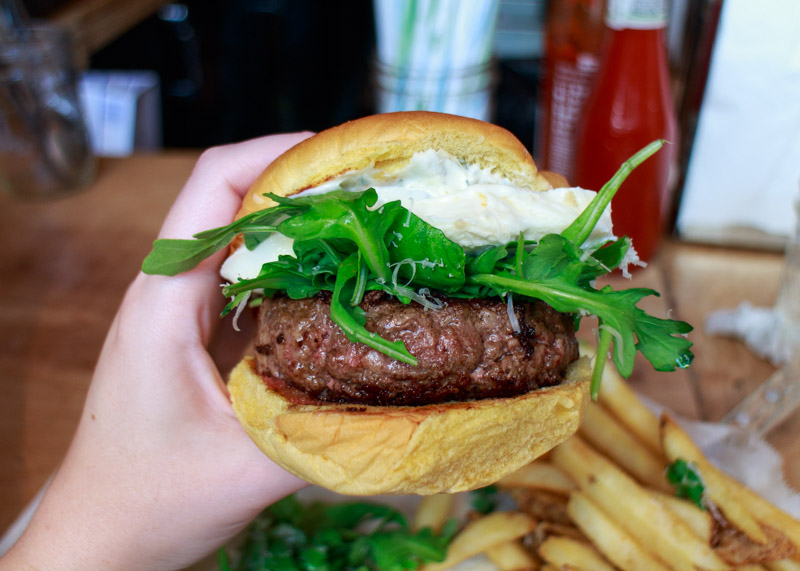
Black Tap has monstrous burgers, fries, onion rings and salads if you’re into that sort of thing. Pictured here is a bison burger with fresh mozzarella, pesto mayo, shaved Parmesan and arugula on a potato bun because potato buns are the best buns. I would advise against getting a burger by yourself and following it with a milkshake by yourself unless you have prepped Joey Chestnut style. The general consensus on Black Tap NYC was that all the food was really good, but not the best burgers and milkshakes we’ve ever had. But we all agreed it was well worth it for the experience (and the Instagram photos). Normally you have to wait 1.5 – 2 hours to get into Black Tap, but if you want to be the first round of people in when they open on weekends at 11am plan to be in line no later than 10:30am. A special shout-out to my Aunt Dottie and Uncle Rob for making sure we got in line on time!

Ultimate Foodie Weekend in NYC  |  Lemon & Mocha

Dominique Ansel Bakery

I finally got to try a Cronut! For those of you who aren’t familiar with the Cronut it is a cream-filled cross between a croissant and a doughnut that was launched by Dominique Ansel Bakery in 2013. And no, it is not anything like the croissant doughnut from Dunkin Donuts. Dominque Ansel’s Cronut is on a level all of its own and it’s trademarked so you know it’s legit. A different Cronut flavor is released every month and is unique to each Dominique Ansel bakery (New York City, Tokyo, London, and opening this fall in Los Angeles).

Ultimate Foodie Weekend in NYC  |  Lemon & Mocha

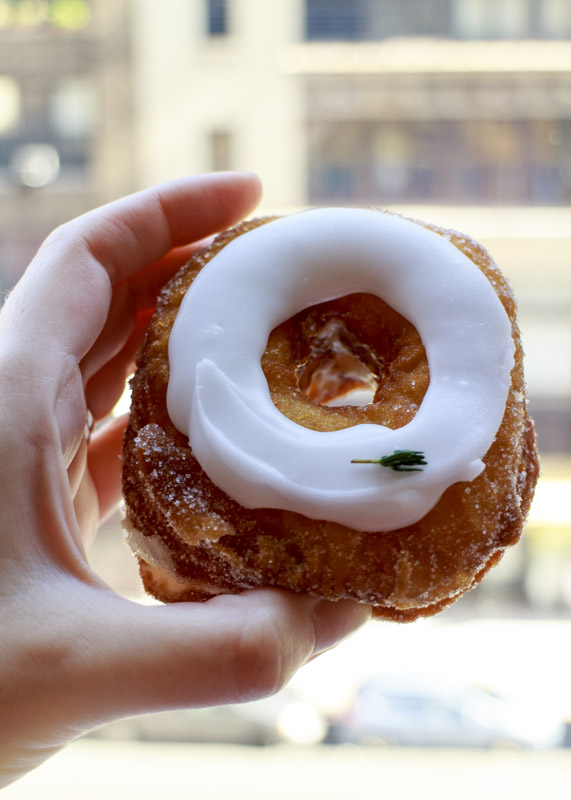
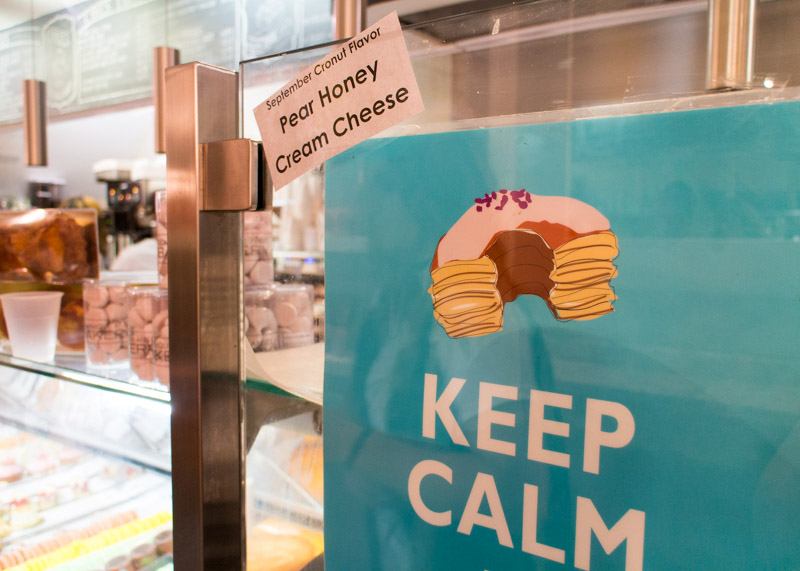
The month’s flavor when we were there was Pear Honey Cream Cheese. Not our ideal flavor combination (unlike past flavors, such as Key Lime Young Coconut, Burnt Vanilla Smoked Caramel or Strawberry Balsamic and Mascarpone – swoon!), but the sugar-coated, flaky layer croissant pastry is so delicious. You can pre-order Cronuts from the bakery two weeks in advance so if you live nearby or know you will be visiting NYC you can pick a date and time to grab your Cronuts without bright and early line-waiting. Pre-ordering opens online every Monday at 11am for dates two weeks out. Check out Cronut 101 for more detailed information.

Ultimate Foodie Weekend in NYC  |  Lemon & Mocha

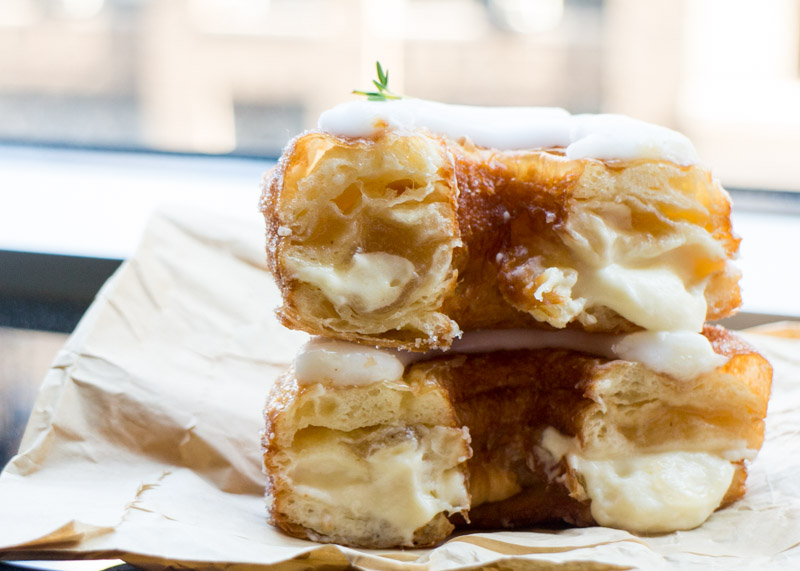
I mean, look at those layers! If your ready to dive in just note that ordering at the bakery is limited to two Cronuts per person; pre-ordering is limited to six Cronuts per order.

Ultimate Foodie Weekend in NYC  |  Lemon & Mocha

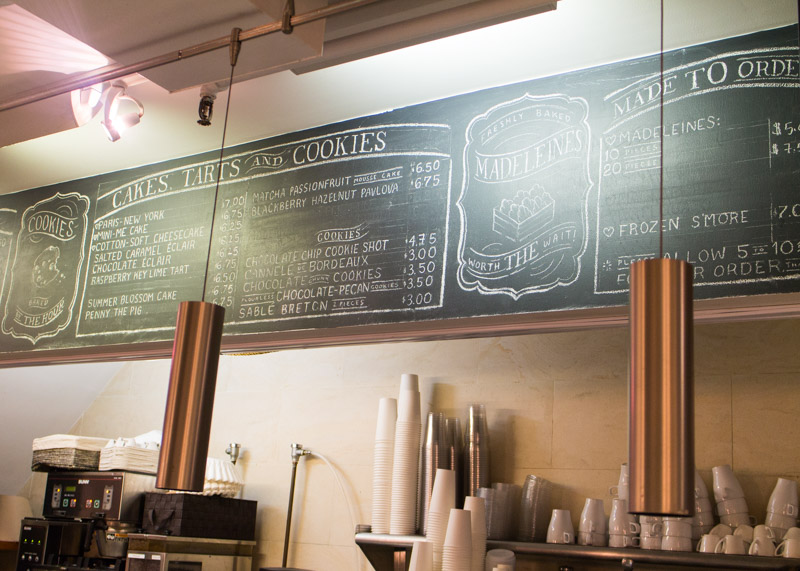
The Dominique Ansel bakery is so much more than just Cronuts. They have pastries, cookies, cakes and cheesecakes in the bakery case, as well as several made to order items. After 3pm you can buy one of their famous cookie shots – a chocolate chip cookie in the shape of a cup that gets filled with milk.

Ultimate Foodie Weekend in NYC  |  Lemon & Mocha

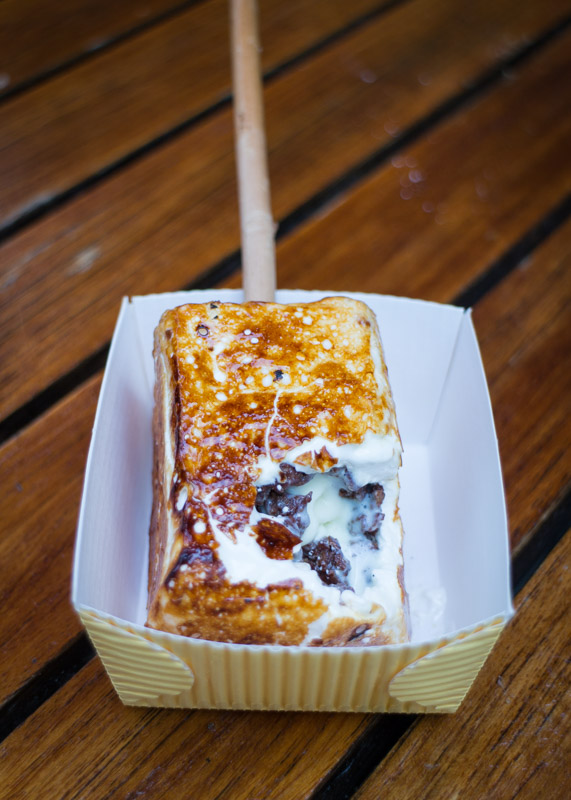
I’m speechless right now. Well not really, but if anything was going to stun me into silence it would be this frozen s’more. Vanilla ice cream is surrounded by chocolate crunchies and then encased in a homemade marshmallow before being torched to order. Amazing! The marshmallow is made with honey instead of sugar to keep its soft texture even after being frozen. If you want to eat your frozen s’more off the stick then eat it right away because once the ice cream melts all bets are off.

Ultimate Foodie Weekend in NYC  |  Lemon & Mocha

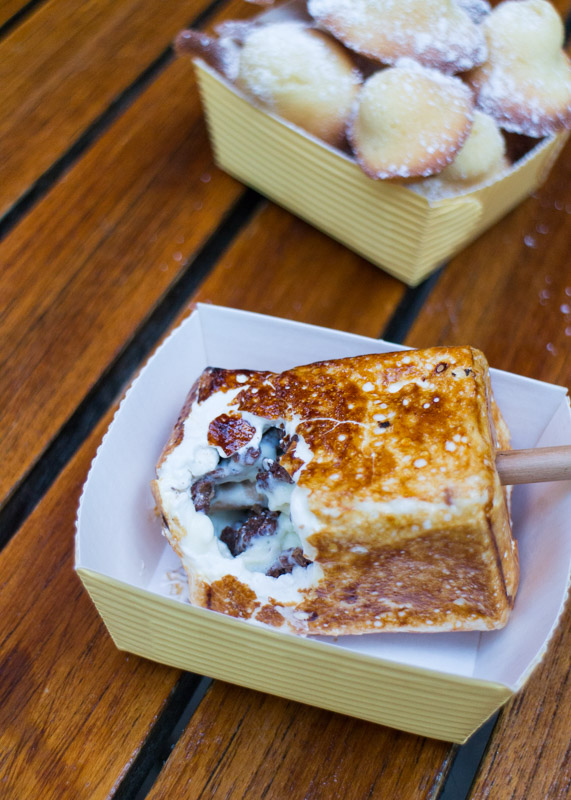
Pictured behind my frozen s’more are the madeleines Matt ordered. Madeleines are little sponge cakes that are light, buttery and highly addictive. Dominique Ansel’s did not disappoint and brought us right back to the first week of our honeymoon in Paris. They have the dough made and then bake them to order so they are always fresh out of the oven. Yum!
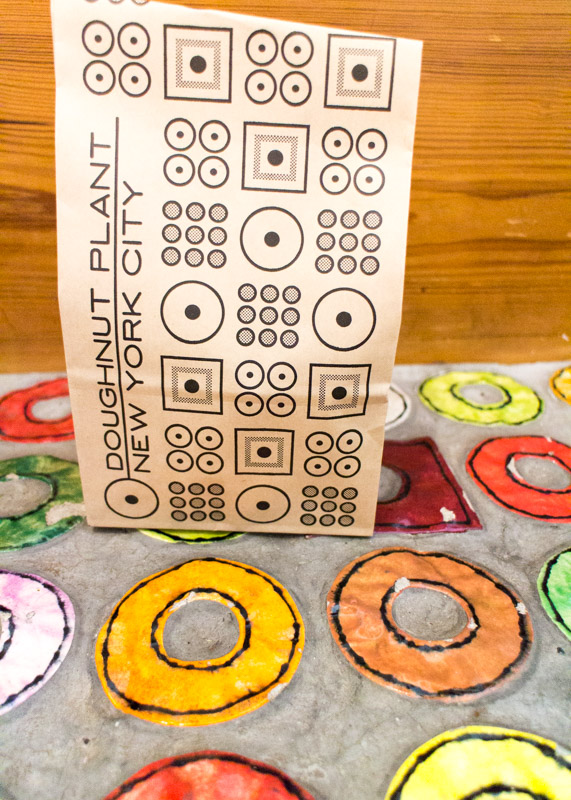
Ultimate Foodie Weekend in NYC  |  Lemon & Mocha

Doughnut Plant

Next up, we have Doughnut Plant! How fun is this doughnut bench they have? Doughnut Plant is full of fun surprises including the doughnut shaped tables, the doughnut door handles and even the disco ball mirrored bathroom – yes that’s exactly what it sounds like.

Ultimate Foodie Weekend in NYC  |  Lemon & Mocha

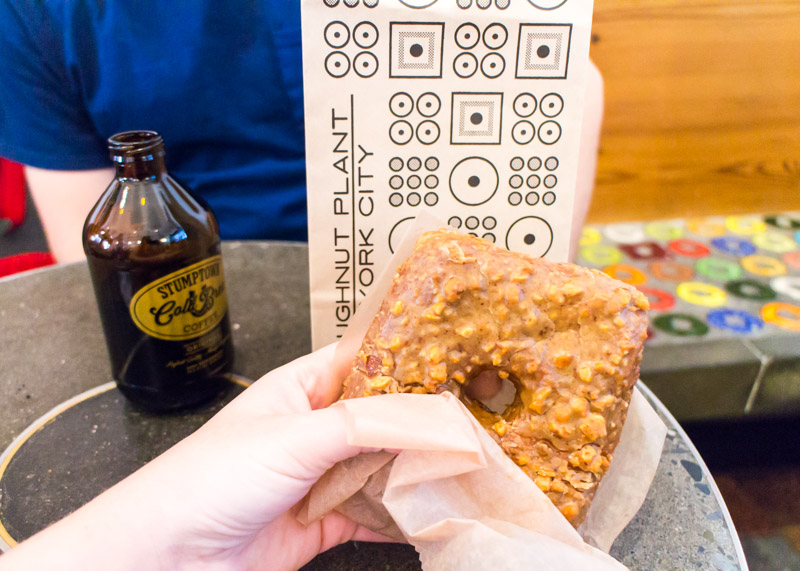
This right here is one of Doughnut Plant’s signature doughnuts. A square yeast doughnut filled with blackberry jam topped with chopped peanuts and a peanut butter glaze. It tasted exactly like a peanut butter and jelly sandwich, and I love classic pb&j’s so of course I was totally digging this doughnut. The square-filled design allows for a perfect doughnut to filling ratio. This staple doughnut is always on their menu, but many of Doughnut Plant’s other flavors rotate seasonally. Check out their website or Instagram for featured doughnut updates.

Ultimate Foodie Weekend in NYC  |  Lemon & Mocha

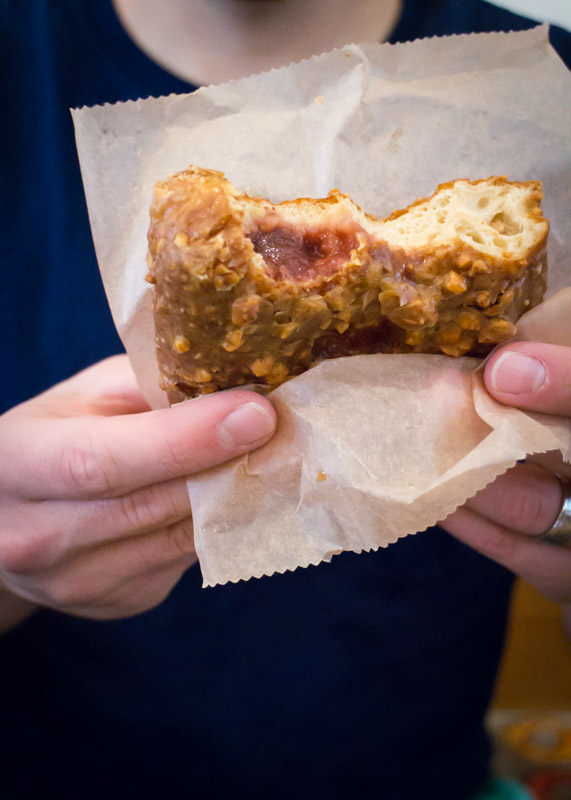
I wish I had another one so I could take a big bite! Doughnut Plant has both cake and yeast doughnuts, however I always tend to gravitate towards yeast ones for their airy and chewy texture. Also, a special thank you to my hand model, Matt, pictured here displaying a freshly nibbled peanut butter and jelly doughnut.

Ultimate Foodie Weekend in NYC  |  Lemon & Mocha

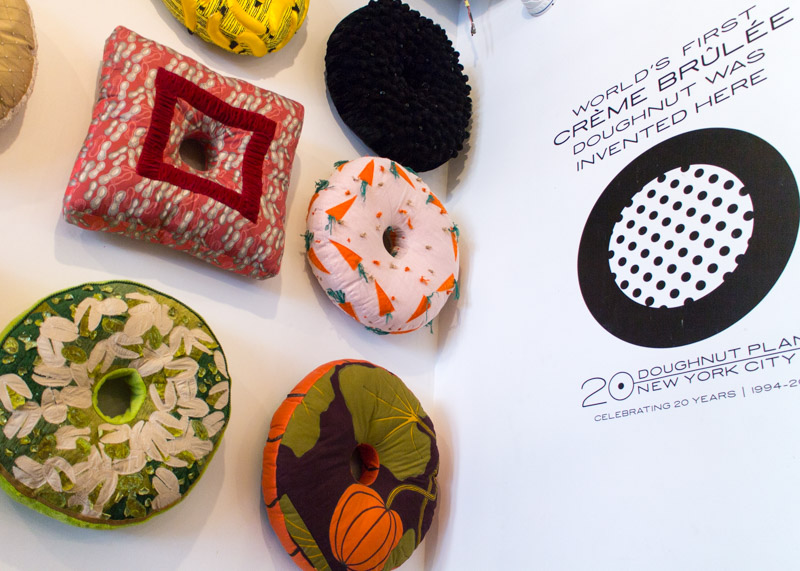
In addition to regular sized doughnuts, Doughnut Plant also has these special items called Doughseeds, which are basically super-sized filled Munchkins. Their most popular is the crème brûlée Doughseed – vanilla bean custard filled huge-mini doughnut topped with caramelized sugar. Unfortunately, we were pretty stuffed from our weekend foodie adventures and were not able to try more flavors, but we will definitely be back.

Be sure to check out part two of my ultimate foodie weekend in NYC later this week! Which spot so far has you most ready to hop in a car, train, plane or subway to go grab a bite?

Christmas Tree Cupcakes

aka Chocolate Cupcakes with Chocolate Almond Ganache Filling and Coconut Buttercream

Christmas Tree Cupcakes  |  Lemon & Mocha

I can’t even with these cupcakes! Just look at their adorableness! Now I haven’t discussed it much on the blog, but I am not a decorator. I love to bake and I love to cook, which is mostly because I really, really (did I say really?) love to eat. But I do not like trying to make my food look pretty. If it ends up looking nice in the end that’s just an added bonus. I do not have the patience for it, although one day I would like to learn how to decorate and style my baked goods and dishes better.

Christmas Tree Cupcakes  |  Lemon & Mocha

In the meantime, I’m just a regular home baker trying to make the best tasting things I can dream up. Where I’m going with all this is that if I can make these cupcakes look this ridiculously adorable that means you can, too. As long as you’re armed with the right ingredients and the right tools then you will be good to go.

Christmas Tree Cupcakes  |  Lemon & Mocha

Now, I’ve been so busy talking about the cute tree decorations that I haven’t even gotten to how amazing the cupcake tastes. I am obsessed with my Perfect Chocolate Cupcakes and my Chocolate Ganache so adding almonds and a coconut buttercream seemed like a fitting and delicious enhancement. The texture of the coconut buttercream is light and fluffy, while still being rich enough to stand up to the chocolate cupcake. You can adjust the intensity of the coconut flavoring based on your personal preference. That chocolate almond ganache is its usual swoon-worthy self amped up with chopped almonds to be the perfect molten surprise. Now have a bit of everything all together and yippee! Damn that’s good!

Christmas Tree Cupcakes  |  Lemon & Mocha

My favorite part about these cupcakes though are the reason I was inspired to make them: they remind me of my Babu. Everyone in my family has ceramic Christmas trees that my grandma painted. I know everyone in my family thinks about Babu everyday, but especially when they turn on their ceramic tree. They are decorated with little colored light “ornaments” and when they light up they remind me of everything that is wonderful and simple about Christmas. They make me think of family and tradition. I’m instantly transported to sitting with Babu at my parent’s house and putting in all the little lights while the smell of her cookies comes from the kitchen. Then suddenly we’re eating the cookies, making Christmas paper chains, putting ornaments on the tree, then snuggled in her bed reading our favorite Christmas stories. She even let me sing her Christmas carols and anyone who knows how, um, interesting, my singing voice is will know what a saint she was for that.

Christmas Tree Cupcakes  |  Lemon & Mocha

Although I loved, and very much miss, our crazy Christmas mornings with all my aunts, uncles and cousins, one of my favorite Christmas mornings with Babu was when I was older. We were at my parents’ house for Christmas morning and since it was just my brother and me, who were both in high school, everyone was sleeping in before present-opening. Babu and I are early risers so the two of us sat by the tree in the still, quiet house and opened a couple of our presents for each other having our very own private mini Christmas morning. It is a memory I will cherish forever. So happy holidays and merry Christmas to all my friends, family and fellow food lovers! Take a moment, or two, throughout all the craziness to enjoy the little things that will mean so much to you for years to come.

Christmas Tree Cupcakes  |  Lemon & Mocha

Christmas Tree Cupcakes
 
Yield: 24 cupcakes
Ingredients
for the cupcakes
for the chocolate almond ganache
  • ¾ cup heavy cream
  • 1- 12 ounce bag of bittersweet chocolate chips
  • 3 tablespoons unsalted butter, softened
  • 1 cup chopped almonds, more or less depending on preference
for the coconut buttercream
  • 2 sticks unsalted butter, room temperature
  • 6 cups powdered sugar
  • ½ cup milk
  • 1 teaspoon coconut extract
  • 1 cup sweetened shredded coconut, more or less depending on preference
  • Additional sweetened shredded coconut for decoration
for the tree decorations
  • 24 pretzel sticks
  • ½ bag green candy melts
  • Nonpareils
Directions
for the cupcakes
  1. Make the Perfect Chocolate Cupcakes according to the instructions then let cool.
for the chocolate almond ganache
  1. Heat the cream over medium heat until steaming, stirring constantly.
  2. Once steaming, remove the cream from the heat. Add the chocolate and stir then let sit for 5 minutes.
  3. Add the butter to the chocolate mixture then stir until smooth. You might have to return to the lowest heat possible while stirring to get it completely smooth.
  4. Add the chopped almonds and stir to combine. Let cool until only slightly warm (I'm not sure if the cooling is completely necessary, but I thought the hot ganache would seep into the cupcake).
for the coconut buttercream
  1. Beat the butter for 3-5 minutes, or until smooth and fluffy, with an electric mixer.
  2. On low speed carefully add the sugar, milk and coconut extract and mix. If the frosting looks too thin slowly add some more powdered sugar, but I didn't need to for this recipe. Add the shredded coconut and stir well to combine.
  3. Spread or pipe a thin layer onto the top of the cupcake. You might find piping easier because of the open hole with the ganache. Top with some shredded coconut for a "snow" effect.
for the tree decorations
  1. Line two baking sheets with wax paper. Use a baking sheet with edges so the nonpareils don't go flying all over your kitchen. Place the pretzel sticks a few inches apart.
  2. Prep a pastry bag with a skinny round tip (I think I used a Wilton round tip #2). Heat the candy melts in a double boiler over medium-low heat, stirring occasionally, until completely melted and smooth. Be sure not to overheat so the chocolate doesn't seize up. Carefully transfer to the pastry bag.
  3. Pipe the chocolate over each pretzel stick in the shape of the a tree. I made single zig-zag lines then went over them two more times. Start up a bit from the base of the pretzel stick so there's room to press the decoration into the cupcake. Do a couple then top with nonpareils or have a sprinkle elf help and sprinkle after you pipe (thanks, Matt!). Let sit at room temperature until firm then carefully pop off the wax paper. To place in the cupcakes I found it easiest to hold and press from the little bit of pretzel at the top - the chocolate is fragile and will break if you press it.
Notes
You can typically find candy melts (sometimes called chocolate or candy wafers) at your local craft store, such as Michaels or A.C. Moore.
This recipe makes enough ganache and buttercream for about 35 cupcakes so you will have leftover unless you make a double batch of cupcakes or reduce the ganache and buttercream recipes.

Chocolate almond ganache adapted from The Curvy Carrot.
Coconut buttercream adapted from Martha Stewart.
Chocolate tree inspiration from Just a Taste.

Babu’s Coffee Cake

Babu's Coffee Cake  |  Lemon & Mocha

It is hard to believe that I am writing this post and it is even harder to write it. One month has passed since my family and I lost my grandma, Babu. For those of you who don’t know me personally or haven’t read my Vanilla Bean Ice Cream Mother’s Day post, Babu and I were incredibly close. These past few weeks without my best friend have felt surreal. As most people who have dealt with loss have experienced, the ache does not get smaller, you just get better at handling it.

Babu's Coffee Cake  |  Lemon & Mocha
Babu loved hearing about my cooking and the food blog. She would always ask me what I was making for dinner and would listen to me read her my latest posts over the phone. Several times I had prints made of the food photos I knew Babu would like and mailed them to her. Babu would share them with her friends in her building and report back to me with which ones everyone wanted to try the most. Not only did Babu encourage me to follow my food passions, but she also helped foster those passions by baking with me and of course our many, many lunch dates.

Babu's Coffee Cake  |  Lemon & Mocha
In my family it is hard to mention coffee cake and not think about Babu. When she lived with us she always made sure there were slices in the freezer. She would make a coffee cake, always waiting to let me help glaze it, then cut it into big slices, wrap them in plastic wrap and pop them in the freezer. I would come home from school, microwave a slice for 30 seconds and it would taste like it just came out of the oven. There would be one slice left and the next day the freezer would be stocked back up with a fresh cake.

Babu's Coffee Cake  |  Lemon & Mocha

After Babu moved back down to Delaware I came to look forward to having some every time I went to visit, especially when we would do our annual beach trip. Since I always knew I would have some on these trips, I never made this cake on my own. When I was thinking of what I could make that would help celebrate Babu on Lemon & Mocha, once beach week started approaching I knew it had to be her coffee cake.

Babu's Coffee Cake  |  Lemon & Mocha

It was difficult knowing I couldn’t ask Babu any questions before I started baking or knowing that this would be my first beach trip without her, but I know she was there with me the whole time- cheering with me when the cake came out of the Bundt pan perfectly and laughing with me when I totally left too much batter for the final layer. I hope that this simple cake can bring you as much joy as it has brought me over the years and that you can share it with someone special, too.

Babu's Coffee Cake  |  Lemon & Mocha

Babu's Coffee Cake
 
Yield: 10-12 servings
Ingredients
for the cake
  • 1 Duncan Hines yellow cake mix
  • 1 package instant vanilla pudding (3.4 ounce size)
  • 4 large eggs
  • ¾ cup vegetable oil
  • ¾ cup water
  • 2 teaspoons vanilla extract
  • ¼ cup sugar
  • 2 teaspoons ground cinnamon
for the glaze
  • 1 cup powdered sugar
  • 3 tablespoons milk
  • 1 teaspoon vanilla extract
Directions
for the cake
  1. Preheat the oven to 350 degrees F. Grease a Bundt pan and set aside.
  2. Combine the cake mix, pudding mix, eggs, vegetable oil, water and vanilla extract with a hand mixer or in the bowl of a stand mixer. Mix until well combined.
  3. In a small bowl, combine the sugar and ground cinnamon.
  4. Evenly pour ⅓ of the batter into the prepared Bundt pan. Use a spatula to even the layer. Sprinkle half of the cinnamon sugar mixture evenly over the batter. Repeat with ⅓ of the batter and the remaining cinnamon sugar. Top with the last ⅓ of batter.
  5. Bake for 40-50 minutes, or until a toothpick inserted in the cake comes out clean. Let cool in the pan for 10 minutes then transfer to a cooling rack. Apply the glaze while still warm, but not hot.
for the glaze
  1. Combine the powdered sugar, milk and vanilla extract until smooth. Spoon or pastry brush the glaze over the warm cake.


No-Bake Red, White & Blue Lemonade Cheesecake Pie

No-bake Red, White & Blue Lemonade Cheesecake Pie  |  Lemon & Mocha

This summer has been slipping away! I had a recipe all planned to share with you for the Fourth of July, but suddenly it was the week before the holiday weekend and I hadn’t cooked or photographed it yet.

No-bake Red, White & Blue Lemonade Cheesecake Pie  |  Lemon & Mocha

I knew I couldn’t let the week pass by without providing some holiday-worthy red, white and blue inspiration so I grabbed everything I needed, whipped it together and snapped some photos. All for you. Don’t you feel special?

No-bake Red, White & Blue Lemonade Cheesecake Pie  |  Lemon & Mocha

I first made this No-bake Red, White and Blue Lemonade Cheesecake Pie back in college. The recipe was actually in a Kraft ad in my Food Network magazine that summer and with my newly discovered lemon obsession I knew I had to make it for Matt and I.

No-bake Red, White & Blue Lemonade Cheesecake Pie  |  Lemon & Mocha

The pie was light, refreshing and super simple to put together.

No-bake Red, White & Blue Lemonade Cheesecake Pie  |  Lemon & Mocha

Somehow I forgot all about it until I was racking my brain for a creative red, white and blue dessert idea.

No-bake Red, White & Blue Lemonade Cheesecake Pie  |  Lemon & Mocha

If you remember my Summer Berry Trifle blog post from the other year I am always looking for new spins on the traditional flag Fourth of July cake I used to make every year with my grandma.

No-bake Red, White & Blue Lemonade Cheesecake Pie  |  Lemon & Mocha

This No-bake Red, White and Blue Lemonade Cheesecake Pie is perfect and will make you the hero of your barbecue! Plus, did I mention that there’s only 8 ingredients and NO BAKING? Enjoy!

No-bake Red, White & Blue Lemonade Cheesecake Pie  |  Lemon & Mocha

No-bake Red, White & Blue Lemonade Cheesecake Pie
 
Yield: 8-10 servings
Ingredients
  • 10 graham cracker squares, crushed into crumbs (about 1.5 cups of graham cracker crumbs
  • ⅓ cup sugar
  • 6 tablespoons unsalted butter, melted
  • 8 ounces cream cheese, softened
  • ½ cup frozen lemonade concentrate, thawed
  • 8 ounces Cool Whip, thawed
  • Halved strawberries, for topping
  • Blueberries, for topping
Directions
  1. Combine the graham cracker crumbs, sugar and melted butter in a medium mixing bowl until they come together and resemble coarse crumbs. Press into the bottom and sides of a lightly greased 9-inch pie pan. Use the bottom of a measuring cup to make sure the crumbs are packed down tightly. Refrigerate for 2 hours before using.
  2. In a medium bowl or the bowl of a stand mixer, beat the cream cheese until whipped and creamy.
  3. Slowly add the ½ cup of lemonade concentrate (be sure not to add the whole can!) and beat after each addition. Once well combined, fold in two cups of the Cool Whip. Pour the mixture into the crust and refrigerate for four hours.
  4. When ready to serve, top with the remaining Cool Whip, strawberries and blueberries. You could top with the fruit beforehand, but the red juice from the strawberries might run on the Cool Whip.
Notes
If you want to skip the first step simply use a pre-made graham cracker crust. I use light cream cheese and light Cool Whip, but regular or light works for this recipe. This pie (and crust) both freeze well.

Recipe slightly adapted from Kraft Recipes.

Eggs Benedict Over Cheddar Scallion Waffles with Crispy Chorizo, Smashed Avocado and Green Chile Hollandaise

Eggs Benedict Over Cheddar Scallion Waffles  |  Lemon & Mocha

I cannot believe I waited so long to share this dish with you. If you thought I was excited about the waffles, oh baby, that pales in comparison to this creation. A couple months ago my brother-in-law, Nick, and our friend, Kate, came to visit and I wanted to make it a proper foodie weekend. I brainstormed for weeks to come up with the perfect breakfast that would have a variety of textures, bold flavors and most importantly, be creative and inspired. This right here is my ultimate breakfast. Eggs Benedict over Cheddar Scallion Waffles with Crispy Chorizo, Smashed Avocado and Green Chile Hollandaise. I know you were probably expecting something sweet and overflowing with chocolate, but there’s actually a candy bar hidden under that waffle! I’m kidding, that would be gross. Or would it… hmmm…

Eggs Benedict Over Cheddar Scallion Waffles  |  Lemon & Mocha

Let’s break down this Southwestern eggs Benedict layer by layer. First, there is the all important base in the form of an outrageously cheesy cheddar and scallion waffle. I took my Perfect Buttermilk Waffle base, omitted the vanilla extract and then loaded it up with sharp cheddar cheese and chopped green onions. Next, I smashed together an avocado with some lime juice and salt to give it a little fresh punch and spread it over the waffle. I found some deli-sliced chorizo at Trader Joe’s so I threw that in a frying pan to make it crispy and crunchy before layering it on top of the smashed avocado.

Eggs Benedict Over Cheddar Scallion Waffles  |  Lemon & Mocha

In comes the perfectly poached egg, ready to burst open with its runny yolky goodness. I poached mine sous vide, but we will come back to that in a later post. If you are intimidated about poaching an egg you could always fry up an over easy egg instead.

Eggs Benedict Over Cheddar Scallion Waffles  |  Lemon & Mocha

Finally, the icing on the cake, er the hot fudge on the sundae, er never mind… the sauce on the savory dish! Creamy, luscious, buttery hollandaise sauce mixed with diced green chiles for a very subtle flavor kick. Hollandaise is made using egg yolks, lemon juice and lots and lots of butter (see tutorial here), but I bought mine right from the dairy section of Trader Joe’s. Top with salsa or sour cream and get ready to make inappropriate noises while you devour this dish.

Eggs Benedict Over Cheddar Scallion Waffles  |  Lemon & Mocha

What Nick and Kate didn’t know is that this dish right here single-handedly kick-started my motivation to dive back into Lemon & Mocha after a longer than intended hiatus. And I am so glad to be back! So make this dish and feel inspired. Or just come over for breakfast and we can cook then devour it together.

Eggs Benedict Over Cheddar Scallion Waffles  |  Lemon & Mocha

Eggs Benedict Over Cheddar Scallion Waffles with Crispy Chorizo, Smashed Avocado and Green Chile Hollandaise
 
Yield: 4 servings, plus extra waffles
Ingredients
for the waffles
  • ½ cup unsalted butter, melted and cooled in a medium mixing bowl
  • 1¾ cups all-purpose flour
  • 2 teaspoons baking powder
  • 1 teaspoon baking soda
  • 1 teaspoon sugar
  • ½ teaspoon salt
  • 3 large eggs, room temperature
  • 1½ cups buttermilk, room temperature
  • 1 cup shredded sharp cheddar, more or less depending on how cheesy you want the waffles
  • ½ cup sliced scallions
for everything else
  • 1 avocado
  • Lime juice, to taste
  • 8 thin slices chorizo
  • 4 poached eggs
  • 2-3 tablespoons diced green chiles
  • ¾ cup warm hollandaise, more or less as desired
  • Sliced scallions, for topping
  • Salsa and sour cream, if desired
Directions
for the waffles
  1. Turn on the waffle iron to get it hot and spray with nonstick cooking spray, depending on manufacturer’s instructions.
  2. Sift the flour, baking powder, baking soda, sugar and salt into a large mixing bowl. Stir to combine then create a well in the center for the liquid ingredients.
  3. Add the eggs to the cooled butter mixing bowl and beat until frothy. Add the buttermilk and beat again until well-combined.
  4. Pour the buttermilk mixture into the well in the dry ingredients. Stir with a wooden spoon until just combined. The buttermilk and leavening will create a batter full of air bubbles. Fold in the cheddar and scallions, being sure not to over-mix.
  5. Pour the batter onto your waffle iron in batches and cook according to manufacturer’s instructions. If working in batches, let waffles rest on a cooling rack after they are cooked, or place them directly on the rack of your oven or toaster oven on a low heat to stay warm.
for everything else
  1. Take four plates and place one waffle on each plate. In a small bowl, mash the avocado and sprinkle with lime juice and sea salt to taste. Spread the avocado mixture on each waffle.
  2. In a dry frying pan, heat the chorizo in a single layer over medium heat, until hot and crispy. Remove from the pan and place in between two paper towels to remove some of the grease before placing two slices on each avocado-topped waffle.
  3. Place one poached egg on top of each chorizo-topped waffle.
  4. Stir the diced green chiles into the warm hollandaise then drizzle (or pour if you’re feeling dangerous) over the poached eggs and waffles. Top with sliced green scallions, salsa and sour cream as desired.
Notes
If you cannot find deli-sliced chorizo, crisp up some crumbled chorizo in a pan instead, being sure to drain/pat out the grease.