About Lauren

Posts by Lauren :

Roasted Veggie Hummus Wraps

Roasted Veggie Hummus Wraps  |  Lemon & Mocha

Lunch always seems to be a struggle for me, especially when I’m trying to eat healthy. I don’t want it to be complicated because if I’m cooking lunch and dinner on a weekday I’ll feel like all I did all day was cook and work with no time to relax. Boring also won’t cut it because then I’ll find myself not wanting to eat it and will end up with takeout or vending machine chips instead. My ideal healthy lunch has lots of veggies, minimal carbs and is something I can mass meal prep on a Sunday without taking too much time out of one of my days off.

Roasted Veggie Hummus Wraps  |  Lemon & Mocha

Roasted Veggie Hummus Wraps are one of the go-to’s in our house. I roast all the vegetables on Sunday and then we are ready for lunches for the week. Having lots of roasted veggies in the fridge for weekday lunches is great when you want veggies, but the thought of another salad is making you want to order a panini and fries! If you have never had roasted vegetables with hummus before you are missing out. The creaminess of the hummus with the tender bell pepper, zucchini, eggplant and mushrooms is a really tasty combination. This recipe makes four servings, but it can easily be scaled up or down. If you want more protein in your lunch these wraps work really well with grilled or rotisserie chicken.

Roasted Veggie Hummus Wraps  |  Lemon & Mocha

When you are buying wraps, especially if you are trying to be healthy, make sure you read the ingredients and nutrition facts. I always thought wraps were healthier than sandwiches, but a while back I did some research and found that a lot of wraps can be worse for you than sliced bread. Many brands claim to be healthy, but are full of sodium and trans fat. Try to find wraps that are high in fiber, low in sodium and don’t have artificial preservatives.

Roasted Veggie Hummus Wraps  |  Lemon & Mocha

A quick tip for softening your wrap to make it easier to roll so it won’t crack on you: wrap the tortilla in a damp paper towel and microwave for ten seconds. That’s it! I told you it was a quick tip!

Roasted Veggie Hummus Wraps
 
Yield: 4 servings
Ingredients
  • 1 red bell pepper, thickly sliced
  • 2 zucchinis, quartered then thickly sliced
  • 1 small eggplant, small diced
  • 1 package sliced baby bella mushrooms, about 8 ounces
  • 4 6” whole wheat wraps
  • ½ cup roasted red pepper hummus
  • 1 cup spinach leaves
  • Olive oil, salt, pepper, garlic powder, Italian seasoning
Directions
  1. Preheat the oven to 425 degrees. Line a half sheet pan with nonstick tinfoil. Arrange all the prepared bell pepper, zucchini, eggplant and mushrooms on the baking sheet. Try to get the vegetables in a single layer, slightly overlapping the mushrooms if needed. Drizzle with olive oil then lightly move around with a spatula to coat. Generously season with ground black pepper, salt, garlic powder and Italian seasoning.
  2. Roast the vegetables in the oven for 20-25 minutes, adding more time if needed, until the vegetables are tender. Toss the veggies halfway through the cooking time.
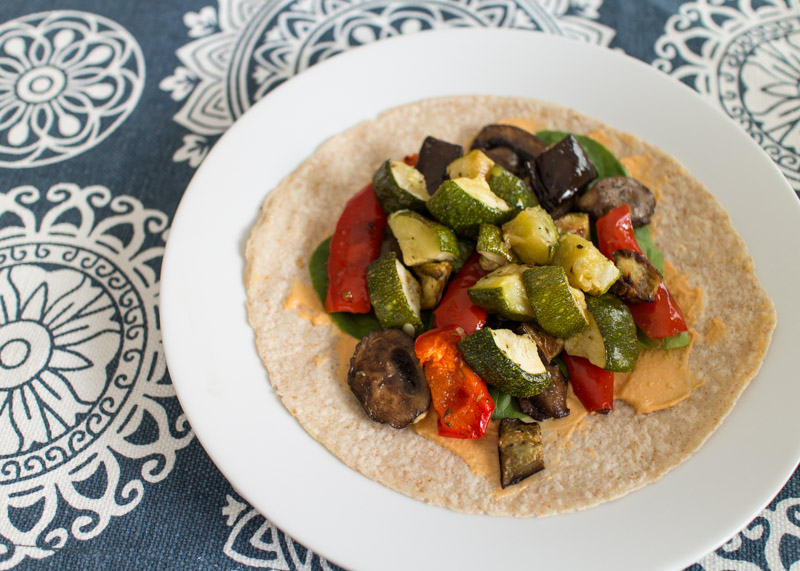
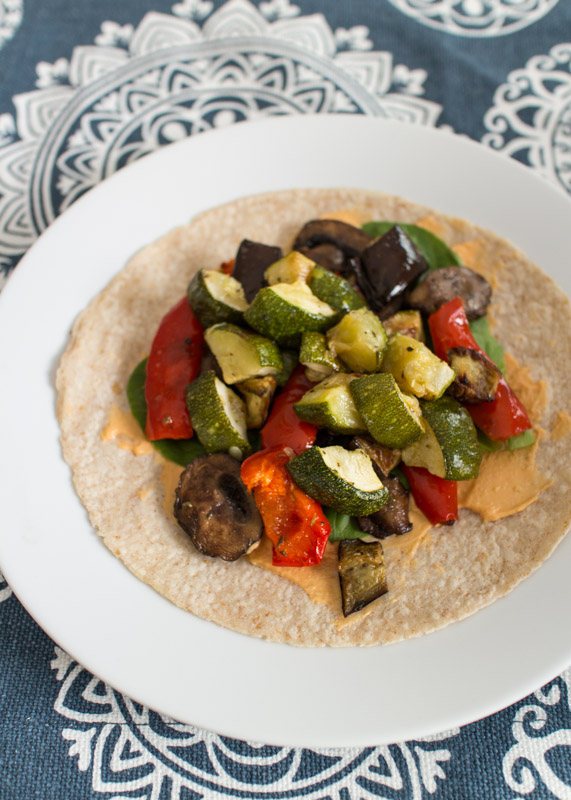
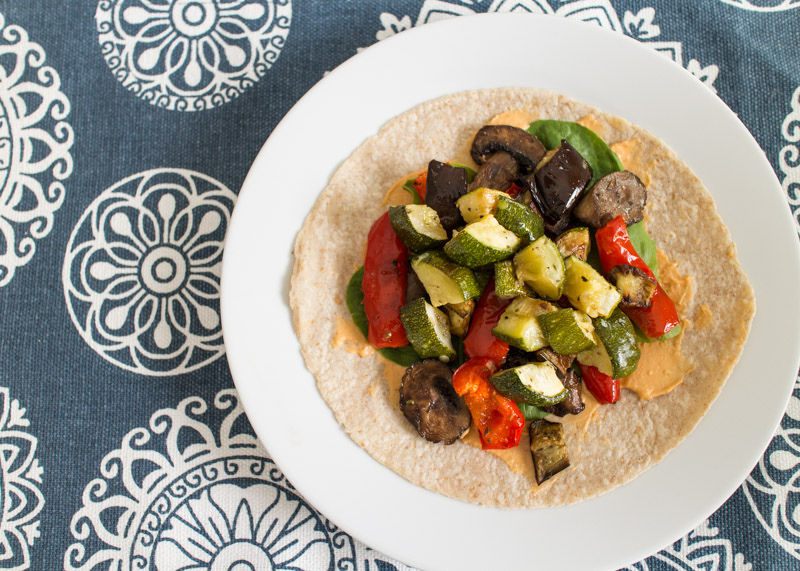
  3. Lay out the wraps. Spread 2 tablespoons of the hummus onto each wrap. Divide the spinach leaves between the 4 wraps then evenly divide the veggies. This is definitely a loaded wrap so you will probably need a fork to finish all the yummy veggies that fall on your plate while eating!
Notes
- If making ahead, store the roasted veggies separate from the wraps and add when ready to eat so they don’t make the wraps soggy. This can be eaten with the veggies room temperature or heated up. If I was bringing these wraps to work or packing in a lunch I would put the divided veggies in a little reusable container. That way the veggies can either be warmed up in their container or left cold. Then I would put the hummus and spinach on the wraps and roll them up. When it is time to eat, carefully unroll the wrap, add the veggies, and wrap it back up.
- For additional protein, add some grilled or rotisserie chicken to the wrap.


Thai Steak Lettuce Wraps with Charred Green Beans

Thai Steak Lettuce Wraps with Charred Green Beans  |  Lemon & Mocha

I am channeling some serious warm weather feels with these Thai Steak Lettuce Wraps with Charred Green Beans. Maybe it’s the lettuce or maybe it’s the lime, but they’re definitely bringing me to fresh springtime. Matt learned how to ski a few years ago and ever since winter hasn’t seemed so bad up here in Boston because we get to go skiing on the weekends. So we tough through the driveway shoveling and the messy commutes because we know there is a bright snow-covered mountain light at the end of the New England winter tunnel. However, now that we are solidly in mid-March I am ready for spring to emerge. Come on barbecues, flip-flops, grilling, and outside walks with no jacket on! Is there anything more exciting than being outside without a jacket on?! Ok, yes, but it’s still pretty awesome.

Thai Steak Lettuce Wraps with Charred Green Beans  |  Lemon & Mocha

We first made this recipe as one of our Blue Apron meals. Have you tried Blue Apron? There are aspects I love about it, such as having all the ingredients sent without having to run back and forth across a grocery store. I’m also a big fan of the detailed photo instructions so other family members can jump in and help by picking some steps to follow on their own. And by that I mean Matt can help without asking me questions or what he should do next while I’m working on another part of the dish 😂.

Thai Steak Lettuce Wraps with Charred Green Beans  |  Lemon & Mocha

The main reason we don’t order Blue Apron more (and why we order a different box now that I will share in another post) is the recipes seemed to be hit or miss for us. These Thai Steak Lettuce Wraps with Charred Green Beans were a definite hit. I’ve made steak lettuce wraps before, but I’ve never added sushi rice and green beans. The rice bulks them up a little and adds a balancing tenderness to the wraps. Charring the green beans brings some smokiness and crunchiness. Finally, the sauce is the perfect combination of zesty, sweet and umami for this springtime weeknight meal. Enjoy!

Thai Steak Lettuce Wraps with Charred Green Beans
 
Yield: 2 servings
Ingredients
  • ¾ cup sushi rice
  • 3 teaspoons olive oil
  • 4 ounces green beans, trimmed
  • 8 ounces sirloin steak
  • 2 cloves garlic, minced
  • 2 tablespoons ponzu sauce
  • 1 tablespoon sugar
  • 1 lime, quartered
  • 1 head butter lettuce, washed and separated
  • A small handful of cilantro leaves, roughly torn
  • A small handful of mint leaves, roughly torn
Directions
  1. In a small pot or a rice cooker, combine the sushi rice, 1½ cups of water, and a pinch of salt. Heat on high until boiling, then cover the pot and reduce the heat to low. Continue to cook for 15-17, or until the rice is tender and there is no more excess water. Remove from the heat and fluff with a fork.
  2. While the rice is cooking, heat 2 teaspoons of the olive oil in a pan on medium-high heat. Add the green beans and season with salt and pepper. Cook the green beans until they are slightly charred and softened, about 4-5 minutes, stirring occasionally. Remove the green beans and wipe the pan with a paper towel.
  3. Dry the steaks if needed then season generously on both sides with salt and pepper. Heat 1 teaspoon of the olive oil in the same pan over medium-high heat. Add the steaks and cook to your desired degree of doneness. For medium-rare steak, cook about 2-3 minutes per side for a 1" steak. Remove the steaks from the pan and let them rest before cutting them for at least 5 minutes.
  4. With the browned bits from the steak still in the pan add the minced garlic, as well as a drizzle of olive oil if the pan is dry. Heat over medium-high heat for 30 seconds to 1 minute, stirring constantly. Add the ponzu sauce, sugar, the juice of 2 lime quarters, and 2 tablespoons of water. Continue to cook for 1-2 minutes or until the sauce has slightly thickened, continuing to stir. Remove the sauce from the heat.
  5. Place the lettuce leaves on the plates. Top each lettuce wrap with some cooked rice and charred green beans. Slice the steak against the grain and place over the rice and green beans. Finish the lettuce wraps with the sauce, torn cilantro and mint leaves, as well as an extra squeeze of lime as desired.

 Recipe from Blue Apron.

Cast Iron Home Fries with Creamy Garlic Dressing

Cast Iron Home Fries with Creamy Garlic Dressing  |  Recipe at lemonandmocha.com

I owe you all a huge apology. It is with a heavy heart that I must let you know that I kept this savory, tangy, and unbelievably tasty cast iron home fries recipe from you all for two years. I legitimately have no excuse and won’t even try to make one up, so I am sorry. But now that I’ve apologized we can all move on and focus on how these Cast Iron Home Fries with Creamy Garlic Dressing need to be at your next brunch. Or weekend breakfast. Or breakfast for lunch, because who says brunch food has to be either breakfast or “breakfast for dinner”?!

Cast Iron Home Fries with Creamy Garlic Dressing  |  Recipe at lemonandmocha.com

When my brother-in-law gave me the Brunch at Bobby’s cookbook I immediately gravitated towards this recipe in the side dish section. Something about the colors of the dish and the crispiness of the potatoes made me want to make (and eat) it ASAP. I’ve had a lot of home fries over the years, but never one with a dressing. Genius! The dressing allows the potatoes to have so much more flavor and really pack a punch.

Cast Iron Home Fries with Creamy Garlic Dressing  |  Recipe at lemonandmocha.com

This side dish could easily be made into the star of brunch by serving it with poached or fried eggs. The thought of the runny yolks mixing with the creamy dressing is causing my brain to overload with excitement right now. Deep breaths. Phew.

Cast Iron Home Fries with Creamy Garlic Dressing  |  Recipe at lemonandmocha.com

I originally made these potatoes to go with the Eggs Benedict over Cheddar Scallion Waffles with Crispy Chorizo, Smashed Avocado, and Green Chile Hollandaise I made for a Southwestern themed brunch. The boldness of these potatoes held up to the outrageous-ness of the eggs Benedict perfectly. I adjusted a few things from the original recipe to save some time and fit my personal preferences, including roasting the garlic for the dressing to add a more mild and caramelized flavor. Enjoy!

Cast Iron Home Fries with Creamy Garlic Dressing  |  Recipe at lemonandmocha.com

Cast Iron Home Fries with Creamy Garlic Dressing
 
Yield: 6 servings
Ingredients
for the garlic dressing
  • ½ cup mayonnaise
  • 2 tablespoons white wine vinegar
  • 1 tablespoon Dijon mustard
  • 4 cloves of roasted garlic (see note)
for the home fries
  • 3 pounds russet potatoes, about 3 large potatoes
  • 3 tablespoons vegetable oil, plus more as needed
  • 1 bell pepper, I used ½ red & ½ orange for some variety
  • 1 small head radicchio
  • 3 scallions
Directions
for the dressing
  1. In a small bowl, mash the roasted garlic. Add the mayonnaise, vinegar, and mustard then whisk to combine. Season with salt and pepper then let sit for 30 minutes to allow the flavors to settle. If you will be letting it sit for more than 30 minutes, cover the bowl and place in the fridge until ready to serve.
for the home fries
  1. Scrub then clean the potatoes. Pierce them each 5-6 times with a fork then place the potatoes on a microwave safe baking dish and cook in the microwave for 5 minutes. Carefully flip the potatoes over then microwave for another 5 minutes. You should be able to poke a fork or paring knife into the potato with no resistance. Add more cooking time if needed, or alternatively use the “potato” setting on your microwave. Once the potatoes are cool enough to handle cut them into a 1-inch dice.
  2. While the potatoes are cooking, prep the rest of the vegetables. Removing the seeds, cut the bell pepper into a thick dice. Halve the radicchio then thinly slice. Thinly slice the scallions, discarding the dark green parts.
  3. Heat 1 tablespoon of the vegetable oil in a cast iron skillet over medium-high heat. Add the diced bell pepper and cook until the pepper starts to soften. Add the remaining oil then the diced potatoes. Spread the potatoes so they are in a single layer and cook until they have begun to get crispy on the bottom, about 5 minutes. Carefully toss them and continue to cook until crispy, about 5 more minutes. Add more oil or increase the heat of the stove if needed. Remove the skillet from the heat.
  4. Move the potatoes and bell pepper to a large bowl or serving dish. Add the sliced radicchio, dressing, and scallions then carefully stir to combine. Feel free to not use all the dressing depending on your personal preference. Season with salt and pepper to taste. Serve while warm or at room temperature.
Notes
- To roast garlic: preheat oven to 425 degrees F. Leaving the skin on the garlic bulb, cut the top off the head of garlic so that almost all the tops of the cloves are exposed. Take a small piece of tinfoil big enough to wrap the garlic in. Place the garlic in the center and partially fold up the sides. Drizzle the exposed garlic with olive oil and season with salt and pepper. Seal the foil to make a little packet of the garlic and roast for 35 minutes. Once it’s cool enough to handle, you can squeeze out the roasted cloves.
- To prep ahead: roast the garlic, make the dressing, microwave the potatoes, and prep the vegetables. Then in the morning you will only have to deal with the cast iron skillet portion of the recipe.
- Cooking the potatoes: the original recipe from Bobby Flay called for the potatoes to be boiled whole for about 25 minutes, or until cooked through. I went with the microwave method to save time, but feel free to boil the potatoes if you prefer.

Recipe adapted from Brunch at Bobby’s.

Irish Cheddar, Bacon & Potato Muffins

Irish Cheddar, Bacon & Potato Muffins  |  Lemon & Mocha

Normally when I think of muffins my mind goes to sweet baked goods. Cinnamon-crumbed, definitely chocolatey, maybe even citrus-infused, but definitely not savory. Until March. Now I am fully on-board the savory muffin train, even if it’s just to make these Irish Cheddar, Bacon, and Potato Muffins over and over again. Yes, these muffins are that amazing.

Irish Cheddar, Bacon & Potato Muffins  |  Lemon & Mocha

The smell when they came out of the oven was so hypnotizing that Matt and I each ate one as soon as we could get the muffin paper liners off without burning ourselves (or at least until it was just minor pain). Then, the flavor was so outrageous that we were each forced to have a second one. It wasn’t our fault; we were hypnotized!

Irish Cheddar, Bacon & Potato Muffins  |  Lemon & Mocha

When I first saw the March muffins in the Food Network Magazine’s Muffin of the Month article, I thought they sounded heavy, but instead they are light and fluffy, while still being loaded with gooey cheese and bacon. Bacon doesn’t need a descriptor; everyone knows how bacony delicious bacon is.

Irish Cheddar, Bacon & Potato Muffins  |  Lemon & Mocha

In addition to the cooked bacon, there is a very small amount of bacon grease in the actual muffin batter so it helps bring that bacon flavor to every bite. I cooked a package of bacon on the griddle on a Sunday, which gave Matt and I some bacon for breakfast (a treat since we don’t cook bacon that often!), the three slices of bacon and one tablespoon of bacon grease I needed for this recipe, as well as cooked bacon for sandwiches and salads for lunches throughout the week.

Irish Cheddar, Bacon & Potato Muffins  |  Lemon & Mocha

Perfect as a grab and go breakfast, these Irish Cheddar, Bacon and Potato Muffins are even better after being warmed briefly in the microwave. Please do yourself a favor and make these muffins! Then do me a favor and bring them to my house so I can eat them with you! Enjoy!

Irish Cheddar, Bacon & Potato Muffins  |  Lemon & Mocha

Irish Cheddar, Bacon & Potato Muffins
 
Yield: 12 muffins
Ingredients
  • 1 large Yukon Gold potato (8 ounces)
  • ¼ teaspoon salt
  • 1½ cups all-purpose flour
  • 1 tablespoon sugar
  • 1 tablespoon baking powder
  • 1¼ cups buttermilk
  • 4 tablespoons unsalted butter, melted
  • 1 large egg
  • 3 slices bacon, cooked with 1 tablespoon bacon grease reserved
  • 4 ounces Irish cheddar cheese, diced
  • ¼ cup chopped fresh chives (about ½ a bunch)
Directions
  1. Preheat the oven to 400 degrees F. Line a 12-cup cupcake pan with paper liners and set aside.
  2. Cook the potato in the microwave. Poke the potato 5-6 times with a fork and wrap in a damp paper towel. Cook until the potato is just cooked through, about 4-5 minutes, being sure to turn it once during cooking. Let the potato cool. Once you can handle it carefully peel off the skin and grate the potato. Lightly season the grated potato with salt and pepper; toss to combine.
  3. In a large bowl, sift together the flour, sugar, baking powder, and ¼ teaspoon salt. Make a well in the center of the flour mixture.
  4. In a medium bowl, whisk together the buttermilk, melted butter, egg, and tablespoon of bacon drippings. Pour the mixture into the well of the flour mixture and stir until just combined. Carefully fold in the grated potato, bacon, cheese, and chives.
  5. Evenly divide the batter among the prepared paper liners. The batter should fill each to the top. Bake for 22-25 minutes, or until the top of the muffin is golden and a toothpick inserted into the center of the muffin comes out clean. Cool the muffins in the pan for 5 minutes, then remove to a cooling rack to completely cool.
Notes
Every time a recipe calls for buttermilk, I use this trick instead: Put a tablespoon of lemon juice in a liquid measuring cup. Add milk until the desired amount of buttermilk is reached (in this case 1¼ cups). Let sit 5 minutes. You can use whatever kind of milk you have in your fridge - I use nonfat milk. If the recipe calls for more than 1¼ cups buttermilk, you will need to use a little more lemon juice.
I used Kerrygold Dubliner cheese.
I had a hard time getting the paper liners off of these muffins. It was definitely worse when they were hot, so let them cool completely before eating. I plan to experiment during future baking of these muffins to see if I can adjust the recipe to get them to stick less or if it would be better to bake them directly in the pan with cooking spray. I will keep you all posted!
To fully savor these muffins, reheat them in the microwave for 15-30 seconds before eating.

Recipe from January/February 2018 issue of Food Network Magazine.

Chocolate Cherry Crinkle Cookies

Chocolate Cherry Crinkle Cookies  |  Lemon & Mocha

When I was deciding what to bake up for Valentine’s Day I immediately thought of these Chocolate Cherry Crinkle Cookies I made over Christmas. I initially made these more for Matt since he loves cherry, but they ended up being one of my favorite cookies.

Chocolate Cherry Crinkle Cookies  |  Lemon & Mocha

These soft and chewy cookies are loaded with cherry preserves, dried cherries, and chocolate chips. The flavor of the cherry preserves is subtle because the dried cherries and the chocolate chips take center stage. The combination of the two, especially baked into a chewy cookie, is habit-forming.

Chocolate Cherry Crinkle Cookies  |  Lemon & Mocha

One of my favorite things about these Chocolate Cherry Crinkle Cookies though was that they stayed fresh in an airtight container for so long! Not that they will last that long in your house, unless you’re a crazy normal person like me and made 10 bazillion different kinds of cookies by the hundreds for Christmas. Then you’ll be happy to know that the dried cherries keep them tasting like you just made them the other day.

Chocolate Cherry Crinkle Cookies  |  Lemon & Mocha

You will need red food coloring to get that perfect color for Valentine’s Day. Between these and the Red Velvet Oreo Truffle Chocolate Crunch Brownies I have a whole bunch of boxes of food coloring lying around with the red missing so I either need to invest in just red food coloring or come up with something for my green, yellow, and blue!

Chocolate Cherry Crinkle Cookies  |  Lemon & Mocha

I hope you all have a wonderful Valentine’s Day and enjoy these Chocolate Cherry Crinkle Cookies!

Chocolate Cherry Crinkle Cookies  |  Lemon & Mocha

Chocolate Cherry Crinkle Cookies
 
Yield: about 30 cookies
Ingredients
  • 1 ¾ cups all-purpose flour
  • ¾ teaspoon baking powder
  • ¼ teaspoon salt
  • 1 stick unsalted butter, at room temperature
  • 1 cup granulated sugar
  • ¼ cup packed light brown sugar
  • 1 large egg
  • ⅓ cup cherry jam or preserves
  • ½ teaspoon vanilla extract
  • ½ teaspoon almond extract
  • 1 teaspoon red food coloring
  • ¾ cup semisweet chocolate chips
  • ⅓ cup sweetened dried cherries, roughly chopped
  • ¼ cup confectioners’ sugar
  • 1 tablespoon red sanding sugar
Directions
  1. In a medium bowl sift together the flour, baking powder, and salt. Set aside.
  2. In a large bowl beat the butter, ½ cup of the granulated sugar, and the brown sugar with a mixer on medium high speed for about 3 minutes, until light and fluffy. Add the egg, beat to combine, then add the jam, both extracts, and the food coloring. Beat until combined, scraping down the sides as needed. Add the flour mixture on low speed and mix until just combined. Fold in the chocolate and dried cherries. Tightly cover the dough and refrigerate at least 1 hour or overnight. The dough needs to be firm; I left my dough overnight both times.
  3. Preheat the oven to 350 degrees F. Line two baking sheets with parchment paper and set side.
  4. In a small bowl combine the confectioners’ sugar and sanding sugar. Roll a heaping tablespoon of dough into a ball and roll in the confectioners’ sugar mixture to coat completely. Repeat with the rest of the dough and space about 2 inches apart on the prepared baking sheets.
  5. Bake for 18 minutes or until the edges of the cookies are golden and the cookies are cracked on top, making sure not to overcook. Let the cookies cool for 5 minutes on the baking sheet then remove to a cooling rack to cool completely.

 Recipe from December 2017 issue of Food Network Magazine.