Recipes

Pumpkin Spice Latte Whoopie Pies

Pumpkin Spice Latte Whoopie Pies  |  Lemon & Mocha

Happy October! I know it’s been October since Tuesday and I’ve already posted since then, but now that I’m sharing a pumpkin recipe with you all it feels more official. I’m super unique and love pumpkin recipes in the fall. Especially baked goods because the smell that fills up the kitchen is amazing.

Pumpkin Spice Latte Whoopie Pies  |  Lemon & MochaFood Network Magazine stayed true to the season and made their October cookies these Pumpkin Spice Latte Whoopie Pies. I’ve made whoopie pies in the past, but they turned out a little dense so I was curious to see how their pumpkin spice version would stack up.

Pumpkin Spice Latte Whoopie Pies  |  Lemon & Mocha

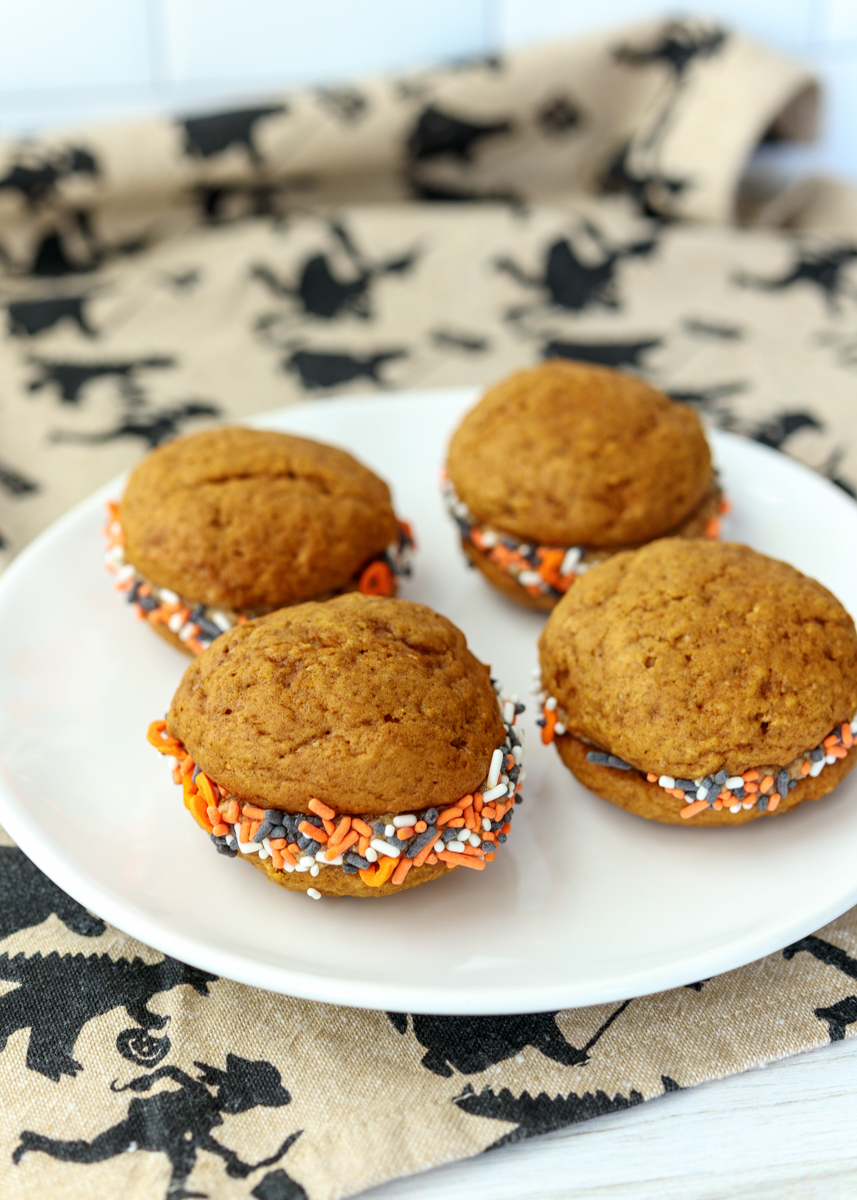
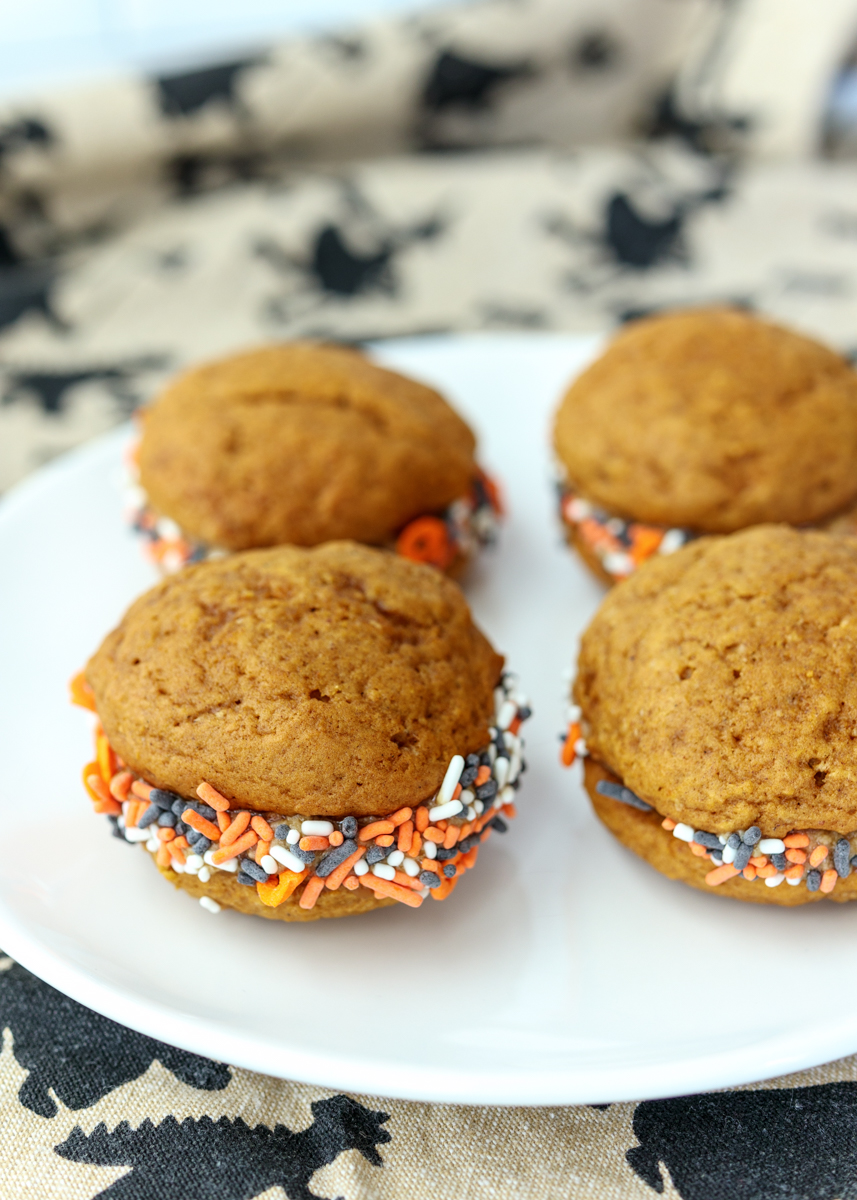
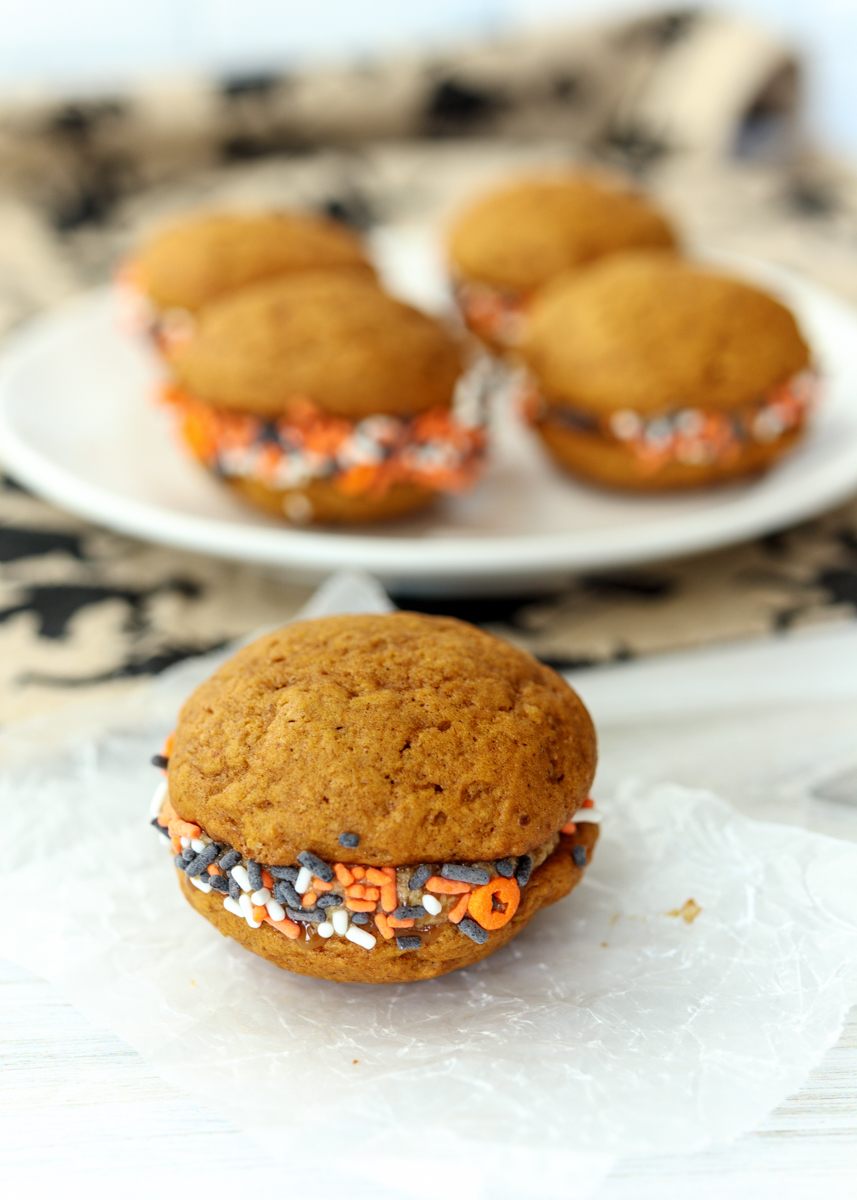
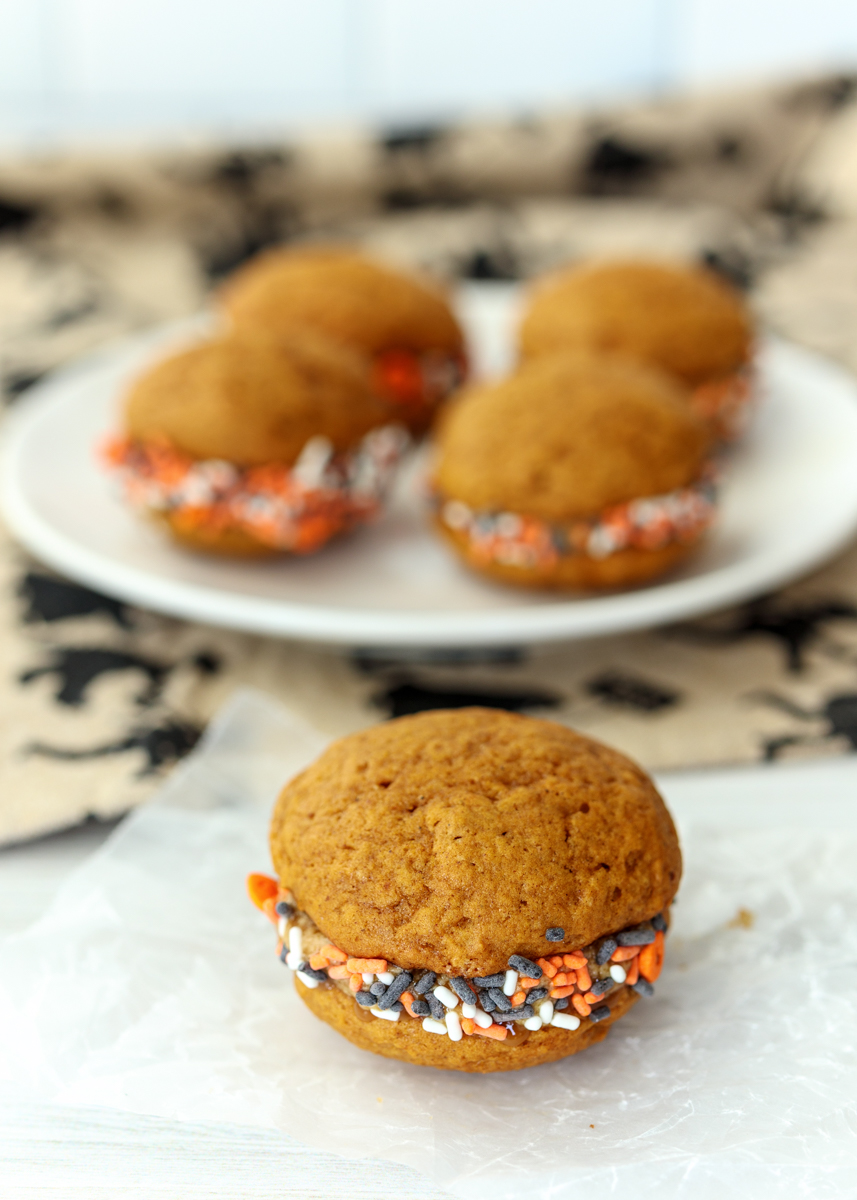
First of all, I love that the cookies for these whoopie pies are so cute and little! Especially because once you sandwich two together with some filling it ends up being quite a lot so they really are the perfect size.

Pumpkin Spice Latte Whoopie Pies  |  Lemon & Mocha

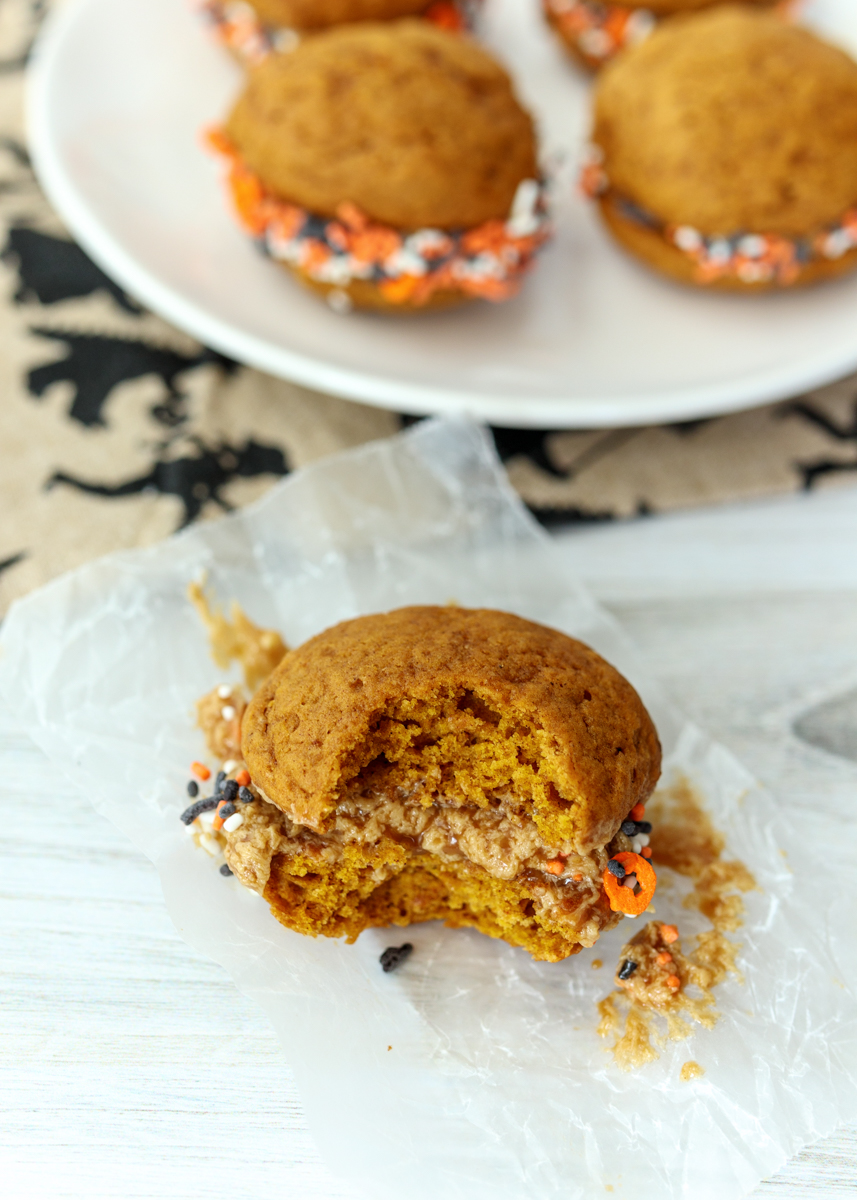
Second, they are moist, definitely not dense and packed with pumpkin spice goodness! I ate one on its own while it was still warm and it was so good. Kind of like a little pumpkin cake in a cookie shape.

Pumpkin Spice Latte Whoopie Pies  |  Lemon & Mocha

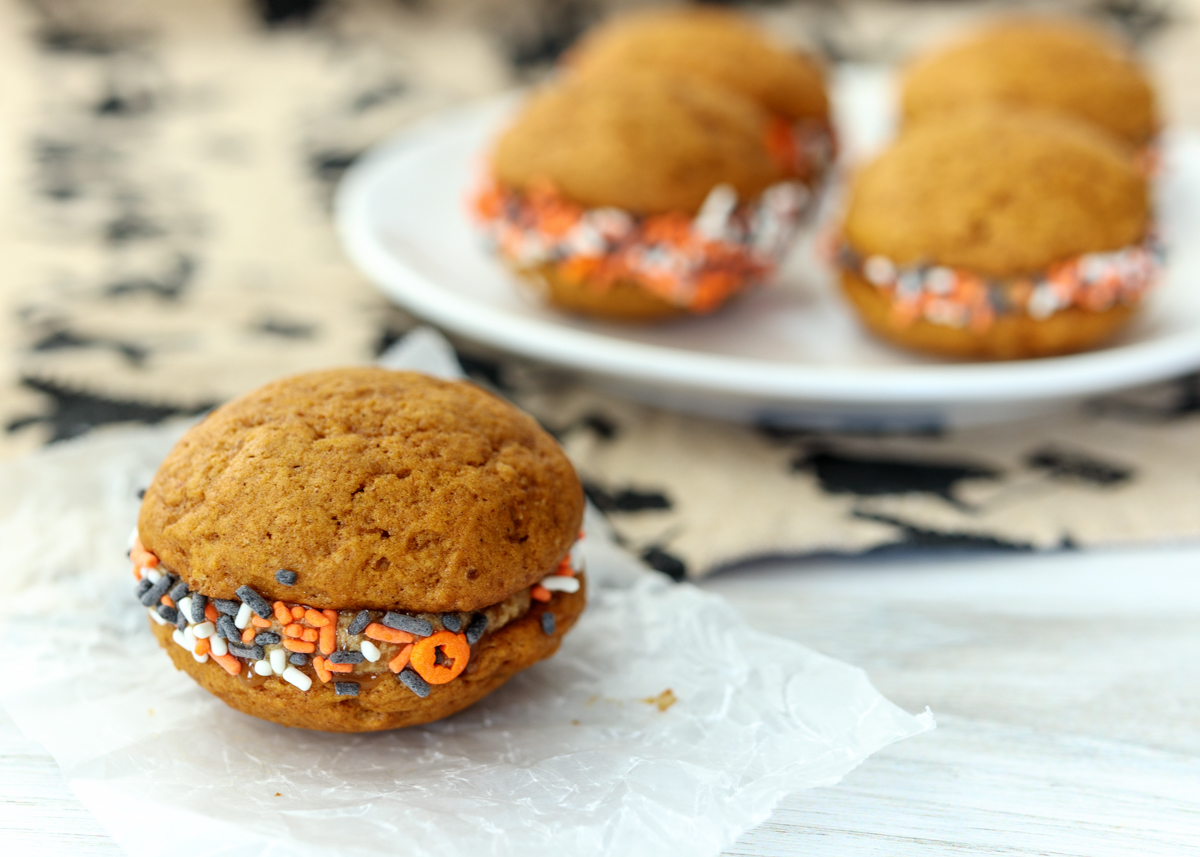
The filling is a coffee buttercream, which is a delicious combination with the pumpkin flavoring. Don’t forget the fun fall sprinkles to roll them in!

Pumpkin Spice Latte Whoopie Pies  |  Lemon & Mocha

Pumpkin Spice Latte Whoopie Pies
 
Yield: 15-16 2" whoopie pies
Ingredients
for the cookies
  • 2 cups all-purpose flour
  • 1 tablespoon pumpkin pie spice
  • 1 teaspoon baking powder
  • ½ teaspoon baking soda
  • ½ teaspoon salt
  • 6 tablespoons unsalted butter, at room temperature
  • ¾ cup granulated sugar
  • ½ cup brown sugar
  • ½ teaspoon vanilla extract
  • 1 large egg, at room temperature
  • 1 cup pure pumpkin puree
for the filling
  • 2 tablespoons milk
  • 2 teaspoons instant coffee granules
  • 12 tablespoons unsalted butter (1½ sticks), at room temperature
  • 2 cups confectioners’ sugar
  • ¼ teaspoon salt
  • Fall sprinkles or nonpareils, for decorating
Directions
for the cookies
  1. Preheat oven to 375 degrees F, making sure to position oven racks in the upper and lower thirds positions. Line 2 baking sheets with parchment paper and set aside.
  2. In a medium bowl, sift together the flour, pumpkin pie spice, baking powder, baking soda and salt.
  3. In the bowl of a stand mixer or in the large bowl with a hand mixer, beat the butter, granulated sugar, brown sugar and vanilla on medium-high speed for 5 minutes, or until pale and fluffy. Add the egg, beat until combined. Add the pumpkin puree and beat on low speed until combined, scraping the sides of the bowl as needed. Add the flour mixture and beat on low until just combined.
  4. Scoop 1½ tablespoon mounds of batter onto the prepared baking sheets, about 2 inches apart. Use damp fingers to shape them into rounds. Alternatively, use a piping bag fitted with a ½-inch round tip to pipe 1½-inch rounds of batter. Bake for 14-16 minutes, switching the pans halfway through baking. They are done when they’re golden and the tops spring back with lightly pressed. Let the cookies cool for 5 minutes on the baking sheet set on a wire cooling rack then transfer to a wire cooling rack to cool completely. Let the baking sheets cool slightly then repeat with the remaining batter.
for the filling
  1. Combine the milk and instant coffee in a small bowl until the coffee dissolves.
  2. In the bowl of a stand mixer or in a large bowl with a hand mixer, beat the butter, confectioners’ sugar and salt on low speed until combined. Increase the speed to medium-high and beat for 3 minutes, or until smooth. Add the milk mixture then beat on medium-low until smooth, about 1 minute, scraping the sides of the bowl as needed. Refrigerate for 20 minutes, or until slightly firm.
  3. When the cookies are cool and the filling is slightly firm, sandwich about 1 tablespoon of filling between 2 cookies. Roll the edges in sprinkles. If the filling is too soft, refrigerate the whoopie pies for 30 minutes, but let sit at room temperature before serving.

 Recipe adapted from January/February 2019 issue of Food Network Magazine.

Some of the links above are affiliate links, which means I may receive a small commission for my referral. This does not affect the retail cost of the item. Thank you for supporting Lemon & Mocha!

Pesto and Provolone Turkey Meatloaf

Pesto and Provolone Turkey Meatloaf  |  Lemon & Mocha

Sometimes I have brainstorming sessions where I’ll think about meals I would want to eat, without putting much thought into how to go about the actual recipe. Or sometimes an idea for a dish just pops into my head and I’ll write it down and hope I know later what the heck I was even thinking about. I have little notes with food ideas in my phone, scattered on post-its and in random notebooks. One note that I wrote (who knows when) said, “provolone and pesto turkey meatloaf.” I would see it every now and then and think, “that sounds so good!” and then move on with whatever I was doing.

Pesto and Provolone Turkey Meatloaf  |  Lemon & Mocha

When I was looking through my Lemon & Mocha calendar trying to think of more dinner dishes I figured it was time to tackle my pesto and provolone meatloaf idea. I’m so glad I did because this turkey meatloaf is incredible! Forget whatever notions you have about ground turkey being dry or flavorless. This meatloaf is tender, moist and packed with creamy pesto and pockets of oozing cheese. Oh, and it’s decently healthy, which is always a fun bonus!

Pesto and Provolone Turkey Meatloaf  |  Lemon & Mocha

I took tips from two of my favorite ground turkey recipes: my Turkey Veggie Mushroom Burgers and my Baked Turkey Pesto Meatballs. We’re taking a cue from the burgers and swapping out the usual breadcrumbs for a healthy whole grain. Using quinoa as one of the binders is a healthy alternative that also helps the meatloaf be really moist.

Pesto and Provolone Turkey Meatloaf  |  Lemon & Mocha

As for the tip from the meatballs, we’re going right ahead and adding a whole bunch of pesto to the meatloaf mixture. Whether you use homemade or store-bought pesto, it’s hard to beat that fresh, garlicky flavor. Adding some to the ground turkey ensures flavor in every bite as well as helping to create a tender meatloaf.

Pesto and Provolone Turkey Meatloaf  |  Lemon & Mocha

But we can’t forget about the provolone part! I bought a block of provolone, cut some of it into chunks and worked those right into the meatloaf. While it was cooking I could see the little pockets of provolone oozing out and it smelled ridiculously good in our kitchen. I already know this recipe is going to get a lot of use with our family! I hope you all enjoy it as much as we did!

Pesto and Provolone Turkey Meatloaf  |  Lemon & Mocha

Pesto and Provolone Turkey Meatloaf
 
Yield: 8 servings
Ingredients
  • 2 pounds ground turkey, 90% lean
  • ½ cup cooked quinoa
  • ½ cup pesto
  • ½ cup chopped provolone cheese
  • 1 shallot, minced
  • 2 cloves garlic, minced
  • 1 large egg
  • 1 tablespoon balsamic vinegar
  • ½ teaspoon salt
  • ¼ teaspoon ground black pepper
Directions
  1. Preheat oven to 350 degrees F. Line a baking sheet with nonstick aluminum foil and set aside
  2. Combine all the ingredients in a large mixing bowl. Be sure not to over-mix. Freeform the meatloaf onto the baking sheet. I usually make mine 4-5 inches wide and about 3-4 inches tall.
  3. Bake for 1 hour or until it reaches an internal temperature of 165 degrees F. Let rest a couple minutes before taking the internal temperature. If desired, top with additional pesto and some shredded provolone during the last few minutes of baking time. Once the meatloaf is done, let rest 10 minutes before slicing.


Freezer Burritos #2: Slow Cooker Pork and Roasted Sweet Potato Freezer Burritos

Freezer Burritos #2: Slow Cooker Pork and Roasted Sweet Potato Freezer Burritos

I’m back with round two of these easy, make-ahead freezer burritos! If you missed my first post, Freezer Burritos: Chicken Verde, Mushroom, Kale and Brown Rice Burritos, make sure you go read it. It’s essentially part one of this post and it goes through all the tips and tricks for making your own healthy freezer burritos at home.

Freezer Burritos #2: Slow Cooker Pork and Roasted Sweet Potato Freezer Burritos

Today I’m sharing another variation that Matt and I have enjoyed: Slow Cooker Pork and Roasted Sweet Potato Freezer Burritos. They are stuffed with tender roasted pork and sautéed peppers and onions. I’ve also substituted spiced roasted sweet potatoes in place of the traditional rice. The pork and the sweet potatoes pair really well together. As promised, below are some protein, grain and filling ideas so you can mix and match to make your ideal freezer burritos. Do you have any favorites that I didn’t include below?

Freezer Burritos #2: Slow Cooker Pork and Roasted Sweet Potato Freezer Burritos

Protein

Shredded chicken
Sliced steak
Shredded salsa verde chicken
Slow cooker pulled pork
Seasoned taco meat
Refried beans
Drained black or pinto beans
Crumbled sautéed chorizo or sausage, drained
Scrambled eggs (breakfast burritos!)

Grain/Starch

Cooked brown or white rice
Lime cilantro rice
Cooked quinoa
Roasted sweet potatoes
Fire roasted corn, drained
Cooked lentils, drained

Filling

Sautéed peppers and onions
Sautéed mushrooms
Cooked kale or spinach greens, drained
Roasted broccoli
Roasted chiles, drained
Caramelized onions
Sautéed zucchini
Shredded cheese

Freezer Burritos #2: Slow Cooker Pork and Roasted Sweet Potato Freezer Burritos

Freezer Burritos #2: Slow Cooker Pork and Roasted Sweet Potato Freezer Burritos
 
Yield: 8 burritos, plus extra shredded pork
Ingredients
  • 2 pounds pork shoulder roast
  • 2 onions
  • ½ teaspoon dried oregano
  • 2 large sweet potatoes, scrubbed clean
  • ¼ teaspoon garlic powder
  • ¼ teaspoon ground cumin
  • ¼ teaspoon paprika
  • ⅛ teaspoon chili powder
  • 1 tablespoon olive oil
  • 2 red bell peppers, stems removed
  • 8 tortillas
  • ⅓ cup shredded mozzarella or colby jack cheese, optional
  • Salt and pepper
  • Cooking spray
  • Salsa, for serving
Directions
  1. Season the pork all over with salt and pepper. Add to the slow cooker. Chop one of the onions and add to the slow cooker, along with the dried oregano. Add 3 tablespoons water then slow cook on low for 8 hours or high for 4 hours. When the pork is done and cooked through, remove from the slow cooker to a cutting board. Leave the onion and juices behind, discard. When the pork is cool enough to handle, shred. Let cool completely or put in the fridge to use later. You will have leftover pork after making the burritos - eat or freeze in a freezer bag for later.
  2. Roast the sweet potatoes. Preheat the oven to 425 degrees. Line a baking sheet with nonstick aluminum foil and set aside. You can peel the sweet potatoes if you prefer; I always leave them unpeeled. Cut the sweet potatoes into ½-inch rounds then cut each round into pieces so you have roughly ½-inch diced pieces. Place the sweet potato pieces on the prepared baking sheet in an even layer and spray with cooking spray. Sprinkle the garlic powder, ground cumin, paprika and chili powder over top. Season with salt and pepper and toss to coat. Bake until tender and slightly caramelized, about 28-35 minutes, tossing about every 15 minutes. Let cool completely or put in the fridge to use later.
  3. Cut the remaining onion in half then cut into slices. Slice the bell peppers. Heat 1 tablespoon of the olive oil over medium-high heat in a large sauté pan. Add the sliced onions and peppers, season with salt and pepper. Sauté until soft and lightly charred, about 7-8 minutes. Remove from the heat and let cool completely or put in the fridge to use later.
  4. When you’re ready to make the burritos, make sure all your ingredients are room temperature or cold. Place the first tortilla on a plate. Add some shredded pork in a lengthwise strip towards the bottom of the tortilla closest to you. Top with some sweet potatoes and then some peppers and onions. Top with some cheese, if using. Fold in each side then take the bottom of the tortilla closest to you and tightly roll it up and over the filling. Continue to roll up the burrito, tightly, tucking in the sides additionally as needed. Wrap in plastic wrap or aluminum foil. Set aside and repeat for the remaining tortillas and fillings. Place all the rolled burritos in a labeled gallon freezer bag and place in the freezer.
  5. To heat: Remove the burrito from the freezer. Remove and discard the plastic wrap or aluminum foil. Place the burrito on a microwave safe plate and microwave at 70% power for 3 minutes. Sear the burrito in a sauté pan lightly sprayed with cooking spray over medium-high heat for 1 minute on each side, until lightly browned. If you don’t want to sear your burrito, microwave for a total of 5 minutes instead of 3. Serve with salsa.


Crispy Baked Fish and Chips

Crispy Baked Fish and Chips  |  Lemon & Mocha

We’re wrapping up a week of healthy dinners here on Lemon & Mocha with a lightened up twist on a classic: Crispy Baked Fish and Chips. Tender, flaky fish coated in a crispy exterior and some homemade french fries, all served alongside a creamy tarter sauce – yum!

Crispy Baked Fish and Chips  |  Lemon & Mocha

We’ve done a few things to the original dish to lighten it up with the most obvious being that we’re baking the breaded fish and french fries instead of frying them. I’ve baked breaded chicken many, many times, but I had never tried it before with fish. It came out so well! The fish was tender and perfectly cooked while the outside was crispy.

Crispy Baked Fish and Chips  |  Lemon & Mocha

The breading in this recipe is interesting and helped in aiding with the crispiness factor. No panko or nuts here; instead the fish is breaded with crisp rice cereal! Also known as Rice Krispies cereal or whatever Trader Joe’s or store brand you prefer. A bowl of Rice Krispies was my go-to during my first trimester so we have plenty of boxes stockpiled in the house. I love that the breading process is only a two step as well. The fish pieces get dunked in some frothy egg whites and then coated in the crispy rice cereal. That’s it!

Crispy Baked Fish and Chips  |  Lemon & Mocha

The baked french fries were also a big hit for Matt and I. I’ve baked fries before, but the trick about preheating the baking sheet in the oven was a new one for me and I definitely think it helped make them crispier. Finally, the tarter sauce has been lightened up as well! I’m not sure about you, but in addition to using tarter sauce on my fish, I love dipping my fries in the stuff. This healthier homemade version is made with a Greek yogurt base and has no mayonnaise. I am a self-proclaimed mayo addict and I was prepared to not like this yogurt version, but it was really good! I didn’t miss the mayo at all and felt like I was eating regular tarter sauce.

Crispy Baked Fish and Chips  |  Lemon & Mocha

The only downfall for this whole meal is that it is not make-ahead friendly, but I’ll let it slide every once in a while for a delicious and healthy fish and chips dinner! Happy Friday, everyone!

Crispy Baked Fish and Chips  |  Lemon & Mocha

Crispy Baked Fish and Chips
 
Yield: 4 servings
Ingredients
for the chips
  • 3 medium russet potatoes, about 1¼ pounds, scrubbed clean
  • ¼ cup extra-virgin olive oil
  • Smoked paprika
  • Coarse sea salt
for the fish
  • 2¾ cups crispy rice cereal, such as Rice Krispies
  • 3 large egg whites
  • 1½ pounds skinless, boneless pollock (or other firm white fish, such as cod), cut into 2-inch by 4-inch pieces
  • Salt and ground black pepper
  • Olive oil cooking spray
for the tarter sauce
  • ⅔ cup nonfat Greek yogurt
  • 3 tablespoons pickle relish
  • ½ teaspoon lemon juice
  • ¼ teaspoon hot sauce
  • Salt
Directions
for the chips
  1. Preheat oven to 450 degrees F, making sure oven racks are in the upper and lower thirds of the oven. Use convection oven setting if available. Place a baking sheet on the top rack to preheat.
  2. While the oven is preheating prep the fries. Cut the unpeeled potatoes into ¼-inch thick sticks. Place them in a large bowl then add the olive oil. Toss to coat then sprinkle with the smoked paprika and toss to coat. Carefully remove the baking sheet from the oven. Add the potato sticks and spread in an even layer, leaving the extra oil behind. Bake the fries on the top rack for 25-30 minutes, or until browned and crispy, flipping the fries once halfway through. When they come out of the oven sprinkle generously with the coarse sea salt.
for the fish
  1. Set a wire cooling rack onto a baking sheet and lightly spray with the olive oil cooking spray.
  2. Set up a breading station with 2 bowls. In the first, combine the cereal (lightly crushing with your hands), 2 teaspoons of salt and some ground black pepper. In the second, whisk the egg whites with a pinch of salt until frothy. First dip the fish pieces in the egg whites then dip in the cereal mixture to completely coat. Place on the prepared wire rack and repeat with the remaining fish pieces, positioned on its side so more of the crust is exposed if possible.
  3. Lightly spray with olive oil cooking spray. Bake the fish on the bottom oven rack for 12 minutes, or until crispy and cooked through. Serve with the chips and tarter sauce.
for the tarter sauce
  1. Combine the yogurt, relish, lemon juice and hot sauce in a small bowl. Season with salt to taste. Cover and place in the fridge for at least 10 minutes before using.

 Recipe from July/August 2010 issue of Food Network Magazine.

Some of the links above are affiliate links, which means I may receive a small commission for my referral. This does not affect the retail cost of the item. Thank you for supporting Lemon & Mocha!

Asian Chicken Meatball Lettuce Wraps

Asian Chicken Meatball Lettuce Wraps  |  Lemon & Mocha

I love a good lettuce wrap, especially when it has fresh and tangy flavors like these Asian Chicken Meatball Lettuce Wraps. Today I’m sharing another healthy dinner recipe with you all, this time from my favorite little cookbook, the Cook This, Not That! cookbook. This is one that I’ve made sporadically over the years ever since buying that cookbook and every time I make it we talk about how we should have it more often.

Asian Chicken Meatball Lettuce Wraps  |  Lemon & Mocha

The chicken meatballs only have six ingredients, but they are packed with flavor. You can grill them on a grill or grill pan for a nice char. I’ve also baked them successfully. Just like with any good lettuce wrap or taco the key to keep you diving back in for more is a layering of flavors. In addition to the grilled chicken meatballs these wraps are also stuffed with a simple pickled cucumber salad and a delicious ginger scallion sauce. I cannot say enough good things about this sauce! I want to drizzle it over all my protein and rice dishes forever.

Asian Chicken Meatball Lettuce Wraps  |  Lemon & Mocha

If you don’t feel like fussing with the lettuce wraps you could always just serve this as a plated meal over the brown rice, but the lettuce does add some welcome freshness to the dish. Sometimes I have trouble finding ground chicken in the store so I’ve also made this dish with ground pork, which goes incredibly well with the pickled and ginger flavors. I hope you all enjoy this one!

Asian Chicken Meatball Lettuce Wraps  |  Lemon & Mocha

Asian Chicken Meatball Lettuce Wraps
 
Yield: 4 servings
Ingredients
for the pickled cucumber salad
  • ½ large English cucumber, sliced into thin rounds
  • ⅓ small red onion, thinly sliced
  • 1½ teaspoons sesame oil
  • 2 tablespoons rice wine vinegar
  • 1½ teaspoons granulated sugar
  • ½ teaspoon salt
  • ½ teaspoon red chili flakes, optional
for the ginger scallion sauce
  • 6-8 scallions, bottoms removed and thinly sliced
  • 1 tablespoon grated fresh ginger
  • 1 tablespoon low-sodium soy sauce
  • 2 tablespoons vegetable oil
  • 1 tablespoon rice wine vinegar
for the lettuce wraps
  • 1 pound ground chicken or pork
  • ½ red onion, minced
  • 2 cloves garlic, minced
  • 1 tablespoon grated fresh ginger
  • 1 jalapeño pepper, minced (if you don’t like spicy food remove all seeds and pith)
  • 2 teaspoons granulated sugar
  • 1 teaspoon salt
  • Boston lettuce leaves, for serving
  • Steamed brown rice, for serving
Directions
for the pickled cucumber salad
  1. Combine the cucumber, onion, sesame oil, vinegar, sugar, salt and red pepper flakes (if using) in a mixing bowl. Let sit for at least 15 minutes before serving. Or make ahead as it will keep in the fridge for up to 5 days.
for the ginger scallion sauce
  1. In a small mixing bowl, combine the scallions, ginger, soy sauce, oil and vinegar. Letting the sauce sit in the fridge for 30 minutes before eating will deepen the flavor.
for the lettuce wraps
  1. Preheat a lightly oiled grill pan or grill over medium-high heat. If using a grill you might want to skewer the meatballs to make them easier to turn and cook.
  2. Combine the ground chicken, onion, garlic, ginger, jalapeño, sugar and salt in a large mixing bowl until just combined. Be sure not to over-mix. Divide into 12 evenly sized meatballs. Grill for 4-5 minutes per side until they reach an internal temperature of 165 degrees F. Remove from the heat and use the lettuce to make wraps stuffed with the rice, grilled meatballs, pickled cucumber salad and ginger scallion sauce.

Recipe from Cook This, Not That!.
Some of the links above are affiliate links, which means I may receive a small commission for my referral. This does not affect the retail cost of the item. Thank you for supporting Lemon & Mocha!