Holiday

Leftover Halloween Candy Chocolate Lasagna

Leftover Halloween Candy Chocolate Lasagna  |  Lemon & Mocha

Happy Monday before Halloween! I don’t love Halloween solely because of the candy, but all those Kit Kats and Reese’s are definitely a big factor! No matter what age you are, you’re bound to have leftover candy after Halloween. It may because your kids collected way more than they need so you snagged a stash for yourself. It may be because you bought several Costco size bags of candy, but no one in your neighborhood felt like coming to your house since it’s on a “hill” – speaking from experience.

Leftover Halloween Candy Chocolate Lasagna  |  Lemon & Mocha

It may be because you went trick-or-treating at Disneyland’s Mickey’s Not So Scary Halloween Party, which Matt and I did two years ago and it was so much fun! Or maybe you just took advantage of all the after-holiday sales while you were hungry and felt at the time you really had to have all four bags of those fun size chocolate candy bars. Either way, now you have a bunch of candy and while it’s great to eat on its own you can only do so much of that before you never want to look at a candy bar again.

Leftover Halloween Candy Chocolate Lasagna  |  Lemon & Mocha

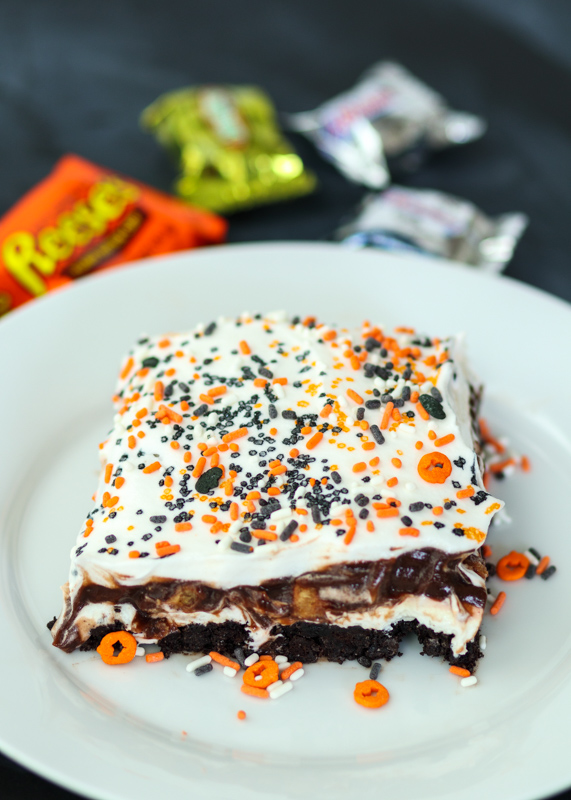
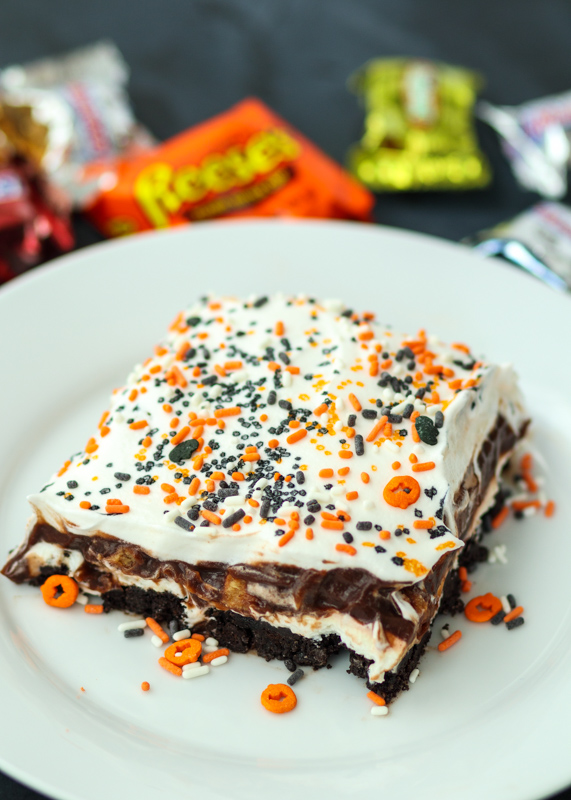
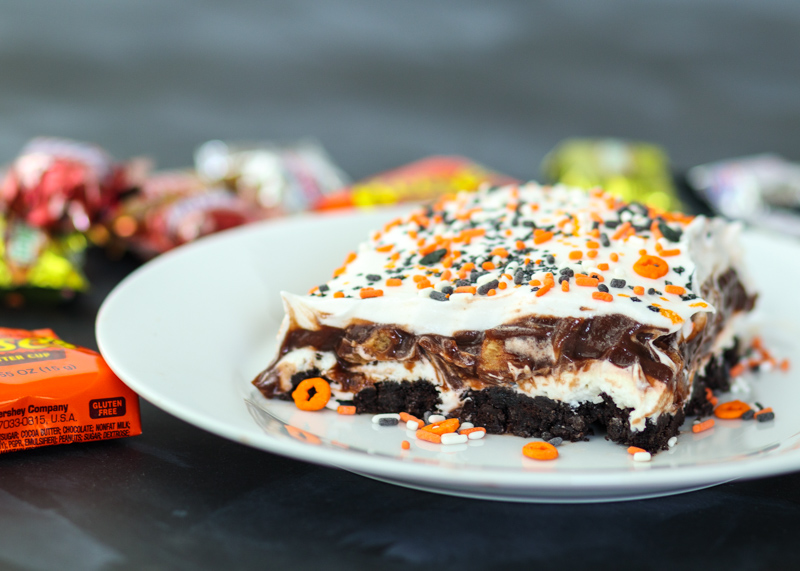
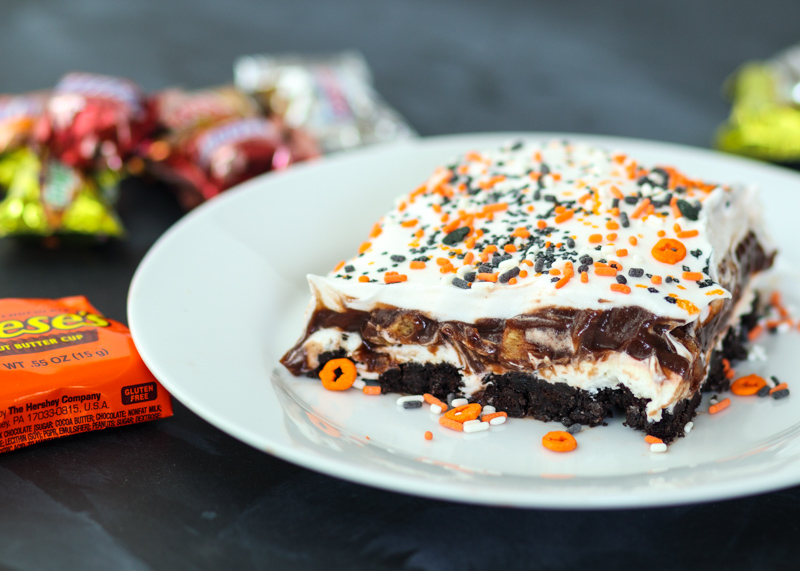
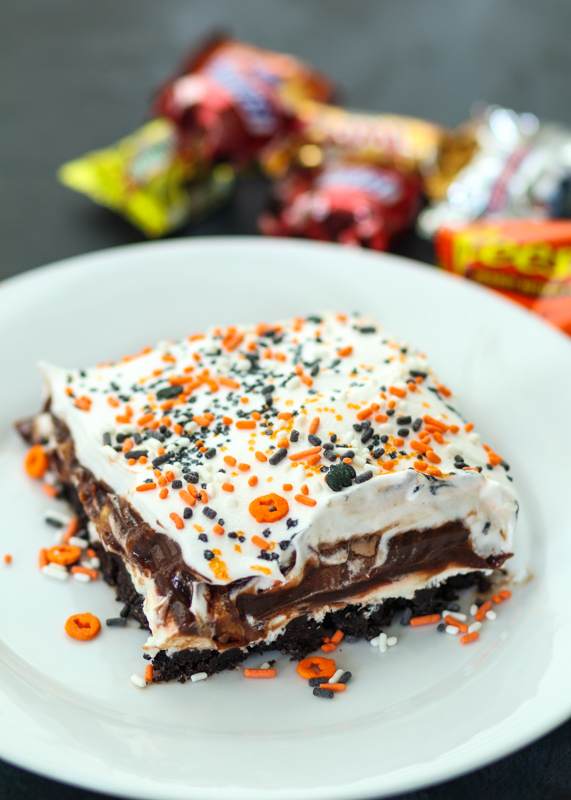
Enter this Halloween Chocolate Lasagna. I hesitate to call it a Chocolate Lasagna since I think the name makes people not want to try it, but according to the internet and Pinterest that is what this layered chocolatey dessert is called. The bottom layer is a no-bake Oreo crust. Next up we have a sweetened cream cheese layer that’s been folded together with some whipped topping to make it light and fluffy. If you don’t want to use store bought whipped topping you could always fold in some homemade whipped cream so I put those directions in the recipe as well. The next two layers are creamy chocolate pudding and then whipped topping. Don’t forget the Halloween candy! You can use whichever chocolate candies you prefer. I chopped up Kit Kat, Reese’s, Milky Way, Snicker’s and 3 Musketeers and sneaked them in between the pudding layer.

Leftover Halloween Candy Chocolate Lasagna  |  Lemon & Mocha

This dessert is addictive, especially with the candy added in as a fun surprise. It tastes incredibly light while you are eating it, but it’s also very rich at the same time. Everyone who had this ate it up and they even each brought a bowl-full home.

Leftover Halloween Candy Chocolate Lasagna  |  Lemon & Mocha

The first time I ever heard of Chocolate Lasagna was last year when Matt’s mom made it for Christmas. The minute I saw all the whipped cream and chocolate I knew I was going to be in love. We kept the leftovers and by we I mean I may or may not have told Matt he couldn’t have any 😂. When I thought of turning it into a leftover Halloween candy dessert I asked Matt’s mom to send me the recipe so I could share it with all of you. And so I could get to eat it again since I had been dreaming about it since last Christmas. If you are looking for other leftover Halloween candy ideas, check out my Leftover Halloween Candy Cookies!

Leftover Halloween Candy Chocolate Lasagna  |  Lemon & Mocha

Leftover Halloween Candy Chocolate Lasagna
 
Yield: 20 - 24 servings
Ingredients
  • 1 14.3-ounce package of Oreo cookies, about 36 Oreos (not double stuff)
  • 6 tablespoons butter, melted
  • 1 8-ounce package cream cheese, room temperature
  • ¼ cup granulated sugar
  • 2 tablespoons milk, cold (use any fat percentage of milk except non-fat)
  • 12 ounces frozen whipped topping (Cool Whip), defrosted
  • 2 4-ounce packages chocolate instant pudding
  • 3¼ cups milk, cold (use at least 1% milk)
  • About 3 cups chopped leftover Halloween candy
  • Halloween sprinkles, for decorating
Directions
  1. Crush the Oreo cookies using a food processor or by placing them in a large freezer bag and crushing them with a meat mallet or rolling pin. They don’t need to be fine crumbs, but there shouldn’t be any huge chunks of cookie. Pour the cookie crumbs into a large mixing bowl and stir in the melted butter until combined. Pour the crumb mixture into a 9x13 baking pan and press the crumbs to form an even layer on the bottom of the pan. Refrigerate while you work on the rest of the layers.
  2. In the bowl of a stand mixer or in a large mixing bowl with a hand mixer, beat the cream cheese until light and fluffy. Add in the sugar and the 2 tablespoons of milk then beat until combined. Fold in 1¼ cups of the whipped topping and spread in an even layer over the Oreo crust.
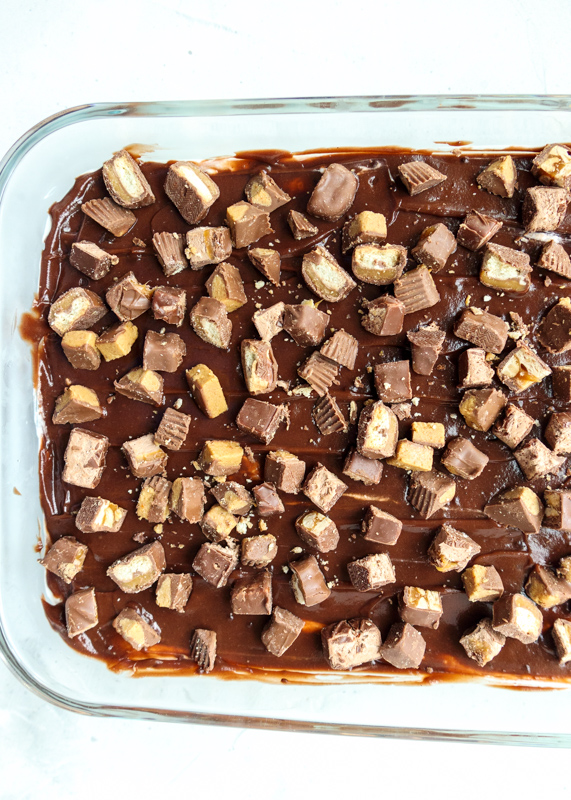
  3. In a medium mixing bowl (or the same one used for the Oreo crust), combine both chocolate instant pudding mixes with the 3¼ cups cold milk. Whisk until the pudding starts to thicken. This will take several minutes; be sure to scrape from the bottom as you whisk. Spread half of the pudding in an even layer over the cream cheese layer. Top with the chopped candies then pour over the remaining half of the pudding and smooth with a spatula. Let sit in the fridge for at least 5 minutes so the pudding can firm up more. Spread the remaining whipped topping over the pudding layer. Place in the fridge for 4 hours or the freezer for 1 hour before serving. Add the Halloween sprinkles right before serving (the colors on the sprinkles may run if you add them ahead of time).
Notes
If you would prefer to use fresh whipped cream instead of frozen whipped topping, follow this substitution. Beat 1¾ cups cold heavy cream (in a cold metal mixing bowl with a cold beater is preferred) with ¾ cup powdered sugar and 1 teaspoon of vanilla extract until you have stiff peaks. This will make about 4 cups whipped cream.

Recipe from Genius Kitchen.

Halloween Witch Chocolate Cupcakes

Halloween Witch Chocolate Cupcakes  |  Lemon & Mocha

Halloween is next week! I love Halloween and I’m so excited to be sharing another festive Halloween treat with you. Last year I shared the Chocolate Marshmallow Monster Cookie Sandwiches and before that there were some Halloween Witches’ Cauldron Cupcakes. This year, we have Halloween Witch Chocolate Cupcakes. Notice a theme? I’m clearly a chocoholic! These are moist chocolate cupcakes with a cream cheese frosting and easy DIY witch leg cupcake toppers. I saw these all over Pinterest and decided they were too cute not to make. I’ve added a link to download a handy free printable I made for you all to the bottom of this post so all you’ll have to do is print and cut out the little witch boots.

Halloween Witch Chocolate Cupcakes  |  Lemon & Mocha

The cupcakes are my Perfect Chocolate Cupcakes and they really are the best chocolate cupcakes. I topped them with a neon green cream cheese frosting that’s not too sweet before adding the witch leg toppers. I’ve linked to the supplies I used below as well.

Halloween Witch Chocolate Cupcakes  |  Lemon & Mocha

When I was growing up, my brother and I loved making haunted houses. If our family was having a party with family friends we would set up the haunted house in the basement. When we got older and no longer went trick-or-treating, my brother and I set up the haunted house in our garage so the trick-or-treaters could walk through it. We would go all out with the decorations and everyone in the family had a role, whether you were supposed to hide under a table and grab people’s legs as they walked by (usually me) or whether you were dressed up like a zombie (usually my brother). My brother was the creative one and my favorite design element was always the soundtrack tapes he would make. One year without my Dad knowing, my brother recorded my Dad bench pressing weights. My Dad’s grunting and the clanking of the metal weights made the best spooky sounds!

Halloween Witch Chocolate Cupcakes  |  Lemon & Mocha

The funny part about all this is that I hate being scared. I don’t like going in haunted houses, going on spooky hay rides or watching scary movies. There is a haunted house ride at the boardwalk where we have our family beach week every summer and my cousin, who is six years younger than me, would try to reassure me during the ride and tell me to open my eyes! Apparently I love everything about haunted houses, except actually going in them! Do you love haunted houses or are they not your thing?

Halloween Witch Chocolate Cupcakes  |  Lemon & Mocha

Matt and I are doing something a little different this year for Halloween – we will be flying to Tokyo, Japan! I’m so excited! Japan has been on our travel bucket list so we are heading to Tokyo, Osaka and Kyoto. Don’t worry; I have plenty of posts scheduled while we’re away, but my access to internet and email will be limited so I may not respond to comments or emails until I return. In the meantime, I have some cozy dinner recipes coming for you this week so stay tuned!

Halloween Witch Chocolate Cupcakes  |  Lemon & Mocha

Printables
Option 1: Print out a pair of witch boots and cut them out. Trace the pair of witch boots onto black construction paper, one pair traced for each cupcake, then cut out the pairs of witch boots. Get that printable here. The boots I made for these photos were made using black construction paper.
Option 2: Print out solid black witch boots with black ink from your printer. Cut them out. Get that printable here (print two copies).

Supplies Used:
Paper straws
Neon gel food dye
Cupcake liners
Round piping tip

Halloween Witch Chocolate Cupcakes
 
Yield: 24 cupcakes
Ingredients
for the witch leg toppers
  • 24 paper straws
  • 24 sets of witch boots, using printable and either black printer ink or black construction paper
  • Tape
for the chocolate cupcakes
  • 2 cups granulated sugar
  • 1¾ cups all-purpose flour
  • ¾ cup cocoa powder
  • 1½ teaspoons baking powder
  • 1 teaspoon baking soda
  • 1 teaspoon salt
  • 2 large eggs
  • 1 cup buttermilk, see note
  • ¼ cup butter, melted
  • ¼ cup vegetable oil
  • 1 tablespoon vanilla extract
  • 1 cup hot coffee, see note
for the cream cheese frosting
  • 12 ounces cream cheese, room temperature
  • 12 tablespoons butter, room temperature
  • 6 cups powdered sugar, sifted
  • 1½ teaspoons vanilla extract
  • Neon gel food dye
Directions
for the witch leg toppers
  1. Cut the straws in half.
  2. Cut out the witch boots. Use a small piece of tape that’s been rolled up to stick each boot to a straw half. Make sure the straw is coming out of the ankle of the boot. Make sure you have a left and right boot pointing out in opposite directions for each cupcake.
for the chocolate cupcakes
  1. Preheat the oven to 350 degrees F. Line two cupcake pans with cupcake liners so you have enough for 24 cupcakes.
  2. In a large mixing bowl or in the bowl of a stand mixer, sift together the sugar, flour, cocoa powder, baking powder, baking soda and salt.
  3. In a medium mixing bowl, whisk together the eggs, buttermilk, melted butter, vegetable oil and vanilla extract. Pour the liquid ingredients into the dry ingredients and mix together until smooth.
  4. Pour the hot coffee into the batter and stir until combined. The batter will be extremely liquidy. Divide the batter between the 24 cupcake liners, filling them slightly more than half full. Bake for 18-20 minutes, or until a toothpick inserted in the center comes back mostly clean. Alternatively, they are done when you gently press your finger on the center of a cupcake and it lightly springs back. I find mine to be done at exactly 19 minutes.
  5. Let cool in the pan for a couple minutes then remove to a wire cooling rack to cool completely before frosting.
for the cream cheese frosting
  1. In the bowl of a stand mixer or in a large mixing bowl with a hand mixer, beat together the cream cheese and butter until fluffy, scraping down the sides as needed. Slowly beat in the powdered sugar and vanilla extract until combined. Add the food dye and mix, continue to add until the desired color is achieved.
  2. Pipe onto the cooled cupcakes and stick a pair of witch legs into each cupcake. Frosted cupcakes require refrigeration since cream cheese frosting has to be refrigerated. You may want to wait to put the toppers in until you are ready to serve them in case they get soggy or the coloring on the straw runs.
Notes
To make your own buttermilk: pour 1 tablespoon of lemon juice or vinegar in a liquid measuring cup. Pour milk, any fat percentage, into the measuring cup until you have 1 cup. Let sit for 5 minutes before using.
If you don’t want to use coffee you can use hot water, but the flavor of the chocolate won’t be as pronounced. You can use decaffeinated coffee if you prefer.
The cupcakes, unfrosted, freeze very well if you want to make them ahead of time.

Some of the links above are affiliate links, which means I may receive a small commission for my referral. This does not affect the retail cost of the item. Thank you for supporting Lemon & Mocha!

Red, White & Blue Spinach Salad

Red, White & Blue Spinach Salad  |  Lemon & Mocha

Happy Wednesday everyone! I just had the best week with my Aunt Elaine, Uncle Pete and goddaughter, Mikaila. They came to visit Matt and I for a few days last week and we spent two packed days exploring Boston. I’ve lived here my whole life and learned all kinds of things I never knew about our city. I also discovered a store on Newbury Street with the cutest patterned dresses and tops – priorities!

Red, White & Blue Spinach Salad  |  Lemon & Mocha

Their visit got me even more excited for my family’s annual beach week; if that’s even possible. For those of you that don’t know, every year my extended family has a beach week down at the Delaware shore. Last year my Aunt Dottie made a salad for lunch to bring to the beach and it was so pretty I had to take a photo and post it on Instagram. When I was trying to think of something healthy and refreshing to post for 4th of July next week I immediately remembered my aunt’s salad.

Red, White & Blue Spinach Salad  |  Lemon & Mocha

This is a Red, White and Blue Spinach Salad loaded with sliced turkey, strawberries, blueberries and feta cheese. You can easily customize it to your own preferences by swapping grilled chicken for the turkey – or even leaving it meatless. Same with the berries and cheese. Not a feta fan? Use goat cheese or mini mozzarella balls. Swap raspberries for the strawberries and blackberries for the blueberries! It’s totally up to you.

Red, White & Blue Spinach Salad  |  Lemon & Mocha

The best part about this salad, both for how it makes it look and how it makes it taste, is the berry balsamic vinaigrette. I love the rich color the dressing gets from the berries. I especially love that you can really taste the berry flavor in the dressing and it pairs so well with the balsamic vinegar. If your berries are really ripe and sweet you might not even need the agave or honey as an additional sweetener.

Red, White & Blue Spinach Salad  |  Lemon & Mocha

The dressing has only five ingredients and could not be any easier – or more delicious! Toss it with the spinach salad and you’ll have some berry happy 4th of July guests. Sorry, I couldn’t resist! So go ahead and use all the berries to enjoy this salad all summer long!

Red, White & Blue Spinach Salad  |  Lemon & Mocha

Red, White & Blue Spinach Salad
 
Yield: 6 servings
Ingredients
for the salad
  • 10 ounces spinach
  • 12 slices deli turkey meat (about 12 ounces)
  • 1 cup quartered strawberries
  • ¾ cup blueberries
  • ¾ cup feta cheese
for the dressing
  • ¼ cup plus 1 tablespoon olive oil
  • 2 tablespoons balsamic vinegar
  • ½ cup quartered strawberries
  • ¼ cup blueberries
  • 1 teaspoon agave or honey, if needed
  • Salt and pepper to taste
Directions
for the salad
  1. Place the spinach in a serving bowl. Rip or cut the deli turkey into pieces. Top with the strawberries, blueberries, feta cheese and turkey.
for the dressing
  1. Place all the ingredients in a high speed blender and blend until combined, about 40 seconds. If your fruit is very ripe and sweet you may not even need the agave or honey - give it a taste without it first if you would like then add if you feel it’s needed. If you want to strain out the blueberry and strawberry seeds you can using a fine mesh strainer, but they didn’t bother Matt or I. Season with salt or pepper to taste. Feel free to thin out the dressing more with some olive oil if desired. Drizzle over the salad or serve alongside the salad when ready to eat.
Notes
If not serving right away, wait to put on the quartered strawberries and turkey. The dressing is best the day it is made.


4th of July Tie-Dye White Texas Sheet Cake

4th of July Tie-Dye White Texas Sheet Cake

I’m back with my annual 4th of July red, white and blue dessert! This year I decided to switch it up. As much as I love berries, they can get expensive, especially if you are cooking for a crowd. Also, berry desserts can sometimes be tricky to make ahead. Instead, I made a tie-dye white Texas sheet cake loaded with red, white and blue batter and tons of festive sprinkles.

4th of July Tie-Dye White Texas Sheet Cake

I’m surprised I’ve kept it together this far into my post because I am SO EXCITED about this cake! I will try to explain to you how buttery and moist this vanilla cake is, but I know I won’t be able to do it justice. It tastes like funfetti box mix cakes, but with no box mix involved. Check out the photos and look at those big crumbs! Yum!

4th of July Tie-Dye White Texas Sheet Cake

The vanilla icing slightly hardens on top and the thin layer of icing creates the perfect frosting to cake ratio since the cake is also very thin. The thin layer of icing is also good because it is definitely sweet. This cake is for all the butter and sugar lovers out there! Any baked good is dangerous around me, but this sheet cake was especially addictive.

4th of July Tie-Dye White Texas Sheet Cake

This is the best type of cake to make for a crowd because the cake is the size of a standard jelly roll pan or half sheet pan. Matt and I ate some, then I gave away multiple slices each to six of my girl friends and I STILL had a whole bunch that I packaged for the freezer! If you do have leftovers it does freeze well, but if you bring this cake to a big party I promise you there will be nothing left!

4th of July Tie-Dye White Texas Sheet Cake

The tie-dye batter was really easy and didn’t add much extra time. I divided the batter into three bowls and left one white while dying the other two red and blue. I then poured the white batter into the prepared sheet pan and smoothed it out. Then I drizzled the red batter followed by the blue batter and swirled it all around with a butter knife. Ta-da! Red, white and blue tie-dye cake batter!

4th of July Tie-Dye White Texas Sheet Cake

The 4th of July sprinkles and mini flags definitely give it that extra patriotic look though – you can find those here and here. I cannot wait for you all to try baking this cake! Make sure to save me a slice ;-).

4th of July Tie-Dye White Texas Sheet Cake

4th of July Tie-Dye White Texas Sheet Cake
 
Yield: 16-20
Ingredients
for the cake
  • 2 cups flour
  • 2 cups sugar
  • 1 teaspoon baking soda
  • 2 large eggs, beaten
  • ½ cup yogurt, see note
  • 1 teaspoon vanilla extract
  • 1 cup unsalted butter
  • 1 cup buttermilk
  • ½ teaspoon salt
  • Red and blue food coloring
for the frosting
  • 4½ cups powdered sugar
  • ¼ teaspoon salt
  • ½ cup unsalted butter
  • ¼ cup milk
  • ½ teaspoon vanilla extract
Directions
for the cake
  1. Preheat the oven to 375 degrees F. Grease a half sheet pan, 13” x 18”. Set aside.
  2. In a large bowl, sift together the flour, sugar and baking soda. Add the beaten eggs, yogurt and vanilla then stir until just combined.
  3. In a small saucepan, melt the 2 sticks of butter over medium heat. Add the buttermilk and salt. Bring to boil, removing from the heat as soon as it starts to boil. Let cool slightly then pour into the flour mixture. Stir until just combined and smooth.
  4. Pour ⅓ of the batter in a bowl, ⅓ of the batter in a second bowl and leave the remaining ⅓ in the original bowl. Use food coloring to dye the batter in one bowl red and the other bowl blue. Leave the third one as is. Pour the batter you didn’t dye into the prepared sheet pan. Smooth into an even layer. Pour the blue batter over the white batter. I zigzagged back and forth. Repeat with the red batter. Using a butter knife, lightly swirl the batters around. Don’t over-mix or they will be one color instead of tie-dye.
  5. Bake for 20-22 minutes, or until a toothpick inserted in the center comes out clean. Let cool in the pan on a wire cooling rack for 20 minutes. Meanwhile, while the cake is cooling make the frosting (the frosting needs to be added when the cake is still a little warm).
for the frosting
  1. Sift the powdered sugar into a medium mixing bowl then mix in the salt.
  2. Melt the butter in a small saucepan over medium heat. Once melted, add the milk and bring to a boil, removing from the heat as soon as it starts to boil. Stir in the vanilla extract. Pour the butter mixture into the bowl with the powdered sugar. Stir until smooth. If it’s too thick, add a little more milk. Pour over the cake as soon as it has cooled for 20 minutes and spread in an even layer. Try to do this quickly as the frosting will start to set as soon as you start spreading it.
Notes
You can use any plain yogurt. Vanilla might also be okay, but I haven’t tried it with that. I used nonfat plain Greek yogurt. If you do not want to use yogurt you could also substitute sour cream.
To make your own buttermilk pour 1 tablespoon of lemon juice or vinegar (I like to use lemon juice) in a liquid measuring cup then add enough milk to equal 1 cup. The fat percentage of the milk does not matter - I use nonfat milk. Let sit for 5-10 minutes before using in the recipe.
The fat percentage of the milk in the frosting does not matter. I used nonfat milk.

Recipe adapted from Genius Kitchen.

Some of the links above are affiliate links, which means I may receive a small commission for my referral. This does not affect the retail cost of the item. Thank you for supporting Lemon & Mocha!

Sweet Potato Salad

Sweet Potato Salad  |  Lemon & Mocha

I am a little addicted to this Sweet Potato Salad. This inspiration came from the restaurant chain Not Your Average Joe’s. I’m not sure if you have one in your state, but we have a few here in Massachusetts and Matt and I are hooked. Last summer they had a limited time barbecue menu and one of the sides was a sweet potato salad. When I asked our waitress about the special sides she started raving about the sweet potato salad so I figured I would give it a shot.

Sweet Potato Salad  |  Lemon & Mocha

It was amazing! It was incredibly flavorful, a little tangy, a little sweet and I couldn’t stop eating it! The next day at work I started telling people that they had to go and order it because it was that good. This summer I haven’t seen it back on their menu yet so I set out to recreate the recipe. Just like the one I had at Not Your Average Joe’s, I couldn’t stop eating this potato salad!

Sweet Potato Salad  |  Lemon & Mocha

I knew the base of the dressing wasn’t all mayonnaise since it had a rich tanginess to it, so I added some buttermilk. The mustard seeds give it a great crunch and the celery salt and smoked paprika bring a ton of flavor. I added in hard boiled eggs and scallions because I remembered them from the original dish and I love both those ingredients in my potato salads. I don’t like spicy food so I put in the teeniest tiniest pinch of chili powder, but you can definitely add more if you want a bit of a kick in your salad.

Sweet Potato Salad  |  Lemon & Mocha

One of my favorite parts of this Sweet Potato Salad is that it tastes even better the next day making it the perfect make ahead side dish for 4th of July, potlucks and summer barbecues. I hope you all have a fantastic weekend and enjoy this Sweet Potato Salad!

Sweet Potato Salad  |  Lemon & Mocha

Sweet Potato Salad
 
Yield: 8 servings
Ingredients
  • 2 pounds sweet potatoes, peeled and cubed
  • 2 hard boiled eggs, chopped
  • 3 scallions, sliced
  • ⅓ cup mayonnaise
  • ¼ cup buttermilk
  • 1 tablespoon plus ½ teaspoon apple cider vinegar
  • 1 tablespoon parsley leaves, chopped
  • 2 teaspoons Dijon mustard
  • ¾ teaspoon mustard seeds
  • ½ teaspoon celery salt
  • ¼ teaspoon smoked paprika
  • Pinch of chili powder, optional
Directions
  1. Put the cubed sweet potatoes in a large sauce pan then cover with water. Add 1 teaspoon salt to the water. Bring to a boil over medium high heat then reduce to simmer for 10-15 minutes until the potatoes are cooked through. Drain the potatoes, rinse with cold water, then let drain until dry. Place in a large mixing bowl and let cool. Once cool add the chopped hard boiled eggs and sliced scallions.
  2. Mix together the dressing. In a medium bowl or liquid measuring cup, whisk together the mayonnaise, buttermilk, apple cider vinegar, parsley, Dijon, mustard seeds, celery salt, smoked paprika and chili powder, if using. Pour over the potatoes and carefully stir until coated. Let sit in the fridge for at least 30 minutes. Give it a stir before serving. It tastes even better the next day.
Notes
If you don't want to buy buttermilk you can make your own with regular milk. Put a little less than a teaspoon of lemon juice (or vinegar, but I like to use lemon juice) in a measuring cup then fill with milk until you reach ¼ cup. Let the mixture sit for 5-10 minutes.