Dessert

Ultimate Oreo Cupcakes

The first buttercream frosting I ever made was an Oreo buttercream. Armed with a mini food processor I chopped the Oreos down to mere crumbs and whipped them into Martha Stewart’s vanilla buttercream recipe. After one taste (and a second and third and fourth) I knew I would never buy store-bought frosting again. Well, unless it’s rainbow chip as I have yet to find a good substitute.

This Oreo buttercream had my head spinning and it wasn’t just the sugar rush. Something this smooth, decadent and bursting with Oreo flavor only takes a matter of mere minutes and a few simple ingredients? That was a dangerous fact to stumble upon.

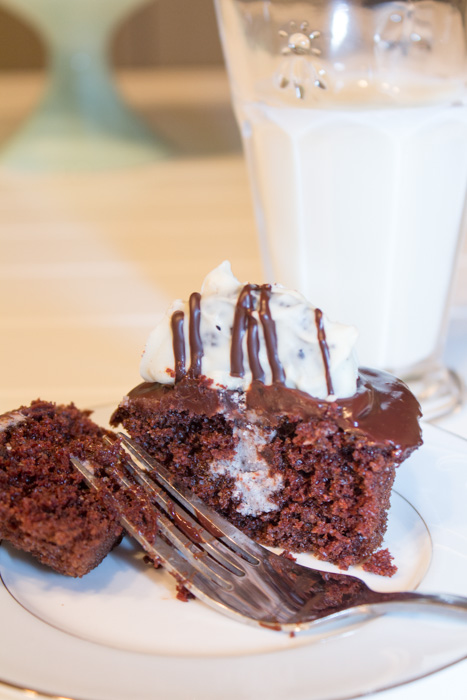
I have since made many buttercreams, whipped frostings, cream cheese frostings and glazes, but I always find myself coming back to that original Oreo buttercream. When I was visiting my family last summer for our annual beach week I wanted to bring them the best of the best. So I decided to combine all my favorites, including these perfect chocolate cupcakes, this amazing chocolate ganache and the above mentioned Oreo buttercream, into an ultimate super cupcake.

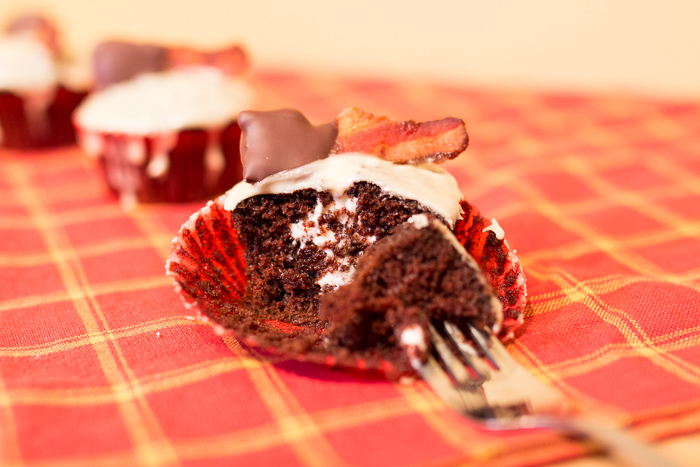
Topped, of course, with a chocolate-covered Oreo, these cupcakes are guaranteed to make your family, friends, coworkers and strangers want to hug you. Or imprison you in their kitchen so you can forever make them these cupcakes, it could really go either way. So enjoy these treats, but proceed with caution.

Ultimate Oreo Cupcakes
 
Yield: 24 cupcakes
Ingredients
for the Oreo buttercream
  • 15 Oreo cookies
  • 2 sticks unsalted butter, room temperature
  • 6 cups powdered sugar
  • ½ cup milk
  • 1 teaspoon vanilla extract
for the Oreo garnish
  • 1 cup white chocolate chips
  • 1 tablespoon vegetable oil
  • 12 Oreo cookies
  • ⅓ cup semi-sweet chocolate chips
for the cupcakes
Directions
for the Oreo buttercream
  1. Chop the Oreo cookies in a food processor until they are fine crumbs, or crush in a thick plastic baggie with a heavy object.
  2. Whip the butter for 2-3 minutes, or until smooth, with an electric mixer.
  3. On low speed carefully add the sugar, milk and vanilla and mix until fluffy. If the frosting looks too thin slowly add some more powdered sugar. Add the Oreo crumbs and mix until well combined.
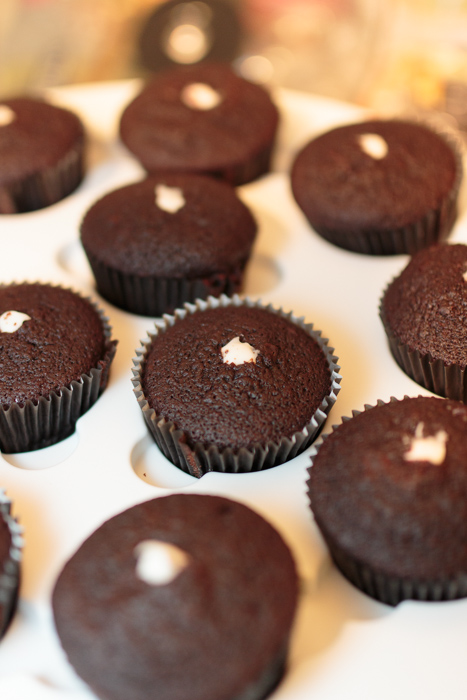
  4. Fit a pastry bag with the Wilton Bismarck tip #230. Fill the pastry bag with the filling. Insert the tip halfway into the center of the cupcake and squeeze in some filling. Slowly start pulling out the tip while still squeezing. Remove and stop squeezing in some filling when the top of the cupcake starts to bulge and is just about to crack. Place in the fridge to chill.
for the Oreo garnish
  1. Cover a plate or cutting board that will fit in your fridge with wax paper and set aside.
  2. Melt the white chocolate chips over a double boiler over medium-low heat. When completely melted stir in the vegetable oil then remove from the heat.
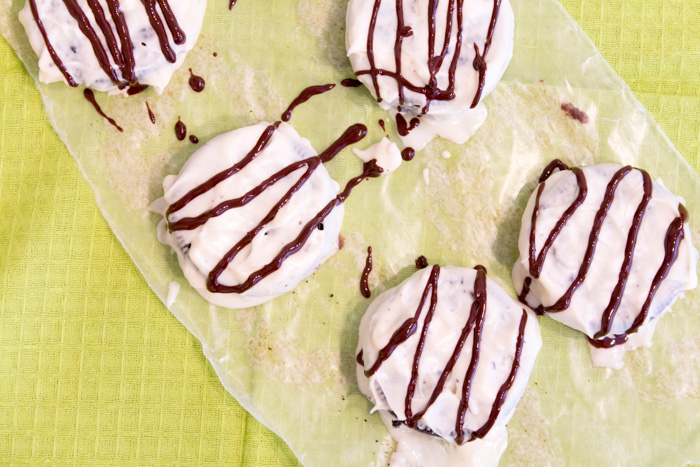
  3. Carefully submerge an Oreo so that it's completely coated in white chocolate before resting it on the wax paper. I used a spoon and a fork to complete this task. Repeat for the rest of the Oreos.
  4. Place the Oreos in the fridge until the chocolate has set.
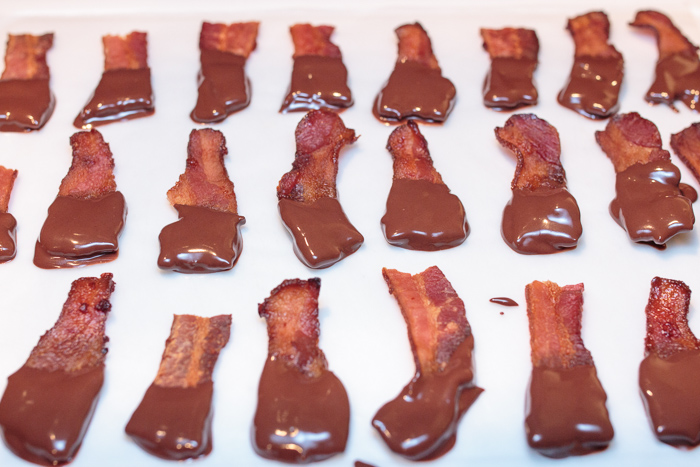
  5. When the chocolate is almost set melt the semi-sweet chocolate chips using the double boiler. Set aside to cool slightly. Remove the Oreos from the fridge and place near your workstation.
  6. Pour the melted semi-sweet chocolate into a pastry bag fitting with a skinny round tip or a plastic baggie with a very small corner snipped off. Pour zigzag lines over the Oreos then return to the fridge to set.
  7. Once the Oreos have set carefully cut in half with a sharp knife.
for the cupcakes
  1. Once the cupcakes have been filled and chilled it's time to top them with the chocolate ganache. If the ganache isn't already warm carefully heat it in a double boiler or in the microwave on low heat.
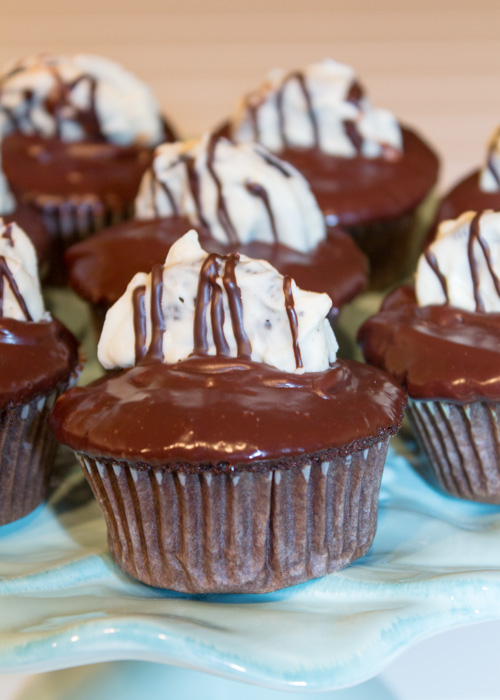
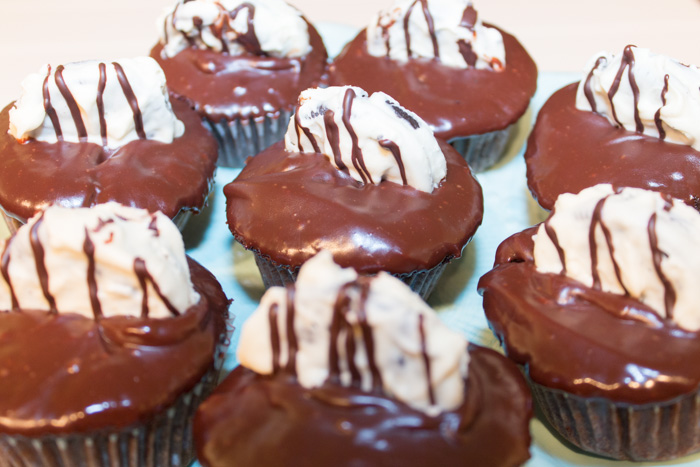
  2. Carefully dip the top of each cupcake in the warm chocolate ganache, letting the excess drip off. After dipping the cupcakes carefully press a chocolate-covered Oreo half into the center of each cupcake before the ganache has time to completely harden. You may have to slightly insert the Oreo into the cupcake so that it stays upright.
  3. Return to the fridge to let the chocolate ganache set. Serve chilled or at room temperature.

Oreo buttercream slightly adapted from Martha Stewart.


Peanut Butter Cup Ice Cream

I have loved ice cream as long as I can remember. Whether it was a simple scoop of vanilla at home, a soft-serve cone from the local lunch spot or a bowl of freeze-dried ice cream bits from the Dippin’ Dots fad, I have loved it, craved it and eaten it all. My love for creating ice cream, however, is a much more recent hobby.

Years ago my stepmom purchased an ice cream maker for the family for Christmas. We made one batch of super rich chocolate ice cream Christmas morning and then that was the end of it. So this past summer I pulled it out of my parents’ basement, brought it to my apartment, dusted it off and got to work.

If you have been intimidated at the prospect of making homemade ice cream then this peanut butter cup ice cream recipe is a fantastic starting point. It is easy, simple, only requires a few ingredients and the end result is snarfworthy. The peanut butter flavor is strong and bold with the mini peanut butter cups providing a surprise treat in every spoonful. A smooth and creamy texture will leave you wanting just one more bite, especially since the ice cream isn’t overly rich. You will wonder why you’ve waiting so long to make something tasty and the ice cream maker will become a regular fixture on your countertop. So make this peanut butter cup ice cream and treat yourself to a big scoop… followed by just one more bite.

Peanut Butter Cup Ice Cream
 
Yield: 1 quart
Ingredients
  • 2⅔ cups half and half
  • ¾ cup plus 2 tablespoons sugar
  • ¾ cup smooth peanut butter
  • ⅛ teaspoon vanilla extract
  • Pinch of salt
  • 1½ cups mini peanut butter cups or chopped peanut butter cups
Directions
  1. Using a blender or food processor puree the half and half, sugar, peanut butter, vanilla and salt until smooth.
  2. Chill the mixture in the fridge until cold then freeze in an ice cream maker according to manufacturer's instructions. During the last couple minutes of churning add the peanut butter cups.
  3. Store in the freezer until firm enough to scoop.

Recipe from The Perfect Scoop.

Vanilla Blackberry-Mascarpone Cake for Two

There are a lot of special days throughout the year, but yesterday was extra exciting. No, it wasn’t Ben & Jerry’s free cone day or a work holiday. And there weren’t any overturned bakery trucks spilling pastries into the street or any celebrity sightings. There was a birthday in the Lemon & Mocha family:  yesterday Matt was one year older! What an old geezer! Just kidding, especially since I’m six months his senior.

As I’m sure you’ve noticed, Matt is an amazing photographer and an excellent eater. He is also one of the most caring people and without his support and encouragement Lemon & Mocha might still have been a dream of mine rather than a reality. To celebrate Matt’s day of birth I wanted to make him an extra special cake. This was more difficult than it sounds as Matt and I have been heavily cutting back on desserts. I found this fabulous blog called Sweetapolita that would ensure the treat would remain a treat and not a week-long gorge session of a full 9-inch layer cake. I haven’t had great luck with scaled down baked goods, including some incredibly disappointing recipe that made two dense vanilla cupcakes, but this mini cake turned out fabulous.

The fruity interior was light and beautiful against the moist vanilla cake. I never have the greatest luck with vanilla cakes, but this one was incredibly tasty. There are a fair amount of components and steps, but I spread it out over a couple days to make it easier to manage. Although the cake is so divine you will want to keep it to yourself, this “cake for two” is more like a cake for four or six so they’ll be plenty for you even if you share. So happy birthday, Matt! As part of my gift I was going to make sure you didn’t have to take any photographs of your own cake, but you couldn’t help yourself 😉

Vanilla Blackberry-Marscarpone Cake for Two
 
Yield: 4-6 servings
Ingredients
for the cake
  • ½ cup whole milk
  • 2 egg whites
  • 1 whole egg
  • 2 teaspoons vanilla extract
  • 1 cup plus 3 tablespoons cake flour
  • ¾ cup sugar
  • 1¼ teaspoons baking powder
  • ½ teaspoon salt
  • ¼ cup unsalted butter, at room temperature
  • 2 tablespoons vegetable shortening
for the blackberry compote
  • 2 cups fresh or frozen blackberries, divided
  • ½ cup sugar
  • 1 tablespoon lemon juice
  • 1 tablespoon orange juice
  • Pinch of salt
for the whipped mascarpone filling & frosting
  • 2 tablespoons cold water
  • 2 teaspoons unflavored gelatin
  • 1¾ cups heavy cream, cold & divided
  • ¼ cup powdered sugar
  • 1 teaspoon vanilla extract
  • Pinch of salt
  • ⅓ cup mascarpone cheese, softened
Directions
for the cake
  1. Preheat the oven to 350 degrees F. Grease 2 round 5-inch baking pans. Line with parchment paper, butter and flour the parchment paper then set aside.
  2. In a small bowl whisk together 2 tablespoons of the milk, egg whites, whole egg and vanilla. Set aside.
  3. In the bowl of a stand mixer combine the cake flour, sugar, baking powder and salt. Add the butter and shortening then mix until combined. Add the rest of the milk then mix on low speed until just combined. Scrape the sides if needed.
  4. Slowly add the egg mixture to the flour mixture while beating on medium speed. Once just combined, evenly divide the batter into the 2 baking pans.
  5. Bake 20 minutes or until a toothpick inserted in the center comes out clean. Remove from the oven and let cool on a cooling rack for 10 minutes. Run a butter knife or offset spatula around the edges of the pans and invert the onto the cooling racks, making sure to turn them right side up for cooling. Let cool completely before beginning assembly.
for the blackberry compote
  1. Heat 1½ cups of the blackberries, sugar, lemon juice, orange juice and salt in a small saucepan over medium heat. Cook, stirring often, until the berries start to cook down, about 10 minutes.
  2. Turn the heat to low and simmer for about 15 minutes, or until the compote has thickened enough that it coats a spoon without dripping off. When ready, remove from the heat and let cool for a couple minutes.
  3. Puree the mixture in a blender or food processor until smooth. Set a fine mesh sieve of a medium bowl and push the compote through, discarding the seeds caught in the sieve. Stir the remaining whole blackberries into the compote then store in an airtight container in the fridge.
for the whipped vanilla mascarpone filling
  1. Place the cold water in a small bowl then sprinkle with the gelatin, letting sit for at least 10 minutes. Heat ⅓ cup of the cream in a small saucepan until just steaming then pour into the gelatin mixture. Place the small bowl in the fridge so the mixture can cool, about 8 minutes. Open the fridge and stir the mixture every couple minutes.
  2. Beat the remaining cream, powdered sugar, vanilla and salt with a stand mixer. This works best if the whisk attachment and stainless steel bowl have been chilled in the freezer. Continue to beat it soft peaks just begin to form, about 1 minute. Slowly add the cooled gelatin mixture, making sure to continue beating until it is thick enough to spread. Make sure you add the gelatin mixture very gradually of the filling could collapse.
  3. Place the mascarpone cheese in a large bowl then carefully fold in the whipped cream mixture. Cover the filling and place in the fridge until you are ready to assemble the cake.
for cake assembly
  1. Carefully cut each cake in half horizontally so you have 4 equal cake layers. Place the first cake layer on a small plate or cake stand. Place a few tablespoons of blackberry compote and a few tablespoons of mascarpone filling onto the center of the cake layer then carefully spread with a spatula. Place a second cake layer on top and repeat until the final cake layer has been placed on the cake. The final cake layer should be placed face down. Smooth the frosting in between the cake layers with an offset spatula and add more frosting on any spots where the compote filling is leaking out.
  2. Carefully wrap the entire cake in plastic wrap and place in the fridge for 30 minutes to help it firm up before frosting.
  3. Making sure your frosting is fluffy, apply a thick layer allover the chilled cake. Smooth with an offset spatula.

Recipe from Sweetapolita.

Pomegranate Molasses Coffee Cake Loaf

Coffee cake is one of the many foods that reminds me of my grandma. I love the soft cake, sweet ribbons of cinnamon sugar and the icing coated top of my grandma’s coffee cake. When she lived with me she would make them regularly, even storing big slices in the freezer so I could pull them out and microwave them for 30 seconds for an after school snack. Although I’m reminded of my grandma because she was the one to bake the coffee cakes, I’m more reminded of the morning ritual that would occur.

As the first two people awake every morning my grandma and I would get to share some alone time. It was different than the alone time we would spend in the car on the way home from field hockey practice and different than the alone time we would spend during our weekly mall trips. The business of the day had not yet begun; the house was quiet and the mood in the kitchen was serene. Now when I go down to visit my grandma we usually get a little alone time, but it’s not that the same as those early kitchen mornings we used to have. The minute I tasted this pomegranate molasses coffee cake loaf I knew my grandma would approve.

Baking this coffee cake loaf could not be easier, but even if it required expert skill and extreme brain power I would still implore you to bake it because it is just that amazing. The cake is moist and perfectly spiced. And the crumble, yes please. I love my grandma’s icing, but I must confess that this crumble takes the cake. Literally. I could eat a plate of just the crumble topping.

I will have to bring my grandma a loaf the next time I visit, but in the meantime I will enjoy it myself and squirrel away big slices in the freezer for midmorning snacks.

Pomegranate Molasses Coffee Cake Loaf
 
Yield: 1 loaf
Ingredients
for the cake
  • 2 cups all-purpose flour
  • ¾ cup sugar
  • 3 teaspoons baking powder
  • 1 teaspoon cinnamon
  • ¼ teaspoon salt
  • 2 large eggs, beaten
  • 1 cup buttermilk
  • ⅓ cup vegetable oil
  • 3 tablespoons pomegranate molasses
  • 2 teaspoons vanilla extract
  • 4 tablespoons unsalted butter, melted
for the crumble
  • 1 cup brown sugar
  • ⅓ cup all-purpose flour
  • 1 teaspoon cinnamon
  • ¼ teaspoon salt
  • 4 tablespoons butter, softened
Directions
  1. Preheat the oven to 350 degrees F. Line a 9x5” loaf pan with parchment paper, lightly coat with cooking spray and set aside.
  2. Combine the flour, sugar, baking powder, cinnamon and salt in a large mixing bowl.
  3. Whisk the eggs, buttermilk, oil, molasses and vanilla extract in a small bowl.
  4. Carefully stir the wet ingredients into the dry ingredients and mix until just combined. Mix in the melted butter until just combined.
  5. In a medium bowl combine the brown sugar, flour, cinnamon and salt. Using a fork of pastry blender cut in the butter until well combined.
  6. Pour half the batter into the prepared loaf pan then top with half the crumble mixture. Pour in the rest of the batter then top with the rest of the crumble mixture. Bake for 55 minutes or until the top is golden.
  7. Remove the loaf from the oven then let cool in the pan for half an hour. Remove the loaf from the pan and let cool on a cooling rack for another hour.
Notes
*If you don't have buttermilk put 1 tablespoon of lemon juice in a liquid measuring cup then fill the rest of the way with milk. Let sit for 5 minutes before using in the recipe. Any milk from skim to whole will work.
*Although the cake won't cut as well while it's still warm it's worth to cut a messy slice just to taste this baby while it's warm!

Recipe from How Sweet It Is.

Chocolate Maple Bacon Cupcakes with a Whiskey Cream Filling

These cupcakes have me in such a frenzy of excitement that I don’t even know where to begin. I suppose the best place to start is how these cupcakes came into existence. Well, literally I baked them, but before that they were just a vision of my tasty, chocolate-clouded imagination. Last year my friend was having a big milestone birthday and three important factors came into play when determining what to make her for said birthday. One, she is a health fanatic and does not eat desserts. I’m talking no desserts even during our holiday potluck at work; this girl’s got some serious willpower. Two, she loves bacon and regularly orders a bacon, egg and cheese, minus the bread and cheese. Don’t ask. Three, and this is the important one, she informed me that for her birthday she was going to treat herself to some dessert.

The minute that sentence left her mouth I knew I was tasked with creating the most amazing, decadent, oh-my-Paula-Deen, diet breaking worthy dessert of all time. Each component is more sin-inducing than the previous and you will wonder how you managed to exist up until this point without experiencing such a life altering cupcake perfect morsel.

The base is a chocolate cake recipe that we know and love, fondly referred to as the perfect chocolate cupcake for its incomparable moist texture and rich chocolate taste. They are then stuffed with a whiskey cream filling. A little bit naughty and a whole lot delicious. The maple glaze on top is light enough that it doesn’t add too much richness to the already decadent cupcakes, but the maple flavor still comes through to compliment the bacon.

Oh the bacon. The ultimate dessert garnish is no garnish at all, but the singular component that unifies the entire cupcake. Pan-fried as all proper bacon should be so that it’s allowed to cook in it’s own grease and soak up as much bacony flavor as possible. Then half dipped in chocolate to create a salty-sweet duo that will bring you to your knees, where you will stay while you finish your cupcake because you’re shaking so much from excitement that you can’t be trusted at a full upright position. If you’ve been searching for the one dessert that will make you overjoyed that you broke your diet then make these this weekend.

Chocolate Maple Bacon Cupcakes with a Whiskey Cream Filling
 
Yield: 24 cupcakes
Ingredients
for the bacon
  • 8 pieces bacon, cooked in a frying pan until crispy
  • ½ cup semisweet chocolate chips
  • 1 teaspoon vegetable oil
for the filling
  • 2 cups powdered sugar
  • ½ cup heavy cream
  • 2 teaspoons whiskey
for the glaze
  • 1 cup powdered sugar
  • ¼ cup maple syrup
Directions
for the bacon
  1. Line a small cookie tray or cutting board that will fit in the fridge with wax paper then set aside.
  2. Carefully break the pieces of bacon into roughly 2” pieces. Set aside.
  3. Melt the chocolate chips in a double boiler over medium heat until smooth, stirring occasionally.
  4. Remove from the heat and stir in the vegetable oil until combined.
  5. Dip half of each piece of bacon into the chocolate, let the excess drip off, then place on the wax paper. Once all the pieces have been dipped place in the fridge to set.
for the filling
  1. Whip the heavy cream in a chilled mixing bowl until stiff peaks are just about to form.
  2. Slowly add the powdered sugar and beat until stiff peaks form, being sure not to over-beat the cream.
  3. Add the whiskey and stir with a spatula until combined. At this point, the filling will taste very strong. The longer the cupcakes rest before eating, especially if resting in the fridge, the more mellow the flavor will become.
  4. Fit a pastry bag with the Wilton Bismarck tip #230. Fill the pastry bag with the filling.
  5. Insert the tip halfway into the center of the cupcake and squeeze in some filling. Slowly start pulling out the tip while still squeezing. Remove and stop squeezing in some filling when the top of the cupcake starts to bulge and is just about to crack.
  6. Place in the fridge to chill.
for the glaze
  1. While the cupcakes are chilling whisk together the powdered sugar and maple syrup in a small mixing bowl.
  2. Remove the cupcakes from the fridge. Carefully dip the top of each cupcake into the maple glaze. Place a piece of chocolate dipped bacon on top so it sets with the glaze.
  3. Place the cupcakes in the fridge to set before serving.