Dessert

Croissant S’mores

We are officially in summer mode, which can only mean one thing: time for another s’mores post. Whether I have to use an oven broiler, microwave or fire pit I am constantly looking for more ways to sneak s’mores into my diet.

I have posted several different s’mores-flavored desserts on Lemon & Mocha, but I wanted to share something that was purely a s’mores recipe. Of course with a twist to make it blog-worthy. I found my calling with croissant s’mores.

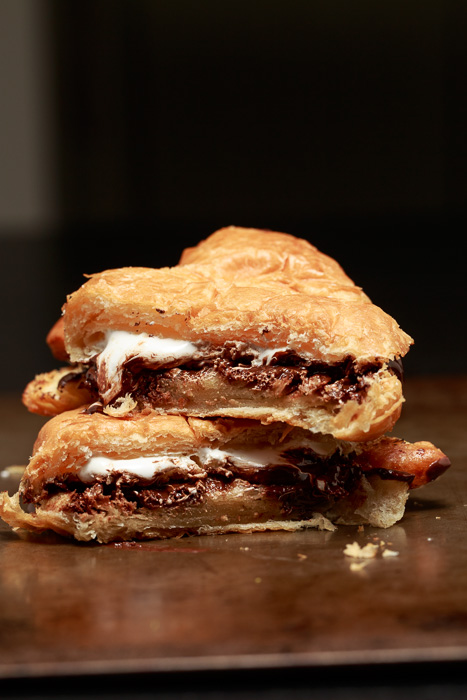
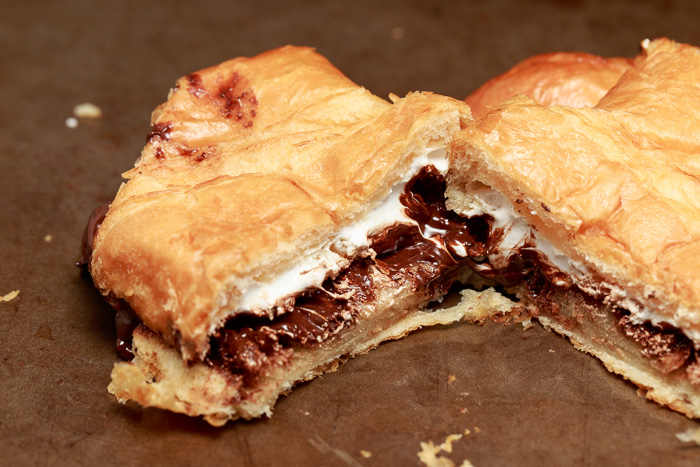
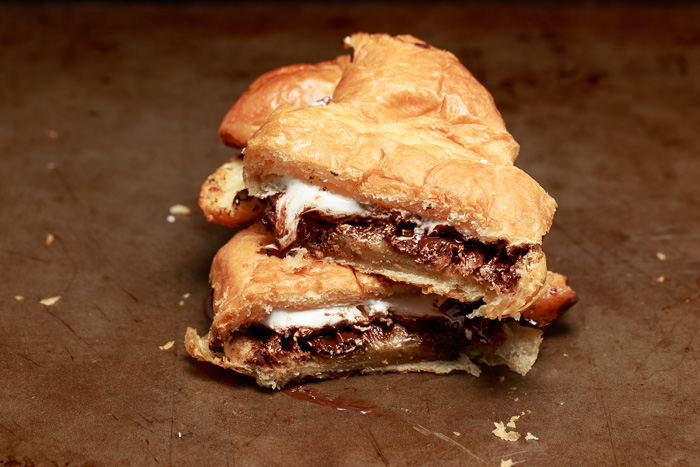
Absent of graham cracker squares, buttery toasted croissant halves serve as the vessel for this scrumptious dessert sandwich. The combination of high-quality dark chocolate and sea salt flakes will literally melt in your mouth.

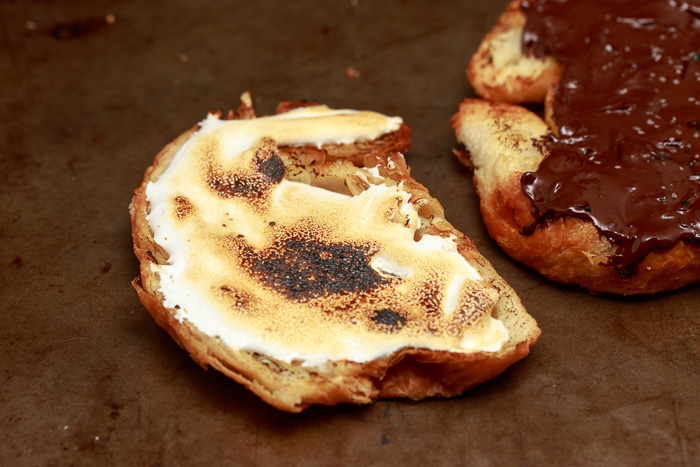
After smearing the sandwich with marshmallow fluff I decided I still wanted the crispy texture and smoky taste you get from traditional s’mores. After some research and tasty experimentation I determined that toasting the marshmallow with a kitchen torch or oven broiler will do the trick just fine.

Although it’s hard to top the original s’mores, the pastry lover in me almost prefers this treat. Almost.

Croissant S'mores
 
Yield: 1 serving
Ingredients
  • 1 croissant, carefully cut in half lengthwise to open it like a sandwich
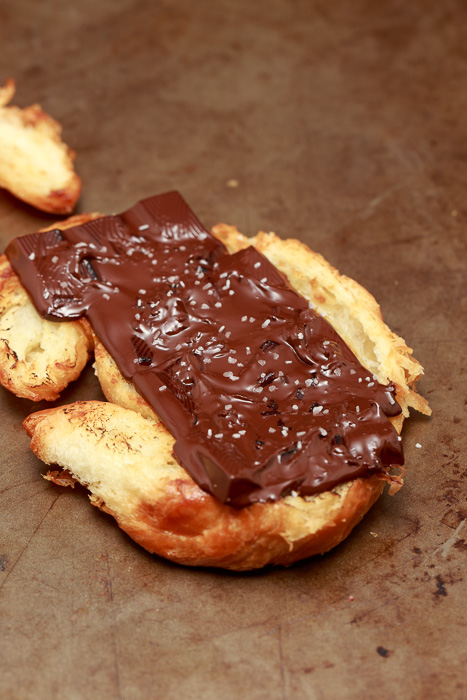
  • 2-4 squares of high quality dark chocolate
  • ¼ cup Marshmallow Fluff
  • Pinch of coarse sea salt flakes
Directions
  1. If not using a kitchen torch, preheat the oven to broil. Line a small baking sheet with tin foil and set aside.
  2. Heat a grill pan or skillet over medium heat and lightly coat with cooking spray. Place the croissant halves cut side down on the heated pan and grill until warmed and slightly toasted, about 4-5 minutes. Remove from the heat and place cut side up. If using the broiler place the croissant cut side up on the prepared baking sheet.
  3. Place the chocolate on the bottom half of the croissant. Spread the Fluff on the top half of the croissant. If using the kitchen torch, torch the chocolate until melted and the Fluff until lightly charred. It’s ok if it catches on fire, just blow it out! Everyone likes an extra toasted marshmallow. If using the broiler, place the baking sheet on the top rack of the oven and broil until the chocolate is melted and the Fluff is toasted, about 3-5 minutes, making sure you are watching carefully.
  4. Sprinkle the sea salt flakes on the melted chocolate then place the top half of the croissant fluff side down onto the melted chocolate half. Serve and enjoy or devour it right at the counter. I chose the later.


Coffee Ice Cream Cookie Sandwich Cake with Salted Butter Caramel Sauce

Did you make the coffee ice cream I posted on Tuesday yet? No? Well you’re going to be kicking yourself for it after you see today’s post. But don’t worry! There’s still time to remedy your huge oversight. If you haven’t already started a grocery list after just reading the title, then let me get right to it: you need to make this dessert. Now.

Or this weekend, you know with that pesky little thing called work consuming the weekdays. Chocolate chip cookie cake with coffee ice cream and a salted butter caramel sauce. Woah, someone hold me, I’m weak in the knees!

The inspiration for this dessert phenomenon was my fellow ice-cream loving friend. We aren’t normal ice cream lovers. We are ice cream aficionados. We eat, sleep and breath ice cream. If we were on the top of Mount Everest we would say to one another, “P-p-pass the ice cream p-p-please.” In addition to our ice cream desires we also maintain our manners under extreme conditions. For her birthday I decided to turn one of our favorite ice cream truck treats into an ultimate dream cake. It’s dessert in a dessert times ten.

Although it looks like a monster of a project, if you split out the components it is completely do-able and so worth it. The strong coffee flavor, buttery and chocolately cookie, and warm caramel sauce will have you making obscene noises perhaps not suitable for children. I have never seen a dessert be devoured so quickly and neither will you.

Coffee Ice Cream Cookie Sandwich Cake with Salted Butter Caramel Sauce
 
Yield: 8-10 servings
Ingredients
for the cake
for the salted butter caramel sauce
  • 6 tablespoons unsalted butter
  • ¾ cup sugar
  • 1 cup heavy cream, divided
  • ½ teaspoon vanilla extract
  • 1 ¼ teaspoons coarse salt
Directions
for the cake
  1. Preheat the oven to 350 degrees F.
  2. Line a 9” round springform pan with parchment paper. Take half the cookie dough and evenly press into the bottom of the springform pan to create a large round cookie. Bake for 20 minutes. Do not overcook the cookie or it will be hard after freezing. Remove and let cool on a wire cooling rack. Repeat with the second half of the cookie dough.
  3. When the cookies are completely cool you can start assembling the cake. Place one of the cookies in the bottom of the springform pan lined with parchment paper. Scoop and evenly spread the coffee ice cream on top of the bottom cookie until you have about a 2” layer. You may not have to use all the ice cream. Place the second cookie on top, right side up, making sure not to press too hard. Wrap the entire pan in plastic wrap and freeze for at least 8 hours. Let the cake sit out and soften before serving.
for the salted butter caramel sauce
  1. Melt the butter over medium heat in a large heavy duty saucepan. Stir in the sugar with a heatproof spatula and continue stirring frequently until the mixture is a deep golden brown and starts to lightly smoke. The sugar will be completely dissolved at this point.
  2. Remove from the heat and carefully whisk in ½ cup of the cream. I recommend using an oven mitt as the mixture may bubble splatter. Stir in the rest of the cream, vanilla extract and salt until combined. If any sugar lumps remain gently whisk over low heat until dissolved. Serve warm.
Notes
Caramel should be stored in the fridge in an airtight container and can be reheated in a saucepan over low heat or in the microwave.


Coffee Ice Cream

Coffee and I have a strange relationship. I’ve gone my whole life without needing caffeine in the morning. Whether I stayed up all night cramming in college or made the mistake of going out too hard on a weekday before having to be in the office at my usual early hour, I have gotten by without depending on coffee, tea, soda or energy drinks. I run on excitement for life! My avoidance was partly not wanting to be dependent on something to wake me up, but mostly because with my severe acid reflux and various other stomach ailments most of those items don’t agree with me. With coffee, it was also due to me not liking the taste.

However, in the last couple years I have come to enjoy coffee as an occasional treat. I still don’t like hot coffee, but a Dunkin Donuts iced mocha or a Starbucks caramel frappuccino? Yes, please! This new-found coffee exploration has also led me to yummy coffee flavored items that were previously, and sadly, absent in my life. Among these my favorite way to consume coffee flavor is through ice cream. No surprise there.

This simple coffee ice cream is smooth, creamy and bursting with coffee flavor. This is my favorite ice cream I have made so far, and that’s saying a lot considering my self-professed chocolate ice cream superiority complex. Although now that I mention it this would be really good with some Oreos or chocolate swirls mixed in… just saying ;-).

Coffee Ice Cream
 
Yield: 1 quart
Ingredients
  • 1 ½ cups whole milk
  • ¾ cup sugar
  • 1 ½ cups whole coffee beans
  • 1 ½ cups heavy cream, divided
  • Pinch of salt
  • 5 large egg yolks
  • ¼ teaspoon vanilla extract
  • ¼ teaspoon finely ground coffee
Directions
  1. Heat the milk, sugar, coffee beans, ½ cup of the heavy cream and the salt in a medium saucepan over medium heat until it is just starting to steam, but not boiling. Remove from the heat, cover and let steep at room temperature for 1 hour.
  2. When the hour is up, place the remaining cup of heavy cream in a medium mixing bowl then set a mesh strainer over top. Set aside.
  3. Reheat the coffee bean mixture over medium heat until it is steaming, but not boiling.
  4. Meanwhile, whisk together the egg yolks in a separate medium bowl. Once the coffee bean mixture is ready, slowly pour some into the egg mixture, whisking constantly, to temper the eggs. Continue slowly pouring and whisking, then scrape the whole mixture back into the medium saucepan.
  5. Stir the mixture over medium heat, making sure to scrape the bottom of the pan, until the mixture has thickened to the point where it is sticking to the back of the spatula. It is ready when you can run your finger over the back of the spatula and the mixture doesn’t run. Pour the mixture through the strainer into the prepared mixing bowl with the cream. Press on the beans to extract as much coffee flavor as possible. Stir the mixture together and add the vanilla and ground coffee. Stir until cool over an ice bath then place in the fridge. When completely chilled freeze in your ice cream maker according to manufacturer’s instructions.
Notes
You can use caffeinated or decaffeinated coffee beans for this recipe, the choice is yours.

Recipe from The Perfect Scoop.

S’mores Cupcakes

Ever since coming across the perfect chocolate cupcake recipe I have been creating as many variations as my waistline can afford for me to make. I am determined to try every variety I can imagine. The reason all my cupcake creations tend to have this chocolate base is 1- chocolate is superior, 2- I still haven’t found a vanilla cupcake recipe I love and 3- the perfect chocolate cupcake recipe is just so, perfect, that I can’t imagine anything tasting any better.

So with that said, now that summer is approaching there is one dessert lingering on everyone’s mind: s’mores. Lemon & Mocha has brought you s’mores fudge and now, s’mores cupcakes. These photos were taken quite some time ago before Matt and I had our groove down and I hope to update them in the future, but I couldn’t wait any longer to post this face-stuffingly-delicious recipe.

Gooey marshmallow fluff oozes out of these cupcakes that are topped with chocolate ganache and a super fancy, but simple, graham-coated chocolate-dipped marshmallow. I definitely snuck a few of these on their own instead of topping all the cupcakes. :)

S'mores Cupcakes
 
Yield: 24 cupcakes
Ingredients
for the cupcakes
  • 1½ cups graham cracker crumbs
  • 5 tablespoons butter, melted
  • 2 cups sugar
  • 1¾ cups all-purpose flour
  • ¾ cup unsweetened cocoa powder
  • 1½ teaspoon baking powder
  • 1½ teaspoon baking soda
  • 1 teaspoon salt
  • 2 large eggs
  • 1 cup buttermilk
  • ½ cup butter, melted
  • 1 tablespoon vanilla extract
  • 1 cup fresh hot coffee
for the filling and toppings
  • 12 ounces Marshmallow Fluff
  • ½ cup heavy cream, optional
  • ½ cup chocolate chips
  • 1 tablespoon vegetable oil
  • 24 marshmallows
  • ⅓ cup graham crackers crumbs, divided
  • 1 cup chocolate ganache
Directions
for the cupcakes
  1. Preheat the oven to 350 degrees F.
  2. Mix together the graham cracker crumbs and melted butter together until combined. Line 2 cupcake pans with 24 paper liners. Place a tablespoon of the graham cracker mixture into each wrapper and press to evenly cover the bottom of the wrapper. Set aside.
  3. In the bowl of a stand mixer combine the sugar, flour, cocoa powder, baking powder, baking soda and salt.
  4. Once the mixture is combined add the eggs, buttermilk, melted butter and vanilla extract. Beat the mixture on medium speed for 2 minutes.
  5. Carefully stir in the hot coffee until well combined. The batter will be extremely liquidy.
  6. Pour the batter evenly between the 24 paper liners over the pressed graham cracker mixture. Bake on the middle rack of an oven for 18-22 minutes or until a toothpick inserted into the center of a cupcake comes out with no batter on it.
  7. Completely cool cupcakes on a wire rack before filling and topping.
for the filling and toppings
  1. Line a baking sheet or firm cutting board narrow enough to fit in your fridge with wax or parchment paper. Set aside.
  2. Using a cupcake corer, apple corer, or knife create a large cavity in the center of each cupcake. Reserve the top of the removed cupcake piece. Fill the cavity with 1-2 tablespoons of Marshmallow Fluff. If the Fluff is too thick to handle, whip it with some heavy cream, a couple tablespoons at a time until it reaches the desired consistency. Place the top of the removed cupcake piece on top of the Fluff filling to seal the cupcake back up. Place the cupcakes in the fridge to chill.
  3. While the cupcakes are in the fridge melt the chocolate chips in a double boiler over medium heat. Once melted remove from the heat and stir in the vegetable oil until smooth. Dip half of each marshmallow in the chocolate and place on the prepared baking sheet or cutting board. Sprinkle the dipped marshmallows with graham cracker crumbs before the chocolate sets. Place in the fridge to harden.
  4. Remove the cupcakes from the fridge and carefully dip the top of each cupcake in the chocolate ganache to coat it. Place a chocolate dipped marshmallow on each cupcakes before the ganache sets. Sprinkle with the remaining graham cracker crumbs, place it in the fridge for the ganache to harden.

Cake from Foodess.

Vanilla Bean Ice Cream

What I love about today’s post is that upon reading the title everyone in my family will immediately know who this recipe is celebrating. My grandma does not like many foods, but she certainly loves her vanilla ice cream. Of course she would not prefer how it’s pictured here; sprinkles and toppings are a huge no-no. But if she were in my apartment this quart of ice cream would be gone in two, three days tops. You may think I’m kidding, but I am not.

In continuing my Mother’s Day celebration I’m posting this vanilla ice cream to wish my grandma a happy Mother’s Day. My grandma lived with us for eight years so I was lucky enough to develop an extra special relationship with her. If your best friend is someone who you can share anything with, who supports you no matter what, who never judges you, who loves you with all their heart, and who can make you laugh so hard you spit milk out your nose, then my grandma was, and still is, my best friend.

Although we now swap stories over the phone rather than during weekly shopping trips since she is many miles away, I am so fortunate to have such a compassionate and strong person be such a large part of my life. So forget a “dear little bit” and treat yourself to a whole quart of vanilla ice cream this Mother’s Day!

Vanilla Bean Ice Cream
 
Yield: 1 quart
Ingredients
  • 1 cup whole milk
  • ¾ cup sugar
  • 2 cups heavy cream, divided
  • Pinch of salt
  • 1 vanilla bean, split in half lengthwise
  • 6 large egg yolks
  • ¾ teaspoon vanilla extract
Directions
  1. In a medium saucepan over medium-low heat, warm the sugar, milk, 1 cup of the cream and salt. Once warm, scrape the seeds from the vanilla bean into the saucepan and add the scraped bean as well. Cover the saucepan, remove from the heat and steep for 30 minutes at room temperature.
  2. Place the remaining cup of cream into a large bowl. Set a mesh strainer on top of the bowl then set set aside.
  3. In a medium bowl whisk the egg yolks then slowly pour the steeped milk mixture into the egg yolks, whisking constantly, to temper the eggs. Pour the milk and egg mixture back into the saucepan. Constantly stir the mixture over medium heat with a heatproof spatula making sure to scrape the bottom and not let any clumps form. Continue stirring until the mixture is thick enough to coat the spatula.
  4. Remove the mixture from the heat and pour it through the mesh strainer into the large bowl with the heavy cream. Stir until combined then mix in the vanilla extract. Add the vanilla bean as well.
  5. Insert the bowl into an ice bath and continue stirring until cool.
  6. Chill the mixture in the fridge. Once cold, remove the vanilla bean then the custard into your ice cream maker following the manufacturer’s directions.

Recipe from The Perfect Scoop.