Main Dishes

Crispy Baked Fish and Chips

Crispy Baked Fish and Chips  |  Lemon & Mocha

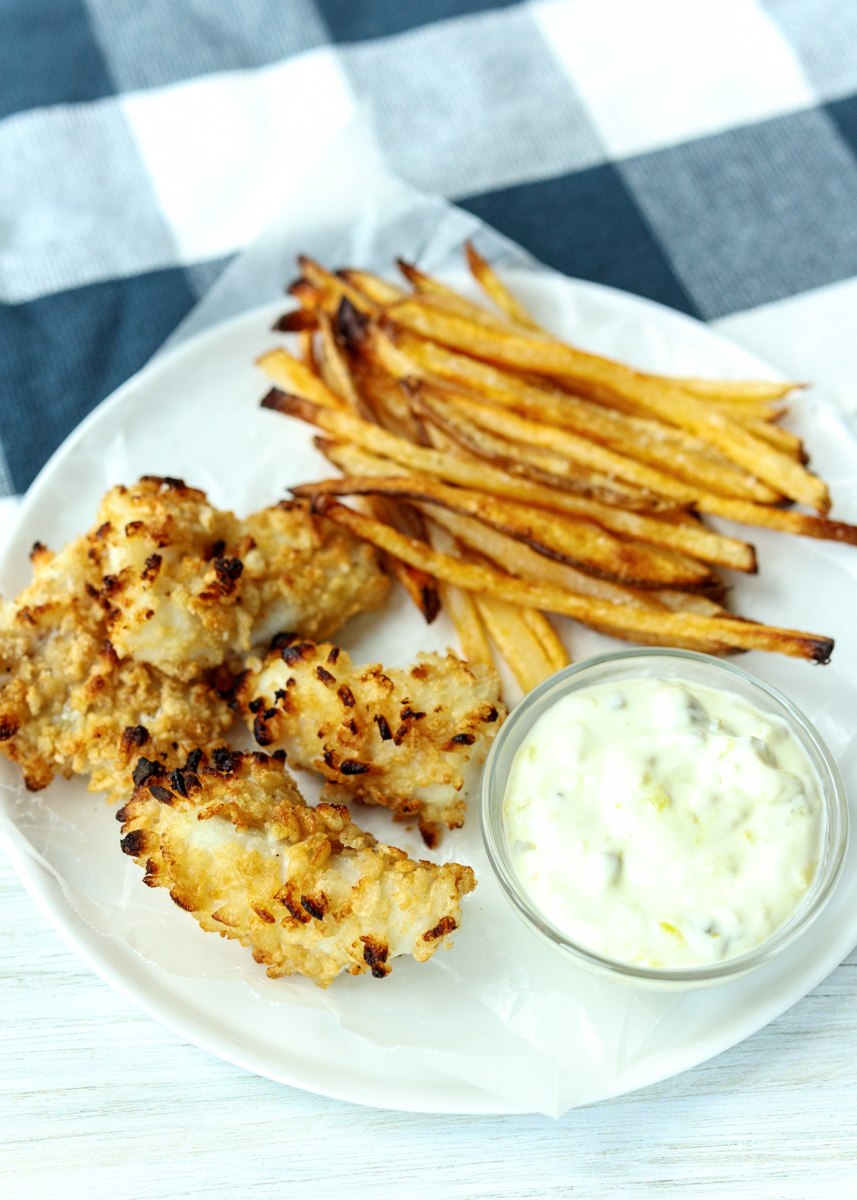
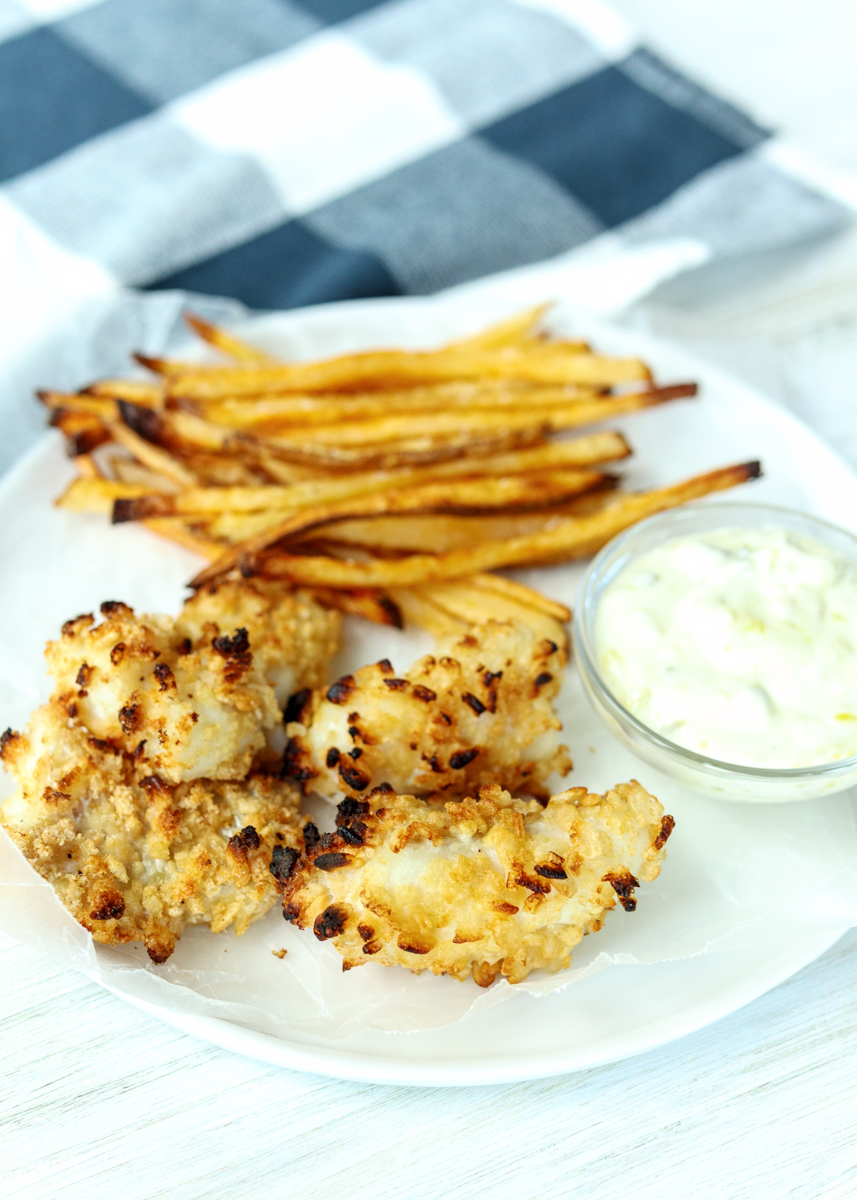
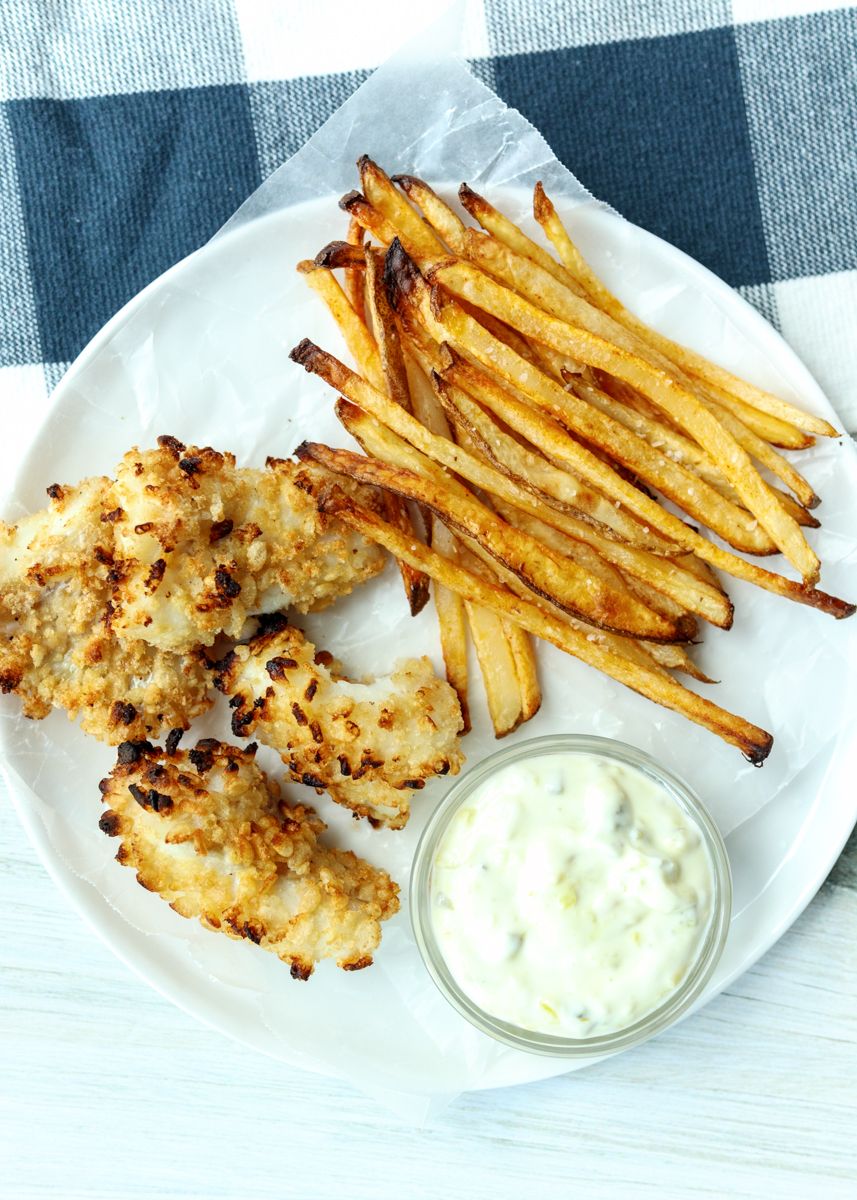
We’re wrapping up a week of healthy dinners here on Lemon & Mocha with a lightened up twist on a classic: Crispy Baked Fish and Chips. Tender, flaky fish coated in a crispy exterior and some homemade french fries, all served alongside a creamy tarter sauce – yum!

Crispy Baked Fish and Chips  |  Lemon & Mocha

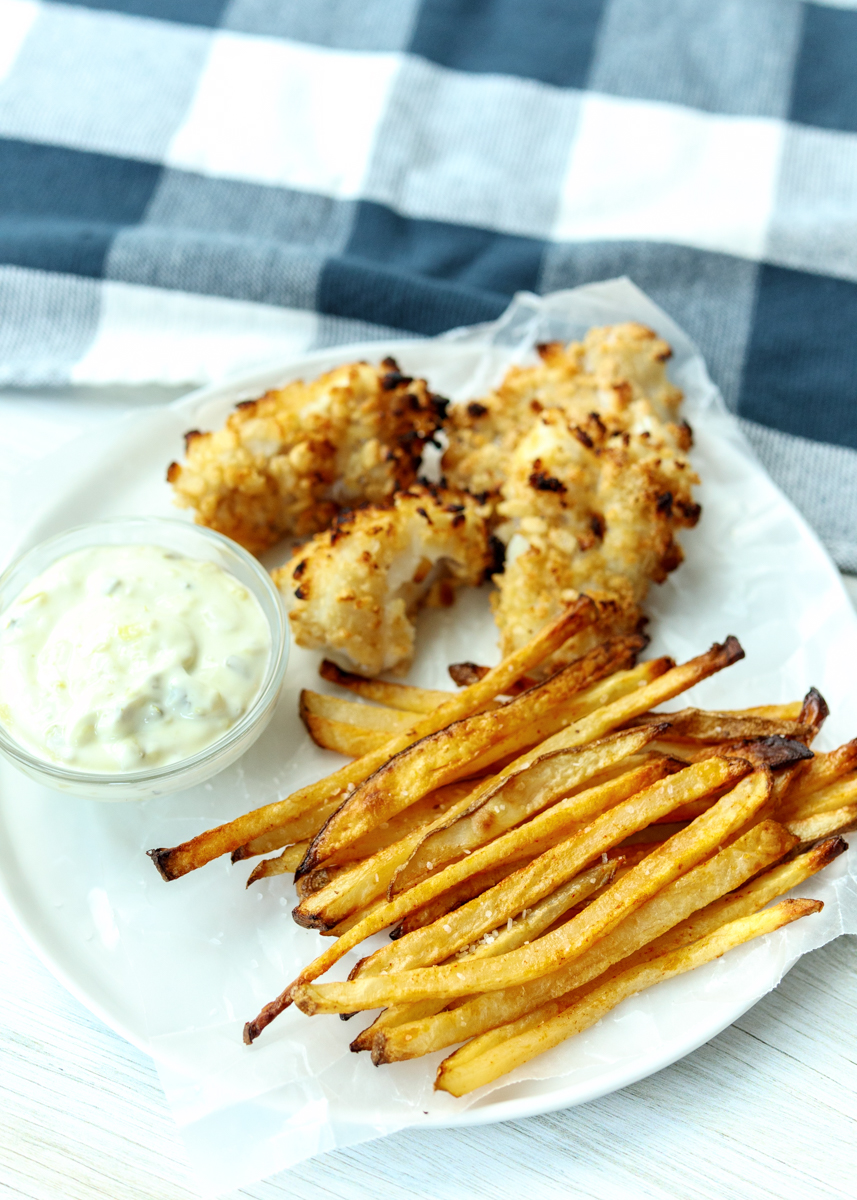
We’ve done a few things to the original dish to lighten it up with the most obvious being that we’re baking the breaded fish and french fries instead of frying them. I’ve baked breaded chicken many, many times, but I had never tried it before with fish. It came out so well! The fish was tender and perfectly cooked while the outside was crispy.

Crispy Baked Fish and Chips  |  Lemon & Mocha

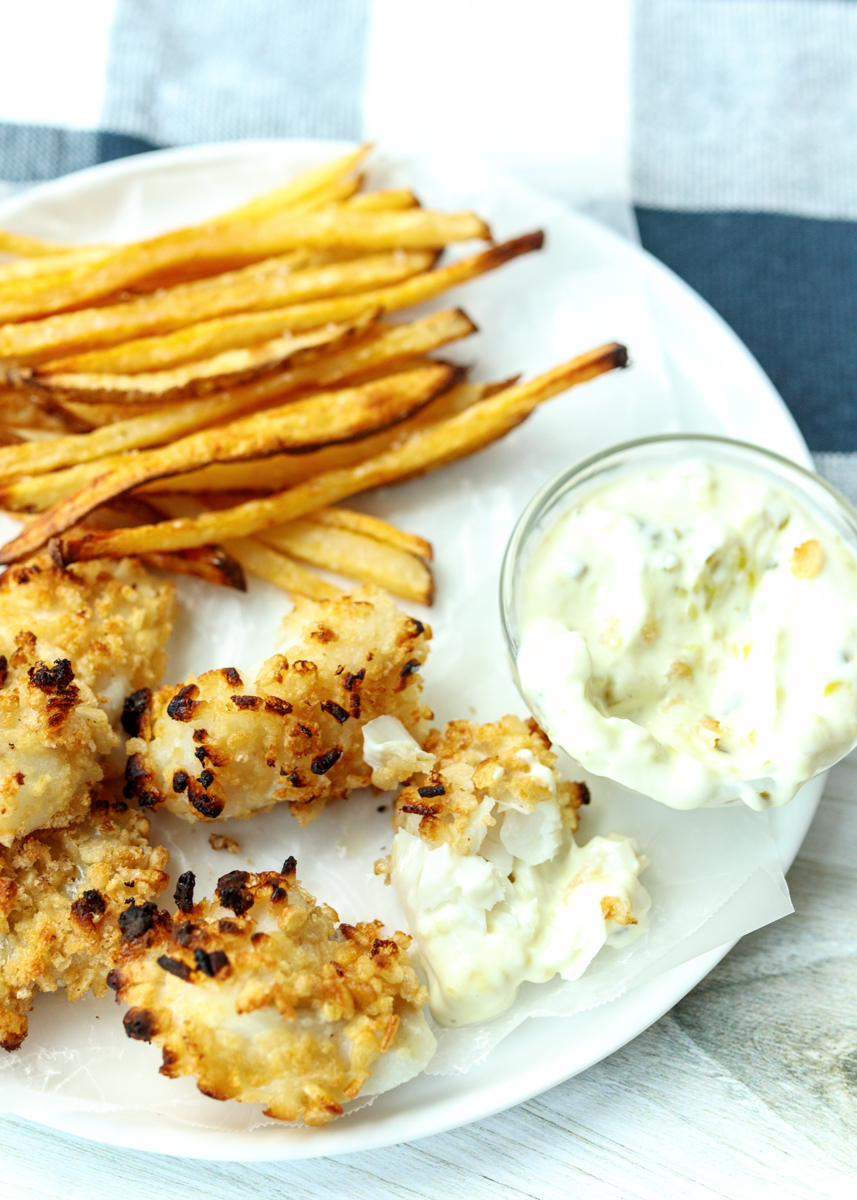
The breading in this recipe is interesting and helped in aiding with the crispiness factor. No panko or nuts here; instead the fish is breaded with crisp rice cereal! Also known as Rice Krispies cereal or whatever Trader Joe’s or store brand you prefer. A bowl of Rice Krispies was my go-to during my first trimester so we have plenty of boxes stockpiled in the house. I love that the breading process is only a two step as well. The fish pieces get dunked in some frothy egg whites and then coated in the crispy rice cereal. That’s it!

Crispy Baked Fish and Chips  |  Lemon & Mocha

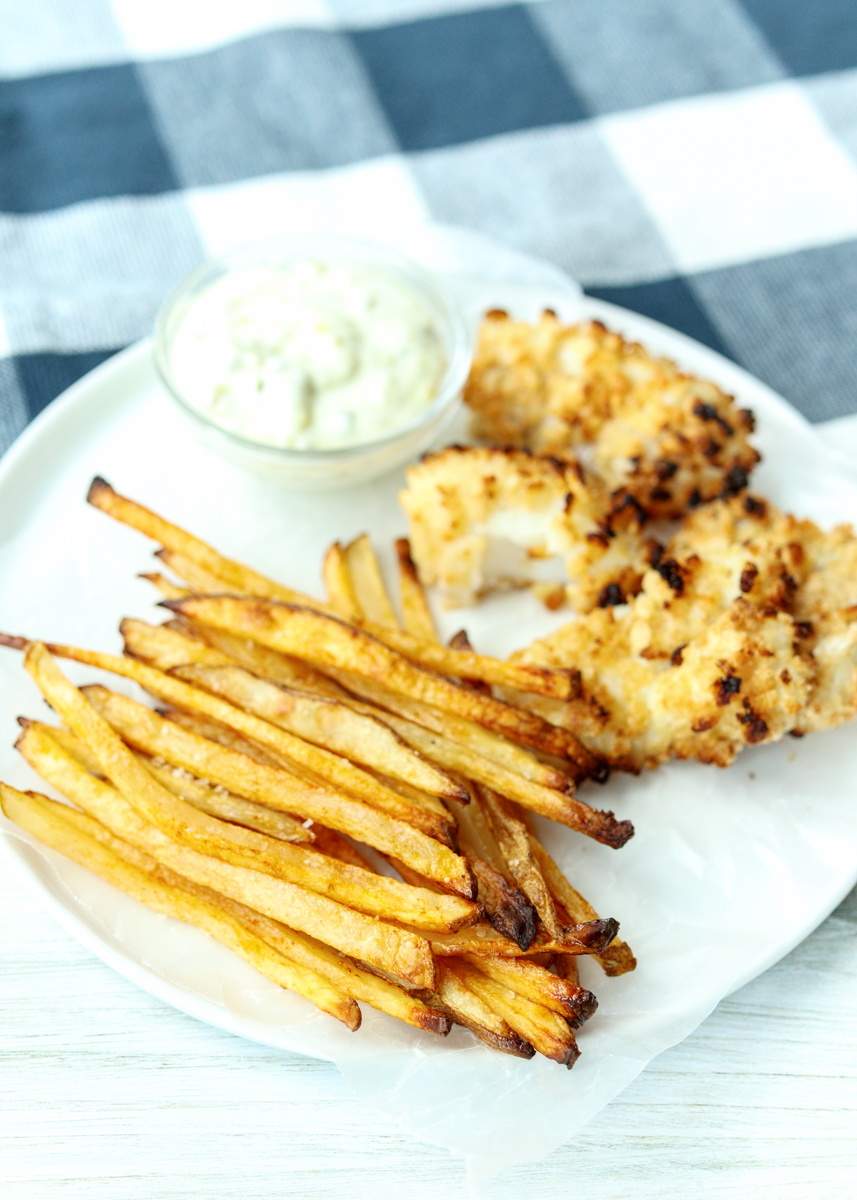
The baked french fries were also a big hit for Matt and I. I’ve baked fries before, but the trick about preheating the baking sheet in the oven was a new one for me and I definitely think it helped make them crispier. Finally, the tarter sauce has been lightened up as well! I’m not sure about you, but in addition to using tarter sauce on my fish, I love dipping my fries in the stuff. This healthier homemade version is made with a Greek yogurt base and has no mayonnaise. I am a self-proclaimed mayo addict and I was prepared to not like this yogurt version, but it was really good! I didn’t miss the mayo at all and felt like I was eating regular tarter sauce.

Crispy Baked Fish and Chips  |  Lemon & Mocha

The only downfall for this whole meal is that it is not make-ahead friendly, but I’ll let it slide every once in a while for a delicious and healthy fish and chips dinner! Happy Friday, everyone!

Crispy Baked Fish and Chips  |  Lemon & Mocha

Crispy Baked Fish and Chips
 
Yield: 4 servings
Ingredients
for the chips
  • 3 medium russet potatoes, about 1¼ pounds, scrubbed clean
  • ¼ cup extra-virgin olive oil
  • Smoked paprika
  • Coarse sea salt
for the fish
  • 2¾ cups crispy rice cereal, such as Rice Krispies
  • 3 large egg whites
  • 1½ pounds skinless, boneless pollock (or other firm white fish, such as cod), cut into 2-inch by 4-inch pieces
  • Salt and ground black pepper
  • Olive oil cooking spray
for the tarter sauce
  • ⅔ cup nonfat Greek yogurt
  • 3 tablespoons pickle relish
  • ½ teaspoon lemon juice
  • ¼ teaspoon hot sauce
  • Salt
Directions
for the chips
  1. Preheat oven to 450 degrees F, making sure oven racks are in the upper and lower thirds of the oven. Use convection oven setting if available. Place a baking sheet on the top rack to preheat.
  2. While the oven is preheating prep the fries. Cut the unpeeled potatoes into ¼-inch thick sticks. Place them in a large bowl then add the olive oil. Toss to coat then sprinkle with the smoked paprika and toss to coat. Carefully remove the baking sheet from the oven. Add the potato sticks and spread in an even layer, leaving the extra oil behind. Bake the fries on the top rack for 25-30 minutes, or until browned and crispy, flipping the fries once halfway through. When they come out of the oven sprinkle generously with the coarse sea salt.
for the fish
  1. Set a wire cooling rack onto a baking sheet and lightly spray with the olive oil cooking spray.
  2. Set up a breading station with 2 bowls. In the first, combine the cereal (lightly crushing with your hands), 2 teaspoons of salt and some ground black pepper. In the second, whisk the egg whites with a pinch of salt until frothy. First dip the fish pieces in the egg whites then dip in the cereal mixture to completely coat. Place on the prepared wire rack and repeat with the remaining fish pieces, positioned on its side so more of the crust is exposed if possible.
  3. Lightly spray with olive oil cooking spray. Bake the fish on the bottom oven rack for 12 minutes, or until crispy and cooked through. Serve with the chips and tarter sauce.
for the tarter sauce
  1. Combine the yogurt, relish, lemon juice and hot sauce in a small bowl. Season with salt to taste. Cover and place in the fridge for at least 10 minutes before using.

 Recipe from July/August 2010 issue of Food Network Magazine.

Some of the links above are affiliate links, which means I may receive a small commission for my referral. This does not affect the retail cost of the item. Thank you for supporting Lemon & Mocha!

Asian Chicken Meatball Lettuce Wraps

Asian Chicken Meatball Lettuce Wraps  |  Lemon & Mocha

I love a good lettuce wrap, especially when it has fresh and tangy flavors like these Asian Chicken Meatball Lettuce Wraps. Today I’m sharing another healthy dinner recipe with you all, this time from my favorite little cookbook, the Cook This, Not That! cookbook. This is one that I’ve made sporadically over the years ever since buying that cookbook and every time I make it we talk about how we should have it more often.

Asian Chicken Meatball Lettuce Wraps  |  Lemon & Mocha

The chicken meatballs only have six ingredients, but they are packed with flavor. You can grill them on a grill or grill pan for a nice char. I’ve also baked them successfully. Just like with any good lettuce wrap or taco the key to keep you diving back in for more is a layering of flavors. In addition to the grilled chicken meatballs these wraps are also stuffed with a simple pickled cucumber salad and a delicious ginger scallion sauce. I cannot say enough good things about this sauce! I want to drizzle it over all my protein and rice dishes forever.

Asian Chicken Meatball Lettuce Wraps  |  Lemon & Mocha

If you don’t feel like fussing with the lettuce wraps you could always just serve this as a plated meal over the brown rice, but the lettuce does add some welcome freshness to the dish. Sometimes I have trouble finding ground chicken in the store so I’ve also made this dish with ground pork, which goes incredibly well with the pickled and ginger flavors. I hope you all enjoy this one!

Asian Chicken Meatball Lettuce Wraps  |  Lemon & Mocha

Asian Chicken Meatball Lettuce Wraps
 
Yield: 4 servings
Ingredients
for the pickled cucumber salad
  • ½ large English cucumber, sliced into thin rounds
  • ⅓ small red onion, thinly sliced
  • 1½ teaspoons sesame oil
  • 2 tablespoons rice wine vinegar
  • 1½ teaspoons granulated sugar
  • ½ teaspoon salt
  • ½ teaspoon red chili flakes, optional
for the ginger scallion sauce
  • 6-8 scallions, bottoms removed and thinly sliced
  • 1 tablespoon grated fresh ginger
  • 1 tablespoon low-sodium soy sauce
  • 2 tablespoons vegetable oil
  • 1 tablespoon rice wine vinegar
for the lettuce wraps
  • 1 pound ground chicken or pork
  • ½ red onion, minced
  • 2 cloves garlic, minced
  • 1 tablespoon grated fresh ginger
  • 1 jalapeño pepper, minced (if you don’t like spicy food remove all seeds and pith)
  • 2 teaspoons granulated sugar
  • 1 teaspoon salt
  • Boston lettuce leaves, for serving
  • Steamed brown rice, for serving
Directions
for the pickled cucumber salad
  1. Combine the cucumber, onion, sesame oil, vinegar, sugar, salt and red pepper flakes (if using) in a mixing bowl. Let sit for at least 15 minutes before serving. Or make ahead as it will keep in the fridge for up to 5 days.
for the ginger scallion sauce
  1. In a small mixing bowl, combine the scallions, ginger, soy sauce, oil and vinegar. Letting the sauce sit in the fridge for 30 minutes before eating will deepen the flavor.
for the lettuce wraps
  1. Preheat a lightly oiled grill pan or grill over medium-high heat. If using a grill you might want to skewer the meatballs to make them easier to turn and cook.
  2. Combine the ground chicken, onion, garlic, ginger, jalapeño, sugar and salt in a large mixing bowl until just combined. Be sure not to over-mix. Divide into 12 evenly sized meatballs. Grill for 4-5 minutes per side until they reach an internal temperature of 165 degrees F. Remove from the heat and use the lettuce to make wraps stuffed with the rice, grilled meatballs, pickled cucumber salad and ginger scallion sauce.

Recipe from Cook This, Not That!.
Some of the links above are affiliate links, which means I may receive a small commission for my referral. This does not affect the retail cost of the item. Thank you for supporting Lemon & Mocha!

Cheese and Pear Stuffed Pork

Cheese and Pear Stuffed Pork  |  Lemon & Mocha

This week is all about tasty and healthy dinner recipes! I have so many dessert recipes coming up that I had to make sure I started off with plenty of real food recipes so Matt and I wouldn’t just be eating dessert for dinner every night. I’m always looking for new healthy dinners to rotate through so I was excited to try some new ones out.

Cheese and Pear Stuffed Pork  |  Lemon & Mocha

This Cheese and Pear Stuffed Pork recipe came from my recipe binder archives, this time by way of Cooking Light Magazine. The combination sounded intriguing so I thought I would give it a shot. I made it on a night my Dad was coming over for dinner, which was a bold move since he can be a little particular about food. But Mikey liked it! I mean Dad liked it!

Cheese and Pear Stuffed Pork  |  Lemon & Mocha

The pork tenderloin is split open and then pounded thin before being stuffed with a creamy and crunchy mixture of blue cheese, walnuts, panko bread crumbs and tart sautéed pears. The whole thing gets rolled up and stuck together with toothpicks, which is a lot easier than it sounds.

Cheese and Pear Stuffed Pork  |  Lemon & Mocha

Due to all the prep steps to get this pork tenderloin stuffed and rolled, it’s not exactly a weeknight dish, but the great part is that once you have the pork tenderloin prepared you can cover it and stick it back in the fridge until you’re ready to bake it. I served it alongside some green beans and roasted potatoes, but you could also go really light and just serve it over a spinach and pear salad. Enjoy!

Cheese and Pear Stuffed Pork  |  Lemon & Mocha

Cheese and Pear Stuffed Pork
 
Yield: 6 servings
Ingredients
  • 2 tablespoons olive oil, divided
  • 3 shallots, thinly sliced
  • 1 cup chopped Anjou pear (or other firm, tart pear), leave skin on
  • ½ cup white wine
  • 1 teaspoon Italian seasoning
  • ½ cup chopped walnuts, toasted (see note)
  • ½ cup crumbled blue cheese
  • ¼ cup panko breadcrumbs
  • 2 tablespoons chopped fresh parsley
  • 2 12-ounce pork tenderloins
  • ½ teaspoon salt
  • 1¼ cups low sodium chicken broth
  • Ground black pepper
Directions
  1. Preheat oven to 425 degrees F.
  2. In a saute pan over medium heat, heat 1 tablespoon of the olive oil. Add the shallots, season with salt and pepper and cook for 6 minutes. Add the chopped pear, white wine, Italian seasoning and some ground black pepper. Cook for 2 minutes and remove from the heat. Let cool slightly then stir in the walnuts, blue cheese, panko and parsley.
  3. Butterfly the pork tenderloins by slicing them lengthwise up to, but not through, the other side. Put the first butterflied pork tenderloin between 2 pieces of plastic wrap and pound with a meat mallet until ¼-inch thick. Top the flattened pork with half the pear mixture, being sure to leave a ½-inch border. Roll from the long side and secure with toothpicks. Tuck in the end edges when you secure with the toothpicks as well. Season with salt and pepper. Repeat for the remaining pork tenderloin.
  4. In a saute pan large enough to fit both pork tenderloins, heat the remaining tablespoon of olive oil. Saute both rolled pork tenderloins for 5 minutes, turning to make sure all sides get browned. Remove from the heat and transfer the pork to a baking dish. Bake for 15 minutes or until the pork reaches 145 degrees F (being sure to temp the pork not the filling). Move the pork from the baking dish to a cutting board and let rest for 5 minutes. Slice the pork before serving.
  5. In the pan used to saute the pork, bring the broth to a boil over medium-high heat. Scrape the pan to make sure you get all the browned bits. Cook for 4 minutes and serve over the pork. Alternatively, you could slice the pork then carefully add to the broth and let cook in the broth as the sauce forms.
Notes
To toast walnuts, bake for 3-5 minutes in a 350 degrees oven, being sure not to let burn.

 Recipe from September 2011 issue of Cooking Light Magazine.

Freezer Burritos: Chicken Verde, Mushroom, Kale and Brown Rice Burritos

Freezer Burritos: Chicken Verde, Mushroom, Kale and Brown Rice Burritos  |  Lemon & Mocha

Sometimes you need a quick meal you can grab straight from the freezer and heat up. So today I’m going to walk you through my favorite new freezer meal: freezer burritos. The recipe today is for these Chicken Verde, Mushroom, Kale and Brown Rice Burritos, which are packed with flavor and plenty of good-for-you foods.

Freezer Burritos: Chicken Verde, Mushroom, Kale and Brown Rice Burritos  |  Lemon & Mocha

Not feeling that combination? That’s okay because we’re going to talk about all different tips you can use to make your own personal favorite freezer burritos. You can certainly buy freezer burritos from the store, but they’re typically loaded with sodium, might not have the exact ingredients you prefer and aren’t exactly cost effective.

Freezer Burritos: Chicken Verde, Mushroom, Kale and Brown Rice Burritos  |  Lemon & Mocha

When I decided to try making my own I was skeptical that the version out of the freezer would taste just as good – and that the texture would be just as good – as a freshly made burrito. Much to my delight I discovered with a few simple tricks these homemade freezer burritos would become a mind-blowing game changer! How so? Because you can pop one out of the freezer, microwave it for three minutes and have a fresh, delicious and healthy (depending on what you put in them!) meal any day of the week. If you want to go one extra step further you can even sear it in a skillet for one to two minutes per side after microwaving to add that extra crispy factor. So let’s get into it.

Freezer Burritos: Chicken Verde, Mushroom, Kale and Brown Rice Burritos  |  Lemon & Mocha

Keep Moisture Out of Your Burritos

The key to having a freezer burrito taste like you got it fresh from your neighborhood Mexican joint and not be a soggy mess is to keep away the wet ingredients.

  • You can still have salsa. This doesn’t mean no salsa. Just toss your protein or other ingredients in the salsa before adding to your burrito so that they are coated, but not dripping. This way you get the flavor the salsa provides without the moisture.
  • Drain well. If you’re using beans make sure they are well drained before adding to the burritos.
  • Sauté those veggies. Sautéing the vegetables before adding them to the burritos is a great way to add flavor while also reducing the moisture. Sautéing vegetables like mushrooms, peppers, onions and greens helps get the excess moisture out of them.
  • Room temperature everything. Make sure all your ingredients are room temperature before starting to assemble the burritos. Warm fillings lead to steamy insides, which cause future soggy burritos. This also goes for your tortillas since cold tortillas are stiff and tend to break. You’ll want to use fresh (aka not the ones that have been sitting in your fridge for weeks) room temperature tortillas.
  • Be smart about your fillings. If it doesn’t belong in the microwave then it doesn’t belong in your burrito. That shredded lettuce and sour cream? Back away from your burritos and put it back in the fridge.

Freezer Burritos: Chicken Verde, Mushroom, Kale and Brown Rice Burritos  |  Lemon & Mocha

Wrap the Burritos Well

This goes for making the actual burrito and for wrapping the finished burrito for freezer storage.

  • Wrap a tight burrito. There are plenty of Youtube videos out there that show you how to properly wrap a burrito. I’m not that much of a perfectionist though; I layer my ingredients in a long line towards the bottom of the tortilla closest to me, tuck in the short sides and then wrap as tightly as I can from the bottom. Having all your ingredients tightly nestled in there will help keep moisture out while they’re in the freezer.
  • Prep for the freezer. There’s a few different ways you can go about this, but I prefer to tightly wrap each burrito in plastic wrap or aluminum foil then place all the wrapped burritos in a gallon storage bag, labeling the burrito type on the outside of the bag. This provides double protection and also allows you to easily remove just one burrito at a time.

In a couple weeks I’ll be sharing another favorite of ours: Slow Cooker Pork and Roasted Sweet Potato Freezer Burritos. I’ll also use that post as a follow-up to this one and list out plenty of protein, grain and filling ideas so you can mix and match your own freezer burritos. What do you load into your ideal burrito?

Freezer Burritos: Chicken Verde, Mushroom, Kale and Brown Rice Burritos  |  Lemon & Mocha

Freezer Burritos: Chicken Verde, Mushroom, Kale and Brown Rice Burritos
 
Yield: 6 burritos
Ingredients
  • 2 tablespoons olive oil, divided
  • 8 ounces kale, thick stems removed
  • ¼ teaspoon garlic powder
  • 8 ounces sliced cremini mushrooms
  • 1½ cups shredded cooked chicken
  • ⅓ cup salsa verde
  • 6 10-inch flour tortillas, room temperature
  • 3 cups cooked brown rice, cooled
  • ⅓ cup shredded mozzarella or colby jack cheese, optional
  • Salt and pepper
Directions
  1. Heat 1 tablespoon of the olive oil over medium-high heat in a large saucepan or lidded sauté pan. Add the kale, season with the garlic powder, salt and pepper. Sauté for 5 minutes. Reduce heat to medium, add ¼ cup water, cover the pan and cook for 12 minutes. Remove from the heat and let cool completely or put in the fridge to use later.
  2. While the kale is cooking, sauté the mushrooms. Heat the remaining tablespoon of olive oil in a sauté pan over medium-high heat. Add the mushrooms, season with salt and pepper and sauté for 7 minutes. Remove from the heat and let cool completely or put in the fridge to use later.
  3. When you’re ready to make the burritos, combine the shredded chicken with the salsa verde. Make sure all your ingredients are room temperature or cold. Place the first tortilla on a plate. Add some brown rice in a lengthwise strip towards the bottom of the tortilla closest to you. Top with some salsa verde chicken. Top with some kale, mushrooms and cheese, if using. Fold in each side then take the bottom of the tortilla closest to you and tightly roll it up and over the filling. Continue to roll up the burrito, tightly, tucking in the sides additionally as needed. Wrap in plastic wrap or aluminum foil. Set aside and repeat for the remaining tortillas and fillings. Place all the rolled burritos in a labeled gallon freezer bag and place in the freezer.
  4. To heat: Remove the burrito from the freezer. Remove and discard the plastic wrap or aluminum foil. Place the burrito on a microwave safe plate and microwave at 70% power for 3 minutes. Sear the burrito in a sauté pan lightly sprayed with cooking spray over medium-high heat for 1 minute on each side, until lightly browned. If you don’t want to sear your burrito, microwave for a total of 5 minutes instead of 3.

 
Salsa Verde
 
Yield: About 2 cups
Ingredients
  • 1 pound tomatillos, husks removed and rinsed
  • 1 clove garlic
  • 1-2 jalapeños, see note
  • ⅓ cup roughly chopped white onion
  • 1 cup cilantro leaves (can include top parts of stems)
  • 1 teaspoon salt
  • 3 tablespoons vegetable oil
Directions
  1. Add the tomatillos, garlic and jalapeño to a medium saucepan and then cover with water. Bring to a boil then reduce to low and simmer covered for 10 minutes. The tomatillos should become pale green and should be soft, but not falling apart.
  2. Use a slotted spoon to transfer the tomatillos, garlic and jalapeño to a high-speed blender or food processor. Add the onion, cilantro and salt then puree until smooth.
  3. Heat the vegetable oil in a medium saucepan over medium heat. Once hot, add the salsa and cook until thickened slightly, about 6-8 minutes, stirring occasionally. Serve warm or refrigerate for later and serve cold or at room temperature.
Notes
If you don’t want your salsa spicy only use 1 jalapeño and remove all the seeds and pith before putting in the blender. If you like it spicy try 1 jalapeño with the seeds and pith and if you want it even more spicy you could add a second jalapeño.

Chicken and Spinach Enchiladas Verde

Chicken and Spinach Enchiladas Verde  |  Lemon & Mocha

I’m so glad I experimented with another recipe from my Pati’s Mexican Table cookbook. This Chicken and Spinach Enchiladas Verde dish was so crave-worthy and will certainly be a new regular at our house. I’ve been thoroughly impressed by every recipe I’ve made from this book and I’m excited to keep cooking more and more recipes from it. Do you have a cookbook at home that just nails it every time for you?

Chicken and Spinach Enchiladas Verde  |  Lemon & Mocha

I did make a few changes to the original recipe by including spinach, since I love to sneak in green veggies whenever I can, and by adding some shredded colby jack cheese.

Chicken and Spinach Enchiladas Verde  |  Lemon & Mocha

Normally when I think of enchiladas I picture a saucy, gooey dish loaded with melted cheese. Not that there’s anything wrong with that once in a while, but for a typical dinner I’m not looking to eat something quite so rich. There’s something about these Chicken and Spinach Enchiladas Verde that is lighter and more refined, while still having all the qualities of a comfort food dish you just want to dive into.

Chicken and Spinach Enchiladas Verde  |  Lemon & Mocha

The key is that the tortillas get fully submerged into the warm Salsa Verde before being stuffed with the chicken and spinach mixture so that when you roll them up you know every bite will have the flavor of the Salsa Verde. This helps give the enchiladas that fork-tenderness so that there isn’t a single dry bite to be had.

Chicken and Spinach Enchiladas Verde  |  Lemon & Mocha

I added that layer of melted colby jack cheese on top because even if I didn’t want the enchiladas weighed down by cheese I still wanted a hint of gooeyness. The mildness of that cheese also pairs really well with the saltiness from the crumbly cotija cheese that gets sprinkled on top after the enchiladas come out of the oven. These Chicken and Spinach Enchiladas Verde are homey enough to be comforting in the cold of winter, while being light enough to eat with a nice glass of white wine in the summer so I’m looking forward to enjoying this dish all year long!

Chicken and Spinach Enchiladas Verde  |  Lemon & Mocha

Chicken and Spinach Enchiladas Verde
 
Yield: 6 servings
Ingredients
  • 2 batches salsa verde, about 4 cups
  • 12 6-inch corn tortillas
  • 2 cups shredded chicken
  • 3 ounces baby spinach leaves
  • 1½ cups shredded colby jack cheese, divided
  • Sour cream, for topping
  • Crumbled cotija cheese, for topping
  • Chopped white onion, for topping
  • Chopped cilantro, for topping
Directions
  1. Preheat the oven to 375 degrees F.
  2. Heat the salsa in a medium saucepan over medium-low heat; once warm reduce to the lowest setting to keep warm until ready to use.
  3. Lightly toast the tortillas. Heat a nonstick skillet over medium heat and add a tortilla. Heat the tortillas, one at a time, for 30 seconds per side in the skillet. Remove with tongs to a plate when done toasting both sides of the tortilla and just stack them on top of each other on the plate until you’re done toasting all the tortillas.
  4. Remove the salsa from the heat. Use tongs to dip a tortilla into the salsa so it’s completely coated then place on a plate. Add a handful of spinach leaves, 2-3 tablespoons of shredded chicken and 1 tablespoon of colby jack cheese. Tightly roll the tortilla up (no need to tuck in the sides) then place seam side down in a 9-inch by 13-inch baking dish. Repeat for the remaining tortillas until they’re all tucked into the baking dish. Top the enchiladas with the remaining salsa then sprinkle with the remaining ½ cup of shredded colby jack.
  5. Cover with aluminum foil and bake for 15 minutes. Remove the aluminum foil and bake for 5 more minutes, or until the cheese on top is melted. Take the enchiladas out of the oven and top with a drizzle of sour cream, the crumbled cotija cheese, chopped white onion and cilantro before serving.

 
Salsa Verde
 
Yield: About 2 cups
Ingredients
  • 1 pound tomatillos, husks removed and rinsed
  • 1 clove garlic
  • 1-2 jalapeños, see note
  • ⅓ cup roughly chopped white onion
  • 1 cup cilantro leaves (can include top parts of stems)
  • 1 teaspoon salt
  • 3 tablespoons vegetable oil
Directions
  1. Add the tomatillos, garlic and jalapeño to a medium saucepan and then cover with water. Bring to a boil then reduce to low and simmer covered for 10 minutes. The tomatillos should become pale green and should be soft, but not falling apart.
  2. Use a slotted spoon to transfer the tomatillos, garlic and jalapeño to a high-speed blender or food processor. Add the onion, cilantro and salt then puree until smooth.
  3. Heat the vegetable oil in a medium saucepan over medium heat. Once hot, add the salsa and cook until thickened slightly, about 6-8 minutes, stirring occasionally. Serve warm or refrigerate for later and serve cold or at room temperature.
Notes
If you don’t want your salsa spicy only use 1 jalapeño and remove all the seeds and pith before putting in the blender. If you like it spicy try 1 jalapeño with the seeds and pith and if you want it even more spicy you could add a second jalapeño.

Recipe slightly adapted from Pati’s Mexican Table.
Some of the links above are affiliate links, which means I may receive a small commission for my referral. This does not affect the retail cost of the item. Thank you for supporting Lemon & Mocha!