Fish & Seafood

Creamy Mustard Roasted Fish

Creamy Mustard Roasted Fish  |  Lemon & Mocha

Would you believe me if I told you this recipe got Matt to eat tilapia? Of course you believe me otherwise this would be a pretty bad story if it wasn’t true! While I’m busy going through my cookbooks that I have yet to make anything from I’m also focusing on sharing recipes with you all that I have made and enjoyed from my cookbooks over the years, like Giada’s Breakfast Bulgur with Warm Berries and Ree Drummond’s Potato, Leek and Bacon Pizza. Add to the list Ina Garten’s Creamy Mustard Roasted Fish. Can you tell I’m a Food Network fan?

Creamy Mustard Roasted Fish  |  Lemon & Mocha

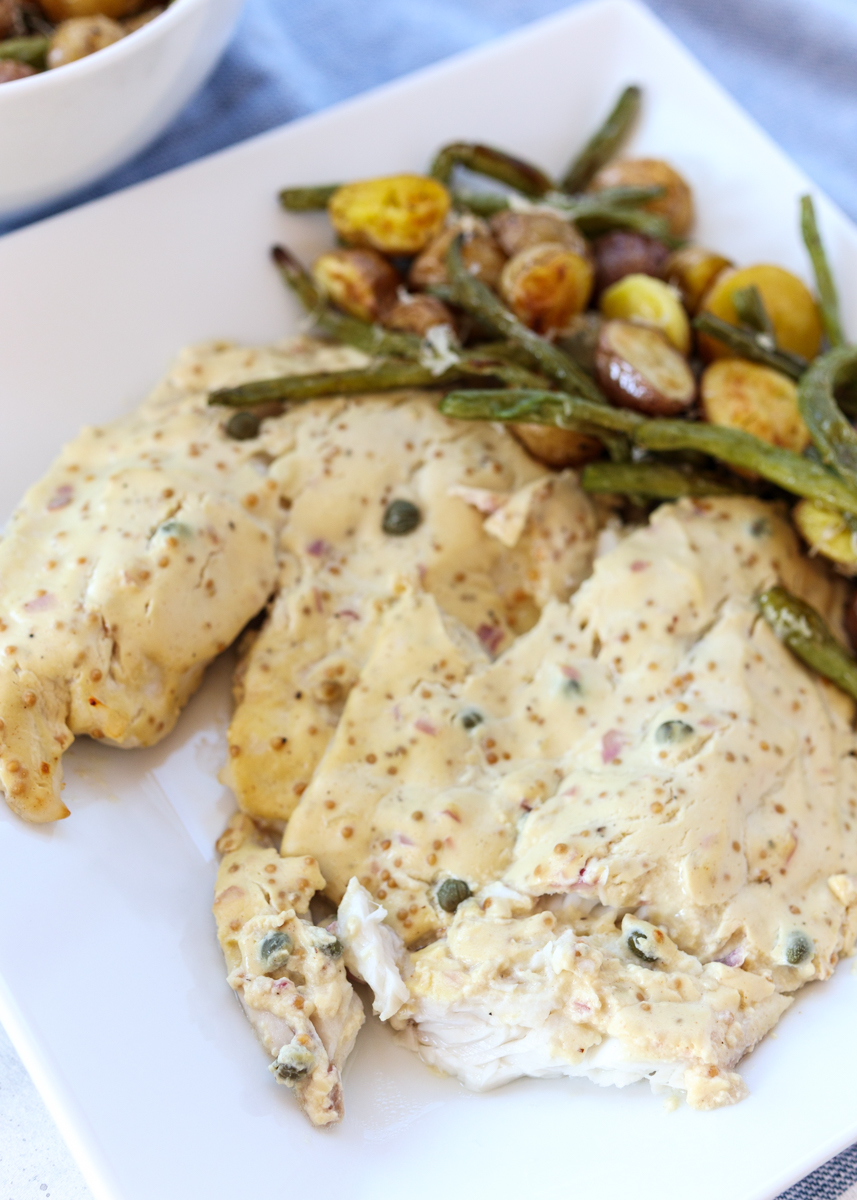
As I’ve mentioned before, I’m continually trying to find cooked fish recipes that Matt enjoys. Sushi is another story; he can now out-eat me on sashimi! Many years ago I wanted to make us some cooked fish and thought this creamy mustard sauce just might do the trick. It worked! Between the mustard, shallot and capers, the sauce is full of punchy flavors that keep the tilapia from tasting “fishy.”

Creamy Mustard Roasted Fish  |  Lemon & Mocha

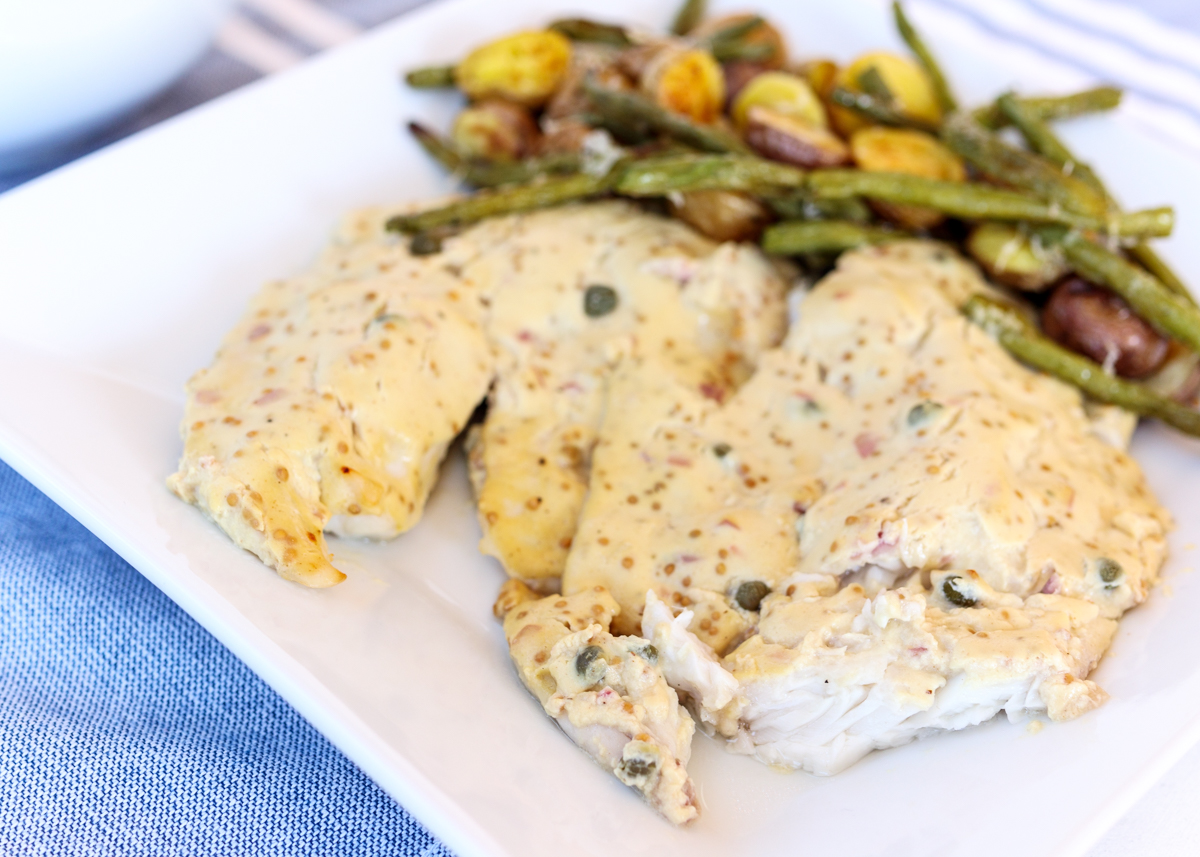
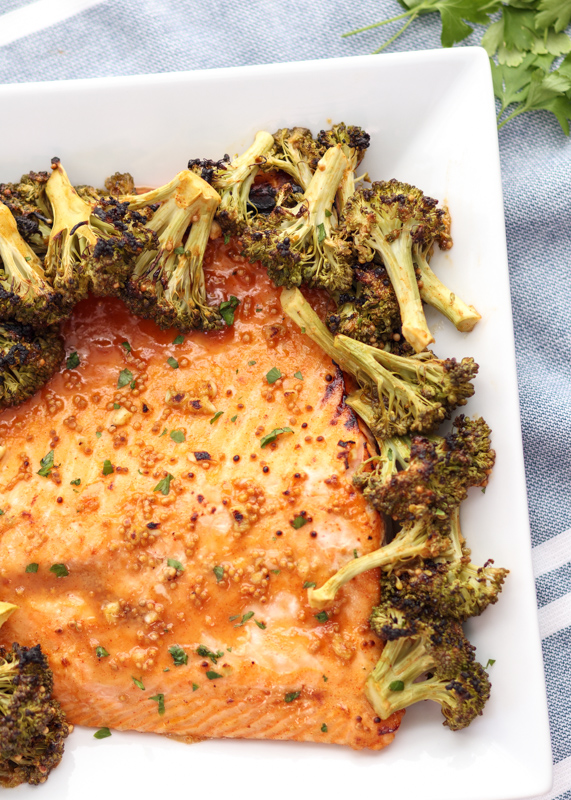
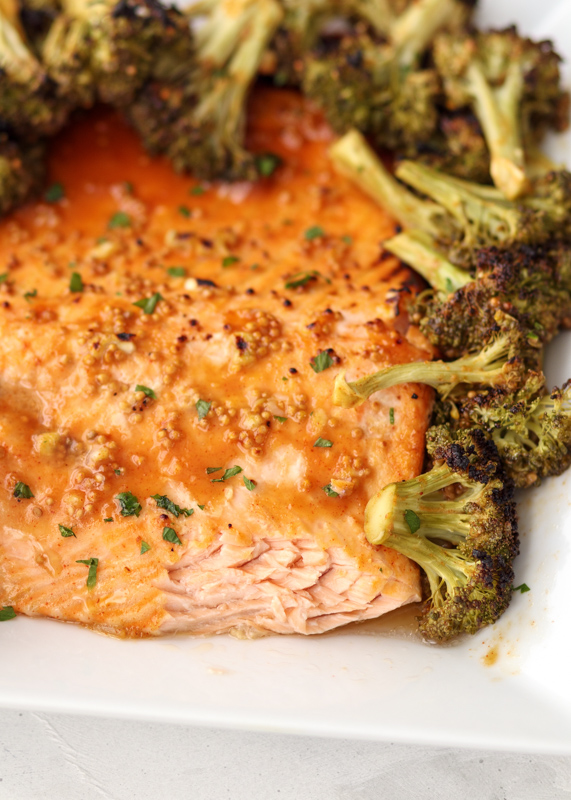
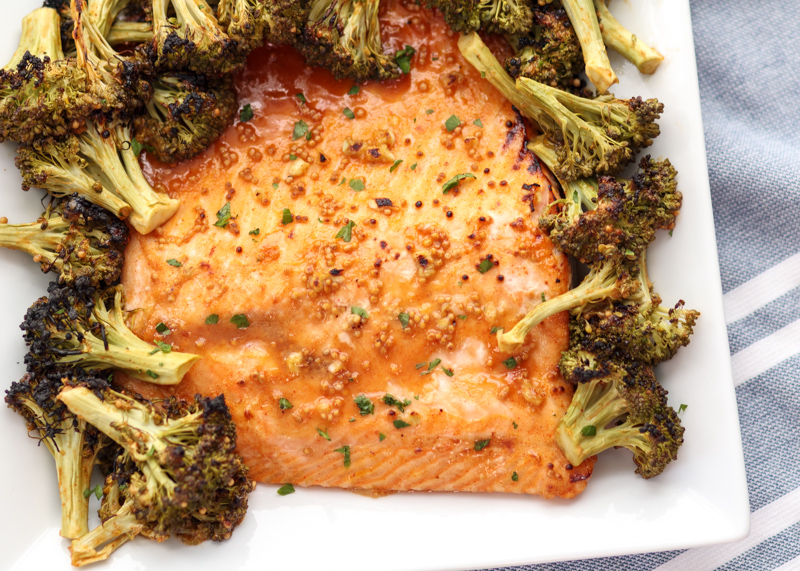
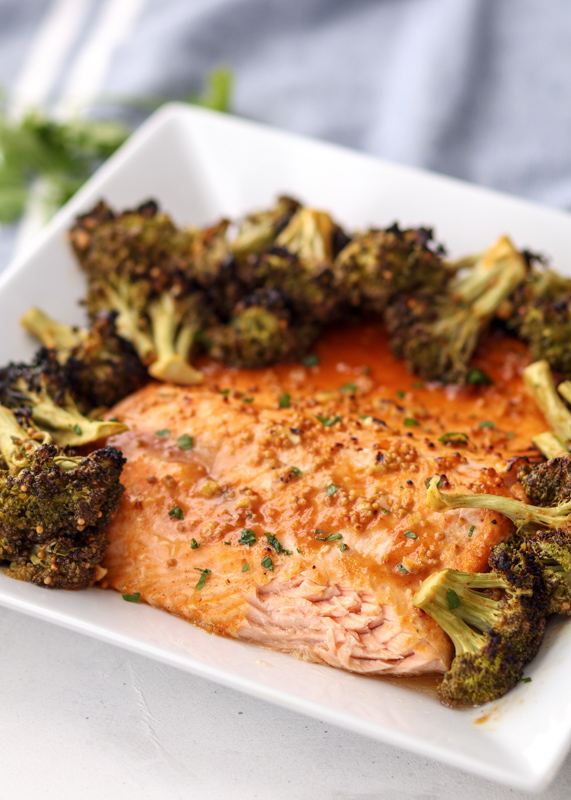
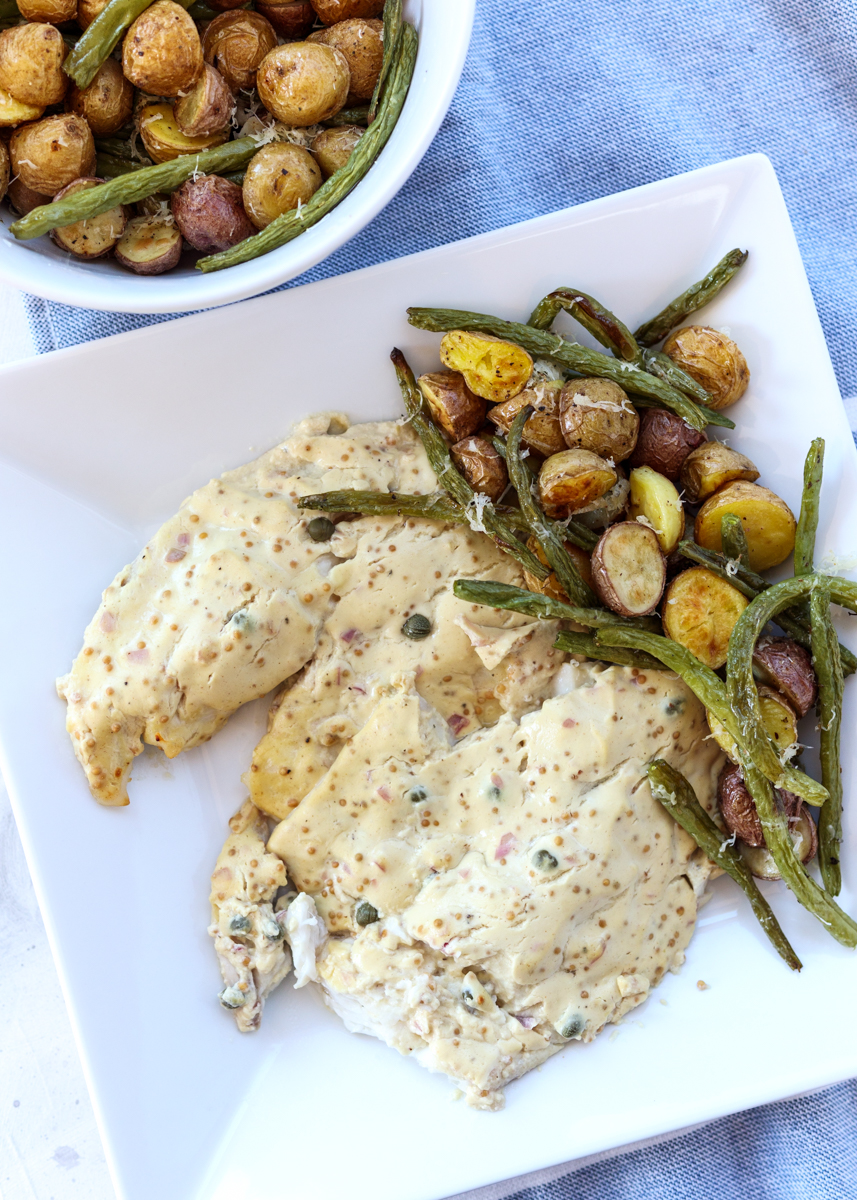
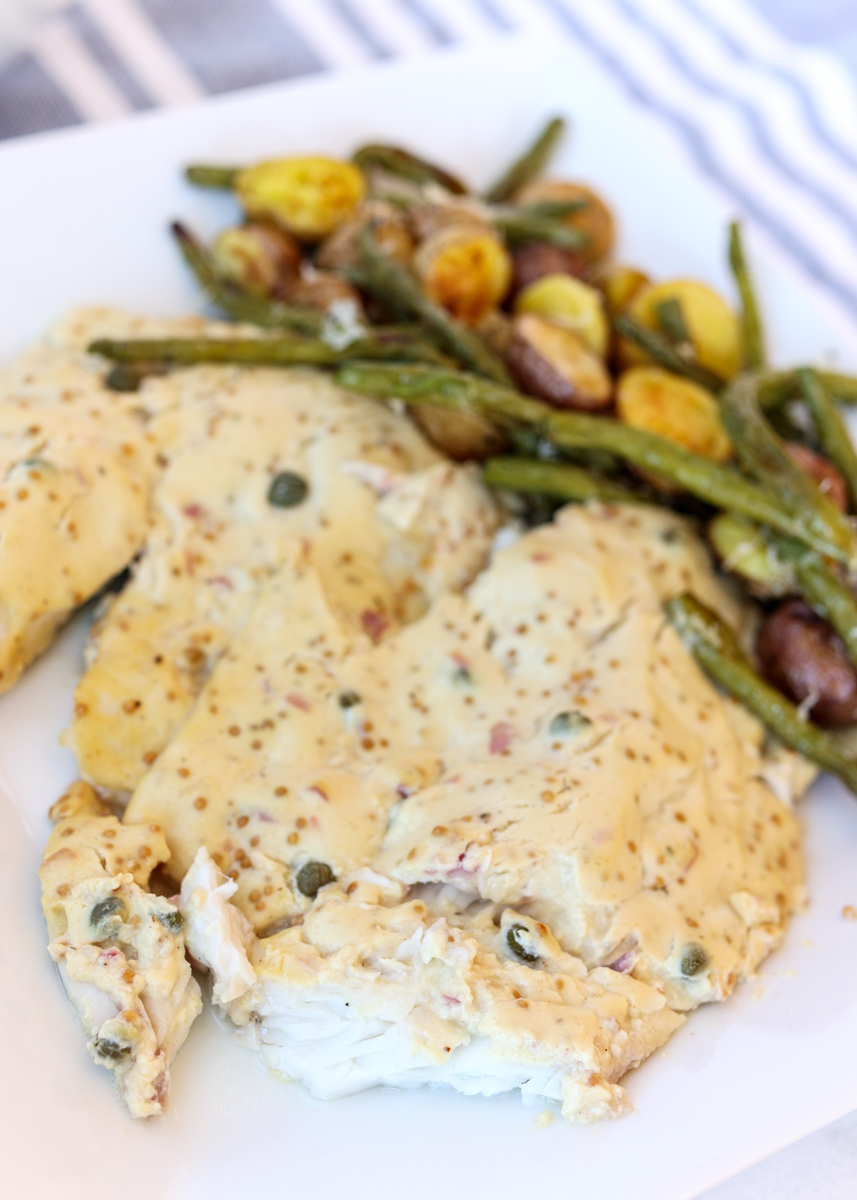
The original recipe from Barefoot Contessa uses crème fraîche to achieve the creamy and slightly sour sauce that pairs so well with the sharp mustard. Crème fraîche is delicious, but it can also be very rich and fattening. Instead, I used my new favorite recipe trick: cauliflower puree! I blended cooked cauliflower florets with plain Greek yogurt to mimic the thickness and creaminess of the crème fraîche. That was combined with the mustard, mustard seeds, shallots and capers for a perfect sauce to be poured over the white fish before baking it.

Creamy Mustard Roasted Fish  |  Lemon & Mocha

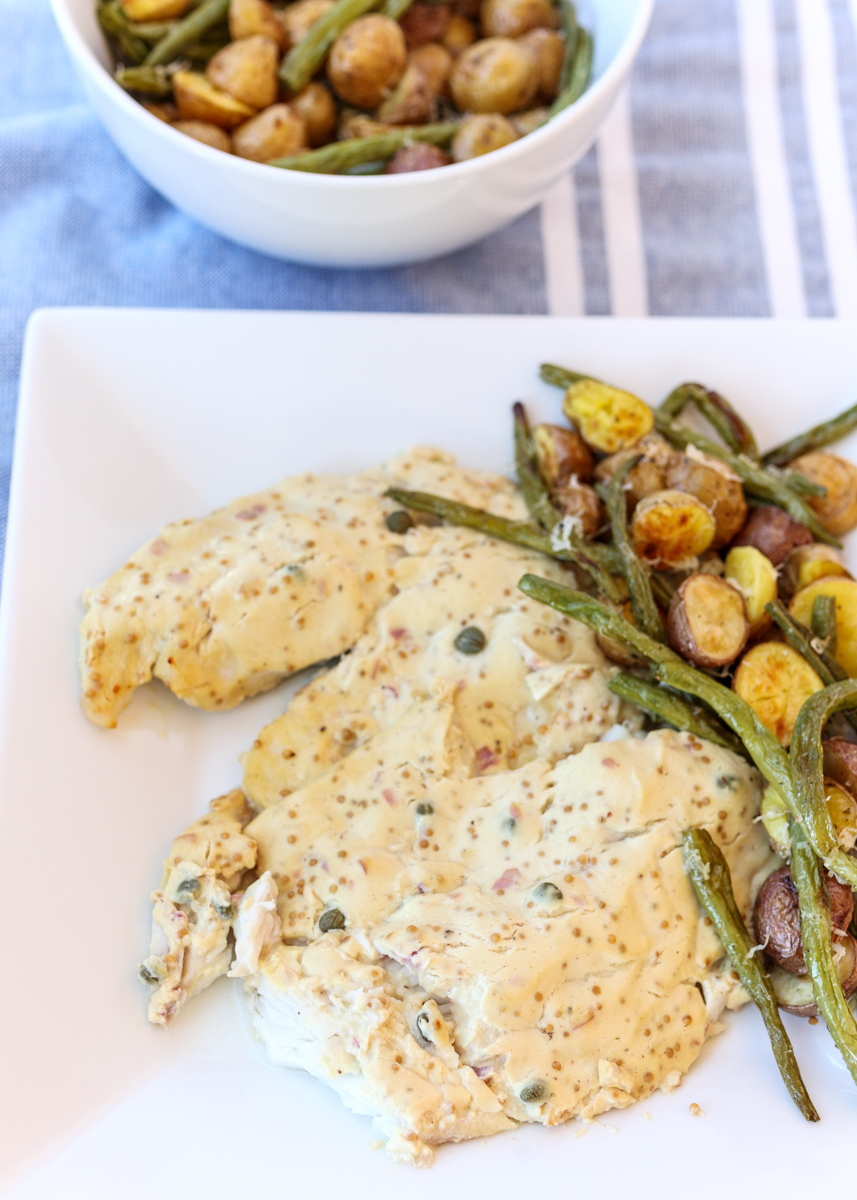
Although the flavor of the sauce is awesome, the best part is that it keeps the tilapia incredibly flaky and moist. I served this dish alongside the Sheet Pan Parmesan Roasted Green Beans and Baby Potatoes and Matt was a happy camper. Who would have thought one day Matt would happily eat tilapia for dinner?! Thanks, Ina!

Creamy Mustard Roasted Fish  |  Lemon & Mocha

Creamy Mustard Roasted Fish
 
Yield: 4 servings
Ingredients
  • 1 cup cauliflower florets (about 8 medium-large florets)
  • ⅔ cup water
  • 5 ounces nonfat Greek yogurt
  • 3 tablespoons mustard
  • 2 tablespoons minced shallots
  • 1 tablespoon mustard seeds
  • 2 teaspoons drained capers
  • 4 tilapia fillets
  • 1 teaspoon salt
  • ½ teaspoon ground black pepper
Directions
  1. Preheat oven to 425 degrees. Line a baking pan large enough to fit the fish fillets with nonstick aluminum foil or parchment paper and set aside.
  2. Add the water and cauliflower florets to a saucepan. Bring to a boil then cover, reduce heat to low and simmer for 10 minutes. Drain the liquid then puree the cauliflower with the Greek yogurt until smooth. Combine the cauliflower-yogurt puree, mustard, minced shallots, mustard seeds and drained capers in a small mixing bowl.
  3. Place the tilapia fillets on the prepared baking pan. Season with the salt and pepper. Spoon the mustard sauce over the fish completely. Bake until the thickest part of the fish flakes, about 10-15 minutes. When it’s done broil for 1 minute.

Recipe adapted from Barefoot Contessa Back to Basics.
Some of the links above are affiliate links, which means I may receive a small commission for my referral. This does not affect the retail cost of the item. Thank you for supporting Lemon & Mocha!

Thai Peanut Shrimp and Broccoli

Thai Peanut Shrimp and Broccoli  |  Lemon & Mocha

See? I told you the healthy recipes would be back! Although I can’t say the same for what I have scheduled for next week. Last week when I posted the Roasted Acorn Squash with a Thai Peanut Sauce I started thinking about that creamy, salty and tangy peanut sauce. More specifically, about how it was so good that I needed to come up with other recipes I could drizzle it all over!

Thai Peanut Shrimp and Broccoli  |  Lemon & Mocha

My mind immediately went to a stir fry so here we are staring at this drool-worthy Thai Peanut Shrimp and Broccoli. This dish came out exactly like I was hoping. The broccoli and shrimp are tender and slightly crispy, but of course the star is that creamy peanut sauce. Pour the whole thing over some brown rice, add some chopped peanuts and scallions and you are in weeknight dinner heaven.

Thai Peanut Shrimp and Broccoli  |  Lemon & Mocha

To make the broccoli for this stir fry I used the steam-sautéed method. Remember that old post? You lightly sauté some garlic and broccoli then add some water and cover the pan so the broccoli finishes cooking by steaming right in the skillet. It cooks the broccoli really quickly while also adding some char and flavor that is missing with traditional steamed broccoli. I also peel and chop the broccoli stalks so that I’m using every bit of the broccoli, but you can feel free to omit this step if you would prefer just to use broccoli florets.

Thai Peanut Shrimp and Broccoli  |  Lemon & Mocha

The shrimp get a quick sear with three minutes on each side before it’s time for the simple peanut sauce made from peanut butter, coconut aminos, light coconut milk, maple syrup, lime juice, ground ginger and a little red pepper flakes. This whole dish is incredibly quick to throw together, which is the beauty of stir fry meals.

Thai Peanut Shrimp and Broccoli  |  Lemon & Mocha

When Matt and I were in our old apartment and would both get home from work late, stir fries were usually a twice a week regular in our rotation. I love this Thai Peanut Shrimp and Broccoli stir fry because the peanut sauce is a nice change from the classic soy sauce base that was usually our go-to. I hope you all enjoy this one! Happy Friday!

Thai Peanut Shrimp and Broccoli  |  Lemon & Mocha

Thai Peanut Shrimp and Broccoli
 
Yield: 2 servings
Ingredients
  • 1 tablespoon plus 1 teaspoon olive oil, divided
  • 1 clove garlic, thinly sliced
  • 1 head broccoli, cut into bite sized florets; stalks peeled, diced and kept separate
  • 2½ tablespoons water
  • ¼ cup creamy peanut butter (I used Jif)
  • 2 tablespoons coconut aminos
  • 2 tablespoons light coconut milk
  • 1 tablespoon maple syrup
  • 1 tablespoon lime juice
  • ¼ teaspoon ground ginger
  • ⅛ teaspoon red pepper flakes, plus more to taste
  • 12 large shrimp, peeled and de-veined
  • 2 tablespoons chopped peanuts
  • 2 tablespoons chopped scallions
  • Salt and pepper
Directions
  1. Heat a tablespoon of the olive oil in a large skillet (that has a lid, but don’t use the lid yet) over medium heat. Add the garlic. When the garlic starts to sizzle, add the diced broccoli stalks and cook for 1 minute. Add the florets and cook for 3 minutes, stirring occasionally. Add the water, cover the skillet and reduce the heat to low. Steam the broccoli for 5 minutes, until tender and the water has steamed off.
  2. While the broccoli is cooking, make the peanut sauce. Whisk the peanut butter, coconut aminos, light coconut milk, maple syrup, lime juice, ground ginger and red pepper flakes in a small mixing bowl until well combined.
  3. When the broccoli is done, remove from the skillet. Heat the remaining teaspoon of olive oil in the skillet over medium-high heat. Once hot, add the shrimp, being sure not to move the shrimp once you place them in the skillet. Season the shrimp with salt and pepper and sear for 3 minutes, flip and sear for another 3 minutes. Reduce the heat to low. Add the broccoli and sauce to the skillet. Stir until combined then remove from the heat. Serve the shrimp and broccoli over brown rice and top with the chopped peanuts and scallions.
Notes
Substitutions: If you can’t use coconut aminos, you can try swapping in low sodium soy sauce. You might need to increase the amount of maple syrup. If you can’t use light coconut milk, substitute water.


Pan Seared Salmon over Blood Orange Quinoa

Pan Seared Salmon over Blood Orange Quinoa

You guys. I am so proud of this dish and I’m excited to finally be sharing it with you! I recently switched over to a recipe notebook, as opposed to my previous millions of scattered scraps of paper, and if you could see all my notes on this one you would know how I’ve been diligently working on perfecting it for the last couple months.

Pan Seared Salmon over Blood Orange Quinoa

The original inspiration for this Pan Seared Salmon over Blood Orange Quinoa was to create a healthy salmon dinner that would incorporate a lot of seasonal produce. Kale and citrus fruits are at their peak, while carrots and shallots are still in season during the early winter in cooler climates. I also wanted to make an all-in-one meal, which is my term for a recipe that includes the protein, grain and veggies without having to come up with different sides. It does not, however, mean a one pot meal since you have to use a couple different pans, but that’s okay because the meal still comes together quickly enough for a weeknight dinner.

Pan Seared Salmon over Blood Orange Quinoa

What you’re looking at is crispy salmon that has been pan seared to perfection and laid on top a flavor-packed bed of blood orange quinoa. You’re incorporating the blood oranges three ways to really help the flavor come through; we’re using the zest, its juice and the actual blood orange segments. This helps give the whole dish a bright acidity.

Pan Seared Salmon over Blood Orange Quinoa

The garlic, shallot and carrots get lightly caramelized before the kale gets tossed in along with some water to help it steam. The kale gets perfectly wilted and tosses really well with the quinoa – no tough greens in this dish! The recipe makes two servings, but you can easily double it if you are cooking for more people.

Pan Seared Salmon over Blood Orange Quinoa

I love seasonal cooking, not only because that means you get the best prices at the grocery store, but the produce with the best flavor and nutrients is going to be what is in season at the moment. One idea I had was to post a seasonal guide at the beginning of each month and then share a few recipes that used the seasonal ingredients as some inspiration. Is that something you would be interested in? If so, let me know in the comments below!

Pan Seared Salmon over Blood Orange Quinoa

Pan Seared Salmon over Blood Orange Quinoa
 
Yield: 2 servings
Ingredients
  • ⅓ cup quinoa
  • 3½ tablespoons olive oil, divided
  • 2 carrots, peeled
  • 1 clove garlic, minced
  • ½ shallot, minced
  • 4 cups chopped kale, thick stems removed
  • 2 blood oranges
  • 2 filets of salmon, skin-on or skinless
  • Salt and pepper
Directions
  1. Bring the quinoa and ⅔ cup water to a boil in a small saucepan. Cover, reduce the heat to low and let simmer for 15 minutes, or until all the water has been absorbed. Fluff and set aside.
  2. Cut each carrot into three pieces then halve each piece lengthwise. Segment one of the blood oranges by cutting off the peel and pith then cutting segments out from the membrane of the orange. Set aside.
  3. Heat 2 tablespoons olive oil in a large pan (skillet with a lid preferred) over medium-high heat. Add the carrots and season with salt and pepper. Cook until lightly browned, about 5-7 minutes. Reduce the heat to medium and add the garlic and shallot. Cook for 1-2 minutes. Add the kale and ¼ cup of water. Cover and cook for 5-7 minutes. Remove the cover and cook for 2 more minutes, or until the water has finished evaporating. Add the zest and juice from 1 of the oranges, about ¼ cup of juice. Add the blood orange segments and quinoa; stir well and season with salt and pepper to taste. Remove from the heat.
  4. Make sure the salmon has been patted dry. Generously season both sides of the salmon with salt and pepper. Add enough olive oil to lightly coat the bottom of a skillet large enough to fit both salmon filets, about 1½ tablespoons of olive oil. Heat the oil over medium-high heat. Once the oil in the pan is hot (you can tell when the oil is shimmering), carefully place the salmon filets in the pan bottom side down. The bottom side is the skin side or the side where the skin was - the less “pretty” side. Once the salmon is in the pan do not move it until it’s time to flip the salmon so it gets nice and crispy. Sear for 2-3 minutes, carefully flip then sear for another 2-3 minutes. You want to take the salmon off the pan when it reaches an internal temperature of 120 degrees F for medium-rare, or 130 degrees F for medium. Plate the quinoa and kale then top with the salmon filet.


Baked Trader Joe’s Cauliflower Gnocchi with Crispy Shrimp and Pesto

Baked Trader Joe’s Cauliflower Gnocchi with Crispy Shrimp and Pesto  |  Lemon & Mocha

Welcome back, everyone! I hope you all had a wonderful Thanksgiving and hopefully some relaxing time off! I’m diving right into this recipe because I can’t wait any longer. This is one of those recipes that didn’t really start as a recipe. It was just something I threw together for Matt and I for dinner and it was so outrageously delicious that I decided it needed to be shared on Lemon & Mocha as soon as possible. And by as soon as possible I mean a couple months later because I’m working with a schedule here! This is my Baked Trader Joe’s Cauliflower Gnocchi with Crispy Shrimp and Pesto. We also have some seared asparagus, sweet peas and sautéed shallots tossed in there.

Baked Trader Joe’s Cauliflower Gnocchi with Crispy Shrimp and Pesto  |  Lemon & Mocha

Before we go much further though, we need to discuss the product this whole dish centers around – Trader Joe’s cauliflower gnocchi. Have you tried this yet? They are frozen gnocchi that have cauliflower as the bulk ingredient and have only 140 calories per serving! They are high in sodium since they are a frozen food after all, but the low calories and fat are pretty hard to beat. When I first saw people posting these gnocchi on Instagram, a lot of people were complaining about them being mushy when cooked according to the stove-top instructions on the back of the bag. The ultimate question seemed to be how to cook Trader Joe’s Cauliflower Gnocchi.

Baked Trader Joe’s Cauliflower Gnocchi with Crispy Shrimp and Pesto  |  Lemon & Mocha

I thought about how much I love roasted cauliflower and how there’s no way they could get mushy if baked so I thought I would give it a shot. It worked! The gnocchi came out tender and perfectly crispy! Now, if you don’t have a Trader Joe’s near you there’s plenty of different cauliflower gnocchi recipes posted online if you search and you should be able to bake homemade gnocchi. I will probably test some of the recipes out in the coming months since I like making gnocchi, but in the meantime I’m sticking with these time-saver frozen ones.

Baked Trader Joe’s Cauliflower Gnocchi with Crispy Shrimp and Pesto  |  Lemon & Mocha

Anyways, back to this dish. The gnocchi are great on their own or with marinara sauce, but then you would miss out on these crispy shrimp coated in garlic, shallot and pesto. There are not a ton of gnocchi in the bag so I made sure to add in lots of green veggies so the dish would be plenty for the two of us for dinner. I highly recommend the asparagus and peas, but feel free to substitute in whichever vegetables you have on hand that would pair well with the shrimp and pesto. Maybe some spinach and pan-seared cherry tomatoes? Yum! Okay, I hope you all enjoyed this post because on Wednesday we’re going full-blown Christmas dishes and treats!

Baked Trader Joe’s Cauliflower Gnocchi with Crispy Shrimp and Pesto
 
Yield: 2 servings
Ingredients
  • 1 bag Trader Joe’s cauliflower gnocchi
  • 1 tablespoon olive oil, plus more as needed
  • ½ shallot, minced
  • 1 clove garlic, minced
  • ½ to ¾ pound asparagus, trimmed then cut into thirds
  • ⅔ cup frozen peas
  • 10 raw shrimp
  • ¼ cup pesto
  • Salt and pepper
Directions
  1. Preheat the oven to 400 degrees F.
  2. Spread the gnocchi out on a baking sheet. Lightly spray them with cooking spray then bake for 40 minutes, or until they are crispy and golden, tossing/flipping 1 or 2 times during cooking.
  3. When the gnocchi are almost done, heat the olive oil in a skillet over medium-high heat. Add the shallot and garlic and sauté for 2 minutes. Add the asparagus and cook until al dente, about 4 minutes. Season with salt and pepper. Add the frozen peas.
  4. Push the veggies to the edges of the skillet and add a very little bit more olive oil. Add the shrimp so they are each directly touching the pan and sauté for 3 minutes on each side, or until pink and curled. Lightly season the shrimp with salt and pepper when you put them in the pan. Reduce heat to low. Add in the cooked crispy gnocchi and the pesto. Toss to combine and season with additional salt and pepper if needed. Add more pesto or olive oil as needed. Top with grated Parmesan if desired.


Sheet Pan Honey Mustard Roasted Salmon & Broccoli

Sheet Pan Honey Mustard Roasted Salmon & Broccoli  |  Lemon & Mocha

Look at this salmon! It is so tender and sticky and sweet and I’m drooling all over my keyboard just writing about it.

Sheet Pan Honey Mustard Roasted Salmon & Broccoli  |  Lemon & Mocha

Salmon lovers and salmon haters alike, rejoice! Even the pickiest fish eater will love this meal and I have proof. I’ve been trying to incorporate more fish into my diet over the last couple months. Now I love salmon and plenty of other fish, but Matt usually does not share my sentiments unless it’s sushi. He agreed to try salmon once a week for dinner with me so I set out gathering some recipes to try.

Sheet Pan Honey Mustard Roasted Salmon & Broccoli  |  Lemon & Mocha

The first week I tried this honey mustard baked salmon and it was a big hit for both the salmon lover (me) and the salmon somewhat dis-liker (Matt). The next week when salmon night rolled around Matt requested the honey mustard salmon again instead of a few other recipes I had found. The next week it happened again and soon enough we were having this recipe every week. And let me tell you, I am not mad about this one bit and still can’t get enough of this dish! Every time I get another taste of it I start craving it all over again.

Sheet Pan Honey Mustard Roasted Salmon & Broccoli  |  Lemon & Mocha

The salmon filet is baked in a foil semi-packet, which traps the steam and keeps the salmon incredibly moist and tender.

Sheet Pan Honey Mustard Roasted Salmon & Broccoli  |  Lemon & Mocha

I turned the dish into a sheet pan supper by roasting the broccoli along with the salmon so I could make our side dish at the same time without any extra steps. Also, because this honey mustard sauce is so good I wanted to smother everything in it. The honey brings sweetness while the Dijon and apple cider vinegar help balance it out so it’s not overly sweet. I love the pop of crunch the whole mustard seeds give so definitely don’t skip those! I hope you all try this salmon soon and love it as much as we do!

Sheet Pan Honey Mustard Roasted Salmon & Broccoli  |  Lemon & Mocha

Sheet Pan Honey Mustard Roasted Salmon & Broccoli
 
Yield: 4 servings
Ingredients
  • ¼ cup Dijon mustard
  • ¼ cup honey
  • 3 cloves garlic, minced
  • 2 tablespoons apple cider vinegar
  • 1 tablespoon whole mustard seeds
  • ½ teaspoon smoked paprika
  • ¼ teaspoon salt
  • ⅛ teaspoon ground black pepper
  • 1½ pound salmon filet, skinless and boneless
  • 2 heads broccoli, cut into florets
  • Chopped fresh parsley, for serving
Directions
  1. Preheat the oven to 375 degrees F. Line a sheet pan with nonstick aluminum foil, with enough overhang on one short side that you will be able to fold it up and over the salmon (the salmon will be on one half of the baking sheet, the broccoli will be on the other). Set aside.
  2. In a small mixing bowl, whisk together the honey, garlic, apple cider vinegar, mustard seeds, smoked paprika, salt and pepper.
  3. Place the salmon filet on the half of the baking sheet with the overhang. Place the broccoli florets on the other. Spoon ½ of the honey mustard mixture over the broccoli florets and toss well so they are fully coated. I usually rub the tops of the florets into the sauce to make sure they get really well coated. Spoon the remaining half of the honey mustard sauce over the salmon filet and brush/spoon so the whole filet is coated, including the sides. Take the overhang of foil and fold it over the salmon like you are making a foil packet that just won’t be sealed on all sides.
  4. Bake in the oven for 22 minutes or until the salmon flakes easily. Be careful when you pull back the foil because there will be a lot of steam. My salmon filet was about an 1½ inches thick so adjust your time accordingly based on the thickness of your filet. I have found that wild salmon tends to cook much quicker than farm raised (I used farm raised), mostly because wild salmon tends to be thinner. Fold back the foil and broil the salmon and broccoli for 1-2 minutes. Make sure the sauce and broccoli doesn’t burn, but gets slightly browned. Serve as is or alongside some rice or quinoa.

Recipe adapted from Gimme Some Oven.