Honey, Pear & Prosciutto Pizza with Arugula

Honey, Pear & Prosciutto Pizza with Arugula  |  Lemon & Mocha

Pizza is a wonderful thing. Unless you’re lactose intolerant or soulless, otherwise, truly wonderful. The combination of crispy and chewy crust, gooey savory cheese, and whatever inventive toppings your tastebuds desire is irresistible.

Honey, Pear & Prosciutto Pizza with Arugula  |  Lemon & Mocha

Last Christmas my stepmom got me this countertop pizza oven from Sur La Table. Ever since then Matt and I have been pizza making machines! Well, the pizza oven is the machine, we’re just an extension of its awesomeness. This bad boy cooks up crispy bottom pizzas with chewy crust and molten cheese in under ten minutes. Oh yeah!

Honey, Pear & Prosciutto Pizza with Arugula  |  Lemon & Mocha

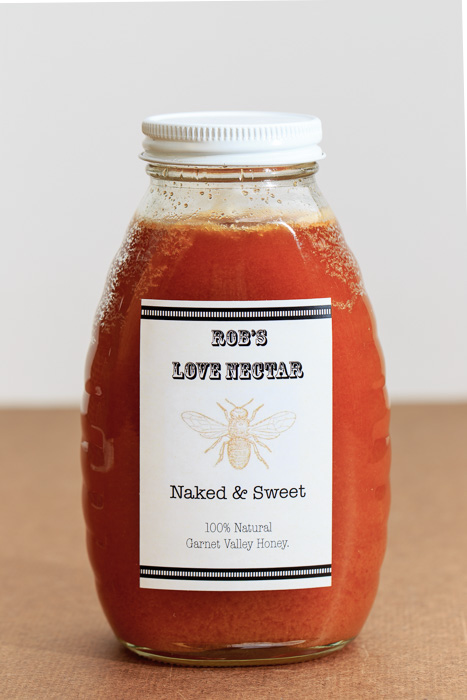
I didn’t make a list of possible pizza combinations as I usually do with other foods, but I don’t think we have made the same pizza twice. When my Uncle Rob sent me a huge jar of his homemade honey I instantly knew I wanted to use some of it for a pizza. I love recipes that combine sweet and savory.

Honey, Pear & Prosciutto Pizza with Arugula  |  Lemon & Mocha

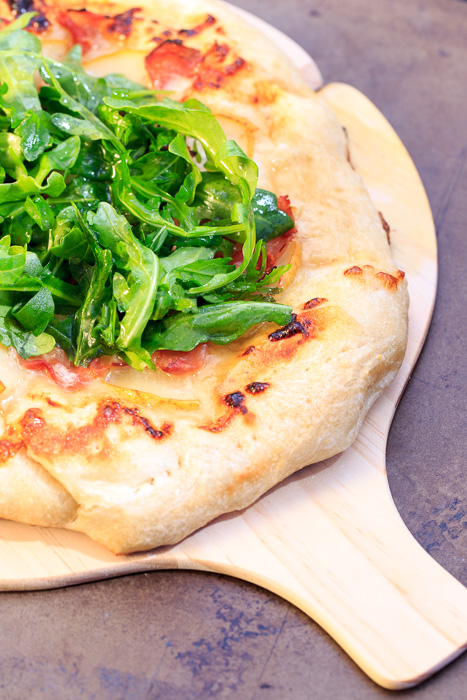
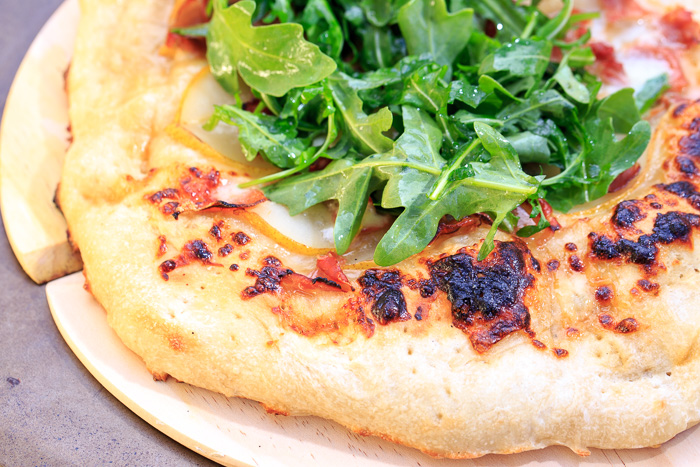
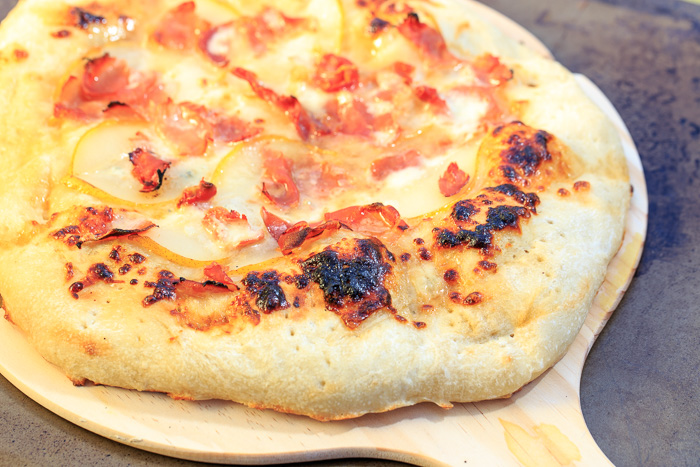
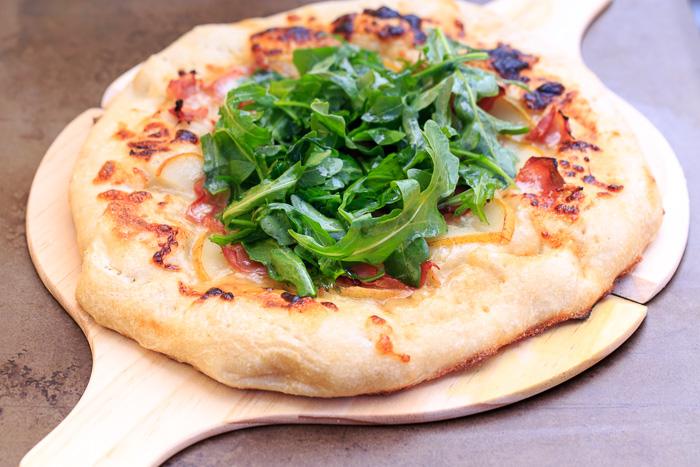
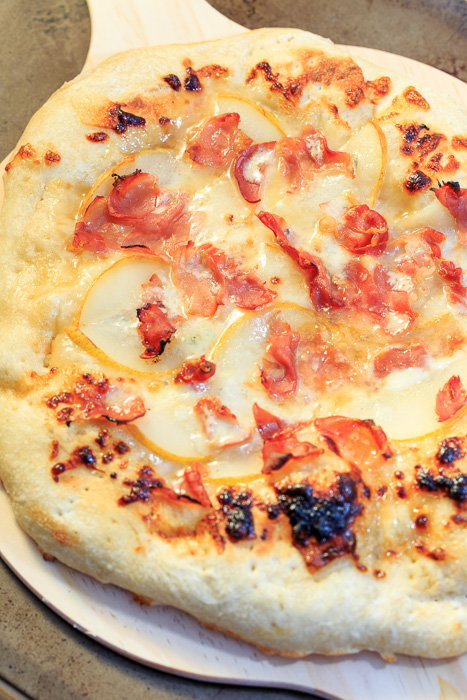
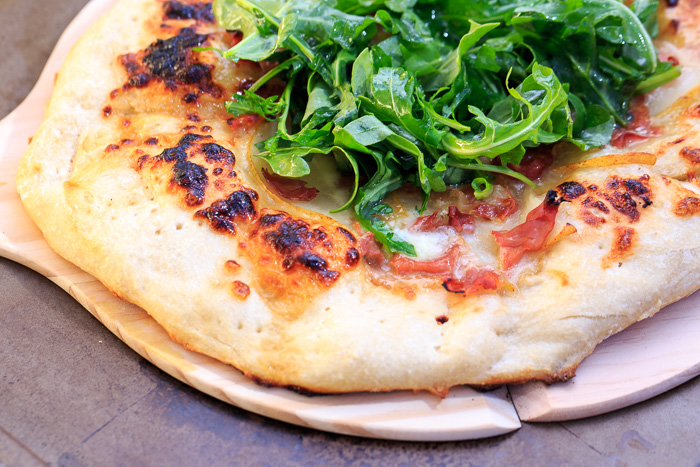
This is a white pizza, which does not mean that it has heliophobia or that it is attending a Diddy party. It simply means it doesn’t have any sauce. Which is fine because the honey, cheese, pear, prosciutto and arugula do more than alright on their own. They come together fabulously for a delightful sweet, savory, salty, herby, cheesy and thirds-don’t-mind-if-I-do dinner.

Honey, Pear & Prosciutto Pizza with Arugula  |  Lemon & Mocha

Okay, time for you to go ahead and make this pizza! I’m going to be sitting here writing a pizza combination list, don’t mind me.

Honey, Pear & Prosciutto Pizza with Arugula  |  Lemon & Mocha

Honey Pear & Prosciutto Pizza with Arugula
 
Yield: 3 servings
Ingredients
for the pizza
  • 1 ball pizza dough
  • 1 tablespoon honey
  • 1 tablespoon olive oil
  • 1½ cups shredded mozzarella
  • 1 pear, thinly sliced
  • 3-4 slices prosciutto
  • ⅓ cup crumbled gorgonzola
for the arugula salad
  • 4 cups arugula
  • ¼ cup olive oil
  • 2 tablespoons lemon juice
  • Salt and pepper
Directions
for the pizza
  1. Preheat oven and prep dough according to pizza dough instructions. Lightly pierce the dough all over with a fork to help keep it from puffing up in the oven.
  2. Mix the honey with the olive oil and brush over the dough, leaving the crust untouched. Top with the mozzarella then the pear slices. Tear the prosciutto slices and place evenly over the top of the pizza. Add the gorgonzola then bake according to pizza dough instructions.
for the arugula salad
  1. While the pizza is baking whisk together the olive oil, lemon juice, salt and pepper to taste. Toss with the arugula, being sure not to overdress. Place on top of the pizza after it comes out of the oven just before serving.

Honey Ice Cream with Pralined Almond Crumble

Honey Ice Cream with Pralined Almond Crumble  |  Lemon & Mocha

It is part two of the Lemon & Mocha honey series! Weren’t you just sitting there in anticipation since Wednesday’s sweet and sticky honey baked wings? I won’t be upset if you weren’t. I will, however, be upset if you don’t shout with joy now that you are finally reading the second honey post. No pressure.

Honey Ice Cream with Pralined Almond Crumble  |  Lemon & Mocha

Honey is found in many desserts from honey cakes to sticky buns. My grandma uses honey to amp up her oatmeal cookies. One of my favorite ways to eat honey at dessert time is in ice cream. No surprise there.

Honey Ice Cream with Pralined Almond Crumble  |  Lemon & Mocha

This honey ice cream with candied almond crumble is sweet, smooth and crunchy all at once. The honey flavors comes through very strong, which is perfect if you want a bold dessert featuring honey. If you are not a huge honey fan you can either use a more subtle honey or substitute half the honey with another flavoring of your choice, such as peanut butter.

Honey Ice Cream with Pralined Almond Crumble  |  Lemon & Mocha

Did I mention the almonds yet? They are coated with a sugar syrup then left to cool and harden making them sweet, snackable and impossible to stop eating. But save some for your ice cream!

Honey Ice Cream with Pralined Almond Crumble
 
Yield: 1 quart
Ingredients
for the ice cream
  • 1½ cups heavy cream
  • ½ cup good-flavored honey
  • 1½ cups whole milk
  • ¼ cup sugar
  • Pinch of salt
  • 5 large egg yolks
for the pralined almond crumble
  • ¼ cup water
  • ½ cup sugar
  • 1 cup whole almonds, unblanched and untoasted
  • ⅛ teaspoon coarse salt
Directions
for the ice cream
  1. Add the heavy cream and the honey to a large bowl. Place a fine mesh sieve over top and set aside.
  2. In a medium saucepan over medium-low whisk together the milk, sugar and salt until warm. Meanwhile whisk together the egg yolks in a medium bowl. Carefully pour the warmed milk mixture, whisking constantly, then pour the whole mixture back into the medium saucepan.
  3. Place the saucepan over low heat and cook the mixture while stirring until thick enough to coat the back of a spoon, about 8 minutes. Make sure the mixture never reaches a boil. Remove from the heat and pour through the fine mesh strainer into the large bowl.
  4. Place the large bowl in an ice bath. Slowly add the cream and continue to stir while sitting in the ice bath until cool.
  5. Once cool, remove from the ice bath then cover and chill in the fridge overnight.
  6. Freeze in your ice cream maker according to manufacturer's instructions, pouring in 1 cup of the pralined almond crumble with 5 minutes left.
for the pralined almond crumble
  1. Line a baking sheet with nonstick foil and set aside.
  2. In a large skillet over medium-high heat combine the water, sugar and almonds. Cook and stir continuously with a wooden spoon until the liquid comes to a boil and the sugar has dissolved then reduce heat to medium.
  3. Continue to cook until the liquid mixture has become sandy in texture. Continue to stir the dark syrup making sure to scrape from the bottom and completely coat the almonds. Keep stirring until the almonds are shiny and glossy.
  4. Remove the pan from the heat before sprinkling with the salt. Pour onto the prepared baking sheet and spread them out. Let them completely cool, breaking up any clusters as needed.
  5. Roughly chop. Pour 1 cup into the ice cream mixture with 5 minutes left. Reserve the rest for topping.

Ice cream slightly adapted from The Perfect Scoop.

Sweet & Sticky Honey Baked Wings

Sweet & Sticky Honey Baked Wings  |  Lemon & Mocha

Remember my Uncle Rob from the filet tailgate sandwiches with whiskey marinade? Well he is a multi-talented man. In addition to grilling up delicious tailgate eats he also harvests honey! As in he has bees in the backyard and a complete beekeeper’s suit. “Rob’s Love Nectar”- check it out! I may be afraid of the bees, but I certainly love their honey.

Sweet & Sticky Honey Baked Wings  |  Lemon & Mocha

Recently Uncle Rob mailed me a big bottle of his honey so I decided to make a series of honey posts out of it. These sticky and sweet honey baked wings are the first of four honey installments and are definitely the best way to kick off this series.

Sweet & Sticky Honey Baked Wings  |  Lemon & Mocha

I was am will-always-be obsessed with these wings. The marinade consists of honey, soy sauce, ginger, garlic and rice wine vinegar to create a balanced flavor profile. The honey caramelizes while the wings are baking in the oven and makes these bad boys incredibly addictive. Finger-lickin’-can’t-breathe-too-busy-eating addictive.

Sweet & Sticky Honey Baked Wings  |  Lemon & Mocha

They are also extremely low maintenance as you can just stick them in the oven and let the magic happen. I was very nervous to break down the wings myself, but after a couple snips with a pair of kitchen shears I had the process down.

Sweet & Sticky Honey Baked Wings  |  Lemon & Mocha

Currently Rob’s Love Nectar is only available through personal gifting, but shop local honey and support your neighboring beekeepers! Also honey pollinated from bees local to your area is said to help with seasonal allergies so that’s another reason to source your honey locally.

Sweet & Sticky Honey Baked Wings  |  Lemon & Mocha

Sweet & Sticky Honey Baked Wings
 
Yield: 4-6 servings
Ingredients
  • ½ cup low sodium soy sauce
  • 1 cup honey
  • 2 tablespoons vegetable oil
  • 1 teaspoons rice vinegar
  • 2 garlic cloves, chopped
  • 2 tablespoons chopped fresh ginger
  • 4 pounds chicken wings & drumettes
  • 1 scallion, chopped, for garnish
  • Toasted sesame seeds, for garnish
Directions
  1. Preheat the oven to 375 degrees F. Line a 9" x 13" with nonstick tin foil and set aside.
  2. Combine the soy sauce, honey, vegetable oil, rice vinegar, garlic and ginger in a medium saucepan with a whisk. Bring the honey mixture to a boil then simmer on low for 10 minutes, stirring occasionally.
  3. Place the split chicken wings in the prepared pan. Pour the heated honey mixture over the wings then toss to coat.
  4. Bake the chicken wings for about 1 hour or until it reaches an internal temperature of 165 degrees F and the skin has darkened. Garnish wings with scallions and sesame seeds before serving.
Notes
To break down the wings follow the steps below:
*Clip off the wing tip at the knuckle using a pair of kitchen shears. Dispose the wing tip or save for homemade chicken stock.
*Make a small snip in the fat between the wing and the drumette so it's easier to get to the joint.
*Cut the knuckle between the wing and the drumette to separate them.
*Cut off any excess fat.

Recipe from the Cookin’ Canuck.

10 Minute Mini Breakfast Tacos

This post was originally published on 8/29/2014. It was updated with new photos and content on 2/5/2019.

10 Minute Mini Breakfast Tacos  |  Lemon & Mocha

Sometimes the best dishes are the ones that take you under ten minutes to make, but still cause you to dance around the kitchen shouting, “Omg, this is SO good!” in between mouthfuls. Before getting reminded that your excited eating habits need to be worked on so the heimlich doesn’t become necessary. But sometimes these things cannot be controlled. I’ll work on it though.

10 Minute Mini Breakfast Tacos  |  Lemon & Mocha

These mini breakfast tacos are the perfect mid-week breakfast, weekend brunch, after school snack, quick dinner and picnic staple. Okay, maybe not the last one. But for everything else this dish is up for the job. The recipe is so simple, but we like simple around here. Especially if it means we can have breakfast tacos for breakfast on a regular basis.

10 Minute Mini Breakfast Tacos  |  Lemon & Mocha

I like to add some creaminess to my scrambled eggs by adding a little cream cheese. It’s a great trick someone taught me years ago. It doesn’t impart the cream cheese flavor on the eggs, it just makes them creamy and fluffy. If you don’t have any cream cheese, you can use a little milk instead. The eggs won’t be as creamy as when you use cream cheese, but they will still be fluffier than just plain scrambled eggs.

10 Minute Mini Breakfast Tacos  |  Lemon & Mocha

How easy is this dish? Well let’s see, first you scramble up some eggs. Then you pile them on top of softened tortillas shredded cheese, salsa and avocado slices. Done! This is just a base recipe and you could definitely get more creative with your taco toppings. Roasted red peppers, corn salsa and pickled red onions are just some ideas off the top of my head. What would you pile on your breakfast tacos?

10 Minute Mini Breakfast Tacos  |  Lemon & Mocha

These 10 Minute Mini Breakfast Tacos are so easy it’s dangerous. How can breakfast tacos be dangerous? Because while you’re chomping away and exclaiming in delight how good they are you might require the heimlich. So eat responsibly folks.

10 Minute Mini Breakfast Tacos  |  Lemon & Mocha

10 Minute Mini Breakfast Tacos
 
Yield: 1 serving
Ingredients
  • 3 large eggs
  • 1 tablespoon cream cheese or milk
  • Salt, pepper and a sprinkling of any other favorite seasonings (I like to sprinkle on some garlic powder, onion powder, paprika and cumin)
  • ½ tablespoon butter or cooking spray
  • 2 6-inch corn or flour tortillas
  • 2 tablespoons shredded cheese (cheddar, monterey jack and pepper jack are all great options)
  • Salsa, avocado slices and any other desired toppings
Directions
  1. In a small mixing bowl, beat the eggs until frothy. Add the cream cheese or milk, salt, pepper and desired other seasonings then lightly beat to combine. If you use cream cheese it won't be mixed in; that's fine.
  2. Melt the butter, or heat the cooking spray, in a medium skillet over medium-low heat. Once melted, add the beaten egg mixture. Let the eggs cook a little then begin to scramble them, making sure to flip them over and break them up often so they remain light and fluffy without getting crispy.
  3. Meanwhile cover the tortillas with a lightly damp paper towel and heat in the microwave for 45 seconds.
  4. When the eggs have cooked through and are still fluffy (I like to take mine off when they are still very slightly wet) remove from the heat and divide over the top of the tortillas. Top with the shredded cheese. Add salsa, the avocado slices, and whatever other toppings you like.


Peaches, Blueberries & Cream Delight

Peaches, Blueberries & Cream Delight  |  Lemon & Mocha

We are still in the peak of peach season. Although it varies based on the year’s climate, peach season is at its peak during July and August. So it’s not too late to squeeze the most out of this juicy sweet fruit!

Peaches, Blueberries & Cream Delight  |  Lemon & Mocha

I love cooking and baking with in season ingredients because they are at the pinnacle of their deliciousness. When I was down in Delaware for my annual family reunion a couple weeks ago my Aunt Dottie grabbed some local peaches at a farmer’s market and asked me to make a peach dessert for dinner.

Peaches, Blueberries & Cream Delight  |  Lemon & Mocha

I realized I didn’t have a go-to peach dessert so I quickly started scouring the web for a recipe that would help the fresh peaches shine. When I stumbled across this recipe from Mel’s Kitchen Cafe I knew it was the one. Just reading the recipe made me drool as I imagined how light and refreshing it would taste. I also loved that it looked simple to whip up.

Peaches, Blueberries & Cream Delight  |  Lemon & Mocha

This peaches, blueberries and cream delight is aptly named. We know from my browned butter peach ice cream with graham cracker crumble that peaches and graham crackers are a tasty pair. This dessert starts with a subtly sweet and buttery no-bake graham cracker crust. Then a sturdy whipped cream is made and folded into the fresh peach slices and blueberries.

Peaches, Blueberries & Cream Delight  |  Lemon & Mocha

You can adapt this dessert to whatever fruit is your favorite or in stock at your local farmer’s market. Strawberries, plums or any other stone fruit and berries would work well. The next combination on my list is peaches and raspberries… mmm. Enjoy!

Peaches, Blueberries & Cream Delight  |  Lemon & Mocha

Peaches, Blueberries & Cream Delight
 
Yield: 8-10 servings
Ingredients
for the crust
  • 3 cups graham cracker crumbs, about 2 sleeves of graham crackers
  • 3 tablespoons sugar
  • 12 tablespoons butter (1 ½ sticks), melted
for the filling
  • 8 ounces light cream cheese, room temperature
  • 1 ½ cups powdered sugar
  • ½ teaspoon vanilla extract
  • 2 cups heavy cream, chilled
  • 5 fresh peaches, peeled, pitted and thinly sliced
  • 1 cup fresh blueberries
Directions
for the crust
  1. Combine the graham cracker crumbs and sugar in a medium bowl. Add the melted butter and mix until combined. Reserve ⅓ of the crumb mixture for topping the dessert. Press the remaining crumb mixture into the bottom of a 9” by 13” pan. Refrigerate while making the filling.
for the filling
  1. In a large bowl beat the cream cheese and powdered sugar together until light with a hand mixer or a stand mixer. Beat in the vanilla.
  2. Carefully pour in the heavy cream and beat on low. As the mixture starts to come together bring the speed up to medium-high and continue until the mixture is thick and airy.
  3. Take the crust out of the fridge and spread a thin layer of the cream over the crust. Layer the sliced peaches on top, followed by the blueberries.
  4. Scoop large blobs of cream onto the fruit and carefully bring together with your rubber spatula to cover the fruit. Continue adding the cream until the 9” by 13” pan is filled to the edges.
  5. Sprinkle with the reserved graham cracker crumbs and cover with plastic wrap before returning to the fridge. Let sit in the fridge for 2-12 hours before serving.

Recipe from Mel’s Kitchen Cafe.