Recipes

Parmesan Crusted Brussels Sprouts

Parmesan Crusted Brussels Sprouts  |  Lemon & Mocha

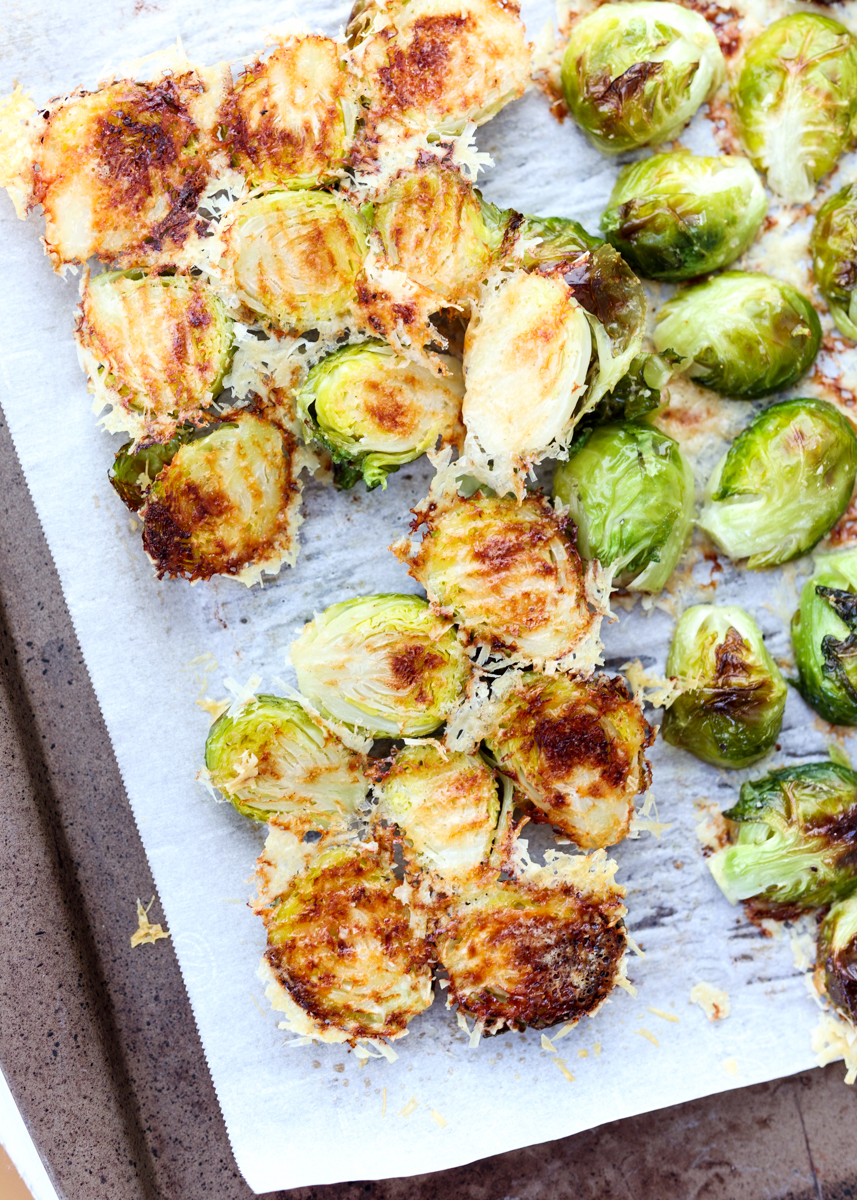
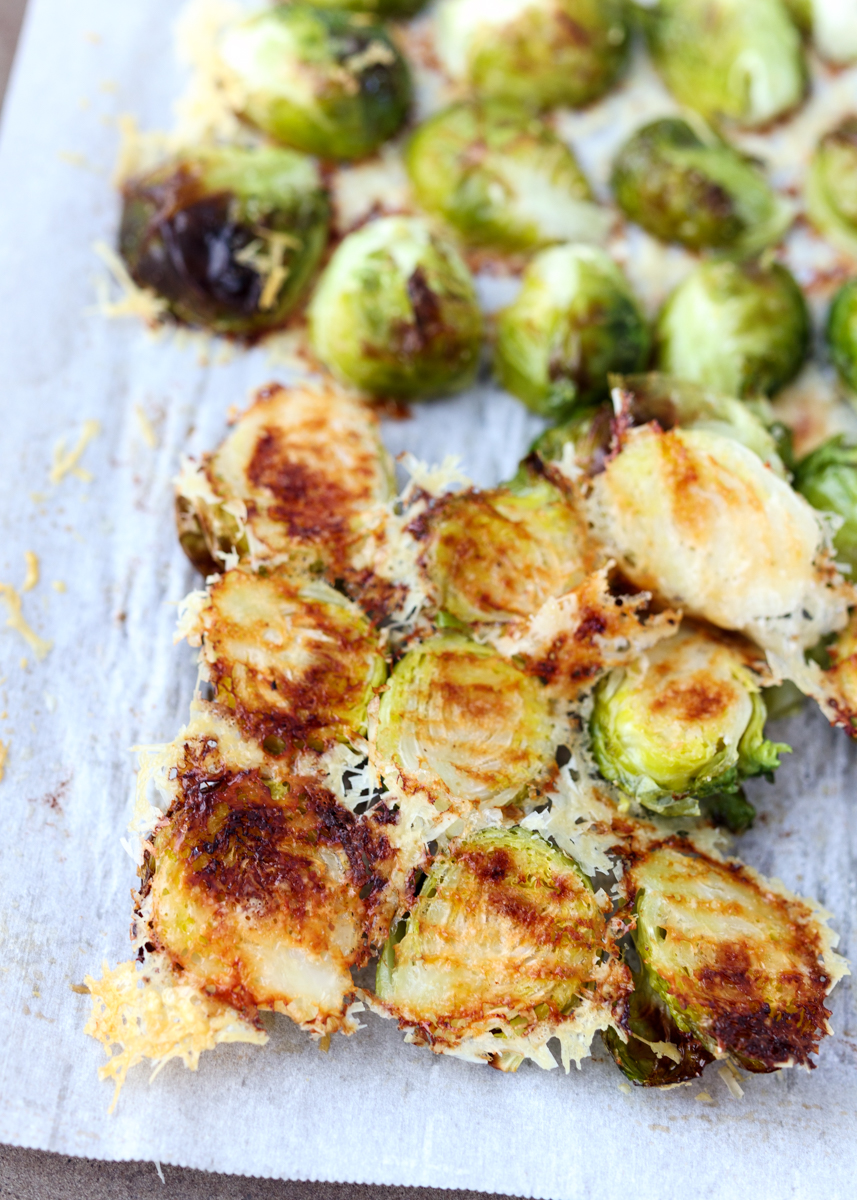
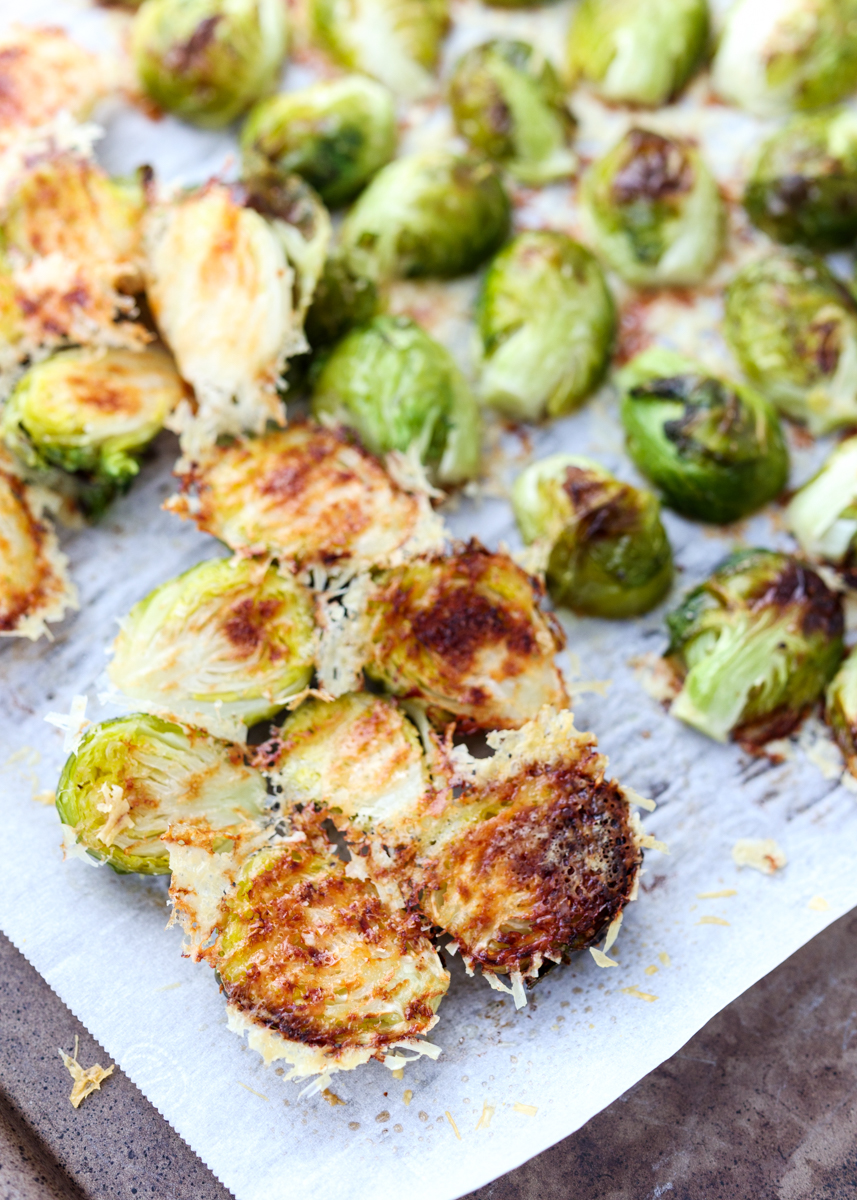
Sometimes a dish is so incredibly simple you’re shocked you didn’t think of it before. That’s how I felt with these Parmesan Crusted Brussels Sprouts. Grating some fresh Parmesan over roasted Brussels sprouts wasn’t something new for me, but grating it before baking the Brussels so they each get a crispy Parmesan cheese skirt? Genius!

Parmesan Crusted Brussels Sprouts  |  Lemon & Mocha

If you’ve never heard of a cheese skirt it’s usually in reference to a burger and it’s when the cheese oozes out the side and gets crispy on the pan or griddle. Apparently a burger restaurant from California, Squeeze Burger, is the originator of the phrase. I like using it for all situations involving melted cheese that gets crispy including these Brussels sprouts.

Parmesan Crusted Brussels Sprouts  |  Lemon & Mocha

I’m not sure where the idea for this quick side dish came from since I found “grate Parmesan on baking sheet before roasting Brussels” as a note in my phone. It could have been something I was watching on TV or something I saw in a magazine, but either way I’m so glad I finally listened to my phone note. I never liked Brussels sprouts growing up, but that’s because I had only ever had them steamed whole. Please promise to never, ever serve your kids steamed whole Brussels sprouts! Especially when you can make these tender, crispy and cheesy roasted Brussels sprouts in twenty minutes.

Parmesan Crusted Brussels Sprouts  |  Lemon & Mocha

If you’re looking for more Brussels sprouts recipes I’ve also posted these citrus Orange Glazed Brussels Sprouts and the decadent Roasted Brussels Sprouts with Pomegranate Molasses and Vanilla Pecan Butter. It’s impossible to pick a favorite because they all are so different and I promise none of them will scare your children away from Brussels sprouts for life. Are you a Brussels sprouts fan? What’s your favorite way to eat them?

Parmesan Crusted Brussels Sprouts  |  Lemon & Mocha

Parmesan Crusted Brussels Sprouts
 
Yield: 4 servings
Ingredients
  • Cooking spray
  • ½ cup fresh grated Parmesan
  • 1 pound Brussels sprouts, trimmed, dark leaves removed and cut in half
  • 1 tablespoon olive oil
  • ½ teaspoon garlic powder
  • ¼ teaspoon ground black pepper
  • ⅛ teaspoon salt
Directions
  1. Preheat oven to 400 degrees F.
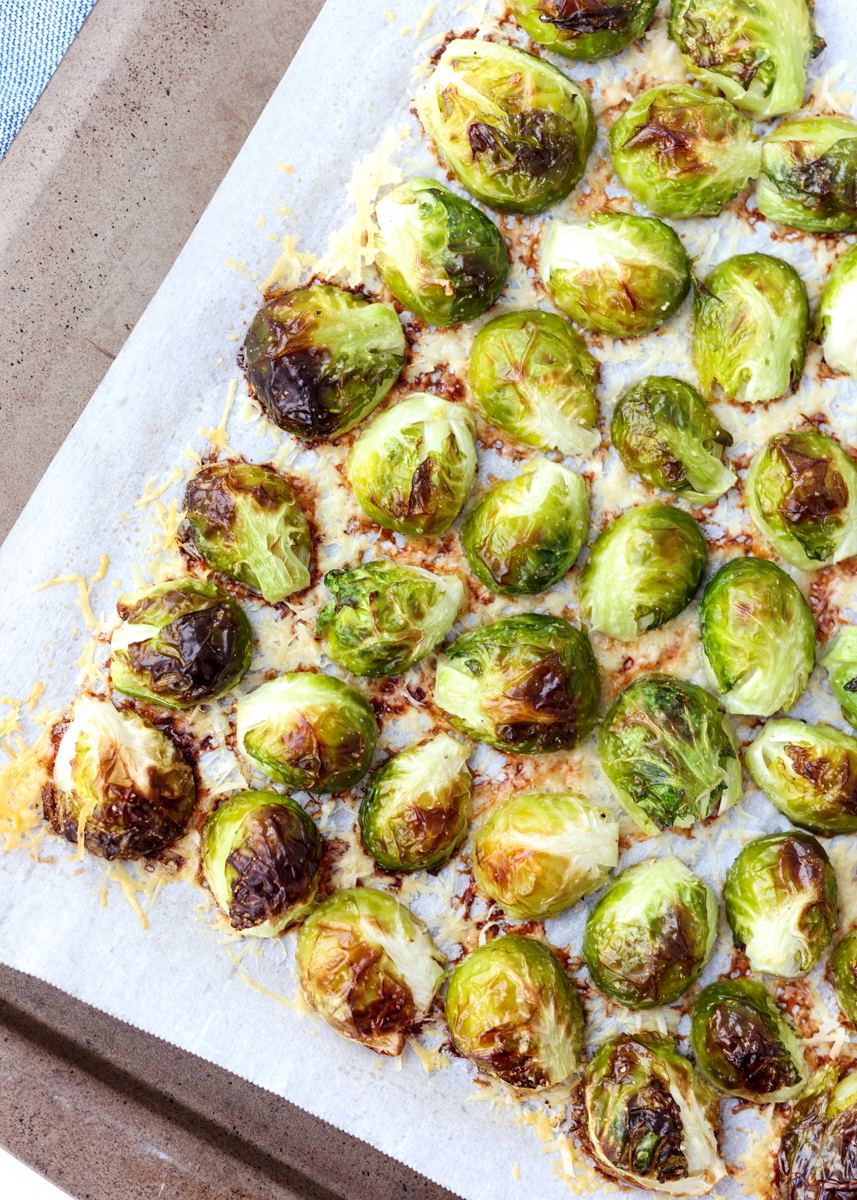
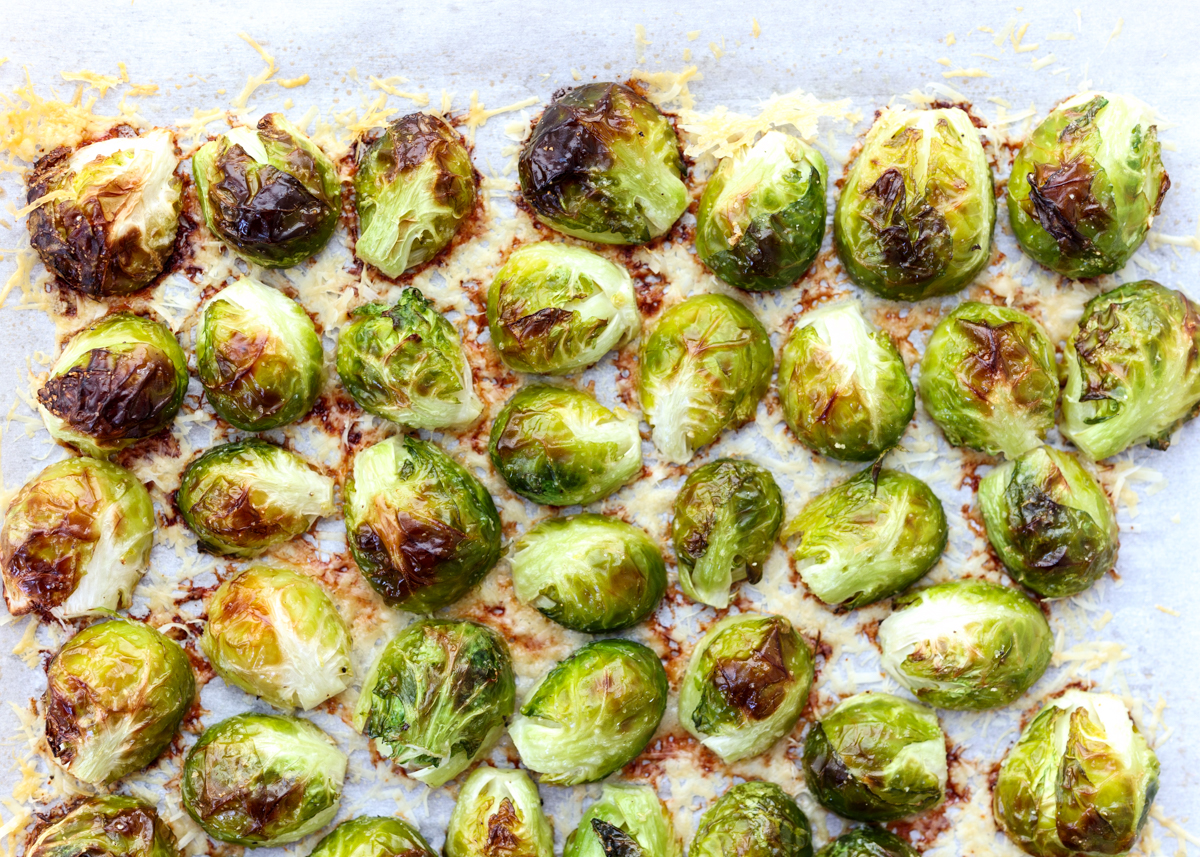
  2. Line a quarter sheet sheet with parchment paper. Lightly spray with cooking spray then sprinkle the Parmesan cheese over top.
  3. Toss the Brussels sprouts with the olive oil in a mixing bowl to coat then toss with the garlic powder, pepper and salt. Place the Brussels sprouts cut side down on the Parmesan cheese. Bake for 18-20 minutes, or until the Brussels and tender and crispy.


Barbecue Meatloaf Sandwiches with Caramelized Onions

Barbecue Meatloaf Sandwiches with Caramelized Onions  |  Lemon & Mocha

Before I dive into these epic meatloaf sandwiches, I forgot to tell you all last week how the February cookbook recipe went! Matt and I made the Angel Hair Frittata from the Half Baked Harvest Cookbook. It was loaded with broccolini, roasted red peppers, sun-dried tomatoes and pesto. The flavor was really good and I think we’ll make it again, but we weren’t one hundred percent sold on the angel hair pasta in it. We love pasta and we wanted to be able to taste it more so since we couldn’t really taste it we might just make it without the pasta next time.

Barbecue Meatloaf Sandwiches with Caramelized Onions  |  Lemon & Mocha

Now, back to these Barbecue Meatloaf Sandwiches with Caramelized Onions. Matt’s birthday is tomorrow so I wanted to make him a special meal last week to celebrate. Yes, a week early because that’s what happens when you’re a food blogger! Matt loves meatloaf and while this meatloaf on its own is amazing I knew I needed to kick it up a notch to make it birthday meal worthy. Enter toasted bun, melted provolone cheese, fresh arugula and rich caramelized onions!

Barbecue Meatloaf Sandwiches with Caramelized Onions  |  Lemon & Mocha

These sandwiches ate like a burger except multiply the tender factor and the flavor level by at least ten. Trust me, it’s a scientific fact. The key to a tender meatloaf is making sure you have enough fat and enough moisture. I used 80% lean ground beef and added moisture with barbecue sauce, an egg, Dijon, and balsamic. To take it even further, I added bread that had been soaked in beef broth. If you add bread crumbs all they will do is take moisture away from the meat.

Barbecue Meatloaf Sandwiches with Caramelized Onions  |  Lemon & Mocha

To get an even richer flavor I added some sautéed mushrooms and onions. Raw veggies are great, but anytime you get a chance to sauté them it really brings out an unbeatable depth of flavor. Finally, cook the meatloaf low and slow freeform on a rimmed baking sheet so that all the barbecue sauce slathered sides get a chance to caramelize. Yum!

Barbecue Meatloaf Sandwiches with Caramelized Onions  |  Lemon & Mocha

Every time I’ve ever made meatloaf I’ve made it slightly differently because I’ve used whatever I have on hand in the fridge and I always add ingredients by feel. If the meatloaf is sticking to the bowl then it needs more liquid ingredients. Now that I finally wrote down a recipe I can recreate it exactly next time Matt says make that really good meatloaf again! I will definitely be making it for these sandwiches again because this has got to be the most ultimate way to eat meatloaf for dinner.

Barbecue Meatloaf Sandwiches with Caramelized Onions  |  Lemon & Mocha

Also, I normally dread taking photographs of burgers and sandwiches because they’re really hard to make look appetizing, but I’m so excited with how my photos came out and they’re really doing justice to these epic sandwiches! Enjoy!

Barbecue Meatloaf Sandwiches with Caramelized Onions  |  Lemon & Mocha

Barbecue Meatloaf Sandwiches with Caramelized Onions
 
Yield: 10 sandwiches
Ingredients
for the meatloaf
  • 1 tablespoon olive oil
  • ½ small onion, small diced
  • 4 ounces sliced cremini mushrooms, roughly chopped
  • Salt, pepper and Italian seasoning
  • 1 egg
  • 1 slice bread (I used potato bread), torn into pieces
  • ½ cup beef broth
  • 1 cup barbecue sauce, divided
  • 1 tablespoon balsamic vinegar
  • 1 tablespoon Dijon mustard
  • 1 teaspoon garlic powder
  • ½ teaspoon salt
  • ¼ teaspoon ground black pepper
  • 2 pounds 80% lean ground beef
for the sandwiches
  • 4 medium onions, halved then sliced
  • 1 tablespoon plus 1 teaspoon olive oil
  • Salt
  • 10 kaiser or brioche buns, cut in half
  • 10 slices provolone cheese
  • Arugula, for topping
  • Barbecue sauce, for topping
Directions
for the meatloaf
  1. Preheat oven to 325 degrees F. Line a rimmed baking sheet with nonstick aluminum foil and set aside.
  2. Heat the olive oil in a medium skillet over medium-high heat. Add the onions and mushrooms then season with salt, pepper and Italian seasoning. Cook until tender and slightly caramelized, about 7 minutes. Remove from the heat.
  3. Beat the egg in a large mixing bowl. Soak the bread pieces in the beef broth for a few minutes then add the soaked bread pieces to the mixing bowl; they will be really mushy. Add ½ cup barbecue sauce, balsamic vinegar, Dijon, garlic powder, salt and black pepper. Add the sautéed onions and mushrooms then mix everything together. Add the ground beef then use your hands to incorporate everything together, being sure not to over-mix (see note). It will come together more on the baking sheet. Scoop the meatloaf mixture onto the prepared baking sheet and form it into a long log, making it roughly the width of your kaiser buns, a couple inches high and then however long it needs to be. Mine was about 12-inches long. Cover the outside of the meatloaf completely with the remaining ½ cup of barbecue sauce.
  4. Bake until it reaches an internal temperature of 165 degrees F, about 1 hour and 5-10 minutes. Let it rest for a couple minutes before taking the temperature of the meatloaf. Once it’s 165 degrees F, let rest for 10 minutes before slicing.
for the sandwiches
  1. Caramelize the onions. Heat the oil in a large saucepan over medium-low heat. Add the onion slices then toss to coat. Season with salt. Cook the onions, stirring every few minutes for 35-40 minutes. Towards the last 20 minutes if they start getting burnt in spots add a little more water (no more than a tablespoon at a time). If you want them really caramelized, you can continue cooking for an additional 10 minutes, but you will want to stir very frequently to make sure they don’t burn. Remove from the heat when done.
  2. Toast the buns. If desired, brush the tops of the buns with an egg wash (1 beaten egg with 1 tablespoon water) then top with poppy seeds and dried onion flakes before toasting.
  3. Melt the provolone over the meatloaf slices then place on the toasted burger buns along with some caramelized onions, arugula and barbecue sauce.
Notes
I recommend using one of the following methods to help keep the meatloaf mixture from sticking to your hands (because you’re able to better incorporate everything without over-mixing if you use your hands): coating your hands with cold water, lightly coating your hands with olive oil or using disposable gloves.

Some of the links above are affiliate links, which means I may receive a small commission for my referral if you purchase something. This does not affect the retail cost of the item. Thank you for supporting Lemon & Mocha!

Hot Chocolate Cupcakes

Hot Chocolate Cupcakes  |  Lemon & Mocha

As much as I want it to be spring already, we still have a few more weeks until the first official day of spring. And, considering that I live in New England, it’s usually a few more weeks after that. I decided to embrace the last bit of winter that we have left and make these decadent and cozy Hot Chocolate Cupcakes.

Hot Chocolate Cupcakes  |  Lemon & Mocha

My inspiration for these cupcakes came from these adorable sparkly snowflake toppers! I have the coolest goddaughter who seriously gets my love of baking and cooking. This past fall for my birthday she scoured Etsy to find unique cupcake toppers for each season. I immediately knew the upcoming year on Lemon & Mocha would have to include four special cupcakes, each showcasing the cute seasonal toppers from my goddaughter.

Hot Chocolate Cupcakes  |  Lemon & Mocha

When I was trying to decide what to make for the winter cupcakes I immediately thought of my favorite winter beverage: hot chocolate. The base of these cupcakes is my Perfect Chocolate Cupcakes. I tweaked the recipe this past fall and they truly are the most moist and light cupcakes with a big chocolate flavor. I’ve raved enough about my chocolate cupcakes in the past though so we can move on the frosting, which is what makes these not just chocolate cupcakes, but Hot Chocolate Cupcakes.

Hot Chocolate Cupcakes  |  Lemon & Mocha

Let me get right to it; this frosting is crazy good. All it took was one bite to know this hot chocolate frosting would be an immediate member of my cake repertoire for years to come. And then I sampled a second, a third and a fourth bite just to be really, really certain.

Hot Chocolate Cupcakes  |  Lemon & Mocha

Cocoa powder and marshmallow fluff help give this buttercream frosting that classic hot chocolate taste. There’s less powdered sugar than a traditional buttercream because we are using marshmallow fluff to sweeten the frosting and to make it, well, fluffy! Also because it wouldn’t be a perfect hot chocolate without marshmallows. Enjoy!

Hot Chocolate Cupcakes  |  Lemon & Mocha

Hot Chocolate Cupcakes
 
Yield: 24 cupcakes
Ingredients
for the cupcakes
  • 2 cups granulated sugar
  • 1¾ cups all-purpose flour
  • ¾ cup cocoa powder
  • 1½ teaspoons baking powder
  • 1 teaspoon baking soda
  • 1 teaspoon salt
  • 2 large eggs
  • 1 cup buttermilk, see note
  • ¼ cup butter, melted
  • ¼ cup vegetable oil
  • 1 tablespoon vanilla extract
  • 1 cup hot coffee, see note
for the frosting
  • 2 cups unsalted butter, softened to room temperature
  • 4 cups marshmallow fluff
  • 2 cups powdered sugar
  • ¼ cup plus 2 tablespoons cocoa powder
  • Mini marshmallows, for topping
Directions
for the cupcakes
  1. Preheat the oven to 350 degrees F. Line two cupcake pans with cupcake liners so you have enough for 24 cupcakes.
  2. In a large mixing bowl or in the bowl of a stand mixer, sift together the sugar, flour, cocoa powder, baking powder, baking soda and salt.
  3. In a medium mixing bowl, whisk together the eggs, buttermilk, melted butter, vegetable oil and vanilla extract. Pour the liquid ingredients into the dry ingredients and mix together until smooth.
  4. Pour the hot coffee into the batter and stir until combined. The batter will be extremely liquidy. Divide the batter between the 24 cupcake liners, filling them slightly more than half full. Bake for 18-20 minutes, or until a toothpick inserted in the center comes back mostly clean. Alternatively, they are done when you gently press your finger on the center of a cupcake and it lightly springs back. I find mine to be done at exactly 19 minutes.
  5. Let cool in the pans for a couple minutes then remove to a wire cooling rack to cool completely before frosting.
for the frosting
  1. Beat the butter until fluffy, about 3 minutes, scrapping down the sides as needed. Add the marshmallow fluff, powdered sugar and cocoa powder. Beat until combined and fluffy, scrapping down the sides as needed. Pipe the frosting using a pastry bag (see note) and top with the mini marshmallows.
Notes
To make your own buttermilk: pour 1 tablespoon of lemon juice or vinegar in a liquid measuring cup. Pour milk, any fat percentage, into the measuring cup until you have 1 cup. Let sit for 5 minutes before using.
If you don’t want to use coffee you can use hot water, but the flavor of the chocolate won’t be as pronounced. You can use decaffeinated coffee if you prefer.
The frosting recipe is written assuming you will be piping a generous amount of frosting on each cupcake. If you would prefer to simply frost with a knife then you can most likely halve the frosting recipe.


Creamy Mustard Roasted Fish

Creamy Mustard Roasted Fish  |  Lemon & Mocha

Would you believe me if I told you this recipe got Matt to eat tilapia? Of course you believe me otherwise this would be a pretty bad story if it wasn’t true! While I’m busy going through my cookbooks that I have yet to make anything from I’m also focusing on sharing recipes with you all that I have made and enjoyed from my cookbooks over the years, like Giada’s Breakfast Bulgur with Warm Berries and Ree Drummond’s Potato, Leek and Bacon Pizza. Add to the list Ina Garten’s Creamy Mustard Roasted Fish. Can you tell I’m a Food Network fan?

Creamy Mustard Roasted Fish  |  Lemon & Mocha

As I’ve mentioned before, I’m continually trying to find cooked fish recipes that Matt enjoys. Sushi is another story; he can now out-eat me on sashimi! Many years ago I wanted to make us some cooked fish and thought this creamy mustard sauce just might do the trick. It worked! Between the mustard, shallot and capers, the sauce is full of punchy flavors that keep the tilapia from tasting “fishy.”

Creamy Mustard Roasted Fish  |  Lemon & Mocha

The original recipe from Barefoot Contessa uses crème fraîche to achieve the creamy and slightly sour sauce that pairs so well with the sharp mustard. Crème fraîche is delicious, but it can also be very rich and fattening. Instead, I used my new favorite recipe trick: cauliflower puree! I blended cooked cauliflower florets with plain Greek yogurt to mimic the thickness and creaminess of the crème fraîche. That was combined with the mustard, mustard seeds, shallots and capers for a perfect sauce to be poured over the white fish before baking it.

Creamy Mustard Roasted Fish  |  Lemon & Mocha

Although the flavor of the sauce is awesome, the best part is that it keeps the tilapia incredibly flaky and moist. I served this dish alongside the Sheet Pan Parmesan Roasted Green Beans and Baby Potatoes and Matt was a happy camper. Who would have thought one day Matt would happily eat tilapia for dinner?! Thanks, Ina!

Creamy Mustard Roasted Fish  |  Lemon & Mocha

Creamy Mustard Roasted Fish
 
Yield: 4 servings
Ingredients
  • 1 cup cauliflower florets (about 8 medium-large florets)
  • ⅔ cup water
  • 5 ounces nonfat Greek yogurt
  • 3 tablespoons mustard
  • 2 tablespoons minced shallots
  • 1 tablespoon mustard seeds
  • 2 teaspoons drained capers
  • 4 tilapia fillets
  • 1 teaspoon salt
  • ½ teaspoon ground black pepper
Directions
  1. Preheat oven to 425 degrees. Line a baking pan large enough to fit the fish fillets with nonstick aluminum foil or parchment paper and set aside.
  2. Add the water and cauliflower florets to a saucepan. Bring to a boil then cover, reduce heat to low and simmer for 10 minutes. Drain the liquid then puree the cauliflower with the Greek yogurt until smooth. Combine the cauliflower-yogurt puree, mustard, minced shallots, mustard seeds and drained capers in a small mixing bowl.
  3. Place the tilapia fillets on the prepared baking pan. Season with the salt and pepper. Spoon the mustard sauce over the fish completely. Bake until the thickest part of the fish flakes, about 10-15 minutes. When it’s done broil for 1 minute.

Recipe adapted from Barefoot Contessa Back to Basics.
Some of the links above are affiliate links, which means I may receive a small commission for my referral. This does not affect the retail cost of the item. Thank you for supporting Lemon & Mocha!

Sheet Pan Parmesan Roasted Green Beans and Baby Potatoes

Sheet Pan Parmesan Roasted Green Beans and Baby Potatoes  |  Lemon & Mocha

How is it Monday already? Did this weekend fly by for anyone else? Hopefully I’ll make it a little better with this quick and easy recipe for Sheet Pan Parmesan Roasted Green Beans and Baby Potatoes. Cheese makes everything better, right? Especially when the Parmesan is coating charred green beans and crispy potatoes.

Sheet Pan Parmesan Roasted Green Beans and Baby Potatoes  |  Lemon & Mocha

I’m not sure if you’ve noticed, but I love cooking meals in the oven. I know you’re probably thinking, “oh yeah, oven cooking in the winter is great and cozy,” but I mean I love-love it, like even when it’s 80 degrees in the summertime. Oven cooking is just so easy and even though I love cooking I also love easy cooking.

Sheet Pan Parmesan Roasted Green Beans and Baby Potatoes  |  Lemon & Mocha

Plus, the crispy textures and caramelized flavors you get from oven cooking? Delicious!

Sheet Pan Parmesan Roasted Green Beans and Baby Potatoes  |  Lemon & Mocha

I do default to our large toaster oven for most oven meals since it preheats so quickly and doesn’t warm up the kitchen, but I will definitely heat up the kitchen if it means I can just throw everything on a sheet pan and have it come out perfect while I work on other stuff like writing this post. Or watching Netflix – getting through all those shows is important work!

Sheet Pan Parmesan Roasted Green Beans and Baby Potatoes  |  Lemon & Mocha

If you’ve never had roasted green beans then you will be instantly hooked. It’s difficult to beat crunchy on the outside and fluffy on the inside roasted potatoes, but these green beans come close! Simply tossed with some olive oil, garlic powder, Italian seasoning, ground black pepper and some fresh grated Parmesan, this roasted sheet pan side dish is easy cooking perfection!

Sheet Pan Parmesan Roasted Green Beans and Baby Potatoes  |  Lemon & Mocha

Sheet Pan Parmesan Roasted Green Beans and Baby Potatoes
 
Yield: 4 servings
Ingredients
  • 16 ounces baby pee wee potatoes, halved (quartered if larger)
  • 12 ounces green beans, trimmed
  • 1 tablespoon olive oil
  • ¼ teaspoon garlic powder
  • ¼ teaspoon Italian seasoning
  • Salt and fresh ground black pepper
  • 3 tablespoons fresh grated Parmesan
Directions
  1. Preheat oven to 425 degrees F.
  2. Toss the halved potatoes and green beans with the olive oil to coat then toss with the garlic powder and Italian seasoning. Season with salt and pepper. Spread out on a baking sheet lined with nonstick aluminum foil or parchment paper. Roast for 25-30 minutes, tossing the green beans and potatoes after 10 minutes. Immediately top with the Parmesan when out of the oven.

Some of the links above are affiliate links, which means I may receive a small commission for my referral if you purchase something. This does not affect the retail cost of the item. Thank you for supporting Lemon & Mocha!