About Lauren

Posts by Lauren :

Vanilla Blackberry-Mascarpone Cake for Two

There are a lot of special days throughout the year, but yesterday was extra exciting. No, it wasn’t Ben & Jerry’s free cone day or a work holiday. And there weren’t any overturned bakery trucks spilling pastries into the street or any celebrity sightings. There was a birthday in the Lemon & Mocha family:  yesterday Matt was one year older! What an old geezer! Just kidding, especially since I’m six months his senior.

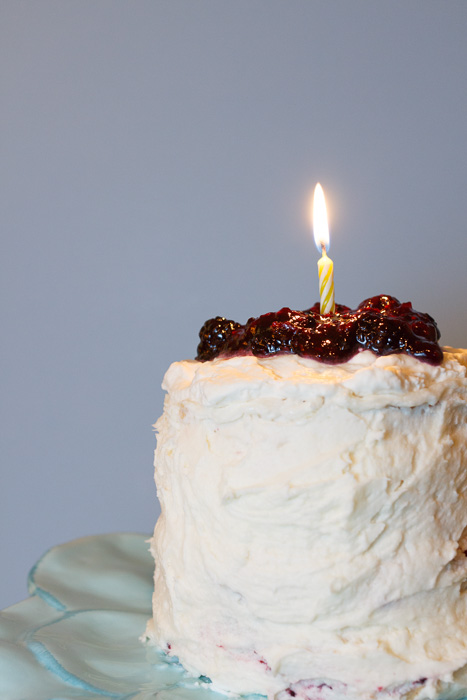
As I’m sure you’ve noticed, Matt is an amazing photographer and an excellent eater. He is also one of the most caring people and without his support and encouragement Lemon & Mocha might still have been a dream of mine rather than a reality. To celebrate Matt’s day of birth I wanted to make him an extra special cake. This was more difficult than it sounds as Matt and I have been heavily cutting back on desserts. I found this fabulous blog called Sweetapolita that would ensure the treat would remain a treat and not a week-long gorge session of a full 9-inch layer cake. I haven’t had great luck with scaled down baked goods, including some incredibly disappointing recipe that made two dense vanilla cupcakes, but this mini cake turned out fabulous.

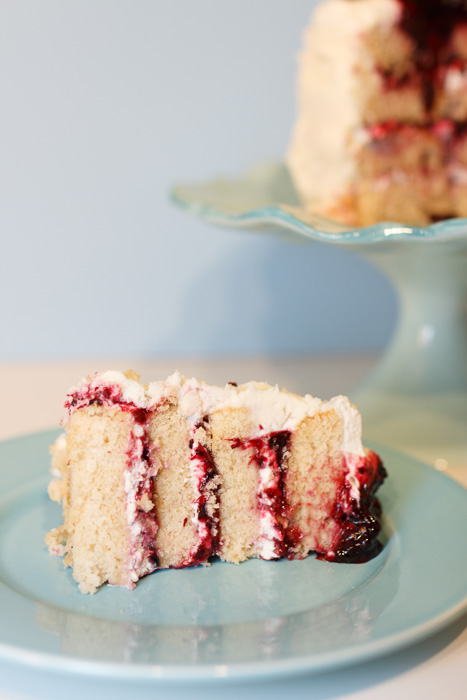
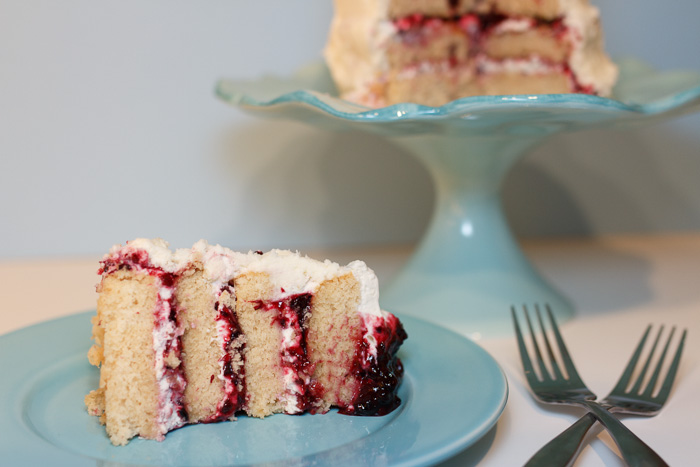
The fruity interior was light and beautiful against the moist vanilla cake. I never have the greatest luck with vanilla cakes, but this one was incredibly tasty. There are a fair amount of components and steps, but I spread it out over a couple days to make it easier to manage. Although the cake is so divine you will want to keep it to yourself, this “cake for two” is more like a cake for four or six so they’ll be plenty for you even if you share. So happy birthday, Matt! As part of my gift I was going to make sure you didn’t have to take any photographs of your own cake, but you couldn’t help yourself 😉

Vanilla Blackberry-Marscarpone Cake for Two
 
Yield: 4-6 servings
Ingredients
for the cake
  • ½ cup whole milk
  • 2 egg whites
  • 1 whole egg
  • 2 teaspoons vanilla extract
  • 1 cup plus 3 tablespoons cake flour
  • ¾ cup sugar
  • 1¼ teaspoons baking powder
  • ½ teaspoon salt
  • ¼ cup unsalted butter, at room temperature
  • 2 tablespoons vegetable shortening
for the blackberry compote
  • 2 cups fresh or frozen blackberries, divided
  • ½ cup sugar
  • 1 tablespoon lemon juice
  • 1 tablespoon orange juice
  • Pinch of salt
for the whipped mascarpone filling & frosting
  • 2 tablespoons cold water
  • 2 teaspoons unflavored gelatin
  • 1¾ cups heavy cream, cold & divided
  • ¼ cup powdered sugar
  • 1 teaspoon vanilla extract
  • Pinch of salt
  • ⅓ cup mascarpone cheese, softened
Directions
for the cake
  1. Preheat the oven to 350 degrees F. Grease 2 round 5-inch baking pans. Line with parchment paper, butter and flour the parchment paper then set aside.
  2. In a small bowl whisk together 2 tablespoons of the milk, egg whites, whole egg and vanilla. Set aside.
  3. In the bowl of a stand mixer combine the cake flour, sugar, baking powder and salt. Add the butter and shortening then mix until combined. Add the rest of the milk then mix on low speed until just combined. Scrape the sides if needed.
  4. Slowly add the egg mixture to the flour mixture while beating on medium speed. Once just combined, evenly divide the batter into the 2 baking pans.
  5. Bake 20 minutes or until a toothpick inserted in the center comes out clean. Remove from the oven and let cool on a cooling rack for 10 minutes. Run a butter knife or offset spatula around the edges of the pans and invert the onto the cooling racks, making sure to turn them right side up for cooling. Let cool completely before beginning assembly.
for the blackberry compote
  1. Heat 1½ cups of the blackberries, sugar, lemon juice, orange juice and salt in a small saucepan over medium heat. Cook, stirring often, until the berries start to cook down, about 10 minutes.
  2. Turn the heat to low and simmer for about 15 minutes, or until the compote has thickened enough that it coats a spoon without dripping off. When ready, remove from the heat and let cool for a couple minutes.
  3. Puree the mixture in a blender or food processor until smooth. Set a fine mesh sieve of a medium bowl and push the compote through, discarding the seeds caught in the sieve. Stir the remaining whole blackberries into the compote then store in an airtight container in the fridge.
for the whipped vanilla mascarpone filling
  1. Place the cold water in a small bowl then sprinkle with the gelatin, letting sit for at least 10 minutes. Heat ⅓ cup of the cream in a small saucepan until just steaming then pour into the gelatin mixture. Place the small bowl in the fridge so the mixture can cool, about 8 minutes. Open the fridge and stir the mixture every couple minutes.
  2. Beat the remaining cream, powdered sugar, vanilla and salt with a stand mixer. This works best if the whisk attachment and stainless steel bowl have been chilled in the freezer. Continue to beat it soft peaks just begin to form, about 1 minute. Slowly add the cooled gelatin mixture, making sure to continue beating until it is thick enough to spread. Make sure you add the gelatin mixture very gradually of the filling could collapse.
  3. Place the mascarpone cheese in a large bowl then carefully fold in the whipped cream mixture. Cover the filling and place in the fridge until you are ready to assemble the cake.
for cake assembly
  1. Carefully cut each cake in half horizontally so you have 4 equal cake layers. Place the first cake layer on a small plate or cake stand. Place a few tablespoons of blackberry compote and a few tablespoons of mascarpone filling onto the center of the cake layer then carefully spread with a spatula. Place a second cake layer on top and repeat until the final cake layer has been placed on the cake. The final cake layer should be placed face down. Smooth the frosting in between the cake layers with an offset spatula and add more frosting on any spots where the compote filling is leaking out.
  2. Carefully wrap the entire cake in plastic wrap and place in the fridge for 30 minutes to help it firm up before frosting.
  3. Making sure your frosting is fluffy, apply a thick layer allover the chilled cake. Smooth with an offset spatula.

Recipe from Sweetapolita.

Dredged Pork Cutlets with Mushrooms & Kale

Do you ever have yourself convinced something is in a certain spot, but then when it’s not there you find yourself going nuts tearing your house apart looking for it? This happened to me recently with a recipe. Actually with a recipe that was supposed to be shared today. A recipe that apparently doesn’t exist because I can’t find it ANYWHERE.

I love cooking new dishes and between magazines, cookbooks, recipes that have been given to me and online recipes I’ve saved I have more recipes than I could ever cook in my lifetime so it is not uncommon for me to go years in between cooking the same dish, even if it was a favorite at the time. About three years ago I distinctly remember making a stovetop pork and mushroom dish for Matt and I in our old apartment. I remember it being simple, quick and incredibly delicious. I remember it being from one of my favorite cookbooks.

Well after combing through all my cookbooks I owned three years ago, all my neatly organized and cataloged magazine recipes, my personal recipe binders and recipes I have saved online I have concluded that this mystery dish is a lost cause. I decided to create a new dish: pork and mushroom 2.0. Since I can’t remember any of the original ingredients other than pork and mushrooms who knows how similar it is to the mystery dish, but what matters is that it’s even more delicious than I remember.

The pork cutlets are lightly dredged in flour before being pan-fried with mushrooms, red wine vinegar and seasonings. Serve it over some wilted kale and top with a fried egg, because all meat tastes better with a little runny yolk sauce. As much as it’s driving me bonkers that I wasn’t able to find that recipe this pork and mushroom dish over kale is certainly a good distraction.

Dredged Pork Cutlets with Mushrooms & Kale
 
Yield: 4 servings
Ingredients
  • 2 tablespoons olive oil, divided
  • 8 cups chopped kale, thick stems removed
  • ½ teaspoon garlic powder
  • ¼ cup water
  • 1 pound pork cutlets, ¼ inch thick
  • 4 tablespoons flour, plus more if needed
  • 12 ounces mushrooms
  • ¼ teaspoon dried oregano
  • ½ teaspoon onion powder
  • 2 tablespoons red wine vinegar
  • Salt, pepper & garlic powder
Directions
  1. Heat 1 tablespoon of olive oil in a large saucepan over medium-high heat. Slowly add the kale using tongs to move around the kale as it cooks down to make room for more. Season with salt, pepper and ½ teaspoon garlic powder. Let the kale saute, moving often with the tongs, until all the kale is moistened and a medium green color, about 5 minutes. Reduce the heat to medium, add ¼ cup water, cover and let cook until tender, about 10-15 minutes.
  2. Season the pork cutlets on both sides with salt, pepper and garlic powder.
  3. Place the flour in a shallow bowl or plate then dredge the first pork cutlet in the flour until it's fully coated. Shake off the excess and set aside on a cutting board or plate. Repeat for the rest of the pork cutlets adding more flour if needed.
  4. Heat the remaining tablespoon of olive oil in a large skillet over medium-high heat. Cook the pork cutlets a few minutes on each side, until they are golden brown and reach an internal temperature of 145 degrees F. Remove the pork from the pan to let rest.
  5. Add the mushrooms to the pan along with the dried oregano and onion powder. Season with salt and pepper. Once the mushrooms have started to brown add the red wine vinegar. Cook until the vinegar has reduced by half and the mushrooms are nice and tender.
  6. Place a serving of kale on each plate followed by some pork and red wine vinegar mushrooms. Serve as is or with a side of rice pilaf.
Notes
Top with an over-easy fried egg for a tasty variation.


Ratatouille Napoleon

I received several fantastic cookbooks around the holidays and I have been so over-the-top excited about each of them that I can’t believe I have waited this long to share them with you. I have spent the last couple months cooking away and trying different recipes from each of the cookbooks. But one of the ones I was most thrilled about diving into, The Southern Vegetarian, was one that began as a gift to someone else. I purchased this book for Christmas for my fellow foodie friend and once it arrived I determined that I needed my own copy right away.

Thankfully my parents got it for me for Christmas so I could start drooling over all the pages without dirtying someone else’s copy. This book proves, if you didn’t believe it already, that eating vegetarian can be exciting, surprising and absolutely drool-worthy delicious. Matt and I previously ate vegetarian about once a week, although it was mostly for cost-saving purposes.

After the holidays were over, a scale had been purchased and we both had picked our jaws up from the floor (ok, it wasn’t that bad, but still a minor reality check moment), we decided to increase our vegetarianism for health concerns as well. Reduce your grocery bill and slim down? No, I’m not talking about starvation, I’m talking about eating (partly) vegetarian!

This ratatouille napoleon is an easy and delicious multifaceted meal that will undoubtedly impress your family and friends. The layering of the crunchy phyllo dough, hearty sautéed vegetables, savory olive tapenade, refreshing ricotta and slightly sweet balsamic reduction will perform a cohesive symphony of flavors on your taste buds. So veggie lovers and meat snarfers alike: make this dish, eat it, repeat, but don’t forget to share.

Ratatouille Napoleon
 
Yield: 6 stacks
Ingredients
for the napoleon
  • 2 cups peeled and diced eggplant
  • ½ yellow onion, diced
  • ½ red bell pepper, diced
  • ½ yellow bell pepper, diced
  • 5 ounces crimini mushrooms, diced
  • 1 tablespoon olive oil
  • 1 tablespoon balsamic vinegar
  • 8 sheets phyllo dough
  • ¼ cup olive tapenade, plus 2 tablespoons
  • ¼ cup reduced fat ricotta cheese, plus 2 tablespoons
  • Salt and pepper
for the balsamic reduction
  • ¼ cup balsamic vinegar
Directions
  1. Preheat the oven to 400 degrees F.
  2. Line a large rimmed baking sheet then spread the eggplant, peppers, onions and mushrooms in an even layer. Lightly drizzle with olive oil and balsamic vinegar. Toss to coat then lightly season with salt and pepper. Bake for 16 minutes then remove from the oven.
  3. Line a large baking sheet with parchment paper and set aside.
  4. Carefully lay a sheet of phyllo on a clean work surface. Lightly coat with cooking spray. Top with another sheet of phyllo. Repeat the process until all 8 phyllo sheets have been laid on top of one another. Using a pizza cutter, cut the phyllo stack into 12 equal squares.
  5. Place half the squares on the baking sheet. Use a medium ice cream scoop to place ¼ cup of the vegetable mixture on half of the phyllo squares. Bake the squares for 18 minutes or until they are golden brown.
  6. Repeat with the remainder of the squares.
  7. Spread olive tapenade on each of the un-topped squares.
  8. To serve, scoop a spoonful of the ricotta onto a plate then layer a tapenade square followed by ratatouille square. Follow with a drizzle of the balsamic reduction.
for the balsamic reduction
  1. Heat the balsamic vinegar in a small saucepan over medium-low heat until it has been reduced to a couple tablespoons.

Recipe adapted from The Southern Vegetarian.

Olive Tapenade

A couple weeks ago Matt’s brother was talking about olive tapenade and I got inspired to create my own. Whenever I decide to make a new item from scratch I like to do some thorough research and soak in whatever information I can about the adventure I’m about to embark on. According to Wikipedia, clearly the smartest website on the internet, a tapenade is, “a Provencal dish consisting of puréed or finely chopped olives, capers, anchovies and olive oil.” This statement provided two surprising conclusions (who knew a dip could be so unpredictable?).

First, this recipe should just be called tapenade since that word already assumes olives are included. However, I’m a descriptive person so I will keep the olive in the title even though it’s apparently redundant. Second, the recipe I had for olive tapenade and was about to create was an imposter and no olive tapenade at all! There were no capers. There were no anchovies. Having only half of the Wikipedia required makings of an olive tapenade made me nervous. So I jazzed up my recipe a bit and added some capers, although you can breath a sigh of relief as I continued to omit the anchovies.

So if all this rambling and mumbo-jumboing about olives and anchovies hasn’t scared you away, please know that this dip, spread or whatever you want to call it is so tasty. Addictingly tasty. The texture is smooth while the briny flavor manages to be hearty and light at the same time. Spread it on a caprese panini. Stuff it in baked chicken breasts. Eat it straight out of the container with rice crackers, a perfect combination. Or you could put it in a presentable bowl for company if that’s your thing. Your guests will be very impressed- as long as you don’t eat it all before they get there.

Olive Tapenade
 
Yield: 1½ cups
Ingredients
  • 2 teaspoons olive oil, divided
  • ½ cup minced shallots, about 3 shallots
  • 3 cloves garlic, chopped
  • ¼ teaspoon dried oregano
  • 1 cup pitted kalamata olives
  • 1 tablespoon capers
  • ½ teaspoon lemon juice
  • Salt and pepper
Directions
  1. Heat 1 teaspoon of olive oil in a small sauté pan over medium heat. Sauté the shallots, garlic and oregano until cooked through and fragrant, about 4 minutes.
  2. Remove from the heat and season with salt and pepper.
  3. Add the garlic mixture, olives, capers, lemon juice and 1 teaspoon of olive oil to the bowl of a food processor and blend until smooth.
  4. Serve with rice crackers or hearty bread.

Recipe adapted from The Southern Vegetarian.

Pomegranate Molasses Coffee Cake Loaf

Coffee cake is one of the many foods that reminds me of my grandma. I love the soft cake, sweet ribbons of cinnamon sugar and the icing coated top of my grandma’s coffee cake. When she lived with me she would make them regularly, even storing big slices in the freezer so I could pull them out and microwave them for 30 seconds for an after school snack. Although I’m reminded of my grandma because she was the one to bake the coffee cakes, I’m more reminded of the morning ritual that would occur.

As the first two people awake every morning my grandma and I would get to share some alone time. It was different than the alone time we would spend in the car on the way home from field hockey practice and different than the alone time we would spend during our weekly mall trips. The business of the day had not yet begun; the house was quiet and the mood in the kitchen was serene. Now when I go down to visit my grandma we usually get a little alone time, but it’s not that the same as those early kitchen mornings we used to have. The minute I tasted this pomegranate molasses coffee cake loaf I knew my grandma would approve.

Baking this coffee cake loaf could not be easier, but even if it required expert skill and extreme brain power I would still implore you to bake it because it is just that amazing. The cake is moist and perfectly spiced. And the crumble, yes please. I love my grandma’s icing, but I must confess that this crumble takes the cake. Literally. I could eat a plate of just the crumble topping.

I will have to bring my grandma a loaf the next time I visit, but in the meantime I will enjoy it myself and squirrel away big slices in the freezer for midmorning snacks.

Pomegranate Molasses Coffee Cake Loaf
 
Yield: 1 loaf
Ingredients
for the cake
  • 2 cups all-purpose flour
  • ¾ cup sugar
  • 3 teaspoons baking powder
  • 1 teaspoon cinnamon
  • ¼ teaspoon salt
  • 2 large eggs, beaten
  • 1 cup buttermilk
  • ⅓ cup vegetable oil
  • 3 tablespoons pomegranate molasses
  • 2 teaspoons vanilla extract
  • 4 tablespoons unsalted butter, melted
for the crumble
  • 1 cup brown sugar
  • ⅓ cup all-purpose flour
  • 1 teaspoon cinnamon
  • ¼ teaspoon salt
  • 4 tablespoons butter, softened
Directions
  1. Preheat the oven to 350 degrees F. Line a 9x5” loaf pan with parchment paper, lightly coat with cooking spray and set aside.
  2. Combine the flour, sugar, baking powder, cinnamon and salt in a large mixing bowl.
  3. Whisk the eggs, buttermilk, oil, molasses and vanilla extract in a small bowl.
  4. Carefully stir the wet ingredients into the dry ingredients and mix until just combined. Mix in the melted butter until just combined.
  5. In a medium bowl combine the brown sugar, flour, cinnamon and salt. Using a fork of pastry blender cut in the butter until well combined.
  6. Pour half the batter into the prepared loaf pan then top with half the crumble mixture. Pour in the rest of the batter then top with the rest of the crumble mixture. Bake for 55 minutes or until the top is golden.
  7. Remove the loaf from the oven then let cool in the pan for half an hour. Remove the loaf from the pan and let cool on a cooling rack for another hour.
Notes
*If you don't have buttermilk put 1 tablespoon of lemon juice in a liquid measuring cup then fill the rest of the way with milk. Let sit for 5 minutes before using in the recipe. Any milk from skim to whole will work.
*Although the cake won't cut as well while it's still warm it's worth to cut a messy slice just to taste this baby while it's warm!

Recipe from How Sweet It Is.