Half Moon Cookies

Half Moon Cookies  |  Lemon & Mocha

Late last summer a bakery a couple blocks away from my apartment closed. I had recently discovered it and quickly became addicted to its treats. I think its closure was due to the universe saving me from gaining 50 bajillion pounds, although technically, they were just unable to renew their lease.

Half Moon Cookies  |  Lemon & Mocha

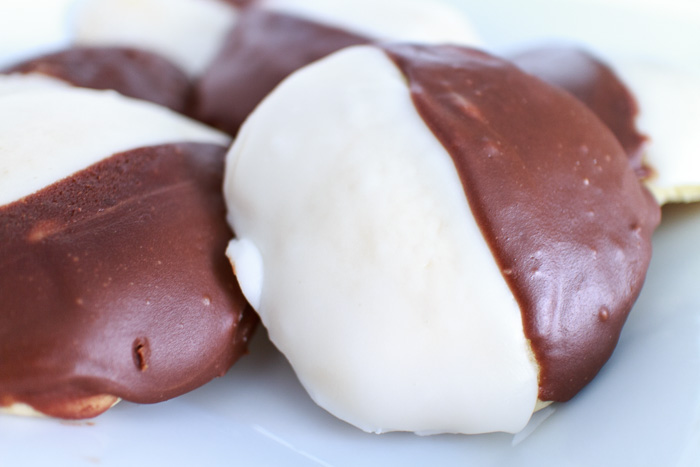
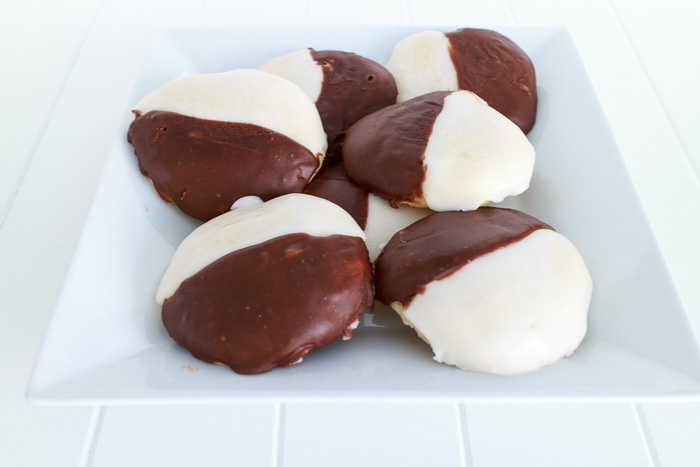
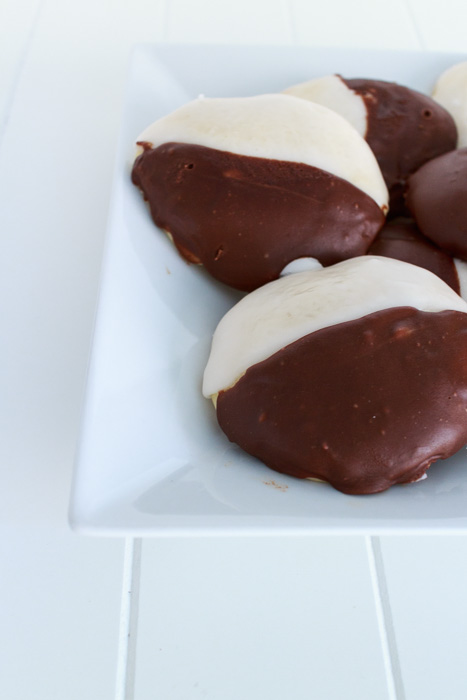
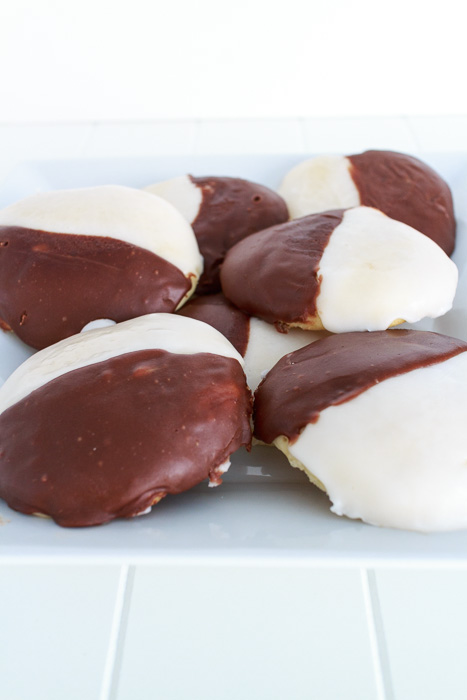
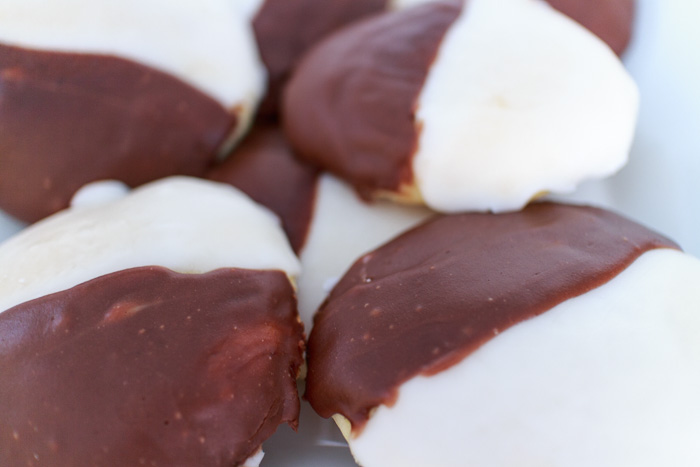
One of my favorite treats of theirs was their half moon cookies. Monstrous in size with a light cakey texture and the perfect amount of chocolate and vanilla icing.

Half Moon Cookies  |  Lemon & Mocha

Shortly after their closing I was craving these delightful cookies and realized that Matt’s half birthday was coming up. I had never done anything for Matt’s half birthday before, but thought it would be a fun surprise. Half moon cookies for a half birthday, what could be better than that?

Half Moon Cookies  |  Lemon & Mocha

I was a little intimidated about the icing portion since my patience for decoration is minimal, but they were actually very easy to frost. And even better to eat of course. With just a hint of lemon in the cookies themselves I must admit that I enjoyed these even more than their counterparts from the closed bakery. So take that universe!

Half Moon Cookies  |  Lemon & Mocha

To get true white icing for your half moon cookies be sure to use clear vanilla extract. You can buy it here, in your regular grocery store or in a large craft store chain, such as A.C. Moore.

Half Moon Cookies  |  Lemon & Mocha

Half Moon Cookies
 
Yield: 22 cookies
Ingredients
for the cookies
  • 1½ cups sugar
  • 1 cup unsalted butter, softened
  • 1 tablespoon baking powder
  • 2 teaspoons vanilla extract
  • 1½ teaspoons salt
  • ⅛ teaspoon lemon extract
  • 3 large eggs
  • 4½ cups all-purpose flour
  • 1 cup milk (not non-fat)
for the vanilla icing
  • 2 cups plus 2 tablespoons powdered sugar
  • 3 tablespoons hot water
  • 2 tablespoons light corn syrup
  • ½ teaspoon clear vanilla extract
for the chocolate icing
  • 1½ cups powdered sugar
  • 2½ tablespoons hot water
  • 2 tablespoons light corn syrup
  • ½ teaspoon vanilla extract
  • ½ cup semisweet chocolate chips, melted
Directions
for the cookies
  1. Preheat the oven to 400 degrees F. Line two baking sheets with parchment paper.
  2. Combine the sugar, butter, baking powder, vanilla extract, salt and lemon extract with the paddle attachment of a stand mixer.
  3. Add the eggs to the sugar mixture one at a time, beating after adding each egg until combined.
  4. Gently stir in 1 cup of the flour followed by ¼ cup of the milk. Continue alternating carefully stirring in 1 cup of flour and ¼ cup of milk, ending with the last ½ cup of flour.
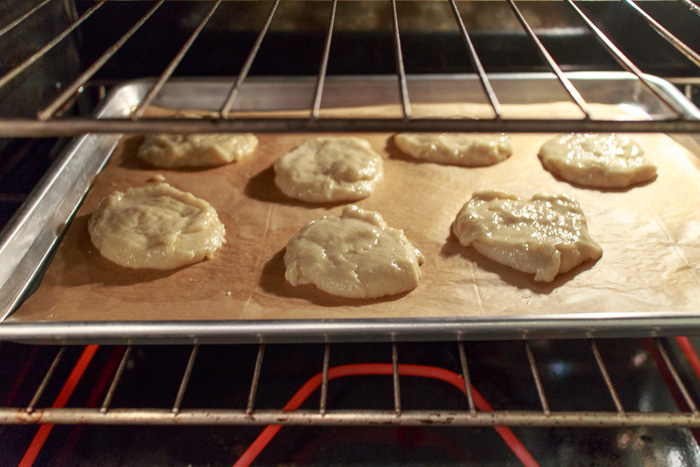
  5. Drop the dough ¼ cup at a time onto the prepared baking sheets. Wet the bottom of the measuring cup (so it doesn’t stick) and press onto the dough to flatten and spread it into a 3” diameter circle. Try to make sure the circle of dough is an evenly flattened. Leave 2” to 2½” between each cookie because they will spread.
  6. Bake for 10-11 minutes and cool them on the pan to give them time to fully set before moving them to a cooling rack
for the vanilla icing
  1. Whisk together the powdered sugar, hot water, corn syrup and vanilla extract.
  2. Once the cookies are completely cooled, use a butter knife or icing spatula to carefully spread the vanilla icing over half of each cookie. It is okay if you ice them a little more than half because you will be adding the chocolate icing.
for the chocolate icing
  1. Whisk together the powdered sugar, hot water, corn syrup and vanilla extract. Add the melted chocolate and stir until smooth and well combined.
  2. Once the vanilla icing has set on the cookies carefully spread the chocolate icing on the other half. Let the cookies rest on the cooling racks until the icing has set.
Notes
*If you don’t want to purchase clear vanilla extract you can use regular vanilla extract, but your vanilla icing won’t be white.
*Store at room temperature

Recipe slightly adapted from King Arthur Flour.

Lemon Dill Salmon

Lemon Dill Salmon  |  Lemon & Mocha

Just as a quick note before we get started here I would like to point out that all the photos in this post are of the uncooked salmon. I was serving this salmon at lunch quite a while back and didn’t get to photograph the finished product, but I didn’t want you to think this is what the salmon should look like when it is done. Not that you would think that, but you never know.

Lemon Dill Salmon  |  Lemon & Mocha

As much as I love grilled salmon there is no grilling salmon in my house. We live in an apartment and do not have the luxury of an outdoor grill so all our grilling is relegated to our single grill pan. No one enjoys the lingering smell of cooked fish in the kitchen and even an odor absorbing splatter screen can’t protect the kitchen from grill pan salmon. So oven-cooked salmon it is in my house. Which is fine by me when you have great simple oven-cooked fish recipes like this lemon dill salmon. Dinner can be on the table in twenty minutes with this quick, fresh and healthy salmon dish. I’ve tried other flavor combinations, but this is my favorite that I always keep making. It may seem weird, but don’t be afraid to eat the whole lemon slice on top of the salmon. You slice it so thin that it just adds the right amount of acidity to the fish. Enjoy!

Lemon Dill Salmon
 
Yield: 2 servings
Ingredients
  • 2 4-ounce salmon filets
  • 3 tablespoons olive oil
  • Salt and pepper
  • 2 teaspoons finely chopped fresh dill
  • 4 very thin slices lemon
Directions
  1. Place the salmon filets in a small baking dish. Drizzle both sides of the salmon filets with the olive oil then season both sides with salt and pepper. Sprinkle the dill evenly on top of the salmon filets then lay the slices of lemon on top. Cover the baking dish and refrigerate for 30 minutes.
  2. Preheat the oven to 350 degrees F.
  3. Bake for 18-20 minutes for until the salmon flakes easily.

Breakfast Sandwiches

Breakfast Sandwiches  |  Lemon & Mocha

I get excited over everything food related and that includes kitchen gadgets. I’ve never ranked my kitchen gadgets, but if I had to this nifty thing would definitely be in my top five. What is it, you ask? A round microwave egg cooker! This little contraption costs less than $4 and has revolutionized breakfast in my house. Crack an egg in the cooker. Beat with a little milk, salt and pepper. Close the lid and microwave for one minute. Ta-da! A perfectly cooked fluffy round egg perfectly sized for breakfast sandwiches.

Breakfast Sandwiches  |  Lemon & Mocha

I haven’t even gotten to the best part- if you throw in some cheese after it cooks and quickly close the lid again the steam will completely melt the cheese. Yeah, that’s right. I’ll give you a minute to soak that all in. My Aunt Dottie shared this gadget find with me last summer and I would not be able to count all the egg sandwiches I’ve made in it over the last year. I talked it up so much that several of my friends have purchased it and are now cooking their own easy egg sandwiches, too.

Breakfast Sandwiches  |  Lemon & Mocha

After I made a bunch fresh I started experimenting with freezing them for even quicker weekday breakfasts on the go. I am happy to report that these freeze well and taste good reheated in the microwave. So go ahead and get cooking!

Breakfast Sandwiches
 
Yield: 1 sandwich
Ingredients
  • Lightly toasted English muffin
  • 1 slice ham
  • 1 egg
  • 1 tablespoon milk
  • Salt and pepper
  • 1 thin slice of cheese that melts well, such as cheddar or monterey jack
Directions
  1. Put the English muffins halves down on a clean surface and place the slice of ham on one of the halves. Set aside.
  2. Crack the egg into the microwavable egg cooker or an eight ounce ramekin. Pour in the milk and a little bit of salt and pepper. Lightly beat the egg mixture then microwave for 1 minute.
  3. Carefully remove from the microwave and quickly place the cheese on top of the cooked egg while still in the cooker or ramekin. If in the ramekin place a plate or tupperware lid on top to help keep in the steam that will melt the cheese.
  4. When the cheese is melted, run a spoon around the edge of the cooked egg then remove and place on top of the ham slice. Take the other half of the English muffin and place it on top.
Notes
To freeze the breakfast sandwiches: make sure you very lightly toast the muffins so they don’t get hard when you reheat them in the microwave. Let the sandwich cool then tightly wrap in plastic wrap. Place the wrapped sandwiches in a labeled freezer bag before putting in your freezer.
To reheat the frozen breakfast sandwiches: remove from the plastic wrap. Wrap in a paper towel and place on a plate. Microwave for 1 minute, or more if needed.

Browned Butter Peach Ice Cream with a Graham Cracker Crumble

Browned Butter Peach Ice Cream with Graham Cracker Crumble  |  Lemon & Mocha

Tuesday’s browned butter peach recipe had me inspired to keep experimenting with peaches. I had all these browned butter peaches and thought the only way I could improve upon them was to turn them into ice cream. So I did.

Browned Butter Peach Ice Cream with Graham Cracker Crumble  |  Lemon & Mocha

My favorite ice cream cookbook has a peach ice cream recipe, but I’m all about kicking it up a notch. Instead of fresh peaches I decided to use my browned butter peaches to give the ice cream base a richer depth of flavor.

Browned Butter Peach Ice Cream with Graham Cracker Crumble  |  Lemon & Mocha

I then decided that browned butter peach ice cream was too simple and was calling for a change of texture. That’s where the graham cracker crumble comes into play. This ice cream tastes like a peach crisp dessert in ice cream form.

Browned Butter Peach Ice Cream with Graham Cracker Crumble  |  Lemon & Mocha

I guess the title of Peach Crisp Ice Cream would have been a lot more concise, but I like to be descriptive. I also didn’t want to deceive people because when you think of a crisp dessert you could be thinking about one of two different toppings. There is the rolled oat topping, that I of course am not a fan of with my new oat allergy. Then there is the brown sugar crumble topping. I’m not sure which is more traditional, but this ice cream incorporates the later.

Browned Butter Peach Ice Cream with Graham Cracker Crumble  |  Lemon & Mocha

Matt has proclaimed this browned butter peach ice cream with a graham cracker crumble as his favorite homemade ice cream. Maybe it will become your favorite, too!

Browned Butter Peach Ice Cream with Graham Cracker Crumble  |  Lemon & Mocha

Browned Butter Peach Ice Cream with Graham Cracker Crumble  |  Lemon & Mocha

Browned Butter Peach Ice Cream with Graham Cracker Crumble  |  Lemon & Mocha

Browned Butter Peach Ice Cream with a Graham Cracker Crumble
 
Yield: 1 quart
Ingredients
  • 5 tablespoons unsalted butter
  • 4 large peaches, peeled and sliced
  • ½ cup sugar
  • ½ cup sour cream
  • 1 cup heavy cream
  • ¼ teaspoon vanilla extract
  • ¼ teaspoon lemon juice
  • 1 sleeve of graham crackers, about 6 ounces, crushed to fine crumbs
  • 8 tablespoons unsalted butter, melted
  • 3 tablespoons sugar
  • Pinch of salt
Directions
  1. Begin in the process of browning the peaches by melting the butter over medium heat in a medium skillet. Swirl the butter until golden brown and aromatic, about 5 minutes. Add the peach slices and cook until soft, about 8-10 minutes. Make sure to turn stir and flip the peaches over. Add the sugar and stir until the sugar dissolves. Remove the peaches with a slotted spoon and let cool to room temperature.
  2. Add the peaches, sour cream, heavy cream, vanilla and lemon juice to a food processor or blender and puree until mostly smooth.
  3. Completely chill the mixture in the refrigerator. While the mixture is chilling make the crumble. Preheat the oven to 325 degrees F and line a baking sheet with foil. Mix together the graham cracker crumbs, melted butter, sugar and salt until crumbs are formed. Spread the crumbs on the baking sheet then bake until light golden brown, about 10 minutes. Let cool completely.
  4. Once the ice cream mixture is chilled freeze in your ice cream maker according to manufacturer's instructions. Layer the ice cream and the graham cracker crumble and freeze before serving.

Ice cream adapted from The Perfect Scoop.
Crumble from Williams Sonoma.

Browned Butter Peaches

Browned Butter Peaches  |  Lemon & Mocha

I eat Greek yogurt almost every day for breakfast, but sometimes on the weekends when I have a little more time I like to spice up my yogurt. Unfortunately since I discovered I’m allergic to oats I’ve had to forgo granola, which leaves me mostly with fruit toppings. Blueberries, strawberries and blackberries are all tasty options, but a few months ago I decided to be adventurous.

Browned Butter Peaches  |  Lemon & Mocha

Peaches are one of those recently discovered foods of mine. This probably isn’t shocking if you have read my earlier posts on Lemon & Mocha. I grew up eating nectarines, but peaches and plums alluded me until several years ago. Same old story: I had never thought to try it, but then someone gave me a piece. It was delicious and I couldn’t believe I had gone all these years without it in my food repertoire, etc. etc. etc.

Browned Butter Peaches  |  Lemon & Mocha

Now that peaches are part of my life I am continuously looking to make up for lost time by cooking with peaches in as many ways as possible. Grilled? Delightful. In a salad? Yes please. With chicken? No thank you, but at least I tried it. In a cake? Scrumptious. One variation I hadn’t tried was dessert peaches by themselves. This quickly led to browned butter peaches. I had seen it on menus before and since I am very familiar with browning butter from my Perfect Chocolate Chip Cookies I thought I would give it a shot.

Browned Butter Peaches  |  Lemon & Mocha

I browned some butter by swirling it in a skillet over low heat until it was golden and smelled nutty. I then added some slices of cut and peeled peaches and let them cook in the browned butter until soft. I took one bite and instantly knew this was the most delicious version of peaches I’ve ever had. I quickly spooned some over vanilla yogurt and for a second time that morning I knew that this was the most delicious way to eat peaches I’ve ever had. Eat these browned butter peaches by themselves, over yogurt, angel food cake, ice cream, french toast, raspberry cobbler, oatmeal, whipped cream, pancakes…

Browned Butter Peaches
 
Yield: 6-8 servings
Ingredients
  • 5 tablespoons unsalted butter
  • 2 tablespoons brown sugar
  • 4 large peaches, pitted, peeled and sliced
Directions
  1. Melt the butter over medium heat in a medium skillet. Swirl the butter until golden brown and aromatic, about 5 minutes.
  2. Add the brown sugar and stir until combined.
  3. Add the peach slices and cook until soft, about 8-10 minutes. Make sure to turn stir and flip the peaches over.
Notes
If serving over yogurt let cool until slightly, about 15 minutes.