Recipes

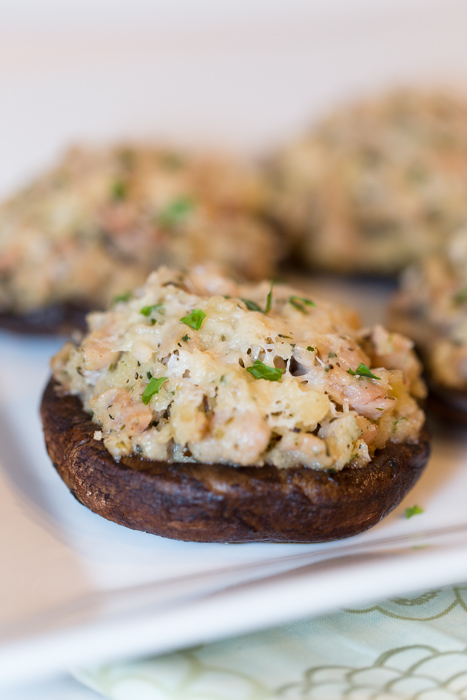
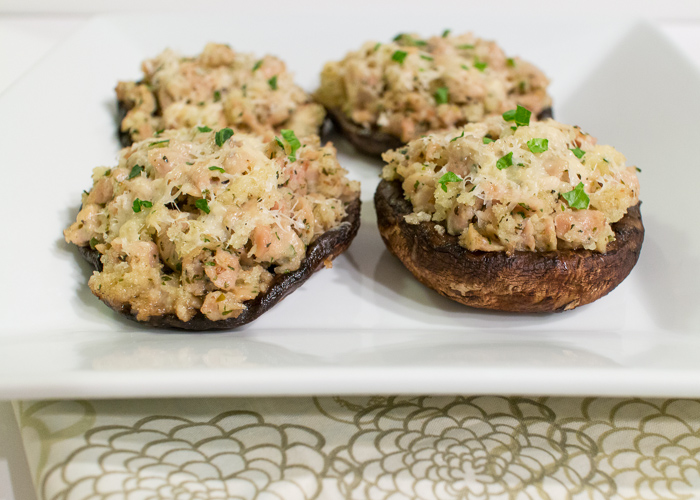
Grilled Stuffed Portobello Mushrooms

Today is a special day. Partly because I am presenting you with these outrageous stuffed mushrooms just in time for you to make for Thanksgiving, but I’ll get to that in a second. It is also my stepmom’s birthday. You should be wishing her a happy birthday, buying her presents and even throwing her a party! Because if it was not for her you would not be staring at these tempting, fragrant grilled stuffed portobello mushrooms. In fact, if it wasn’t for my stepmom you would probably be reading a blog about chicken fingers, noodles and fish sticks right now, although that does sound rather delicious.

My palate growing up was mostly limited to “kid’s food,” but my stepmom opened up a whole new world for me. Artichokes, couscous and eggplant, oh my! And mushrooms, thank heavens for the mushrooms. The greatest gift my stepmom has ever given me, aside from love, support and all that good stuff, is the gift of mushrooms. Although she didn’t gift them to me in the literal sense, as that would be a little silly and hard to wrap, I had never given mushrooms a second glance until she cooked them for me. And as they say, the rest is history.

Fast forward to today where these mushrooms sit on your computer screen exploding with juicy sausage bits, creamy marscarpone cheese, nutty Parmesan, crunchy bread crumbs and tantalizing herbs and spices. The mushrooms themselves have been grilled to perfection as they are hearty in taste, but delicate enough in texture to yield to your fork’s cut. Are you still with me or did you you already run to your kitchen to start making these? If you haven’t, then what are you waiting for?! Perfect as a side dish, main dish or even in place of traditional stuffing for a tasty twist this Thanksgiving, gifting these mushrooms to your guests might result in future spontaneous house calls around dinnertime. Don’t say I didn’t warn you.

Grilled and Stuffed Portobello Mushrooms
 
Yield: 6 servings
Ingredients
  • 2 tablespoons olive oil
  • 12 ounces turkey or chicken sausage, casings removed
  • 2 cloves garlic, minced
  • 4 ounces marscarpone cheese
  • 2 teaspoons dried parsley flakes
  • 2 teaspoons dried oregano
  • ¾ cup panko bread crumbs
  • 1 cup fresh grated Parmesan
  • 6 large portobello mushrooms, stems removed
  • Salt and pepper
Directions
  1. Heat the olive oil over medium-high heat in a large skillet. Crumble the sausage and add it to the pan. Cook for 5 minutes, or until cooked through, stirring often.
  2. Add the garlic, cook for 1 minute then remove the pan from the heat.
  3. Add the marscarpone, parsley flakes, oregano, bread crumbs and ½ cup of the Parmesan to the cooked sausage and stir until well combined. Season with salt and pepper.
  4. Heat a grill pan over medium-high heat.
  5. Lightly coat the pan with olive oil or cooking spray then place the mushrooms stem side down on the grill pan. Lightly coat the tops of the mushrooms with olive oil or cooking spray and season with salt and pepper. Cook the mushrooms for 4 minutes.
  6. Turn the mushrooms over and cook them for another 2 minutes.
  7. Carefully fill the mushrooms with the sausage mixture. Top with the remaining Parmesan cheese then tent some tin foil over the pan to help the Parmesan melt. Grill for another 6 minutes then remove from the heat and serve.
Notes
I used fully cooked roasted garlic chicken sausages from Trader Joe's and would highly recommend them for this recipe. If you use them as well follow these adaptations to the recipe above:
*Omit the minced garlic
*There is not a thick casing so you can simply crumble and tear the sausage with the casing intact
*Still complete the first step of the recipe even though they are cooked because it will help brown and warm the sausages

Recipe slightly adapted from Giada at Home.

Pumpkin Hummus

This post was not supposed to be pumpkin hummus. I had other recipes in store for you before this hummus was even a thought. Upon realizing I had yet to post a pumpkin recipe I immediately went out and purchased a can of pumpkin puree. Trial one was some sort of chocolate pumpkin tart, but I never got to the pumpkin portion. Although the chocolate tart shell tasted delicious, it wasn’t very… photogenic… so Matt and I happily ate the scrapped tart shells while I moved on to trial two. One skillet pumpkin cornbread later I was staring at a beautiful dish that would have photographed quite nicely, but after one bite I knew it wasn’t for Lemon & Mocha. Thankfully I refuse to settle on mediocre dishes and was determined to share some pumpkin tastiness so this smooth and addictive pumpkin hummus was able to find its way to the homepage. The lesson to be had here is try, try, again, if you fall down get back up, no tart shell shall go uneaten, or something like that.

If you are looking for something light to serve before your big Thanksgiving meal next week or you simply would like something tasty to snack on and get you in the fall spirit look no further than this pumpkin hummus. Do you have five minutes and either a food processor or an immersion blender? Then you are five minutes away from savory, creamy, pumpkiny hummusy perfection. The pepita garnish provides a great crunch and nicely compliments the cumin and cinnamon spiced pumpkin flavor. What are pepitas? Well they are just shelled pumpkin seeds. I know you’re thinking I’m super smart right now, but don’t feel bad, Google taught me that just the other day! I served this hummus with cinnamon sugar pita chips, but any sort of pita chip or cracker will pair well. Another idea is to serve pumpkin hummus and roasted turkey wraps the day after Thanksgiving- now we’re talking.

Pumpkin Hummus
 
Ingredients
  • One 15-ounce can chickpeas
  • 1 clove garlic
  • ¾ cup pumpkin puree
  • 5 tablespoons tahini paste
  • 5 tablespoons olive oil
  • 3 tablespoons lemon juice
  • ½ teaspoon cumin
  • ¼ teaspoon cinnamon
  • Salt
  • Pepitas for garnish
Directions
  1. Drain and rinse the chickpeas to remove the excess salt. Set aside in the strainer to dry.
  2. Puree the chickpeas, pumpkin, tahini, olive oil, lemon juice, cumin and cinnamon in a food processor or with an immersion blender until smooth.
  3. Season with salt to taste. Top with the pepitas before serving.

Recipe adapted from the October 2013 issue of Food Network Magazine.

French Onion Green Beans

Can you believe Thanksgiving is next week? It seems like I was just saying I couldn’t believe it was already November! I won’t be cooking for Thanksgiving, but I’m going to be posting Thanksgiving recipes for the next few posts for all of you who will be cooking this year. Although great as a Thanksgiving or winter holiday side dish, these French onion green beans are also easy enough for any day of the week this winter.

When I think about Thanksgiving, not only do savory side dishes and plates piled high with pie slices come to mind, but also post-turkey food comas and stomach aches. Between the mashed potatoes and gravy, sausage stuffing, sweet potato casserole and macaroni and cheese, there are many heavy side dishes that end up on the Thanksgiving table. I made these green beans as a light addition to your table that also won’t take up space in your oven. They have all the flavor of a green bean casserole without any of the creamed soup, milk or fried onions.

The original recipe called for a Lipton Onion mix packet, but I found a copycat recipe to use since I like to know exactly what ingredients I’m putting in my food (and can avoid unnecessary “ingredients” like caramel color and partially hydrogenated soybean oil). Everyone will be gobbling up their vegetables this holiday with these green beans on the menu. Enjoy!

French Onion Green Beans
 
Yield: 12 servings
Ingredients
  • 2 tablespoons unsalted butter
  • 2 cups pearl onions
  • 1½ pound haircots verts
  • 1 tablespoon minced garlic
  • 1 tablespoon Worcestershire sauce
  • ¼ cup minced dried onion
  • 2 tablespoons low sodium beef bouillon powder
  • 1 teaspoon onion powder
  • Pinch of celery seed
  • Pinch of sugar
  • ½ cup white wine
  • 1 tablespoon lemon juice
  • Zest from 1 lemon
  • Pepper to taste
Directions
  1. Melt the butter over medium heat in a large sauté pan. Add the pearl onions, cover the pan and cook for 15 minutes, stirring occasionally.
  2. Meanwhile, boil some water, add salt and cook haircots verts for 3 minutes. Drain and immediately place the greens into ice water until cool. Drain the greens.
  3. Add the garlic, Worcestershire and spices to the onions then stir.
  4. Add the wine and scrape up any brown bits from the bottom of the pan. Add the haircots verts and cook for 4 minutes. Stir in lemon juice, zest and season with pepper.
Notes
Make sure you use the low sodium beef bouillon powder or the dish will be too salty.

Recipe adapted from November/December 2013 issue of Cuisine at Home and Food.com.

Stracciatella Chocolate Hazelnut Gelato Pie

“What is this vision of deliciousness I see before me?” you ask? A chocolate hazelnut gelato pie in name, but it is so much more than that. There are layers involved and layers make things scrumptiously complex. The base of this pie is a lightly sweetened chocolate cookie crust. Resting on top of the crust lies a creamy stracciatella chocolate hazelnut gelato. Stracciatella is the Italian version of chocolate chip ice cream except there are no chips or chunks, just wispy bits of hardened chocolate throughout the gelato. The subtle hazelnut flavors breaks through the richness of the rest of the pie and brings it to a new level of decadence and addictiveness. Finally, the fudgey ganache topping speckled with toasted hazelnuts. Since my keyboard is still recovering from drooling on it while describing this ganache on Tuesday I’ll just say yum.

A couple months ago I brought this pie to a barbecue at my parents’ house. Having sampled the gelato I was excited to try the pie. The dessert received rave reviews, which I’m sure you guessed based on the uncharacteristically long description of it in the beginning of the post. The surprise of the night was that my dad claimed, and continues to claim to this day over two months later, that this was the best dessert he has ever eaten. That’s right, not one of the best, but the best.

Now my dad has a healthy ice cream obsession as is family tradition so you might be thinking well of course he liked it, it’s gelato. But you have to know that my dad is a creature of habit. Yes he might eat ice cream every single night and yes there were 12 half gallons of ice cream in his house on my last count, but they were all of the same three flavors. God forbid he run out ;-). He also has this extraordinary skill to pick through a dessert and consume only the ice cream portion, so the fact that he ate this pie in entirety and claimed it as the best dessert ever? That is what we call a food victory.

Chocolate Hazelnut Gelato Pie
 
Yield: 10 servings
Ingredients
for the crust
  • 6 ounces chocolate wafers
  • 4 tablespoons unsalted butter, melted
  • 2 tablespoons sugar
  • Pinch of salt
for the gelato
  • 1½ cups toasted hazelnuts
  • 1 cup whole milk
  • 2 cups heavy cream
  • ¾ cup sugar
  • ¼ teaspoon salt
  • 4 ounces milk chocolate, chopped
  • 5 large egg yolks
  • ⅛ teaspoon vanilla extract
  • 5 ounces bittersweet chocolate, chopped
for the topping
Directions
for the crust
  1. Preheat the oven to 350 degrees F.
  2. Pulse the chocolate wafers in a food processor until fine crumbs. Add the butter, sugar and salt pulse until well combined.
  3. Press into the bottom and up the sides of a springform pans.
  4. Bake for 10 minutes then cool on a wire rack.
for the gelato
  1. If the hazelnuts are not toasted, bake them in an even layer on a baking sheet at 350 degrees F for 10-12 minutes. Let cool.
  2. Rub the hazelnuts to try and get rid of as much of the skins as possible. Use a food processor to finely chop the toasted hazelnuts.
  3. In a medium sauce pan heat the milk, 1 cup of the cream, sugar and salt until warm. Once warm remove from the heat.
  4. Add the chopped hazelnuts to the warmed mixture, cover and let sit at room temperature for 1 hour.
  5. Place the milk chocolate in a large bowl.
  6. In a medium saucepan heat the remaining 1 cup of cream until it starts to boil. Remove from the heat and pour over the milk chocolate.
  7. Stir the chocolate and cream until the chocolate is melted and smooth.
  8. In the medium saucepan used to heat the cream, place a mesh strainer over top then pour the hazelnut mixture through the strainer into the medium saucepan. Push on the hazelnuts with a wooden spoon to try and get as much liquid as possible. Discard the hazelnuts.
  9. Rewarm the hazelnut liquid over medium heat. While the liquid is heating whisk together the egg yolks in a medium bowl. Once the hazelnut liquid is warm, slowly pour the liquid into the bowl with the egg yolks, whisking constantly, to temper the eggs. Pour the warmed eggs and liquid back into the saucepan.
  10. Still on medium heat, stir constantly until the mixture thickens and coats the spatula.
  11. Place the bowl with the melted milk chocolate mixture over an ice bath and set a mesh strainer on top. Pour the egg mixture through the mesh strainer into the large bowl. Add the vanilla and stir until cool.
  12. Once the mixture is cool chill in the refrigerator completely. Once cold, pour into your ice cream maker following the manufacturer's directions.
  13. While the mixture is in the ice cream maker, melt the bittersweet chocolate over a double boiler and stir until it's smooth. Transfer the chocolate into a measuring cup with a pouring spout.
  14. During the last couple minutes of churning in the ice cream maker pour the melted bittersweet chocolate into the ice cream maker in a thin stream to create the stracciatella.
  15. When the gelato is done churning carefully spoon it into the prepared crust and smooth the top. Freeze until no longer soft.
for the topping
  1. Take the pie out of the freezer and carefully pour the prepared ganache over the top of the gelato. Smooth the top with a spatula then sprinkle with the toasted hazelnuts.
  2. Freeze for several hours or overnight. Remove from the freezer 15-20 minutes before serving.
Notes
I use Ghiradelli chocolate bars.

Crust from Martha Stewart.
Gelato from The Perfect Scoop.

Chocolate Ganache

This recipe is life changing. Now I know I have been throwing a lot of bold words around on Lemon & Mocha lately, but there are so many recipes out there that I can’t afford to be meek. If I let you live your life even just one more day without tasting this chocolate ganache I could never forgive myself. And if I withheld this deliciousness from you for months before suddenly sharing, well, I shudder to think about the angry mobs.

Chocolate ganache is just a fancy way of saying a sauce of chocolate and heavy cream, or a fancy way of saying “mmm.” You heat heavy cream until it’s steaming, add in the chocolate then voila- the ganache is complete. This ganache has been known to bring people to their breaking point. I have even heard someone utter that they were ready to smack a ganache-topped cupcake out of child’s hand because they thought it was the last one! Don’t worry, I won’t name names ;-).

Now this photo is deceiving because once you have poured, dipped or drizzled the ganache it hardens into a glistening chocolate shell and develops a fudge-like quality. The beauty of this recipe other than the rich chocolate taste and smooth velvety texture is its versatility. Originally used to make faux Hostess cupcakes, I have since used the ganache for a wide variety of chocolate sinfulness. Topping chocolate cupcakes? Check. Coating brownies? Check. Eating with a spoon? Check. Matt likes to heat leftover ganache in the microwave then drizzle over ice cream. Now is that a boy after my own heart or what? You better make sure your computer screen is clean because when you see what I make with the ganache on Friday you might find yourself licking your monitor. It’s ok, I won’t judge.

Chocolate Ganache
 
Ingredients
  • ¾ cup heavy cream
  • 1- 12 ounce bag of bittersweet chocolate chips
  • 3 tablespoons unsalted butter, softened
Directions
  1. Heat the cream over medium heat until steaming, stirring constantly.
  2. Once steaming, remove the cream from the heat. Add the chocolate and stir then let sit for 5 minutes.
  3. Add the butter to the chocolate mixture then stir until smooth.
  4. Dip, pour or drizzle as directed in your recipe.
Notes
Any leftover ganache will keep in an airtight container in the fridge for up to 4 weeks.

Recipe from The Curvy Carrot.