Healthy Chicken Cobb Salad with Creamy Avocado Dressing

Healthy Chicken Cobb Salad with Creamy Avocado Dressing  |  Lemon & Mocha

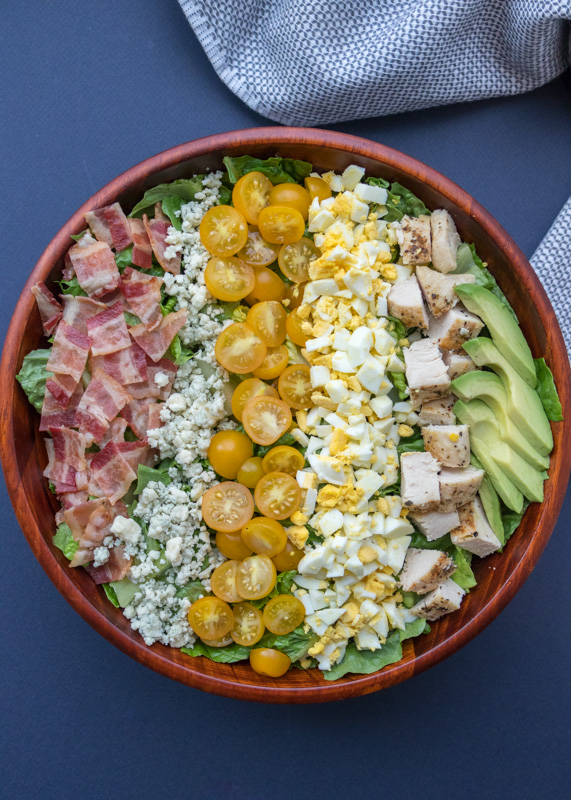
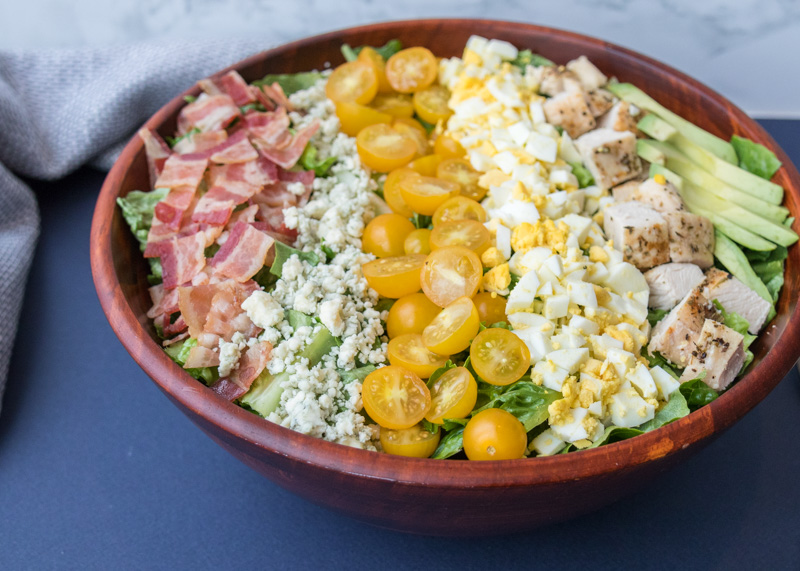
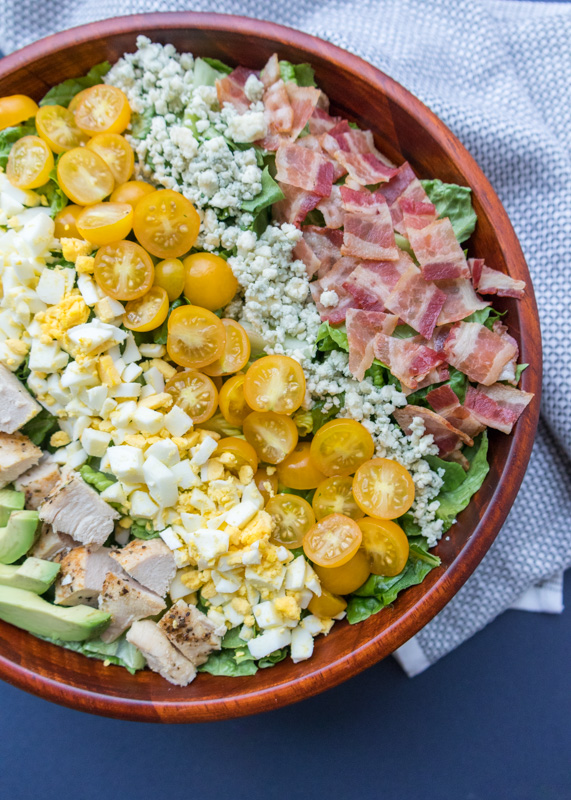
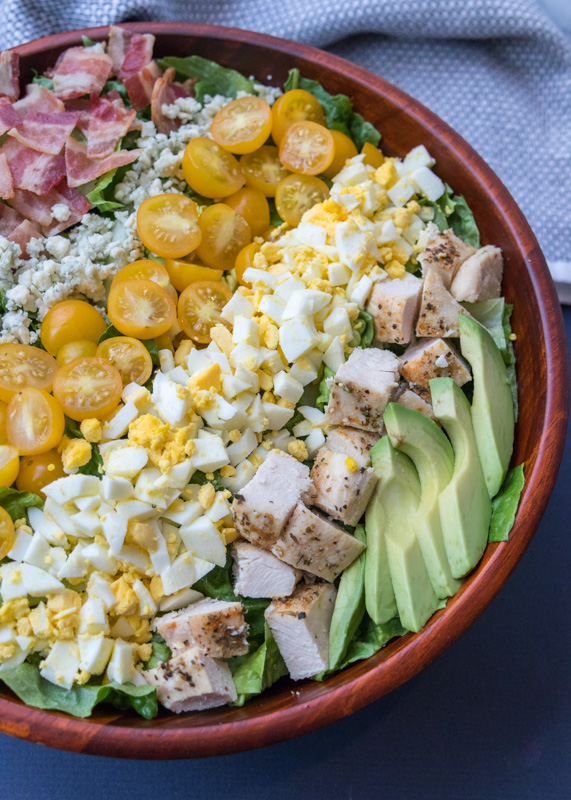
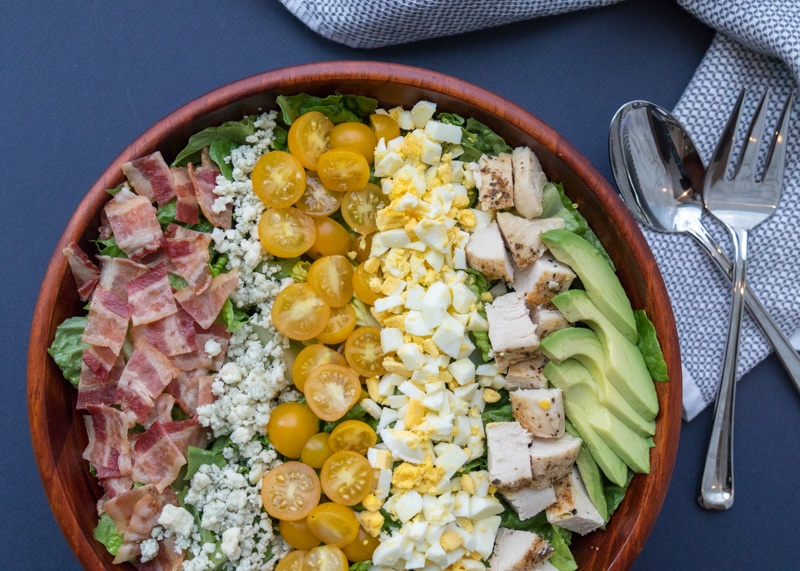
As you all know, I am not a huge salad fan, but I love a good cobb salad. Cobb salads have all the best yummy toppings! Bacon, avocado, hard-boiled eggs, blue cheese – so good!

Healthy Chicken Cobb Salad with Creamy Avocado Dressing  |  Lemon & Mocha

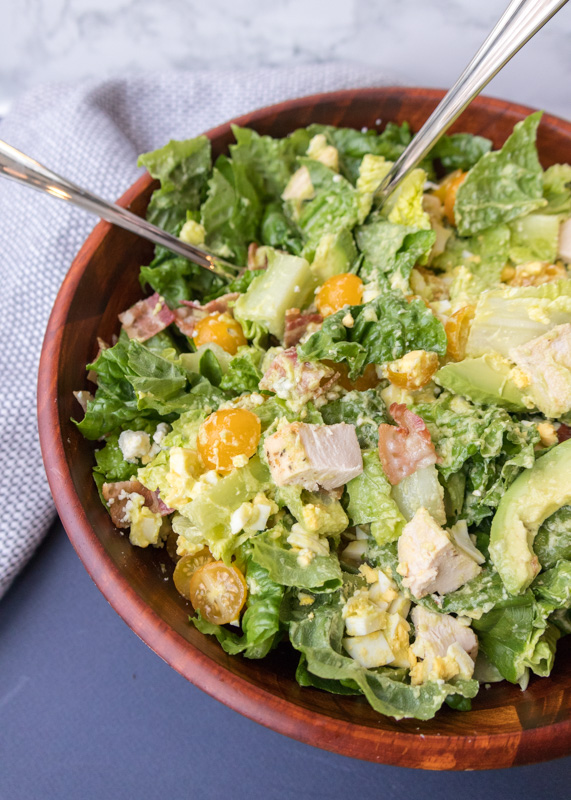
Most cobb salads are covered with unhealthy creamy dressings, but today we’re switching things up. The dressing is still creamy, but it’s fresh, preservative free and full of only good fats. The creaminess of the dressing comes from the avocado and it gets a nice acidic punch from the lime juice. In addition to this cobb salad, I’ve also used the creamy avocado dressing lightly drizzled over grilled chicken. It would also taste great tossed with warm roasted potatoes – the options are endless!

Healthy Chicken Cobb Salad with Creamy Avocado Dressing  |  Lemon & Mocha

Looking at the list of ingredients you might think this salad isn’t healthy, and I’m certainly not a nutritionist, but for me, this salad gets its healthy title from moderation. I would much rather have a small amount of real bacon than more of a “healthier” substitute. Plus, this salad is loaded up with greens and lean protein.

Healthy Chicken Cobb Salad with Creamy Avocado Dressing  |  Lemon & Mocha

I love making this salad on a Sunday when Matt and I need to detox from the weekend. It makes four servings so the two of us are set for two lunches each.

Healthy Chicken Cobb Salad with Creamy Avocado Dressing  |  Lemon & Mocha

I especially loved having this recipe in my back pocket for the summertime when I was eating lunch outside. No microwave needed and the crunch of the romaine is so refreshing when it’s warm out. I hope you enjoy!

Healthy Chicken Cobb Salad with Creamy Avocado Dressing  |  Lemon & Mocha

Healthy Chicken Cobb Salad with Creamy Avocado Dressing
 
Yield: 4 servings
Ingredients
for the salad
  • 2 boneless skinless chicken breasts
  • Garlic powder, Italian seasoning, salt and pepper to season
  • 8 heaping cups of chopped romaine lettuce, washed
  • 2 hard-boiled eggs
  • 2 slices bacon, cooked
  • ½ an avocado
  • ¼ cup blue cheese crumbles
for the dressing
  • 3 tablespoons water, plus more as needed
  • 2 tablespoons olive oil
  • 1 tablespoon lime juice
  • ½ an avocado
  • 1 clove garlic
  • Salt and pepper to taste
Directions
for the salad
  1. Preheat the oven to 350 degrees F. Line a baking sheet with nonstick aluminum foil and place the chicken breasts on it. Very lightly drizzle with olive oil then season generously with garlic powder, Italian seasoning, and pepper. Lightly season with salt. Bake the chicken for 25-30 minutes or until they reach an internal temperature of 165 degrees F. Let cool then chop and set aside.
  2. While the chicken is cooking prep the rest of the ingredients. Slice the hard-boiled eggs. Crumble the bacon. Dice the avocado.
  3. Divide the lettuce between 4 bowls or containers. Divide the chicken, egg, bacon, avocado and blue cheese between the 4 servings.
for the dressing
  1. Combine all the ingredients in a blender and puree until smooth. Add more water if desired for a thinner consistency. Use roughly 2 tablespoons of dressing per salad.
Notes
If you want your salad even healthier you can omit the chopped avocado since there’s already avocado in the dressing. You could also swap some of the romaine lettuce for a different green, such as spinach.


Zucchini Noodles & Chicken Sausage in Vodka Sauce

Zucchini Noodles & Chicken Sausage in Vodka Sauce  |  Lemon & Mocha

Happy Monday! This week I’m kicking it off with an easy and healthy dinner recipe – zucchini noodles (aka zoodles) and chicken sausage in vodka sauce! This was the very first recipe I made with my KitchenAid spiralizer attachment. Currently, this is the most used attachment I have for my mixer. I love noodling vegetables! Firstly, because this thing cranks out the veggie noodles so fast. Secondly, something about the noodle shape makes me want to eat all the veggies. Probably because I have a noodle obsession.

Zucchini Noodles & Chicken Sausage in Vodka Sauce  |  Lemon & Mocha

I’ve made curly-q potatoes, beet noodles, sweet potato noodles and even apple curly-q’s, but zucchini noodles are the ones I go back to time and time again. The best part of this veggie noodle craze is that even if you don’t have a spiralizer I’ve seen prepared spiralized veggies in every grocery store I’ve been in, from Whole Foods to Market Basket to Stop & Shop. So convenient! However, as with most prepared foods, they are pricier than buying the veggies whole and preparing them yourself so I would highly recommend getting a spiralizer, whether it’s a hand held one or the KitchenAid attachment.

Zucchini Noodles & Chicken Sausage in Vodka Sauce  |  Lemon & Mocha

This dish is a great weeknight meal especially because it is made all in one pan. Check out this handy how-to graphic I made!

Zucchini Noodles & Chicken Sausage in Vodka Sauce  |  Lemon & Mocha

First, the zoodles get sautéed with some seasoning. It only takes a few minutes because they’re so thin and noodly. After you take the zucchini noodles out, you sauté some sliced chicken sausage, add the vodka sauce to warm it up, toss with the zucchini noodles and serve. Done! After sprinkling with Parmesan, of course.

Zucchini Noodles & Chicken Sausage in Vodka Sauce  |  Lemon & Mocha

I promise that even the least experienced cook out there can nail this. I love cooking, but most weeknights I want dinner to be done as quickly as possible so Matt and I can have the rest of the night to get stuff done and relax. This meal is one of our go-to dinner recipes for a reason! Enjoy!

Zucchini Noodles & Chicken Sausage in Vodka Sauce  |  Lemon & Mocha

Zucchini Noodles & Chicken Sausage in Vodka Sauce
 
Yield: 2 servings
Ingredients
  • 3 medium zucchinis, ends removed
  • 3 teaspoons olive oil
  • ¼ teaspoon garlic powder
  • 2 chicken sausages (I use Trader Joe’s Roasted Garlic Chicken Sausage)
  • ¾ - 1 cup vodka sauce or preferred marinara sauce, depending on how saucy you like it
  • Grated Parmesan cheese, for topping
Directions
  1. Wash and dry the zucchinis then spiralize them using your desired method. Heat 2 teaspoons of the olive oil in a nonstick skillet over medium-high heat. Add the zucchini noodles and season with the garlic powder. Season with salt and pepper to taste. Sauté the zoodles until cooked through, but still al dente, about 5 minutes. Remove the zoodles from the pan.
  2. Drain and wipe any liquid from the pan then return it to medium heat with the remaining teaspoon of olive oil. Slice the chicken sausages and add to the pan. Cook until lightly browned. Reduce the heat to medium-low and add the vodka sauce. Stir and let warm then add the zucchini noodles. Toss to coat then divide between two bowls. Top with the Parmesan cheese and enjoy!
Notes
Zucchinis retain a lot of water so if you have leftovers they will most likely be watery when you reheat them. These are best eaten right after being prepared.


Mexican Street Corn Pasta Salad

Mexican Street Corn Pasta Salad  |  Lemon & Mocha

Matt, my cousin, Sarah, and I have a slight obsession with elote, also known as Mexican street corn. If your life has been elote-less thus far, what you need to know is that it is grilled corn slathered in lime juice, mayonnaise or crema, then sprinkled with salt, cotija cheese and chile powder. Basically, perfection on a cob.

Mexican Street Corn Pasta Salad  |  Lemon & Mocha

It’s hard to say where our obsession stems from. It could be because we’re cheese freaks, because we love Mexican food, or maybe because we have some inexplicable connection to corn fields. However, I think the real reason we love it so much is because it reminds us of summer beach days.

Mexican Street Corn Pasta Salad  |  Lemon & Mocha

Every year my family meets at the beach in Delaware for our family beach week. A few years ago, we started incorporating happy hour towards the end of the beach day. Yes, we enjoy having a drink while the sun’s still warm before having to shower and get ready for dinner. But let’s be honest – it’s really about the corn. We tried it at happy hour at the Mexican restaurant near the beach and we got hooked. I’m talking left the beach early because we couldn’t take the corn craving anymore hooked. Ever since then, we’ve been on an elote frenzy, ordering it whenever we see it popping up on restaurant menus. So when I saw this Mexican Street Corn Pasta Salad I knew I needed to have it as soon as possible.

Mexican Street Corn Pasta Salad  |  Lemon & Mocha

I first made it to bring to a barbecue and the weeks following I made it two more times because Matt and I couldn’t get enough. It is that good. I love elote and literally the only thing that could make it better is pasta, because hello – pasta! This pasta corn salad is packed with mind-boggling flavor and loaded with all the best goodies. There’s avocado, cheese and bacon in there. Yes, bacon! The pasta salad is smoky without being spicy, although you can certainly make it more spicy. My preference is usually just the least-spicy baby version possible.

Mexican Street Corn Pasta Salad  |  Lemon & Mocha

Every time I’ve made this it’s come out perfectly delicious. Even though I think it’s perfect as is, one of the reasons I love making pasta salads (other than my noodle obsession) is that it’s so easy to adjust the flavors to your personal preferences. Like it richer? Add more mayonnaise. Like it with more zippiness? Add more lime juice and zest. I like to make it as written, taste, and then add more of whatever I feel it needs, if anything. If you are going to make it ahead I would wait and stir in the bacon, cheese and avocado last minute. Also the pasta will soak up some of the dressing if you leave it overnight before serving so maybe make some extra dressing to pour in last minute as well.

Mexican Street Corn Pasta Salad  |  Lemon & Mocha

Mexican Street Corn Pasta Salad
 
Yield: 8 servings
Ingredients
for the pasta salad
  • 1 lb farfalle pasta
  • 2 15-ounce cans of fire-roasted corn, roughly 3 cups corn (see note)
  • 3 scallions
  • ½ cup parsley leaves (or cilantro if you prefer)
  • ½ jalapeño (see note)
  • 6-8 strips bacon, cooked
  • ⅔ cup Cotija cheese
  • 1 avocado
for the dressing
  • ¾ cup regular mayonnaise
  • 4 tablespoons lime juice
  • Zest from 1 lime
  • 1½ teaspoons hot sauce (see note)
  • ½ teaspoon smoked paprika
  • ⅛ teaspoon ground cumin
  • ⅛ teaspoon chili powder (more if desired)
  • Salt and pepper to taste
Directions
for the pasta salad
  1. Cook the farfalle pasta according to the package directions, being sure not to overcook. Strain and then immediately rinse with cold water. Let strain until completely drain, lightly patting with paper towel if needed.
  2. Drain the cans of corn and add them to a large mixing bowl. Add the cooked pasta. Remove the ends of the scallions then slice and add to the bowl. Chop the parsley or cilantro and add to the bowl. Carefully remove the seeds and pith from the jalapeño being sure to wear gloves or wash your hands immediately after. Finely chop and add to the mixing bowl. Crumble the cooked bacon and the cheese into the mixing bowl. Pour the dressing on top then stir to combine. Season with salt and pepper as needed. Dice the avocado and fold in to combine.
for the dressing
  1. Combine all the ingredients in a small bowl and whisk to combine. Season with salt and pepper as needed.
Notes
- Note about corn: If you can’t find or don’t want to use cans of fire-roasted corn, you have a few options. Trader Joe’s sells roasted corn in their freezer section. You could char some drained regular canned corn in a skillet on medium-high heat. You could also grill your corn then remove from the cob.
- Note about spiciness: I do not like spicy food. If you make the recipe as written and remove the seeds and pith from the jalapeño, use a mild hot sauce (I use Trader Joe’s Green Dragon sauce), and use a minimal amount of the chili powder, it will not be spicy. If you are concerned, reduce the amount of hot sauce and omit the chili powder. If you want it spicier, I would leave the seeds of the jalapeño and increase the amount of chili powder.

Recipe adapted from Chelsea’s Messy Apron.

Triple Berry Naked Angel Food Cake

Triple Berry Naked Angel Food Cake  |  Lemon & Mocha

Don’t worry, I promise this cake isn’t scandalous. Definitely delicious, but certainly not scandalous. It is called a naked cake because the sides aren’t frosted, but I will get to that in a bit. Last month we celebrated Matt’s 30th birthday!

Triple Berry Naked Angel Food Cake  |  Lemon & Mocha

When Matt and I first started dating during our sophomore year of college we celebrated his 20th birthday – that’s a whole decade of birthdays! We had only been dating for a few weeks, but I made him these very literal cupcakes.

200803091lemonandmocha

I’ve clearly come a long way- ha! I’ve made Matt many birthday desserts over the years, but I wanted this one to be extra special.

Triple Berry Naked Angel Food Cake  |  Lemon & Mocha

I decided to turn one of Matt’s favorite desserts, this Summer Berry Trifle, into a layer cake. The cake layers are angel food cake that have been brushed with a simple lemon syrup to keep them extra moist and bursting with light lemon flavor. The creamy filling and topping is a sturdy whipped cream. Basically, the base of a cream cheese frosting folded in with lots and lots of Cool Whip to make it light and fluffy. Piled in the middle and on top are sweet fresh berries. I used a combination of strawberries, blackberries and raspberries. Altogether, they make a fresh and light cake – perfect for eating a big slice.

Triple Berry Naked Angel Food Cake  |  Lemon & Mocha

When you get a big bite of the syrup-brushed cake with the cream filling and the berries it is completely magical.

Triple Berry Naked Angel Food Cake  |  Lemon & Mocha

Now, to the scandalous aspect of the cake. A naked cake simply means that there is little or no icing on the sides of the cake, letting the layers bare all. The layers of whipped filling in the middle and on the top of the cake are thick enough that you really don’t need the additional filling on the sides of the cake. Leaving the cake naked lets the beautiful berries in the middle of the cake peek out. It also saves you time from having to try to make the sides look perfect and smooth – a win-win!

Triple Berry Naked Angel Food Cake  |  Lemon & Mocha

I think a cake this delicious is great any time of the year, but it is especially fitting for a summer gathering with berry season soon approaching. Enjoy!

Triple Berry Naked Angel Food Cake  |  Lemon & Mocha

Triple Berry Angel Food Cake Trifle
 
Yield: 8-10 servings
Ingredients
  • 1 box angel food cake mix, batter prepared according to directions on box
  • ¾ cup sugar
  • ¼ cup plus 1 tablespoon fresh lemon juice
  • ¼ teaspoon lemon or almond extract
  • 8 ounces reduced fat cream cheese, room temperature
  • 16 ounces reduced fat Cool Whip
  • 8 ounces strawberries, washed
  • 1 cup blackberries, washed
  • 1 cup raspberries, washed
  • More berries for topping, if needed
Directions
  1. To make two round cakes, I lined two 9” round pans with parchment paper. I divided the batter between the two prepared pans, making sure not to fill them more than ¾ full. You will most likely have some excess batter. I weighed them with my kitchen scale to make sure they would be even layers. Bake at the temperature specified by the box for 20-30 minutes. The cake is done when the top is dark golden brown and the top cracks are dry not sticky. When it’s done baking, tilt the pan on its side. I leaned mine up, cake facing down, against a raised cooling rack. Once it’s completely cool, run a knife around the edges of the pan then carefully remove.
  2. Over medium-high heat in a small saucepan heat ¼ cup of the sugar and ¼ cup of the lemon juice. Stir frequently while heating until the sugar dissolves. Remove the saucepan from the heat and stir in the lemon extract. Set aside.
  3. Beat the remaining ½ cup of sugar and the cream cheese on medium speed with a mixer until fluffy. Fold in the Cool Whip until smooth. Stir in the tablespoon of lemon juice. Take one of the cooled angel food cake rounds and brush the top with the lemon syrup. Spoon a bunch of the whipped filling onto the cake and smooth with a spatula. Put half of the berries in a single layer on top of the filling. I left the blackberries and raspberries whole, but I halved and quartered the strawberries depending on how big they were. Dollop some more of the whipped filling on top of the berries then carefully smooth it out over the berries with a spatula. Top with the second angel food cake layer. Brush the top with the lemon syrup. Spread a thick layer of the whipped filling on top and smooth with a spatula. Top with the remaining berries. Store in the fridge until ready to serve.

Recipe adapted from the July/August 2010 issue of The Food Network Magazine.

Carrot-Coconut Muffins

Carrot-Coconut Muffins  |  Lemon & Mocha

It’s hard to believe we’re already four muffins into the year! It seems like just the other day that I was making the Food Network’s Pomegranate Orange January Muffins and here we are in April. Time flying by is fine by me until we start getting some nice summer weather in Boston. Then it better slow down!

Carrot-Coconut Muffins  |  Lemon & Mocha

The muffins for April from the Food Network Magazine’s Muffin of the Month are carrot muffins with a coconut twist. Very fitting since Easter was this month (just barely) and carrot cake seems to be the official dessert of the Easter Bunny.

Carrot-Coconut Muffins  |  Lemon & Mocha

I’m going to be honest about these muffins since authenticity is very important to me here at Lemon & Mocha. They tasted like really good carrot cake muffins, but with all the specialty ingredients listed, from the coconut oil to the macadamia nuts to the crystallized ginger, I was expecting a wow factor. I wanted the coconut and ginger flavors to punch my taste buds! Unfortunately the coconut seemed to mostly be coming from the flakes sprinkled on top and the spicy ginger-ness was very mild.

Carrot-Coconut Muffins  |  Lemon & Mocha

I am going to make these muffins again at some point, but I’m going to recipe-test and adapt them to make perfect muffins. Not just really good muffins. I’m thinking continuing with the island theme of the coconut and macadamia nuts, but adding more pronounced flavor and some pineapple. Yum!

Carrot-Coconut Muffins  |  Lemon & Mocha

If you tried the April muffins, what did you think?

Carrot-Coconut Muffins  |  Lemon & Mocha

Carrot-Coconut Muffins
 
Yield: 12 muffins
Ingredients
  • 1½ cups all-purpose flour
  • 1 teaspoon ground cinnamon
  • 1 teaspoon baking powder
  • ¼ teaspoon baking soda
  • ½ teaspoon ground ginger
  • ½ teaspoon salt
  • ¾ cup packed light brown sugar
  • ½ cup plain whole milk yogurt
  • ⅓ cup coconut oil, melted
  • 2 large eggs
  • 1 teaspoon vanilla extract
  • 1½ cups grated carrots (about 3 carrots)
  • ½ cup sweetened shredded coconut, plus more for topping
  • ½ cup chopped macadamia nuts
  • ¼ cup finely chopped crystallized ginger
  • ½ cup confectioners’ sugar
  • 2 teaspoons milk
Directions
  1. Preheat the oven to 375 degrees F. Line a 12-cup cupcake pan with paper liners and set aside.
  2. In a large bowl, sift together flour, cinnamon, baking powder, baking soda, ground ginger, and salt. Make a well in the center.
  3. In a small bowl, whisk together the brown sugar, yogurt, melted coconut oil, eggs, and vanilla. Pour into the well of the flour mixture and stir until combined. Add the carrots, coconut, macadamia nuts, and crystallized ginger then fold until combined.
  4. Evenly divide the batter between the prepared lined cups. They should each be about ¾ full. Bake for 20-25 minutes until the muffin is golden and a toothpick inserted into the center of the muffin comes out clean. Let cool in the pan for 5 minutes then move to a wire cooling rack to cool completely.
  5. While the muffins are cooling, make the glaze. Sift the confectioners’ sugar into a small bowl then add the milk. You want it to be thin enough to drizzle, but thick enough so it won’t just run off the muffins. If it is too thin, add more powder sugar. If it is too thick, add more milk. When the muffins are completely cool, spoon a little glaze onto the top of each muffin and immediately sprinkle with the shredded coconut. The coconut will make the glaze spread out even more.

 Recipe from January/February 2018 issue of Food Network Magazine.