Recipes

Leebreeze

Leebreeze  |  Lemon & MochaWhat wondrous sight do you see before you? Alas! Lemon & Mocha’s first ever drink post! Time to break out the cups, ice and don’t forget the vodka!

Leebreeze  |  Lemon & Mocha

We aren’t just saying “cheers” to this post though, we are wishing my amazing dad a happy birthday. My dad is known for his Leebreezes so there seemed to be no better fitting tribute than this perfect summer cocktail.

Leebreeze  |  Lemon & Mocha

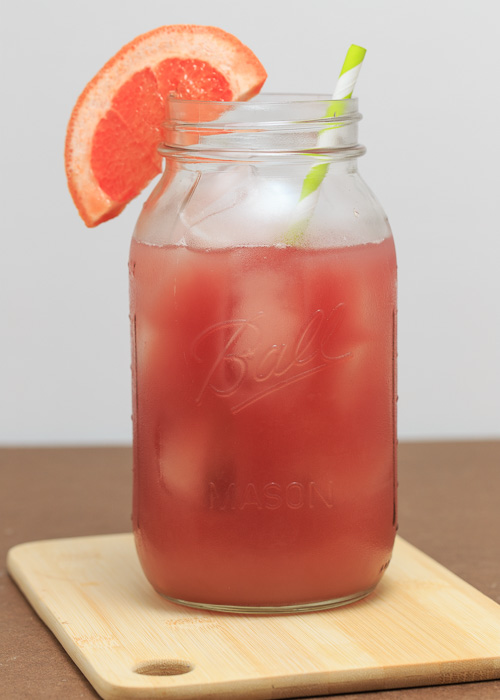
The Leebreeze is a variation of the traditional sea breeze drink, and by variation I mean it’s the same thing with a different name. A sea breeze consists of cranberry juice, grapefruit juice and vodka. Don’t forget the vodka. While you can make little onesies and twosies of this drink it is best prepared in a big pitcher for all party-goers and barbecue attendees to enjoy.

Leebreeze  |  Lemon & Mocha

For those of you that don’t know or haven’t guessed thus far, my dad’s first name is Lee, hence the Leebreeze. The naming was the genius work of one of my cousins a couple years ago. While my dad certainly didn’t invent the sea breeze, nor the Leebreeze for that matter, he brought the sea breeze a certain attitude that only my dad could.

Leebreeze  |  Lemon & Mocha

My dad is often the life of the party with his laugh heard from three rooms over and he wants everyone to have a great time. The Leebreeze isn’t just a relaxing fruity cocktail; it’s a let’s-get-this-party-started-go-to. So when your barbecue needs a little perk this summer, break out a pitcher of Leebreezes and turn it up a notch.

Leebreeze  |  Lemon & Mocha

Leebreeze
 
Yield: 8 servings or 1 drink
Ingredients
for a pitcher
  • 12 ounces vodka, room temperature
  • 30 ounces cranberry juice
  • 16 ounces grapefruit juice
  • Ice cubes
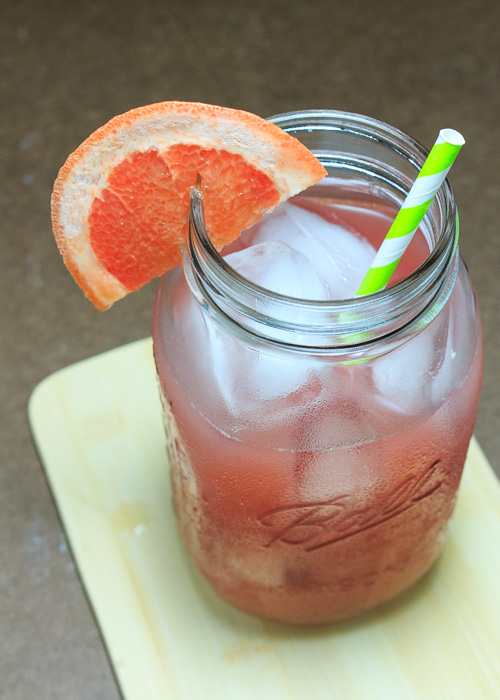
  • Grapefruit slices for garnish
for a single drink
  • 1.5 ounces vodka, room temperature
  • Cranberry juice
  • Grapefruit juice
  • Ice cubes
  • Grapefruit slice for garnish
Directions
for a pitcher
  1. Fill a standard gallon pitcher half to three quarters full with ice. Pour the vodka, cranberry juice and grapefruit juice over top then stir. Taste and adjust amounts of ingredients if needed. Pour into glasses and garnish with grapefruit slices.
for a single drink
  1. Fill a glass with ice. Pour the vodka over top. Pour in cranberry juice until the glass is three quarters full. Top off the remaining quarter with grapefruit juice. Stir, taste and adjust amounts of ingredients if needed. Garnish with a grapefruit slice.


Aunt Jen’s Chicken Ginger Dumplings

Chicken Ginger Dumplings  |  Lemon & Mocha

It seems most people that cook a fair amount have a signature dish. It may not even be their own recipe and it certainly doesn’t have to be fancy, but when you tingle with anticipation knowing what they will bring to every dinner party, family outing or potluck, then you have discovered their signature dish.

Chicken Ginger Dumplings  |  Lemon & Mocha

There are quite a few members of my family with multiple signature dishes. One of these talented people is my Aunt Jen. Everything she makes is delicious, but one of her party appetizers that always gets everyone into a mad feeding frenzy is her chicken dumplings.

Chicken Ginger Dumplings  |  Lemon & Mocha

As with any dumpling, the filling is where this recipe stands out. Bursting with tender ground chicken and a punch of flavor from the ginger and scallions these bites are perfectly paired with any soy sauce based dipping sauce you have on hand.

Chicken Ginger Dumplings  |  Lemon & Mocha

The second best part of these dumplings, because you can’t compete with the taste, is that other than the time involved, creating these smash party bites is a quite simple process.

Chicken Ginger Dumplings  |  Lemon & Mocha

Throw together the filling in a food processor, stuff and enclose the pre-made wrappers and steam. Then eat of course. Or share if you’re nice like my Aunt Jen.

Chicken Ginger Dumplings  |  Lemon & MochaChicken Ginger Dumplings  |  Lemon & Mocha

Aunt Jen's Chicken Ginger Dumplings
 
Yield: 6-8 appetizer servings
Ingredients
  • 3 tablespoons olive oil, divided
  • 1 yellow onion, diced
  • 2 cloves garlic, minced
  • 1 tablespoon fresh ginger, minced
  • 6 scallions, white and green separate, chopped
  • 2 boneless skinless chicken breasts
  • 2 teaspoons low sodium soy sauce
  • 1 tablespoon cilantro, chopped, optional
  • 1 package wonton wrappers, about 40-50 wrappers
  • Salt and pepper
Directions
  1. Line a baking sheet with parchment paper and set aside. If you are going to cook them right away then prepare a steamer basket by lining with a round piece of parchment paper. This will keep the dumplings from sticking while they cook. I’ve read that you can also use a small plate, but I’ve never tried it.
  2. Heat 1½ tablespoons of the olive oil in a large pan over medium-high heat. Sauté the onion, garlic, ginger and white parts of the scallions until fragrant and the onions are slightly translucent.
  3. Combine the chicken and sautéed vegetables in a food processor and pulse until finely chopped.
  4. Place the processed chicken mixture into a medium mixing bowl then add the green parts of the scallions, the soy sauce, the remaining 1½ tablespoon of olive oil, salt, pepper and cilantro, if using. Mix until just combined.
  5. Fill a small bowl or cup with warm water and set aside. Make sure wonton wrappers not in use are covered so they don’t dry out. To fill the dumplings place a teaspoon of filling in the center of a wonton wrapper. Use your finger to rub some water onto the edge of the wrapper to help it seal together. When folding in half bring two corners together to create a large triangle, making sure to squeeze out any air. Tightly pinch with your fingers to seal. To create the shape in these images bring the two opposite points of the triangle together and pinch. Lay the sealed dumplings on the baking sheet while you are making the rest.
  6. If you are cooking the dumplings right away steam them in a single layer on the parchment paper lined steamer basket for 12 minutes. Once they are cooked you can sauté them in sesame oil for a couple minutes on each side if desired. Serve with soy sauce. If you are freezing them for later place the baking sheet in the freezer until they have frozen individually before moving them all to a large freezer bag. To cook from frozen steam for at least 20 minutes. Whether you are cooking right away or freezing the dumplings for later work in batches so they aren’t sitting out for too long. This might cause them to dry out and lose their seal.


Half Moon Cookies

Half Moon Cookies  |  Lemon & Mocha

Late last summer a bakery a couple blocks away from my apartment closed. I had recently discovered it and quickly became addicted to its treats. I think its closure was due to the universe saving me from gaining 50 bajillion pounds, although technically, they were just unable to renew their lease.

Half Moon Cookies  |  Lemon & Mocha

One of my favorite treats of theirs was their half moon cookies. Monstrous in size with a light cakey texture and the perfect amount of chocolate and vanilla icing.

Half Moon Cookies  |  Lemon & Mocha

Shortly after their closing I was craving these delightful cookies and realized that Matt’s half birthday was coming up. I had never done anything for Matt’s half birthday before, but thought it would be a fun surprise. Half moon cookies for a half birthday, what could be better than that?

Half Moon Cookies  |  Lemon & Mocha

I was a little intimidated about the icing portion since my patience for decoration is minimal, but they were actually very easy to frost. And even better to eat of course. With just a hint of lemon in the cookies themselves I must admit that I enjoyed these even more than their counterparts from the closed bakery. So take that universe!

Half Moon Cookies  |  Lemon & Mocha

To get true white icing for your half moon cookies be sure to use clear vanilla extract. You can buy it here, in your regular grocery store or in a large craft store chain, such as A.C. Moore.

Half Moon Cookies  |  Lemon & Mocha

Half Moon Cookies
 
Yield: 22 cookies
Ingredients
for the cookies
  • 1½ cups sugar
  • 1 cup unsalted butter, softened
  • 1 tablespoon baking powder
  • 2 teaspoons vanilla extract
  • 1½ teaspoons salt
  • ⅛ teaspoon lemon extract
  • 3 large eggs
  • 4½ cups all-purpose flour
  • 1 cup milk (not non-fat)
for the vanilla icing
  • 2 cups plus 2 tablespoons powdered sugar
  • 3 tablespoons hot water
  • 2 tablespoons light corn syrup
  • ½ teaspoon clear vanilla extract
for the chocolate icing
  • 1½ cups powdered sugar
  • 2½ tablespoons hot water
  • 2 tablespoons light corn syrup
  • ½ teaspoon vanilla extract
  • ½ cup semisweet chocolate chips, melted
Directions
for the cookies
  1. Preheat the oven to 400 degrees F. Line two baking sheets with parchment paper.
  2. Combine the sugar, butter, baking powder, vanilla extract, salt and lemon extract with the paddle attachment of a stand mixer.
  3. Add the eggs to the sugar mixture one at a time, beating after adding each egg until combined.
  4. Gently stir in 1 cup of the flour followed by ¼ cup of the milk. Continue alternating carefully stirring in 1 cup of flour and ¼ cup of milk, ending with the last ½ cup of flour.
  5. Drop the dough ¼ cup at a time onto the prepared baking sheets. Wet the bottom of the measuring cup (so it doesn’t stick) and press onto the dough to flatten and spread it into a 3” diameter circle. Try to make sure the circle of dough is an evenly flattened. Leave 2” to 2½” between each cookie because they will spread.
  6. Bake for 10-11 minutes and cool them on the pan to give them time to fully set before moving them to a cooling rack
for the vanilla icing
  1. Whisk together the powdered sugar, hot water, corn syrup and vanilla extract.
  2. Once the cookies are completely cooled, use a butter knife or icing spatula to carefully spread the vanilla icing over half of each cookie. It is okay if you ice them a little more than half because you will be adding the chocolate icing.
for the chocolate icing
  1. Whisk together the powdered sugar, hot water, corn syrup and vanilla extract. Add the melted chocolate and stir until smooth and well combined.
  2. Once the vanilla icing has set on the cookies carefully spread the chocolate icing on the other half. Let the cookies rest on the cooling racks until the icing has set.
Notes
*If you don’t want to purchase clear vanilla extract you can use regular vanilla extract, but your vanilla icing won’t be white.
*Store at room temperature

Recipe slightly adapted from King Arthur Flour.

Lemon Dill Salmon

Lemon Dill Salmon  |  Lemon & Mocha

Just as a quick note before we get started here I would like to point out that all the photos in this post are of the uncooked salmon. I was serving this salmon at lunch quite a while back and didn’t get to photograph the finished product, but I didn’t want you to think this is what the salmon should look like when it is done. Not that you would think that, but you never know.

Lemon Dill Salmon  |  Lemon & Mocha

As much as I love grilled salmon there is no grilling salmon in my house. We live in an apartment and do not have the luxury of an outdoor grill so all our grilling is relegated to our single grill pan. No one enjoys the lingering smell of cooked fish in the kitchen and even an odor absorbing splatter screen can’t protect the kitchen from grill pan salmon. So oven-cooked salmon it is in my house. Which is fine by me when you have great simple oven-cooked fish recipes like this lemon dill salmon. Dinner can be on the table in twenty minutes with this quick, fresh and healthy salmon dish. I’ve tried other flavor combinations, but this is my favorite that I always keep making. It may seem weird, but don’t be afraid to eat the whole lemon slice on top of the salmon. You slice it so thin that it just adds the right amount of acidity to the fish. Enjoy!

Lemon Dill Salmon
 
Yield: 2 servings
Ingredients
  • 2 4-ounce salmon filets
  • 3 tablespoons olive oil
  • Salt and pepper
  • 2 teaspoons finely chopped fresh dill
  • 4 very thin slices lemon
Directions
  1. Place the salmon filets in a small baking dish. Drizzle both sides of the salmon filets with the olive oil then season both sides with salt and pepper. Sprinkle the dill evenly on top of the salmon filets then lay the slices of lemon on top. Cover the baking dish and refrigerate for 30 minutes.
  2. Preheat the oven to 350 degrees F.
  3. Bake for 18-20 minutes for until the salmon flakes easily.

Breakfast Sandwiches

Breakfast Sandwiches  |  Lemon & Mocha

I get excited over everything food related and that includes kitchen gadgets. I’ve never ranked my kitchen gadgets, but if I had to this nifty thing would definitely be in my top five. What is it, you ask? A round microwave egg cooker! This little contraption costs less than $4 and has revolutionized breakfast in my house. Crack an egg in the cooker. Beat with a little milk, salt and pepper. Close the lid and microwave for one minute. Ta-da! A perfectly cooked fluffy round egg perfectly sized for breakfast sandwiches.

Breakfast Sandwiches  |  Lemon & Mocha

I haven’t even gotten to the best part- if you throw in some cheese after it cooks and quickly close the lid again the steam will completely melt the cheese. Yeah, that’s right. I’ll give you a minute to soak that all in. My Aunt Dottie shared this gadget find with me last summer and I would not be able to count all the egg sandwiches I’ve made in it over the last year. I talked it up so much that several of my friends have purchased it and are now cooking their own easy egg sandwiches, too.

Breakfast Sandwiches  |  Lemon & Mocha

After I made a bunch fresh I started experimenting with freezing them for even quicker weekday breakfasts on the go. I am happy to report that these freeze well and taste good reheated in the microwave. So go ahead and get cooking!

Breakfast Sandwiches
 
Yield: 1 sandwich
Ingredients
  • Lightly toasted English muffin
  • 1 slice ham
  • 1 egg
  • 1 tablespoon milk
  • Salt and pepper
  • 1 thin slice of cheese that melts well, such as cheddar or monterey jack
Directions
  1. Put the English muffins halves down on a clean surface and place the slice of ham on one of the halves. Set aside.
  2. Crack the egg into the microwavable egg cooker or an eight ounce ramekin. Pour in the milk and a little bit of salt and pepper. Lightly beat the egg mixture then microwave for 1 minute.
  3. Carefully remove from the microwave and quickly place the cheese on top of the cooked egg while still in the cooker or ramekin. If in the ramekin place a plate or tupperware lid on top to help keep in the steam that will melt the cheese.
  4. When the cheese is melted, run a spoon around the edge of the cooked egg then remove and place on top of the ham slice. Take the other half of the English muffin and place it on top.
Notes
To freeze the breakfast sandwiches: make sure you very lightly toast the muffins so they don’t get hard when you reheat them in the microwave. Let the sandwich cool then tightly wrap in plastic wrap. Place the wrapped sandwiches in a labeled freezer bag before putting in your freezer.
To reheat the frozen breakfast sandwiches: remove from the plastic wrap. Wrap in a paper towel and place on a plate. Microwave for 1 minute, or more if needed.