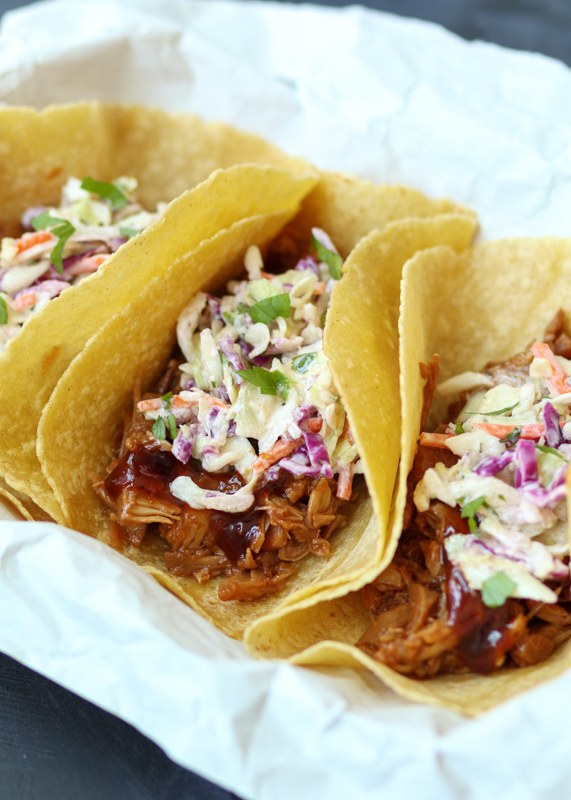
Vegetarian

Winter Pesto Pasta

Winter Pesto Pasta  |  Lemon & Mocha

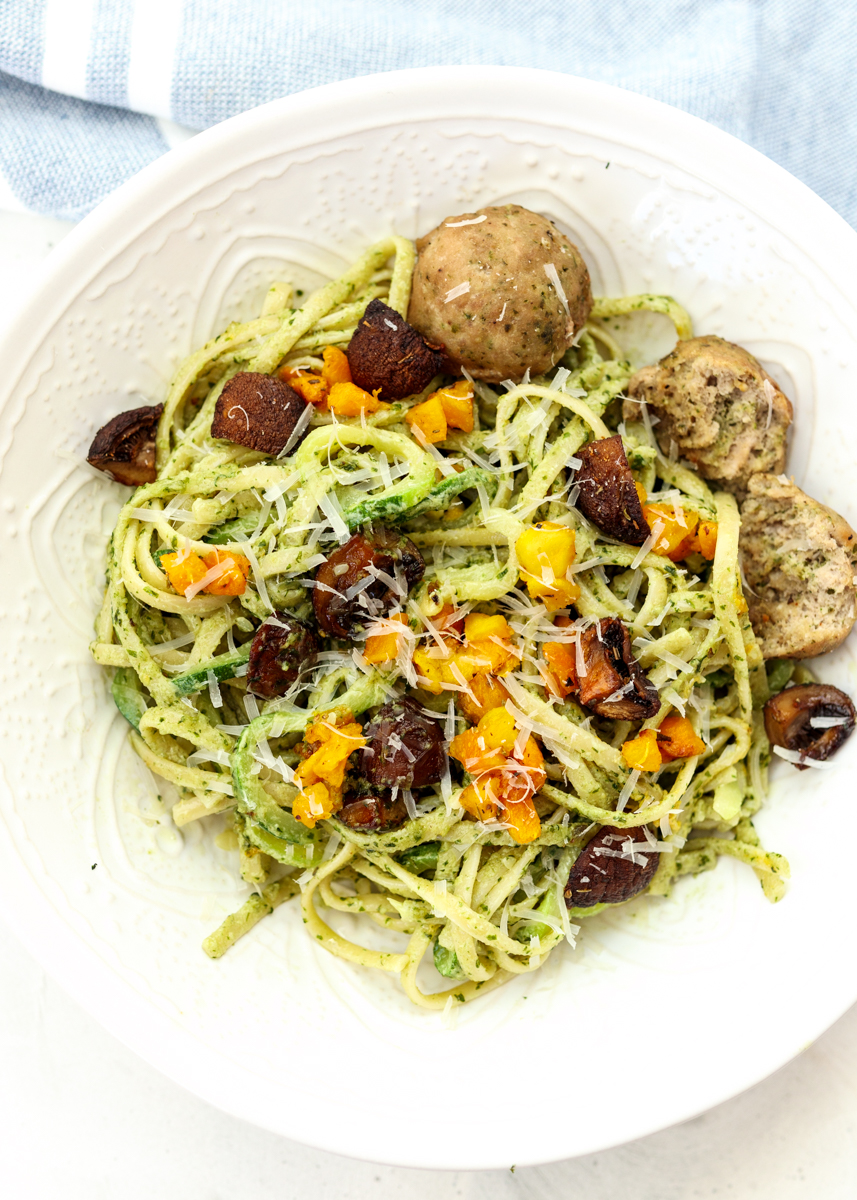
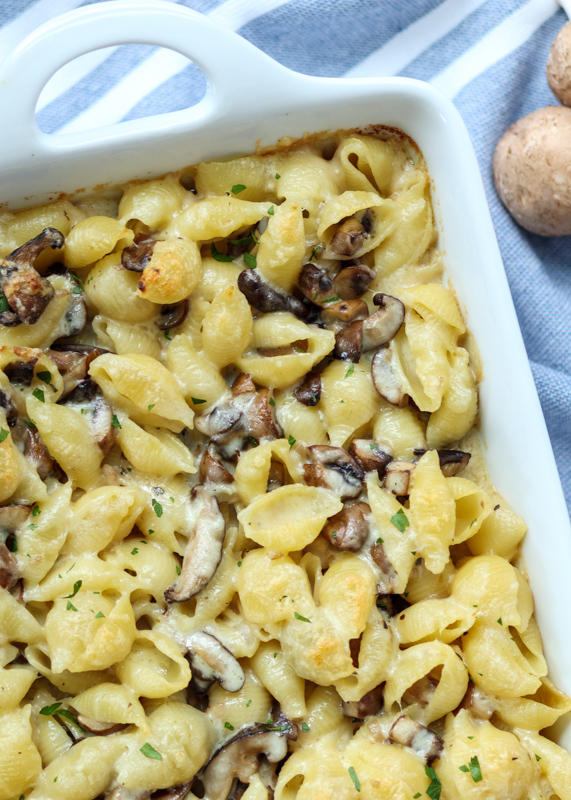
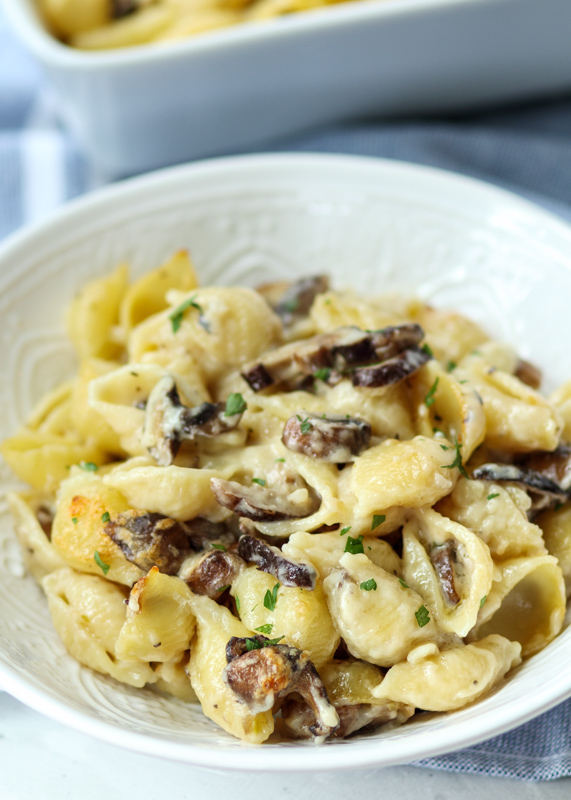
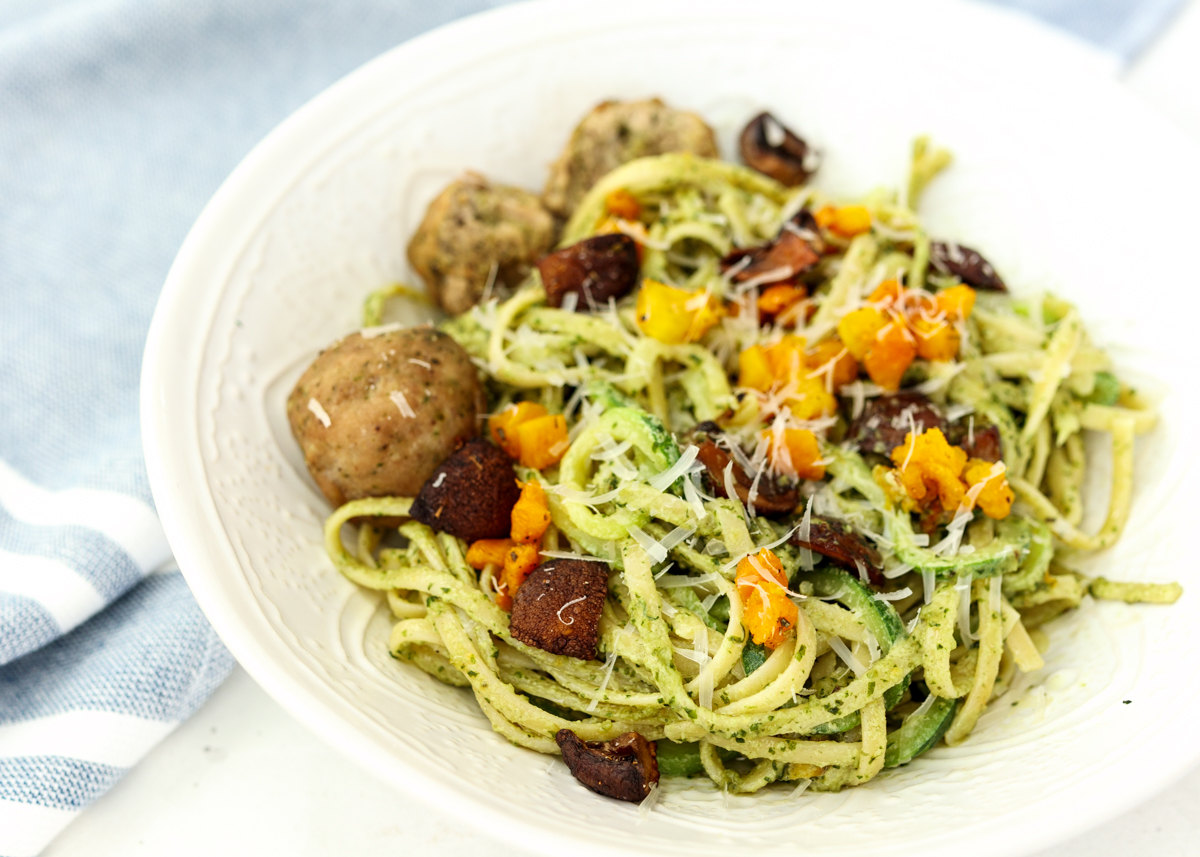
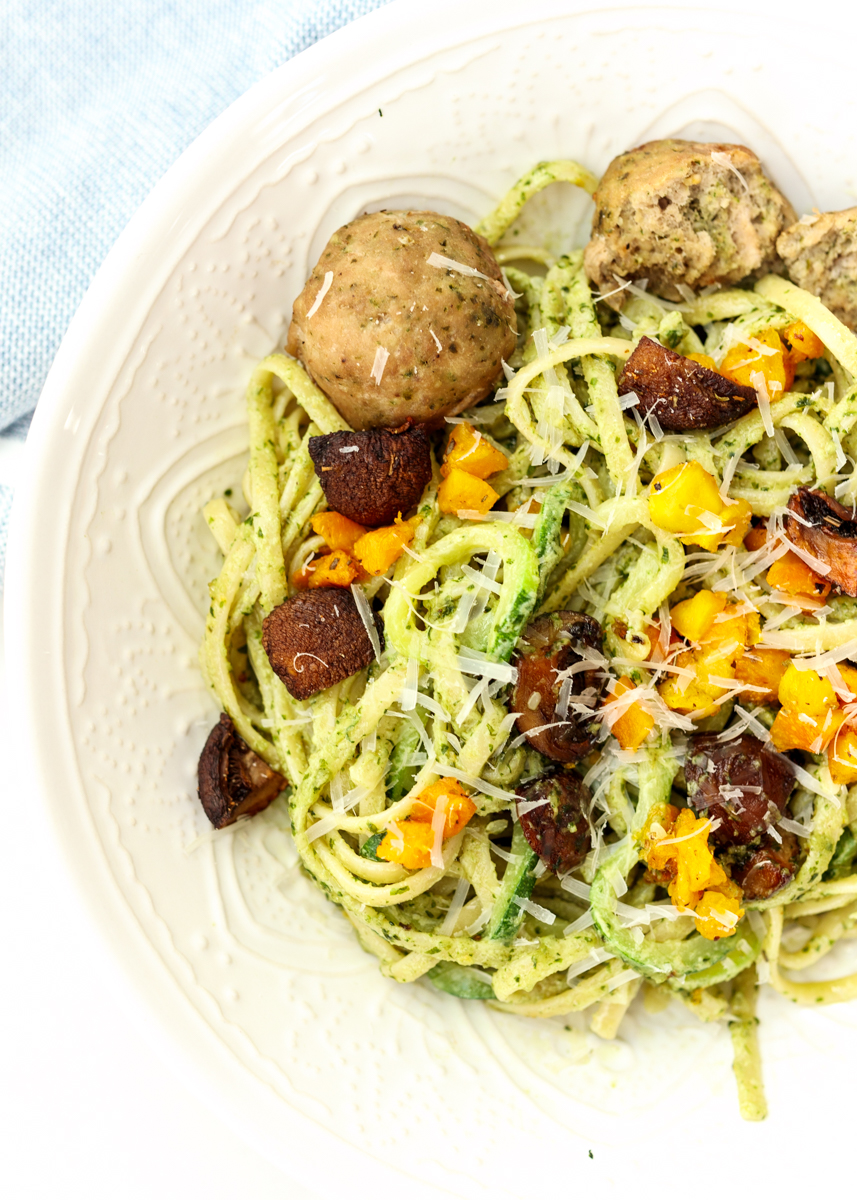
Winter Pesto Pasta is a cozy dish loaded with roasted butternut squash and mushrooms that is sure to warm you up during these chilly winter days. Whenever Matt and I are craving pasta I like to load it up with lots of veggies and I love the ease and the taste of roasted vegetables, especially in the wintertime.

Winter Pesto Pasta  |  Lemon & Mocha

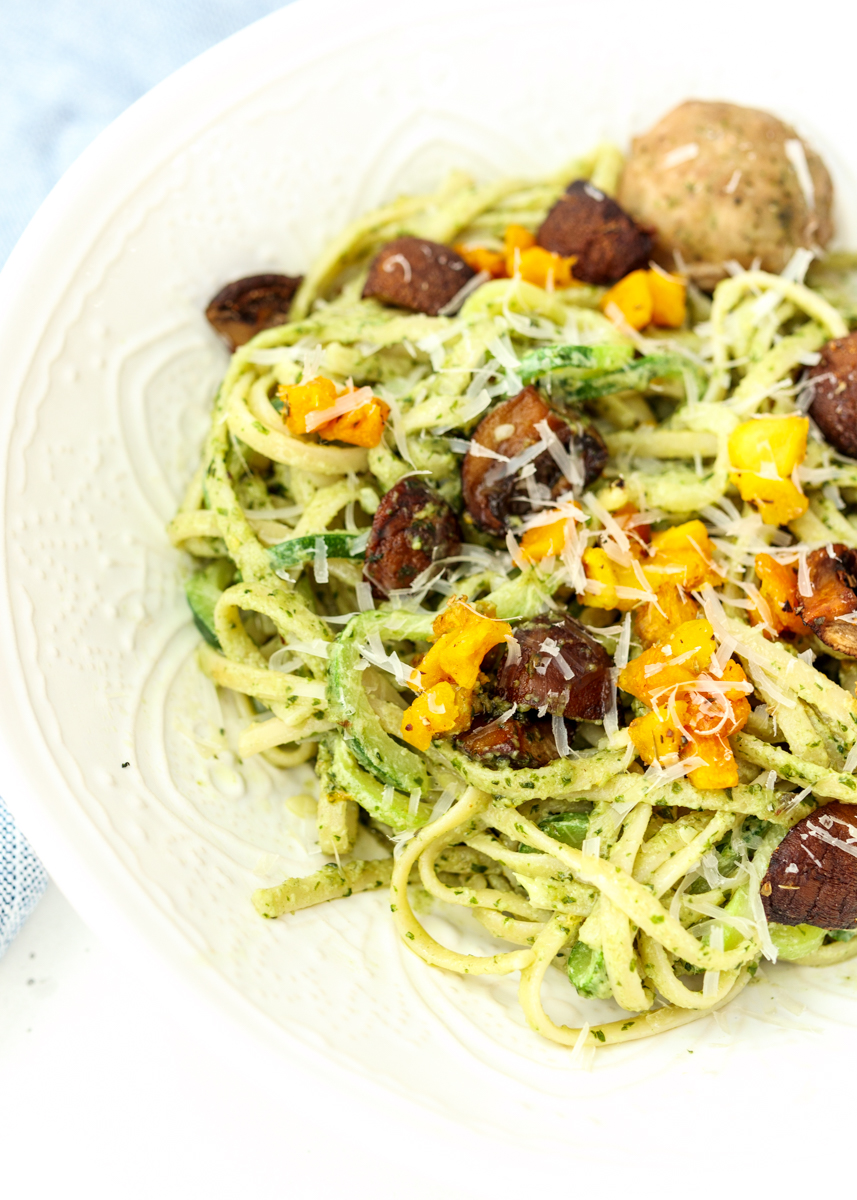
I also used a mix of spaghetti and zucchini noodles to sneak in even more vegetables. You can spiralize the zucchini yourself or pretty much every grocery store now sells spiralized vegetable noodles. The best part is that you just throw them into the water when the pasta is almost done cooking so it could not be easier to add zucchini noodles into your pasta dishes. You could keep the meal vegetarian, but I served it alongside my Baked Pesto Turkey Meatballs – love those!

Winter Pesto Pasta  |  Lemon & Mocha

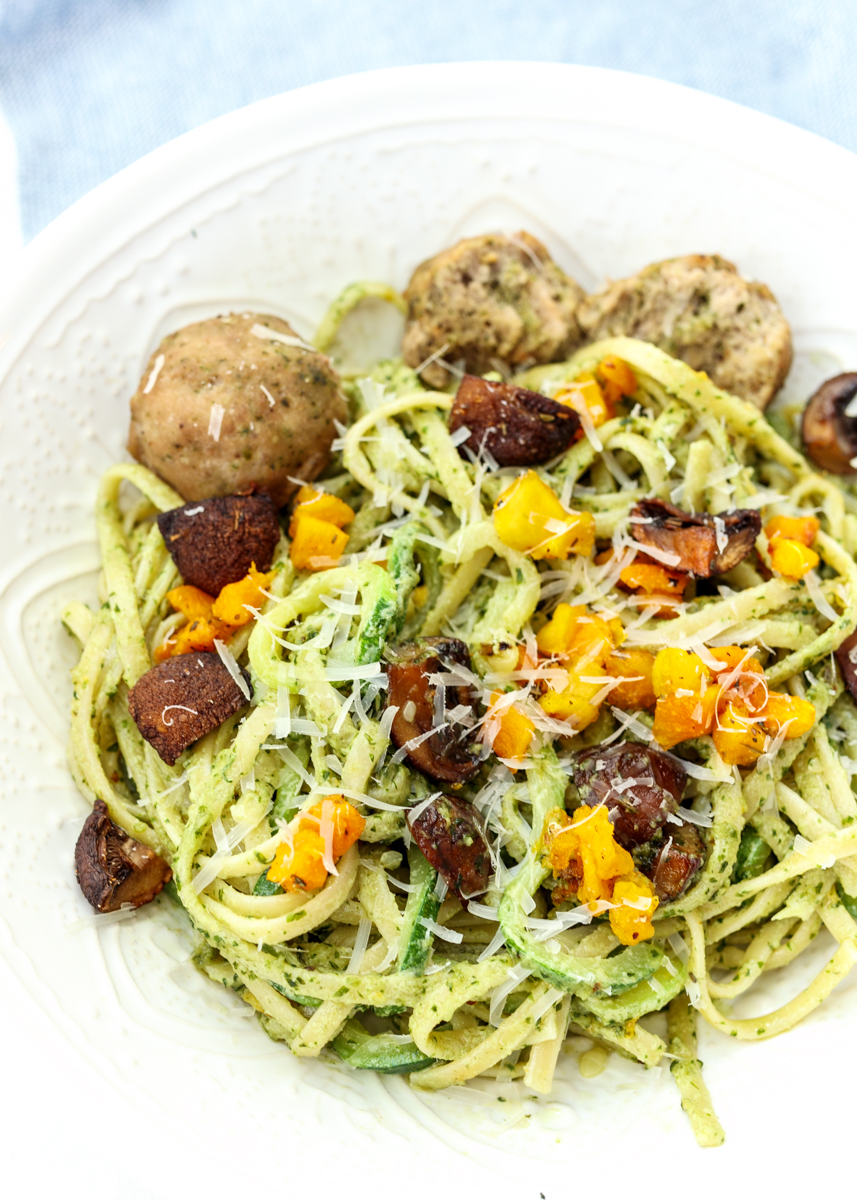
The star of the whole dish, though, is the quick and easy homemade pesto. I love tomato sauce, but we are both way more into pesto around here. My favorite seed butter company, 88 Acres, which is a local Massachusetts company, sent me some of their new products to try in exchange for sharing them on Instagram. The exchange didn’t involve my blog at all; I’m purely sharing this here because their new product prompted me to discover my new favorite homemade pesto hack.

Winter Pesto Pasta  |  Lemon & Mocha

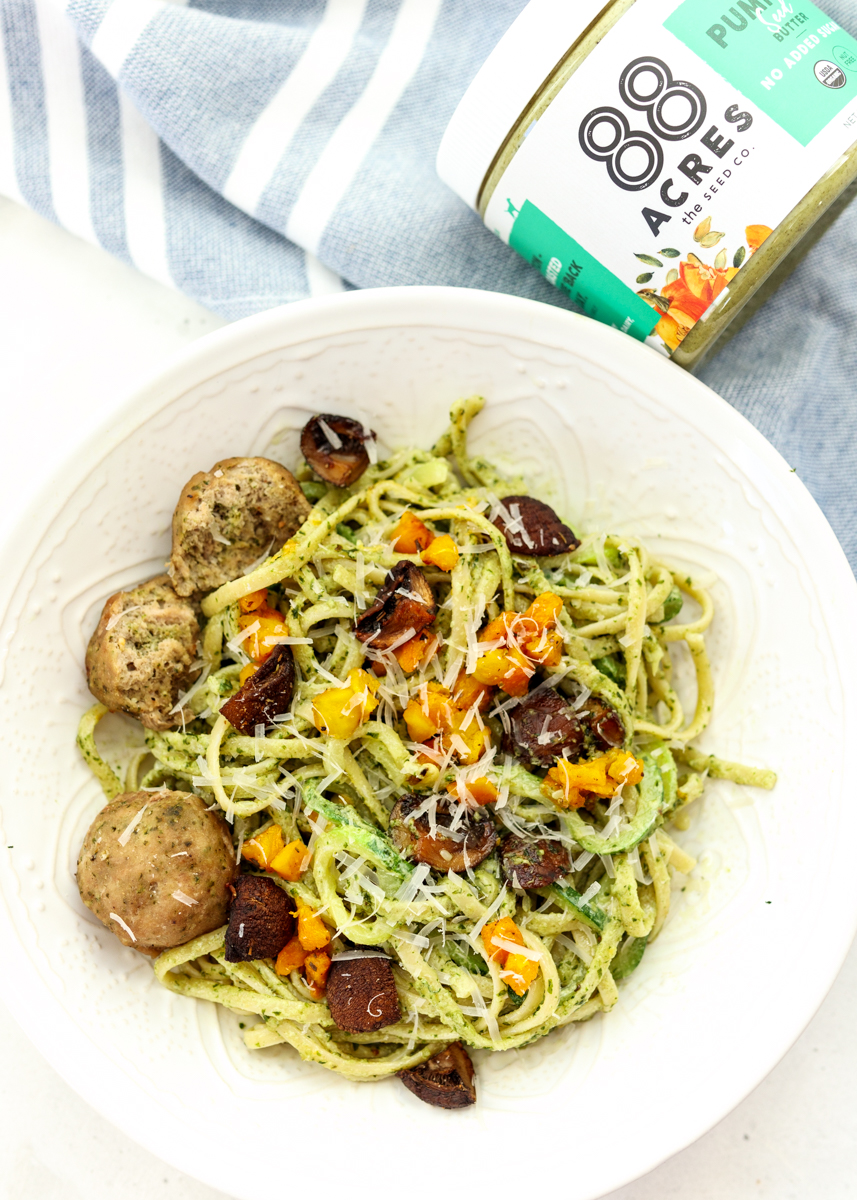
Instead of grinding down seeds or nuts to use in the pesto, I just used some of their new no-sugar added pumpkin seed butter. I combined the pumpkin seed butter, basil, Parmesan, garlic powder, a little olive oil and some salt to taste. It was creamy, flavor-packed and saved me from having to buy pricey pine nuts.

Winter Pesto Pasta  |  Lemon & Mocha

I’m excited to try this new hack with other seed butters! I would recommend using one that has no-sugar added though to avoid adding sugar to your pesto. You could also try making this pesto with roasted pumpkin seeds and adding more olive oil, which I’m sure would be really good, too. Do you like experimenting with different types of pesto or do you have a go-to one you make all the time?

Winter Pesto Pasta  |  Lemon & Mocha

Winter Pesto Pasta
 
Yield: 2 servings
Ingredients
  • 1 cup small diced butternut squash
  • 6 medium whole cremini mushrooms, stems removed and quartered
  • 2½ tablespoons olive oil, divided
  • ¼ teaspoon dried oregano
  • ¼ teaspoon garlic powder, divided
  • ⅛ teaspoon salt
  • 4 ounces spaghetti
  • 1 cup fresh basil
  • 2 tablespoons no-sugar added pumpkin seed butter
  • 2 tablespoons fresh grated Parmesan, plus more for topping
  • 1 zucchini, zoodled
  • Baked Pesto Turkey Meatballs, optional
Directions
  1. Preheat the oven to 400 degrees F. Line a baking sheet with nonstick aluminum foil or parchment paper and place the butternut squash cubes and quartered mushrooms in a single layer. Toss the veggies with ½ tablespoon of olive oil then sprinkle with ¼ teaspoon dried oregano, ⅛ teaspoon garlic powder, ⅛ teaspoon salt and some fresh ground black pepper. Roast the veggies for 25 minutes, or until tender and slightly caramelized, tossing once halfway through baking.
  2. Cook the spaghetti according to the package instructions. When the spaghetti is 2 minutes away from being done, toss in the zucchini noodles. Drain the spaghetti and the zucchini noodles together once tender in a colander.
  3. While the water is coming to a boil for the pasta, make the pesto. Combine the basil, Parmesan, pumpkin seed butter, the remaining 2 tablespoons of olive oil, ⅛ teaspoon garlic powder and salt to taste in a food processor. Add more olive oil if needed, about 1 tablespoon more. Pulse until smooth.
  4. When the spaghetti and zucchini noodles have been drained, add them back to the pot along with the pesto, butternut squash and mushrooms. Toss to combine. Serve with fresh grated Parmesan on top and baked pesto turkey meatballs, if desired.


Italian Kale Salad

Italian Kale Salad  |  Lemon & Mocha

Happy Monday, everyone! I hope you all had a great weekend. Matt and I spent the weekend visiting family and we had a food-packed day in Philadelphia on Saturday. If you saw my stories on Instagram then you will know just how much food we consumed! Whenever I have a few days of heavy eating I immediately start craving a salad. The key is that the salad needs to be satisfying enough that you can eat it as your meal and not feel like you need to dive into a bag of chips after.

Italian Kale Salad  |  Lemon & Mocha

This Italian Kale Salad is loaded with all kinds of delicious toppings and the dressing packs the perfect balsamic punch. Along with the kale and radicchio, there’s chickpeas, artichoke hearts, roasted red peppers, red onion and Parmesan.

Italian Kale Salad  |  Lemon & Mocha

I first came up with this salad in December to post for the healthy January we’re doing here and we loved it so much that I served it at Christmas dinner as well. I’ve also made it almost every week since first making it because we just can’t get enough. I actually just ate some for lunch with a soft boiled egg on top for some protein!

Italian Kale Salad  |  Lemon & Mocha

I love kale salads because you can dress them ahead of time and the greens never taste wilted; in fact they often taste even better after sitting for a bit. The key with kale salads, which I talked about previously in my Strawberry Kale Salad with Goat Cheese and Pecans post, is that you need to tear and scrunch the leaves for about five minutes to break the greens down and get rid of their natural bitterness. My Dad and Diane have always said they don’t like the taste of kale, but I am happy to report that they were both fans of this salad at Christmas.

Italian Kale Salad  |  Lemon & Mocha

You could serve this Italian Kale Salad along with dinner or have it as a main dish with some grilled chicken or shrimp on top. I hope you all love this one as much as we do and I cannot wait to share Wednesday’s recipe with you all!

Italian Kale Salad  |  Lemon & Mocha

Italian Kale Salad
 
Yield: 4 servings as a main dish
Ingredients
for the salad
  • 8 ounces kale, thick stems removed
  • 1 cup chopped radicchio
  • ¾ cup chickpeas, drained and rinsed
  • ½ cup canned artichoke hearts, quartered (about 2 artichoke hearts)
  • ⅓ cup chopped roasted red pepper
  • ¼ cup thinly sliced red onion
  • Fresh grated or shaved Parmesan, for topping
for the dressing
  • 3 tablespoons olive oil
  • 1½ tablespoons honey
  • 1½ tablespoons balsamic vinegar
  • 1 tablespoon Dijon mustard
  • ¼ teaspoon Italian seasoning
  • Salt to taste
Directions
for the salad
  1. Make sure all thick ribs and stems are removed from the kale. If the kale isn’t already chopped, roughly chop then place in a large bowl. Tear and massage the kale for about 5 minutes. To massage the kale scrunch it up with both your hands, release, and scrunch up some more, tossing and tearing as you go. This helps tenderize the kale and reduce its bitterness by breaking down the cellulose structure.
  2. Add the radicchio, chickpeas, artichoke hearts, roasted red pepper and onion. Toss to combine. Add the dressing and toss to completely coat. Top with the Parmesan. If you aren’t serving right away, cover and refrigerate until serving. Toss again before serving.
for the dressing
  1. In a small bowl or liquid measuring cup, whisk together the olive oil, honey, balsamic vinegar, mustard and Italian seasoning until combined. Season with salt to taste.
Notes
To roast the red pepper: Spray a baking sheet or aluminum foil covered baking sheet with nonstick cooking spray. Wash and dry the red pepper then place on the baking sheet. Bake at 400 degrees for 20 minutes, flip the pepper over then bake for 20 more minutes. When the pepper is cool enough to handle, remove and discard the skin, stem and seeds. You need roughly 1 whole red pepper for this recipe.


Mushroom Mac and Cheese

Mushroom Mac and Cheese  |  Lemon & Mocha

Today is Lemon & Mocha’s five year anniversary! Can you believe it? Five years ago today I published the first ever Lemon & Mocha blog post and here we are with another first – the first ever mac and cheese recipe on the site! Can you believe that? I can’t decide which thing shocks me more. I think, and anyone who knows me well will agree, that this being the first mac and cheese recipe is the most surprising part of today by far. I am OBSESSED with macaroni and cheese. I have been since I was a kid and I’m equally surprised I haven’t just turned into a big mac and cheese noodle so far. Although not for a lack of trying – check out my Halloween costume from last year!

Mushroom Mac and Cheese  |  Lemon & Mocha

When I was in middle school I would come home from school every day and eat an entire box of Kraft macaroni and cheese. I took my box mac and cheese very seriously, too. I remember one time being at my best friend’s house and telling her mom not to worry, that I would make the box of mac and cheese because I knew the secret way to make it taste best (more butter, less milk, is key!). Nowadays, I’m all about the Annie’s mac and cheese. But what I love most of all is a cheesy, gooey, flavor packed homemade macaroni and cheese.

Mushroom Mac and Cheese  |  Lemon & Mocha

The flavor packed part is really important because a quality mac and cheese needs to be more than just noodles and melted cheese sauce. It has to have depths to its flavors so each bite takes you on a flavor roller coaster. Not a huge upside down one, but like a medium curvy one so just when you think you’ve settled in another flavor curve hits your palate. I usually use multiple types of cheeses and a little dijon mustard in all my homemade mac and cheeses as a start for that extra depth of flavor.

Mushroom Mac and Cheese  |  Lemon & Mocha

This mushroom version is some next level mac and cheese though since it’s loaded with umami. If you aren’t familiar with the term, check out my Balsamic Roasted Mushrooms post! We’re sautéing both cremini and shiitake mushrooms in shallots and garlic before putting them in the dish so they’ve reached their peak deliciousness. We’re also using dried mushrooms, which get re-hydrated in some warm water before being sautéed. The reason we do this is so we create a rich mushroom liquid that we use right in the Mushroom Mac and Cheese. This lets rich mushroom flavor permeate every bite, even if you don’t get an actual piece of mushroom.

Mushroom Mac and Cheese  |  Lemon & Mocha

I’ve made this mac and cheese in the past, but this most recent time Matt and I couldn’t get enough of it. The minute I took my last photo I grabbed a fork and started eating it right from the serving bowl – smelling it while photographing had been tortuous! We didn’t want to eat it all over the weekend because it’s, you know, not the healthiest, so I froze a container of it. Needless to say, that container promptly got defrosted the next night!

Mushroom Mac and Cheese  |  Lemon & Mocha

I can’t believe this is the first macaroni and cheese recipe I’m posting on Lemon & Mocha, but I promise it won’t be my last. Also, how many times did I just type mac and cheese? It must be my favorite word combination. Thank you all so much for continuing to follow this journey with me! As much as I pour my heart into my cooking, I equally pour my heart into my writing each week and connecting with everyone in this tiny online space brings me so much joy. So thank you, thank you, thank you!

Mushroom Mac and Cheese  |  Lemon & Mocha

Mushroom Mac and Cheese
 
Yield: 6-8 servings
Ingredients
  • ½ ounce dried shiitake mushrooms
  • 1 cup hot water
  • 1 pound dried medium shell pasta
  • 5 tablespoons unsalted butter, divided
  • 1 tablespoon olive oil
  • 1 large shallot, minced
  • 2 cloves garlic, minced
  • 10 ounces whole cremini mushrooms, stems removed and chopped
  • ½ teaspoon dried oregano
  • 3 tablespoons flour
  • ¼ cup white wine
  • 2 cups whole milk
  • 2 cups shredded gruyere cheese
  • 1½ cups shredded fontina cheese, divided
  • 1 cup shredded sharp or smoked cheddar cheese
  • 1 tablespoon dijon mustard
  • Salt and pepper
Directions
  1. Submerge the dried mushrooms in the hot water. Let sit for 30 minutes to 1 hour. When they are done, remove them from the water, squeeze them out, then chop and place with the other chopped mushrooms. Make sure to reserve the mushroom stock.
  2. Preheat the oven to 375 degrees F. Lightly spray a 9x13” baking pan with nonstick cooking spray and set aside.
  3. Cook the pasta to al dente according to the box instructions. Drain.
  4. Heat 2 tablespoons of the butter and the olive oil in a large skillet over medium-high heat. Sauté the shallot and garlic for 1-2 minutes. Add the chopped cremini and shiitake mushrooms. Add the dried oregano and season with salt and pepper. Sauté until the mushrooms have stopped releasing liquid and are browned. Set aside.
  5. In a large dutch oven or stock pot, melt the remaining 3 tablespoons of butter over medium-low heat. Add the flour and cook for about 3 minutes, whisking constantly. The roux should be slightly darkened. Add the white wine, whisk to combine and let cook for 1 minute. Add the milk and whisk. Once the milk has warmed, add 2 cups shredded gruyere, 1 cup shredded fontina and 1 cup shredded cheddar, whisking after each addition. Once smooth, add 3 tablespoons of the mushroom stock (the water the dried mushrooms were in), the mustard and the cooked mushroom mixture. Stir to combine. Add the cooked pasta and stir to completely coat. Taste and season with salt and pepper as needed.
  6. Pour the mac and cheese into the prepared baking pan. Sprinkle the remaining ½ cup shredded fontina cheese on top. Bake for 20 minutes.


Maple Apple Grilled Cheese

Maple Apple Grilled Cheese  |  Lemon & Mocha

Happy Friday, friends! It seems only right to celebrate the upcoming weekend with something ooey, gooey and cheesy. Since it’s already October we can’t forget the fall flavors either! This grilled cheese is loaded with tart granny smith apple slices, a sweet and spicy maple mustard and some maple smoked cheddar. I only have one other grilled cheese recipe on Lemon & Mocha and while the Hobo Egg Grilled Cheese is an epic sandwich, it’s about time I shared some more cheesy goodness.

Maple Apple Grilled Cheese  |  Lemon & Mocha

This grilled cheese has been in motion ever since I bought some spicy maple mustard and some maple smoked cheddar cheese. Pemberton Farms is a local market and nursery Matt and I like to go to and mid-summer we went on a Saturday to buy a bunch of flowers and bushes. We never have an issue parking there, but there was a line to get in the parking lot. We circled the block before finally finding a street spot and headed in to see that they were having a customer appreciation day complete with dozens of local vendors giving away samples of food, beer, wine and spirits. There was even free barbecue in the parking lot and a live band in the outdoor nursery! Needless to say, it was a bad day to try and buy flowers, but a perfect day to eat some free food and chat with local vendors.

Maple Apple Grilled Cheese  |  Lemon & Mocha

I tried this maple smoked cheddar from Grafton Village Cheese that was creamy with a little sweetness from the maple and had a nice smoky flavor. I commented that the cheese would be really good on a grilled cheese with apples and the woman at the vendor booth said she loves making them with April’s Maple spicy maple mustard. I knew she was onto something so we bought both the cheese and the mustard. I’ve been waiting a while to make this grilled cheese since I wanted to make it in the fall and it was definitely worth the wait. Although I most likely won’t be waiting weeks to have it again!

Maple Apple Grilled Cheese  |  Lemon & Mocha

Since April’s Maple is really local I wrote in the recipe for you to make your own maple mustard with equal parts spicy mustard and pure maple syrup, but if you spot April’s Maple products near you I definitely recommend trying them out! If you can’t find the Grafton Village maple smoked cheddar (although I noticed online that Wegman’s seems to carry it, even in some non-local towns), you can substitute with any smoked cheddar, smoked gouda or a sharp cheddar.

Maple Apple Grilled Cheese  |  Lemon & Mocha

Other than the outrageous fall flavors inside, the key to a perfect grilled cheese is how you cook the outside. My two biggest tips are 1) cook it low and slow so the cheese has plenty of time to melt and 2) spread mayonnaise on the outside of your bread. Yes, mayonnaise! I first learned this trick from Roxy’s Grilled Cheese, which is a Boston food truck. The mayo gets cooked off, but it creates a perfectly browned and crunchy outside to your grilled cheese. Every bit of that outside bread gets a very thin coat of the mayo making sure that the entire surface area of that bread will get browned in the pan. Definitely try this one!

Maple Apple Grilled Cheese  |  Lemon & Mocha

Maple Apple Grilled Cheese
 
Yield: 1 grilled cheese
Ingredients
  • 1½ teaspoons Dijon or spicy mustard
  • 1½ teaspoons pure maple syrup
  • 2 slices sourdough bread
  • 2 teaspoons mayonnaise
  • 3 ounces maple smoked cheddar, sliced
  • 6 thin slices of granny smith apple, about ¼ of a large apple
Directions
  1. In a small bowl, combine the mustard and maple syrup. Spread over the inside of one of the slices of sourdough bread.
  2. Heat a nonstick frying pan over medium-low heat. Spread 1 teaspoon of the mayonnaise on the other side of the bread you spread the maple mustard on. Place the bread in the frying pan, mayonnaise side down. Next evenly place the slices of cheese on top of the mustard then evenly place the slices of apple. Spread the other teaspoon of mayonnaise on the outside of the second slice of bread and place that slice of bread, mayonnaise side up, on top of the sandwich stack. Cover the grilled cheese with a pot lid big enough to cover it.
  3. Cook until the cheese melts then carefully flip. This will depend on how thin you sliced your cheese, but mine cooked on medium-low for 7 minutes. Once you flip the grilled cheese leave it uncovered. Turn up the heat to medium-high and cook just until the bottom bread gets browned and crispy, about 1-2 minutes. Remove from the pan, let cool for a minute or two, then cut and enjoy!
Notes
If you can’t find maple smoked cheddar, use smoked cheddar. If you can’t find smoked cheddar you can substitute with smoked gouda or sharp cheddar.


Barbecue Jackfruit Tacos

Barbecue Jackfruit Tacos  |  Lemon & Mocha

Before I dive into how I came up with this recipe or start describing what it tastes like I first need to address the obvious question: what is jackfruit? I did not know the answer to this until a couple months ago. Technically, jackfruit is a relative of figs and is indeed a fruit. However, the more relevant answer is that it has the texture of chicken and while the fruit is young it has a neutral taste letting it take on the flavor of whatever sauce you slather over it. For these two reasons, in the last year or so jackfruit has become increasingly popular as a meat alternative for vegans and vegetarians. Now, it is important to note that the flesh of the jackfruit does not have much protein at all so I would recommend serving it alongside something high in protein, such as this Three Bean and Roasted Cauliflower Salad.

Barbecue Jackfruit Tacos  |  Lemon & Mocha

Jackfruit is, however, low in calories, and I can definitely see why it is popular as a meat alternative. Once I shredded up this jackfruit and cooked it in some barbecue sauce, it looked exactly like pulled pork. Matt thought it was pulled pork when I served it and after he took a bite – and after me telling him it was jackfruit – he looked at me and said, “You’re sure this isn’t pork?” While it doesn’t have the richness of pork, the texture is almost identical to a pulled chicken or pork and smothered in barbecue sauce no one would ever be the wiser.

Barbecue Jackfruit Tacos  |  Lemon & Mocha

I had heard of jackfruit, but got the opportunity to try it a couple months ago at our Whole Foods. They had it in the burrito bar and let me try a sample. I loved the texture, but it was too spicy for me. I decided I needed to do more research and make my own version so I could enjoy it. Remember how the Elote Hot Dogs came to be? I think I’m noticing a pattern here with my inability to consume spicy foods…

Barbecue Jackfruit Tacos  |  Lemon & Mocha

Anyways, I discovered that you can buy jackfruit in a can. I got mine from Trader Joe’s. What you are looking for is green jackfruit. Make sure you do not buy the one that comes in syrup. The one from Trader Joe’s comes in a brine instead of water so I just made sure I rinsed them well before cutting. For cutting tips check out my little diagram below.

Barbecue Jackfruit Tacos  |  Lemon & Mocha

After it’s all cut up, the jackfruit gets cooked down with some onion, garlic and barbecue sauce before being shredded and loaded up onto tortillas. I made a quick and healthy slaw for the tacos with nonfat Greek yogurt to balance the flavors of the barbecue sauce. You can use any barbecue sauce you prefer, but I highly recommend my easy homemade barbecue sauce that is free of refined sugar.

Barbecue Jackfruit Tacos  |  Lemon & Mocha

Matt and I both really enjoyed these tacos and I’m looking forward to making them again soon! Have any of you tried jackfruit before?

Barbecue Jackfruit Tacos  |  Lemon & Mocha

Barbecue Jackfruit Tacos
 
Yield: 6 servings, 12 mini tacos
Ingredients
for the tacos
  • 2 20-ounce cans jackfruit
  • 1 teaspoon olive oil
  • ½ small red onion, chopped
  • 1 clove garlic, minced
  • ¼ cup water
  • 1 cup barbecue sauce
  • 12 6-inch tortillas, warmed
for the slaw
  • 2 cups shredded cabbage or slaw mix
  • ¼ cup plain nonfat Greek yogurt
  • 1 tablespoon chopped parsley
  • 1 teaspoon lime juice
  • ½ teaspoon Worcestershire
  • ¼ teaspoon salt
  • ⅛ teaspoon garlic powder
  • ⅛ teaspoon onion powder
  • ⅛ teaspoon paprika
  • Ground black pepper
Directions
for the tacos
  1. Prepare the jackfruit. If your jackfruit is in brine instead of water make sure you rinse it well in a colander then dry completely before cutting. Cut following the diagram pictured above: place a wedge of the jackfruit on a cutting board so the narrow edge is closest to you. Slice from the wide curved edge down to the narrow edge so you have about 5 or so smaller wedges. This will make it easier for shredding later.
  2. Heat the olive oil in a rimmed skillet or medium stock pot over medium-high heat. Add the onion and garlic and sauté until the onions start to turn translucent, about 3 minutes. Reduce the heat to medium then add the jackfruit and the water. Stir and cook for a couple minutes. Add the barbecue sauce, stir, then turn down the heat to low, cover and let simmer for 20 minutes. Remove from the heat and serve over the warmed tortillas topped with the slaw.
for the slaw
  1. Combine all the ingredients in a medium mixing bowl. Season with ground black pepper to taste.