Recipes

Pineapple Barbecue Chicken Foil Packets

Pineapple Barbecue Chicken Foil Packets  |  Lemon & Mocha

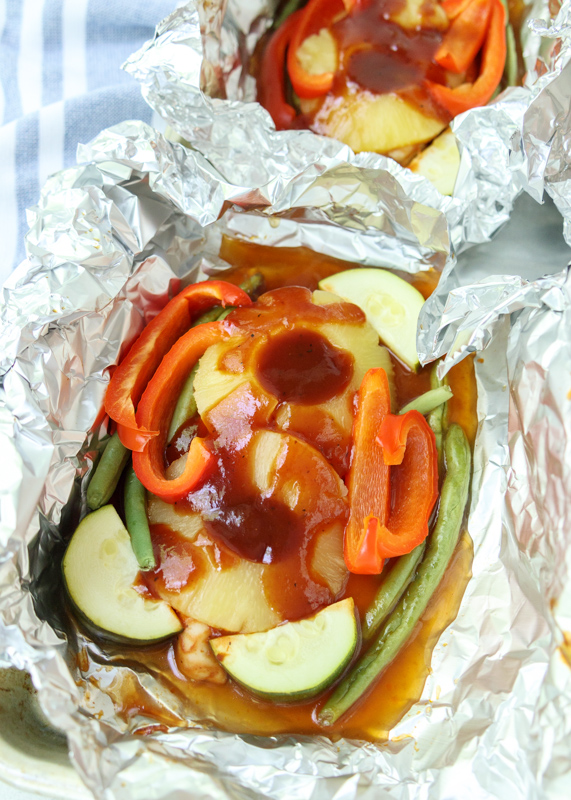
It’s finally Friday! To celebrate I’m sharing these Pineapple Barbecue Chicken Foil Packet. Yes, I know it seems weird to celebrate with a chicken dish, but this dish is worth celebrating. Remember when I posted the Barbecue Chicken Stuffed Sweet Potatoes and I said the healthy homemade barbecue sauce was so good you would be seeking out recipes to put it on? Well, that’s what I’ve been doing! Have you tried my barbecue sauce yet? No?? Make it this week! I promise it’s so delicious you will be shocked you’ve never made homemade barbecue sauce before. You will also be very, very happy to eat it without any guilt since there’s no refined sugar or preservatives.

Pineapple Barbecue Chicken Foil Packets  |  Lemon & Mocha

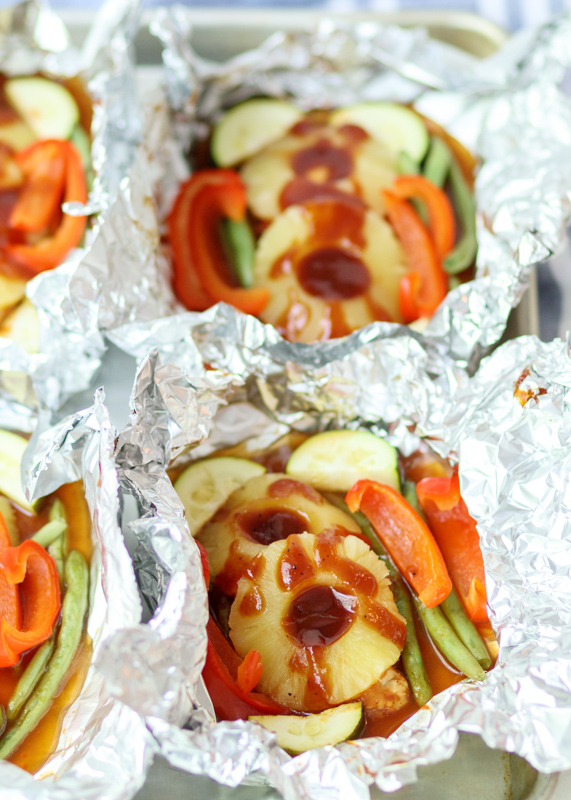
Barbecue and pineapple is such a classic pairing that I had to stick the two together for these foil packets. I also loaded them with veggies so you could have a quick and easy all-in-one meal. Cooking in a foil packet is a great way to keep everything inside moist as it cooks. All the sauces and juices get trapped in the packet, which helps concentrate the flavor and make everything tender.

Pineapple Barbecue Chicken Foil Packets  |  Lemon & Mocha

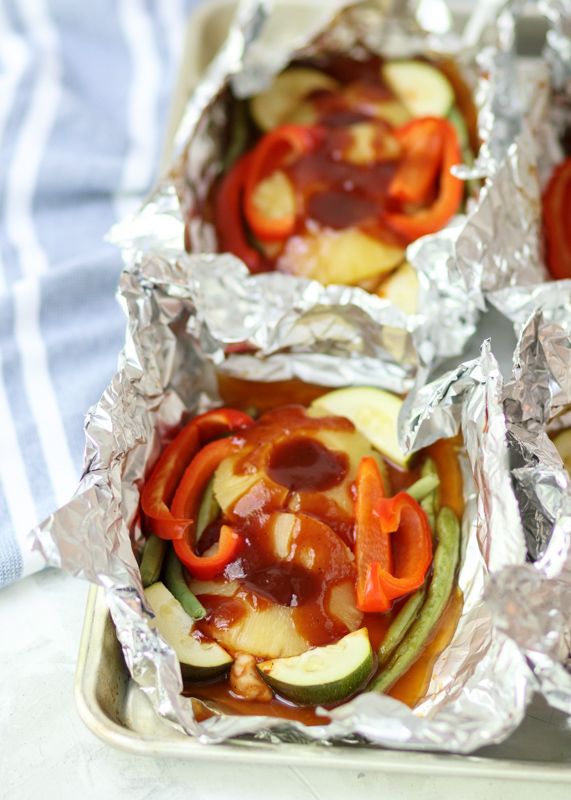
I used green beans, red bell pepper and zucchini for some variety, but you can swap with your favorite seasonal vegetables. Just make sure they aren’t so big that they might not steam through, like big florets of broccoli, or too small that they will turn to mush, like really thin asparagus.

Pineapple Barbecue Chicken Foil Packets  |  Lemon & Mocha

Another advantage to cooking in a foil packet is that clean up couldn’t be easier! On a side note, I’ve been wondering about the impact my aluminum foil usage in the kitchen is having on the environment so I did some research. This article from The Kitchn explains that a lot of towns will accept aluminum foil in the recycling bin if it’s been rinsed and they have a link to check to see if your town or city allows you to toss rinsed foil in with your single stream recycling. So awesome! Unfortunately my town excludes aluminum foil from recycling, but many of the towns I checked do so hopefully mine will soon as I would happily rinse and recycle my foil, which is still a super easy cleanup! In the meantime, I’m going to start rinsing and reusing my foil to cut back on my waste. Any bit helps!

Pineapple Barbecue Chicken Foil Packets  |  Lemon & Mocha

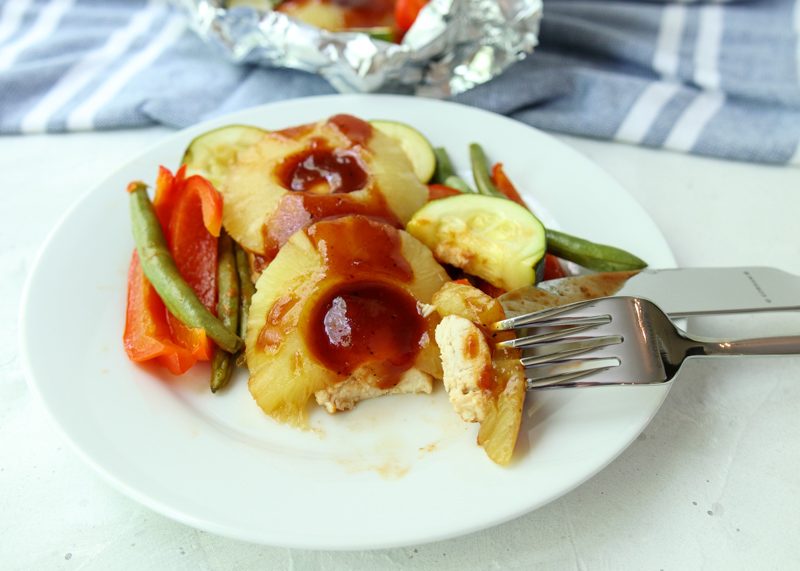
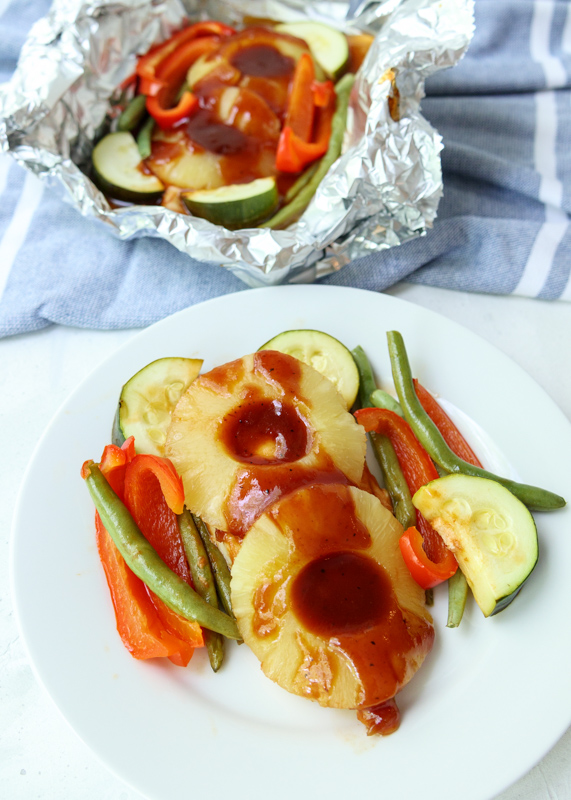
Okay, back to this sweet and juicy chicken dish! You can eat it as a meal in-itself like Matt and I did, or it would also be fantastic with some rice. If you don’t have too much leftover liquid in your packets (see the recipe – the zucchinis and chicken release some water and juices) then you could serve the rice family style and just let everyone scoop some into their packets. This is a great way to serve a healthy chicken dish for a crowd because you can prep all the packets ahead of time and just throw them in the oven when everyone arrives. I hope you all have a fabulous weekend – and don’t forget to try this barbecue sauce!

Pineapple Barbecue Chicken Foil Packets  |  Lemon & Mocha

Pineapple Barbecue Chicken Foil Packets
 
Yield: 4 servings
Ingredients
for the chicken
  • 1 pound boneless skinless chicken breasts, cut into 4 thin portions
  • ⅔ pound green beans
  • 1 red bell pepper
  • ½ zucchini
  • 8 sliced rings of pineapple
for the barbecue sauce
  • 1 small can tomato paste, about 6 ounces
  • 1 cup water
  • 2 tablespoons apple cider vinegar
  • 4 teaspoons molasses
  • 4 teaspoons Worcestershire sauce
  • 4 teaspoons maple syrup
  • 2 teaspoons dijon mustard
  • 1 teaspoon onion powder
  • 1 teaspoon garlic powder
  • ½ teaspoon paprika
  • ¼ teaspoon salt
  • ¼ teaspoon ground black pepper
Directions
for the chicken
  1. Preheat the oven to 350 degrees F. Lay out 4 pieces of aluminum foil that are big enough to completely seal in the chicken, set aside.
  2. Prep the veggies. Trim the green beans. Cut the bell pepper into slices about ½” to ¾” thick. Cut the zucchini into thick rounds then halve.
  3. Season the chicken with salt and pepper. Put 1 breast on each piece of aluminum foil and slightly fold up the sides so nothing with spill out. Divide the green beans, red pepper slices and zucchini wedges between the 4 packets, nestled the vegetables on either side of the chicken. Top the chicken with some barbecue sauce, making sure to save some for serving. Then place 2 pineapple rings on each chicken breast. Fold up the foil packets to tightly seal, place the packets on a baking sheet and bake for 20-25 minutes, or until the chicken reaches an internal temperature of 165 degrees F.
  4. When opening the packets, be very careful because of the steam and the hot liquid in the packets. There will be liquid from the chicken and the zucchini. Remove the contents of each packet to a plate, top with additional barbecue sauce and serve.
for the barbecue sauce
  1. Combine all the ingredients in a small saucepan. Bring to a boil then reduce to low heat, cover and simmer for 15 minutes, stirring occasionally. Remove from the heat.
Notes
For the chicken, I halved 2 chicken breasts lengthwise to get 4 thin breasts.
You can grill these foil packets instead of baking them if you would prefer. I have not tried grilling them so I’m not sure on the exact timing it would take, but make sure to flip it halfway through - and that your foil packet is sealed extra tight!


Red, White & Blue Spinach Salad

Red, White & Blue Spinach Salad  |  Lemon & Mocha

Happy Wednesday everyone! I just had the best week with my Aunt Elaine, Uncle Pete and goddaughter, Mikaila. They came to visit Matt and I for a few days last week and we spent two packed days exploring Boston. I’ve lived here my whole life and learned all kinds of things I never knew about our city. I also discovered a store on Newbury Street with the cutest patterned dresses and tops – priorities!

Red, White & Blue Spinach Salad  |  Lemon & Mocha

Their visit got me even more excited for my family’s annual beach week; if that’s even possible. For those of you that don’t know, every year my extended family has a beach week down at the Delaware shore. Last year my Aunt Dottie made a salad for lunch to bring to the beach and it was so pretty I had to take a photo and post it on Instagram. When I was trying to think of something healthy and refreshing to post for 4th of July next week I immediately remembered my aunt’s salad.

Red, White & Blue Spinach Salad  |  Lemon & Mocha

This is a Red, White and Blue Spinach Salad loaded with sliced turkey, strawberries, blueberries and feta cheese. You can easily customize it to your own preferences by swapping grilled chicken for the turkey – or even leaving it meatless. Same with the berries and cheese. Not a feta fan? Use goat cheese or mini mozzarella balls. Swap raspberries for the strawberries and blackberries for the blueberries! It’s totally up to you.

Red, White & Blue Spinach Salad  |  Lemon & Mocha

The best part about this salad, both for how it makes it look and how it makes it taste, is the berry balsamic vinaigrette. I love the rich color the dressing gets from the berries. I especially love that you can really taste the berry flavor in the dressing and it pairs so well with the balsamic vinegar. If your berries are really ripe and sweet you might not even need the agave or honey as an additional sweetener.

Red, White & Blue Spinach Salad  |  Lemon & Mocha

The dressing has only five ingredients and could not be any easier – or more delicious! Toss it with the spinach salad and you’ll have some berry happy 4th of July guests. Sorry, I couldn’t resist! So go ahead and use all the berries to enjoy this salad all summer long!

Red, White & Blue Spinach Salad  |  Lemon & Mocha

Red, White & Blue Spinach Salad
 
Yield: 6 servings
Ingredients
for the salad
  • 10 ounces spinach
  • 12 slices deli turkey meat (about 12 ounces)
  • 1 cup quartered strawberries
  • ¾ cup blueberries
  • ¾ cup feta cheese
for the dressing
  • ¼ cup plus 1 tablespoon olive oil
  • 2 tablespoons balsamic vinegar
  • ½ cup quartered strawberries
  • ¼ cup blueberries
  • 1 teaspoon agave or honey, if needed
  • Salt and pepper to taste
Directions
for the salad
  1. Place the spinach in a serving bowl. Rip or cut the deli turkey into pieces. Top with the strawberries, blueberries, feta cheese and turkey.
for the dressing
  1. Place all the ingredients in a high speed blender and blend until combined, about 40 seconds. If your fruit is very ripe and sweet you may not even need the agave or honey - give it a taste without it first if you would like then add if you feel it’s needed. If you want to strain out the blueberry and strawberry seeds you can using a fine mesh strainer, but they didn’t bother Matt or I. Season with salt or pepper to taste. Feel free to thin out the dressing more with some olive oil if desired. Drizzle over the salad or serve alongside the salad when ready to eat.
Notes
If not serving right away, wait to put on the quartered strawberries and turkey. The dressing is best the day it is made.


4th of July Tie-Dye White Texas Sheet Cake

4th of July Tie-Dye White Texas Sheet Cake

I’m back with my annual 4th of July red, white and blue dessert! This year I decided to switch it up. As much as I love berries, they can get expensive, especially if you are cooking for a crowd. Also, berry desserts can sometimes be tricky to make ahead. Instead, I made a tie-dye white Texas sheet cake loaded with red, white and blue batter and tons of festive sprinkles.

4th of July Tie-Dye White Texas Sheet Cake

I’m surprised I’ve kept it together this far into my post because I am SO EXCITED about this cake! I will try to explain to you how buttery and moist this vanilla cake is, but I know I won’t be able to do it justice. It tastes like funfetti box mix cakes, but with no box mix involved. Check out the photos and look at those big crumbs! Yum!

4th of July Tie-Dye White Texas Sheet Cake

The vanilla icing slightly hardens on top and the thin layer of icing creates the perfect frosting to cake ratio since the cake is also very thin. The thin layer of icing is also good because it is definitely sweet. This cake is for all the butter and sugar lovers out there! Any baked good is dangerous around me, but this sheet cake was especially addictive.

4th of July Tie-Dye White Texas Sheet Cake

This is the best type of cake to make for a crowd because the cake is the size of a standard jelly roll pan or half sheet pan. Matt and I ate some, then I gave away multiple slices each to six of my girl friends and I STILL had a whole bunch that I packaged for the freezer! If you do have leftovers it does freeze well, but if you bring this cake to a big party I promise you there will be nothing left!

4th of July Tie-Dye White Texas Sheet Cake

The tie-dye batter was really easy and didn’t add much extra time. I divided the batter into three bowls and left one white while dying the other two red and blue. I then poured the white batter into the prepared sheet pan and smoothed it out. Then I drizzled the red batter followed by the blue batter and swirled it all around with a butter knife. Ta-da! Red, white and blue tie-dye cake batter!

4th of July Tie-Dye White Texas Sheet Cake

The 4th of July sprinkles and mini flags definitely give it that extra patriotic look though – you can find those here and here. I cannot wait for you all to try baking this cake! Make sure to save me a slice ;-).

4th of July Tie-Dye White Texas Sheet Cake

4th of July Tie-Dye White Texas Sheet Cake
 
Yield: 16-20
Ingredients
for the cake
  • 2 cups flour
  • 2 cups sugar
  • 1 teaspoon baking soda
  • 2 large eggs, beaten
  • ½ cup yogurt, see note
  • 1 teaspoon vanilla extract
  • 1 cup unsalted butter
  • 1 cup buttermilk
  • ½ teaspoon salt
  • Red and blue food coloring
for the frosting
  • 4½ cups powdered sugar
  • ¼ teaspoon salt
  • ½ cup unsalted butter
  • ¼ cup milk
  • ½ teaspoon vanilla extract
Directions
for the cake
  1. Preheat the oven to 375 degrees F. Grease a half sheet pan, 13” x 18”. Set aside.
  2. In a large bowl, sift together the flour, sugar and baking soda. Add the beaten eggs, yogurt and vanilla then stir until just combined.
  3. In a small saucepan, melt the 2 sticks of butter over medium heat. Add the buttermilk and salt. Bring to boil, removing from the heat as soon as it starts to boil. Let cool slightly then pour into the flour mixture. Stir until just combined and smooth.
  4. Pour ⅓ of the batter in a bowl, ⅓ of the batter in a second bowl and leave the remaining ⅓ in the original bowl. Use food coloring to dye the batter in one bowl red and the other bowl blue. Leave the third one as is. Pour the batter you didn’t dye into the prepared sheet pan. Smooth into an even layer. Pour the blue batter over the white batter. I zigzagged back and forth. Repeat with the red batter. Using a butter knife, lightly swirl the batters around. Don’t over-mix or they will be one color instead of tie-dye.
  5. Bake for 20-22 minutes, or until a toothpick inserted in the center comes out clean. Let cool in the pan on a wire cooling rack for 20 minutes. Meanwhile, while the cake is cooling make the frosting (the frosting needs to be added when the cake is still a little warm).
for the frosting
  1. Sift the powdered sugar into a medium mixing bowl then mix in the salt.
  2. Melt the butter in a small saucepan over medium heat. Once melted, add the milk and bring to a boil, removing from the heat as soon as it starts to boil. Stir in the vanilla extract. Pour the butter mixture into the bowl with the powdered sugar. Stir until smooth. If it’s too thick, add a little more milk. Pour over the cake as soon as it has cooled for 20 minutes and spread in an even layer. Try to do this quickly as the frosting will start to set as soon as you start spreading it.
Notes
You can use any plain yogurt. Vanilla might also be okay, but I haven’t tried it with that. I used nonfat plain Greek yogurt. If you do not want to use yogurt you could also substitute sour cream.
To make your own buttermilk pour 1 tablespoon of lemon juice or vinegar (I like to use lemon juice) in a liquid measuring cup then add enough milk to equal 1 cup. The fat percentage of the milk does not matter - I use nonfat milk. Let sit for 5-10 minutes before using in the recipe.
The fat percentage of the milk in the frosting does not matter. I used nonfat milk.

Recipe adapted from Genius Kitchen.

Some of the links above are affiliate links, which means I may receive a small commission for my referral. This does not affect the retail cost of the item. Thank you for supporting Lemon & Mocha!

Sweet Potato Salad

Sweet Potato Salad  |  Lemon & Mocha

I am a little addicted to this Sweet Potato Salad. This inspiration came from the restaurant chain Not Your Average Joe’s. I’m not sure if you have one in your state, but we have a few here in Massachusetts and Matt and I are hooked. Last summer they had a limited time barbecue menu and one of the sides was a sweet potato salad. When I asked our waitress about the special sides she started raving about the sweet potato salad so I figured I would give it a shot.

Sweet Potato Salad  |  Lemon & Mocha

It was amazing! It was incredibly flavorful, a little tangy, a little sweet and I couldn’t stop eating it! The next day at work I started telling people that they had to go and order it because it was that good. This summer I haven’t seen it back on their menu yet so I set out to recreate the recipe. Just like the one I had at Not Your Average Joe’s, I couldn’t stop eating this potato salad!

Sweet Potato Salad  |  Lemon & Mocha

I knew the base of the dressing wasn’t all mayonnaise since it had a rich tanginess to it, so I added some buttermilk. The mustard seeds give it a great crunch and the celery salt and smoked paprika bring a ton of flavor. I added in hard boiled eggs and scallions because I remembered them from the original dish and I love both those ingredients in my potato salads. I don’t like spicy food so I put in the teeniest tiniest pinch of chili powder, but you can definitely add more if you want a bit of a kick in your salad.

Sweet Potato Salad  |  Lemon & Mocha

One of my favorite parts of this Sweet Potato Salad is that it tastes even better the next day making it the perfect make ahead side dish for 4th of July, potlucks and summer barbecues. I hope you all have a fantastic weekend and enjoy this Sweet Potato Salad!

Sweet Potato Salad  |  Lemon & Mocha

Sweet Potato Salad
 
Yield: 8 servings
Ingredients
  • 2 pounds sweet potatoes, peeled and cubed
  • 2 hard boiled eggs, chopped
  • 3 scallions, sliced
  • ⅓ cup mayonnaise
  • ¼ cup buttermilk
  • 1 tablespoon plus ½ teaspoon apple cider vinegar
  • 1 tablespoon parsley leaves, chopped
  • 2 teaspoons Dijon mustard
  • ¾ teaspoon mustard seeds
  • ½ teaspoon celery salt
  • ¼ teaspoon smoked paprika
  • Pinch of chili powder, optional
Directions
  1. Put the cubed sweet potatoes in a large sauce pan then cover with water. Add 1 teaspoon salt to the water. Bring to a boil over medium high heat then reduce to simmer for 10-15 minutes until the potatoes are cooked through. Drain the potatoes, rinse with cold water, then let drain until dry. Place in a large mixing bowl and let cool. Once cool add the chopped hard boiled eggs and sliced scallions.
  2. Mix together the dressing. In a medium bowl or liquid measuring cup, whisk together the mayonnaise, buttermilk, apple cider vinegar, parsley, Dijon, mustard seeds, celery salt, smoked paprika and chili powder, if using. Pour over the potatoes and carefully stir until coated. Let sit in the fridge for at least 30 minutes. Give it a stir before serving. It tastes even better the next day.
Notes
If you don't want to buy buttermilk you can make your own with regular milk. Put a little less than a teaspoon of lemon juice (or vinegar, but I like to use lemon juice) in a measuring cup then fill with milk until you reach ¼ cup. Let the mixture sit for 5-10 minutes.


Watermelon Caprese Salad

Watermelon Caprese Salad  |  Lemon & Mocha

Tomorrow is the first day of summer! I’m posting one of my favorite summer dishes to celebrate – Watermelon Caprese Salad. Even though caprese salad is incredibly simple, when it’s made with fresh peak-season tomatoes it is complete summer perfection. Layers of sweet tomatoes, creamy mozzarella and fresh basil are drizzled with extra virgin olive oil, syrupy balsamic glaze and thick granules of sea salt.

Watermelon Caprese Salad  |  Lemon & Mocha

The only addition I’ve ever tasted that has somehow been even better than the classic is juicy watermelon slices. I first had this combination during the summer five years ago with my parents at a restaurant out in Colorado. I even have a picture! Here it is below. Matt had just gotten me my first “real” camera that spring for our trip to Seattle so I was putting it to good use taking pictures of all our dishes.

Watermelon Caprese Salad  |  Lemon & Mocha

It was a special on the menu that night and even though their summer caprese had figs, heirloom tomatoes and burrata, the real standout was the watermelon. Diane and I could not believe how much the crisp sweet watermelon brought to the dish.

Watermelon Caprese Salad  |  Lemon & Mocha

Later that summer we were at our annual family beach week and my aunt was making a caprese salad with some tomatoes she got at the farm stand. Diane suggested that we put some watermelon slices on it like the dish we had in Colorado; just like that we officially converted to religious Watermelon Caprese Salad makers and we haven’t looked back since! Watermelon individually pairs well with all the components of a caprese salad and makes the salad even more refreshing and summery.

Watermelon Caprese Salad  |  Lemon & Mocha

Since there’s only a few ingredients you want them to really shine so make sure you buy the best watermelon, tomatoes, mozzarella and basil your farmer’s market or grocery store has to offer. I promise once you try this version it will be your new summer go-to! Enjoy and happy summer everyone!

Watermelon Caprese Salad  |  Lemon & Mocha

Watermelon Caprese Salad
 
Yield: 6 servings
Ingredients
  • ¼ of a seedless watermelon, sliced into pieces roughly the same size and thickness of the tomato slices
  • 2 ripe tomatoes, sliced
  • 8 ounces fresh mozzarella, sliced
  • Fresh basil leaves
  • Extra virgin olive oil
  • Salt, preferably sea salt or kosher salt
  • Balsamic glaze (see note)
Directions
  1. Layer the caprese salad. I like to do a tomato slice, topped with a mozzarella slice, topped with a watermelon slice, then finally topped with a basil leaf. I usually plan on 2 stacks like this per person, depending on how many other sides there will be. Arrange the stacks so they are layered over one another.
  2. When you are ready to serve, drizzle with olive oil and balsamic glaze. Sprinkle the salt over top then serve.
Notes
You can find balsamic glaze at the grocery store - Trader Joe's has a great one. If you want to make your own: combine ½ cup good quality balsamic vinegar with 2 tablespoons brown sugar in a small saucepan over medium heat. Stir until the sugar has dissolved. Bring to a boil then reduce heat to low and simmer until the mixture is reduced by half, about 10 minutes. The glaze should be thick and syrupy. Let cool before serving. Store in the fridge in an airtight container for up to 2 weeks.