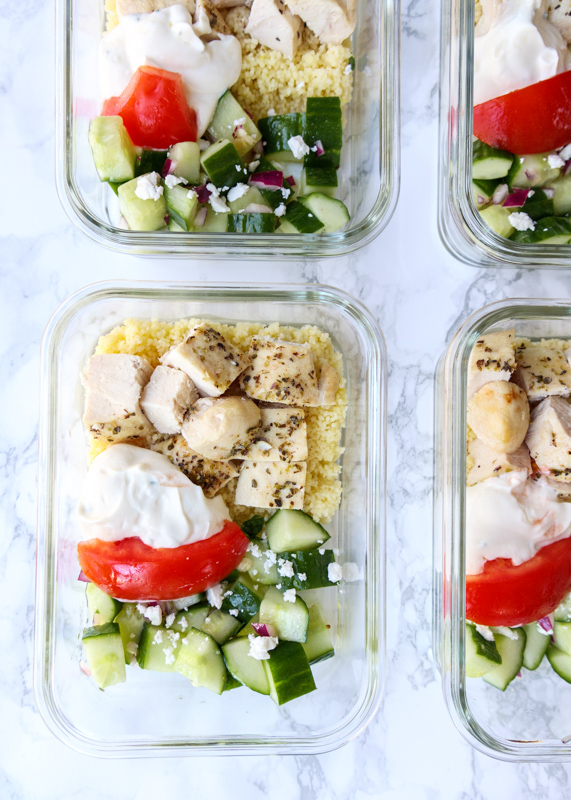
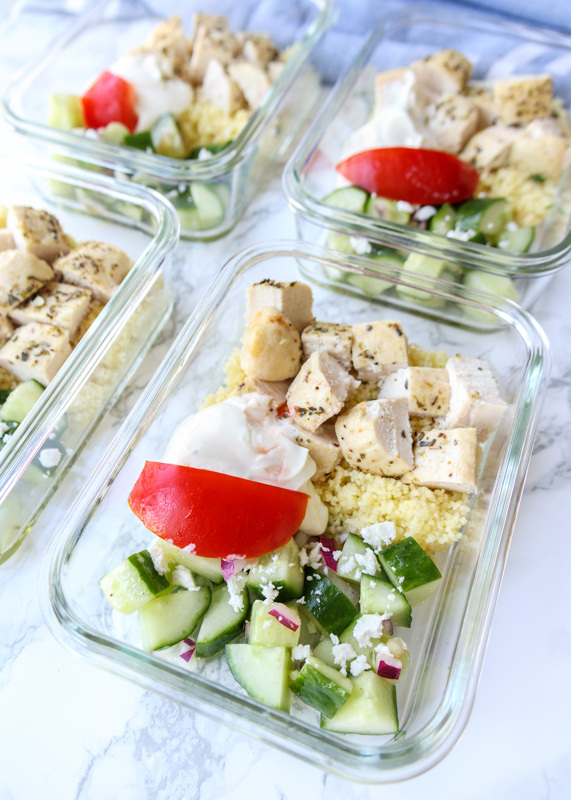
Greek Chicken Bowls

Greek Chicken Bowls  |  Lemon & Mocha

I don’t know where to start with these Greek Chicken Bowls. I know it’s unusual for me to be at a loss for words when it comes to food, but I think it stems from there not being an interesting or exciting reason as for why I created this dish. There’s no restaurant meal these bowls are based on. The recipe isn’t adapted from some cookbook I like. I wasn’t making them with anyone particular in mind that loves Greek food or anything. I was simply trying to create a healthy lunch I could meal prep for Matt and I that wasn’t anything like any of the dishes I normally make. So that’s how these Greek Chicken Bowls came to be. Super uninteresting and definitely not exciting. But what is exciting is how a healthy meal can be so packed with flavors and textures.

Greek Chicken Bowls  |  Lemon & Mocha

These Greek Chicken Bowls have a few more components than my normal prepped meals, but all the components are so simple that I don’t even mind it. The star of the dish is the marinated chicken. It took me a couple tries to get it right, but the version I landed on imparts plenty of lemon and oregano flavor after the chicken has been baked with only thirty minutes of marinating time.

Greek Chicken Bowls  |  Lemon & Mocha

I also love that I always have all the ingredients right in my pantry or fridge so I can whip this Greek marinated chicken up any day of the week. I like using chicken tenders because they take less time to bake than chicken breasts. They also have more edges to soak up the Greek vinaigrette marinade making for even more flavorful Greek Chicken Bowls.

Greek Chicken Bowls  |  Lemon & Mocha

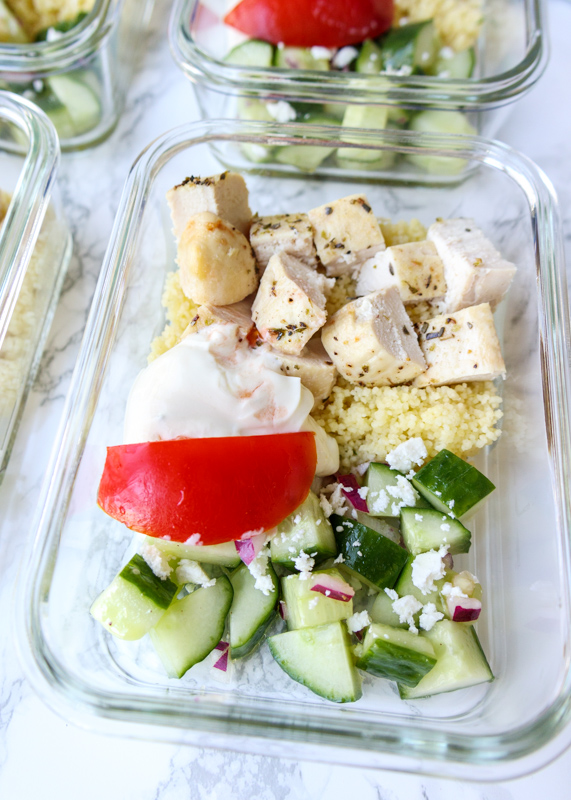
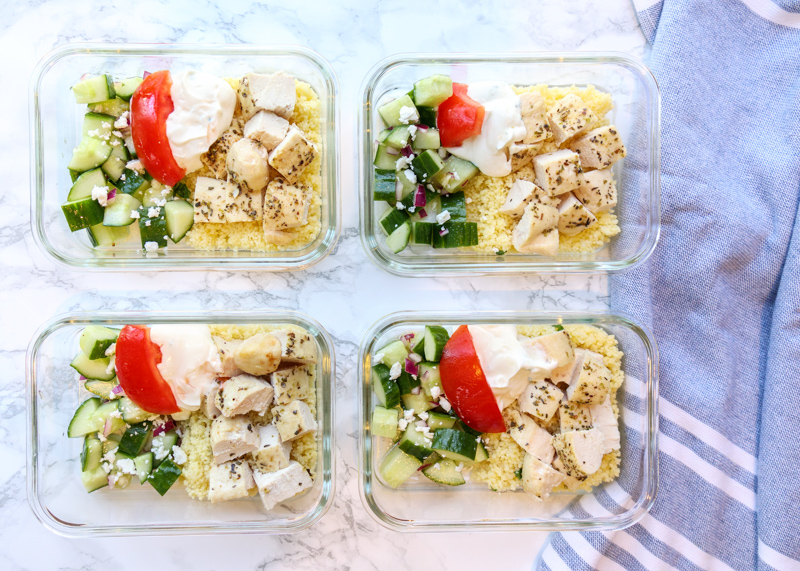
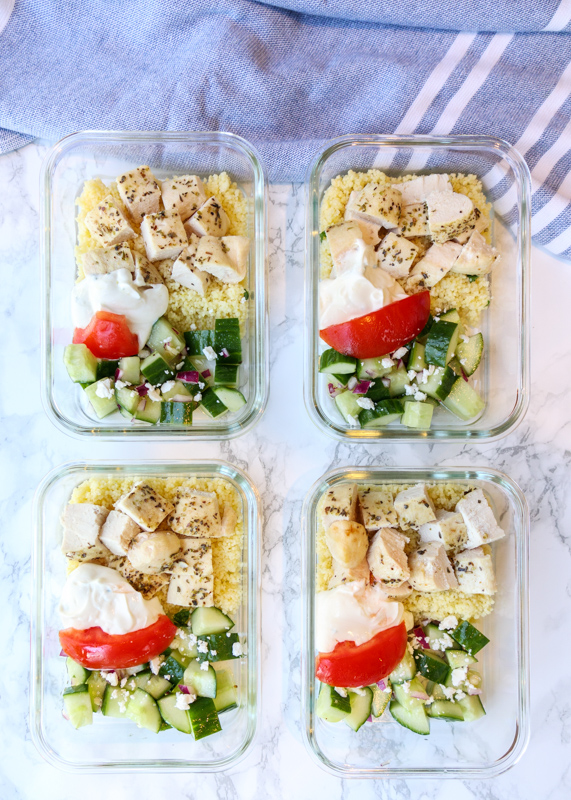
If you would rather grill your chicken, go for it! The juicy chicken gets served alongside some lemon cous cous, a quick cucumber salad and an easy yogurt mint sauce. I’m lemon obsessed and Greek food is big on lemon flavors so you knew I had to sneak it into multiple components! You could definitely make the chicken on its own and serve with different sides, but if you’re going to make more components than just the chicken I strongly recommend you make all four components. The chicken, cous cous, cucumber salad and yogurt sauce all balance each other and bring unique flavors to the dish creating that perfect bite!

Greek Chicken Bowls  |  Lemon & Mocha

Greek Chicken Bowls
 
Yield: 4 servings
Ingredients
for the chicken
  • 1 pound boneless skinless chicken breasts or tenders
  • ¼ cup olive oil
  • ¼ cup lemon juice
  • 1 teaspoon dried oregano
  • 1 teaspoon dried parsley
  • ½ teaspoon garlic powder
  • ½ teaspoon salt
  • ¼ teaspoon ground black pepper
for the cous cous
  • ½ cup uncooked cous cous
  • 1 tablespoon packed parsley leaves, finely chopped
  • Zest from ½ lemon
for the cucumber salad
  • 2 cup diced English cucumber, about ⅔ of a large English cucumber
  • 1½ tablespoons finely diced red onion
  • ½ - 1 clove garlic, minced
  • 1½ tablespoons olive oil
  • 2 teaspoons red wine vinegar
  • 1 tablespoon feta cheese crumbles
  • Salt and pepper to taste
  • 1 tomato, for garnish
for the yogurt mint sauce
  • 1 container plain nonfat Greek yogurt, about 5.3 ounces
  • 2 leaves fresh mint, chopped
  • 1 teaspoon honey
  • 1 teaspoon lemon juice
  • 1 teaspoon olive oil
Directions
for the chicken
  1. In a shallow bowl or container big enough to fit the chicken, whisk together the olive oil, lemon juice, dried oregano, dried parsley, garlic powder, salt and black pepper. Add the chicken and make sure all the pieces get completely coated. Marinate in the fridge for at least 30 minutes.
  2. Preheat the oven to 350 degrees F.
  3. When the chicken is done marinating, bake for 30 minutes (22 minutes for tenders) or until they register 165 degrees F with a meat thermometer. Let cool slightly then dice and divide among the 4 containers.
for the cous cous
  1. Bring ½ cup water to boil in a small saucepan. Remove the pan from the heat. Add the cous cous and a pinch of salt. Stir then cover, letting sit for 10 minutes. The cous cous should absorb the water and be soft. Fluff with a fork then stir in the lemon zest and chopped parsley. You can add some olive oil if you would like, but I skipped it since I was trying to reduce the amount of oil in the overall dish. Divide the cous cous among the 4 containers.
for the cucumber salad
  1. Combine the diced cucumber, diced red onion, minced garlic, olive oil and red wine vinegar in a small bowl. Season with salt and pepper to taste. Divide among the 4 containers then divide the feta cheese between the 4 containers and sprinkle on top of the salad.
for the yogurt mint sauce
  1. Combine all the ingredients in a small bowl. Divide among the 4 containers.
Notes
This bowl is meant to be eaten cold because of the cucumber salad and yogurt sauce.


Lemon Blackberry Icebox Cake

Lemon Blackberry Icebox Cake  |  Lemon & Mocha

We’re starting Monday off with a bang! This super simple no-bake Lemon Blackberry Ice Box Cake is channeling summer as we try to soak up the last week of August. I love lemon flavors all the time, but I especially love eating it in the summer since it makes me think of fresh ingredients and sunshine. Combine the lemon with some fresh plump blackberries and we are in full summer mode over here!

Lemon Blackberry Icebox Cake  |  Lemon & Mocha

I made this cake because I wanted to participate in Sally’s Baking Challenge over on Sally’s Baking Addiction. If you aren’t familiar with her blog, she posts a new challenge recipe every month to inspire more people to bake. I participated last month making cherry hand pies you can check out over on my Instagram and I had so much fun that I decided I wanted to participate again this month. The challenge for August is a chocolate chip cookie layer cake, which sounds amazing, but it is HUGE. Since there’s so many challenge months I missed out on, I decided to head into the archives and make a dessert from a past challenge.

Lemon Blackberry Icebox Cake  |  Lemon & Mocha

Last year, she posted one for a lemon blueberry icebox cake. Matt’s not a blueberry fan so we settled on blackberries and that’s how this cake came to be on your screen right now. Well after I made it, photographed it, edited it and loaded it up of course. While all that was happening, this light and tart cake was devoured so it’s safe to say it was a big success. Don’t be fooled by the challenge part; icebox cakes could not be easier since there is absolutely no baking involved.

Lemon Blackberry Icebox Cake  |  Lemon & Mocha

Even though I’ve eaten plenty of them, I’ve actually never make an icebox cake before. An icebox cake is typically made by layering cookies and whipped cream then placing it in the freezer. The cookies soak up moisture from the whipped cream and develop a soft “cake-like” texture. This version has multiple layers and each of them have me doing a happy dance.

Lemon Blackberry Icebox Cake  |  Lemon & Mocha

First, for our cookies we’re using graham crackers. You will need about six full-sheet graham crackers, which is just shy of one whole sleeve. For the whipped cream layer we are making a quick homemade lemon whipped cream. Beat together heavy cream, powdered sugar, lemon juice and lemon zest until you have soft peaks – done! I love a pillowy homemade whipped cream, but the brightness from the lemon takes it to a new level.

Lemon Blackberry Icebox Cake  |  Lemon & Mocha

Finally, we have our homemade blackberry sauce that you can make with a saucepan in under ten minutes. We’re going to layer each component multiple times so you have a show-stopping cake slice like the ones pictured here that will have everyone thinking you spent hours in the kitchen. Below is a quick shot I took to show you how I layered the graham crackers; it doesn’t have to be perfect.

Lemon Blackberry Icebox Cake  |  Lemon & Mocha

I can’t wait for you all to try this one! I’ll be busy over here dreaming up other icebox cake variations to make in the near future.

Lemon Blackberry Icebox Cake  |  Lemon & Mocha

Lemon Blackberry Icebox Cake
 
Yield: 10 servings
Ingredients
for the blackberry sauce
  • 2 teaspoons cornstarch
  • 2 teaspoons lemon juice
  • 1 tablespoon warm water
  • 2 cups fresh or frozen blackberries
  • 2 tablespoons granulated sugar
  • 1 teaspoon lemon zest
for the cake
  • 2 cups heavy cream
  • ¼ cup powdered sugar
  • 1 tablespoon lemon juice
  • 1 teaspoon lemon zest
  • 6 full-sheet graham crackers, a little less than 1 standard sleeve
  • Lemon zest and blackberries for garnish, optional
Directions
for the blackberry sauce
  1. In a small bowl, whisk together the cornstarch, lemon juice and warm water until the cornstarch dissolves. Set aside.
  2. In a small saucepan over medium heat, stir together the blackberries and sugar. Continue to stir until the blackberries have started releasing some of their juices, then add the cornstarch mixture. Stir for another 2-3 minutes while the blackberry sauce starts to thicken, mashing up some of the blackberries as you stir. Remove from the sauce from the heat and stir in the lemon zest. Set aside until it’s completely cool. Feel free to put it in the fridge if you want to speed up the cooling.
for the cake
  1. Line a 9 x 5 inch loaf pan with plastic wrap, making sure there is overhang over the edges so you’ll be able to easily life out the cake. Set aside.
  2. In the bowl of a stand mixer or in a large bowl using a hand mixer, beat together the heavy cream, powdered sugar, lemon juice and lemon zest on medium-high speed with the whisk attachment. Continue to beat until soft peaks form, about 3 minutes. Soft peaks are when peaks are just starting to hold, but flop over quickly.
  3. Make an extremely thin layer using a couple tablespoons of the whipped cream you just made on the bottom of the prepared loaf pan. This is to help the bottom layer of graham crackers stick. I'm going to describe the layering order here, but there is a quick list in the recipe notes section for reference. First, use about 2 graham crackers to make a single layer (see reference photo in the post). Next, a layer of whipped cream using about ¾ cup of the whipped cream. Then, layer half of the blackberry sauce. After the blackberry sauce comes another whipped cream layer of about ¾ cup followed by another single graham cracker layer. Layer another ¾ cup of whipped cream followed by the remaining blackberry sauce. Then another ¾ cup of whipped cream, a single graham cracker layer, and finally the rest of the whipped cream. Done!
  4. Once you have all your layers, you can top with lemon zest and blackberries for garnish, if desired, then cover with aluminum foil or plastic wrap and freeze for at least 4 hours. The icebox cake can be frozen 2-3 days before serving.
  5. When you’re ready to serve, let it soften in the fridge for 1 hour before serving or allow it to sit at room temperature for 10-15 minutes. Use the plastic wrap overhang on the sides to remove the cake from the pan and cut into slices. All leftovers (if you have any!) should be stored in the fridge.
Notes
Layer the following components in this order:
- Single graham cracker layer (about 2 crackers)
- Whipped cream layer using about ¾ cup of the whipped cream
- Blackberry sauce layer, using half of the blackberry sauce
- Whipped cream layer (3/4 cup)
- Single graham cracker layer (about 2 crackers)
- Whipped cream layer (3/4 cup)
- Blackberry sauce layer (remaining half of blackberry sauce)
- Whipped cream layer (3/4 cup)
- Single graham cracker layer (about 2 crackers)
- Whipped cream layer (the rest of the whipped cream)

Recipe slightly adapted from Sally’s Baking Addiction.

Pesto Presto Chicken

Pesto Presto Chicken  |  Lemon & Mocha

Welcome to the second recipe I made to use up my batch of Basil Pesto! This recipe is adapted from another cookbook I’ve had for a while and really love – Rachel Ray’s Look + Cook. The cookbook has awesome step-by-step photos to 100 different recipes that make my mouth water every time I flip through it.

Pesto Presto Chicken  |  Lemon & Mocha

It seems like people either love or hate Rachel Ray. I love her because all her recipes that I’ve made have come out so good. Matt, on the other hand, can’t stand when she comes on the Food Network and starts saying “EVOO” and “GB” (garbage bowl). Whatever Matt thinks about her acronyms, he is definitely a fan of this dish.

Pesto Presto Chicken  |  Lemon & Mocha

Rachel Ray named it Pesto Presto Chicken in her cookbook, so I kept the title since that’s how I always think of it. My version is chicken breasts stuffed with a pesto goat cheese mixture and topped with tomatoes and a little Parmesan. I know a lot of people don’t like tomatoes for textural reasons so you can certainly leave off the tomatoes if you are not a fan. If you are a fan, they add a fresh and juicy element to the dish that you don’t want to miss!

Pesto Presto Chicken  |  Lemon & Mocha

The first time I made this dish was for my Dad and I. As I’ve mentioned before, my Dad is very picky, especially when it comes to dinner meals. The chicken got rave reviews and he said he would definitely eat it again, which shocked both me and Diane! It’s kind of hard not to like this dish, though. Creamy pesto stuffed inside chicken? Yes, please!

Pesto Presto Chicken  |  Lemon & Mocha

The presto part comes from how quick the dish is to make. The only thing that takes me some time is butterflying and pounding out the chicken breasts so sometimes I will do that the day before so I can just fill and bake them the next night. Pesto Presto Chicken is perfect alongside some pasta or eaten with a side of asparagus or broccoli – yes, I know, my answer to everything! My Dad is my ultimate picky-meter so I guarantee your family will like this dish!

Pesto Presto Chicken  |  Lemon & Mocha

Pesto Presto Chicken
 
Yield: 4-6 servings
Ingredients
  • ⅓ cup pesto
  • 4 ounces goat cheese
  • 3 tablespoons milk (whatever you have in your fridge is fine)
  • 1 garlic clove, minced
  • 1 teaspoon Italian seasoning
  • ½ cup Parmesan, divided
  • 4 boneless skinless chicken breasts
  • 1 tomato
  • Cooking spray
Directions
  1. Preheat the oven to 450 degrees F. Line a baking sheet with nonstick aluminum foil or spray with cooking spray. Set aside.
  2. In a small mixing bowl, combine the pesto, goat cheese, milk, garlic, Italian seasoning and ¼ cup of the Parmesan. If your goat cheese is too hard to stir, microwave it for 15 seconds or so until soft.
  3. Butterfly each chicken breast so it resembles an open book. You do this by using a sharp knife to slice the chicken horizontally, but don’t cut all the way through to the other side because you want to be able to open it like a book. Lay plastic wrap over the butterflied chicken breast then evenly pound with a meat mallet or rolling pin until it’s ¼-inch thick. Place the chicken breast on the prepared baking sheet, still open. Spread ¼ of the prepared pesto mixture on one half of the chicken breast then fold the other half over top of it. Repeat with the remaining 4 chicken breasts.
  4. Lay the tomato slices over top of the folded over chicken breasts. Lightly spray with cooking spray. Sprinkle the remaining Parmesan over the tomato slices. Bake for 20 minutes or until they reach an internal temperature of 165 degrees F. If you want more color on the tomatoes and Parmesan on top you could always broil them for 1 minute towards the end of baking.

Recipe adapted from Rachel Ray’s Look + Cook.
Some of the links above are affiliate links, which means I may receive a small commission for my referral. This does not affect the retail cost of the item. Thank you for supporting Lemon & Mocha!

Baked Pesto Turkey Meatballs over Lemon Cauliflower Rice

Baked Pesto Turkey Meatballs over Lemon Cauliflower Rice  |  Lemon & Mocha

Grab your pesto because you need to make these Pesto Turkey Meatballs as. soon. as. possible! I got the idea for these meatballs from a Hello Fresh box Matt and I got a couple months ago. Usually I already have our meals planned out, but every once and a while we will order one of those meal prep boxes to switch it up. The inspirational meal was pesto turkey burgers. It basically only used pesto to flavor the ground turkey, but I was shocked when the burgers were juicy and so flavorful. I decided to take that concept and create Pesto Turkey Meatballs.

Baked Pesto Turkey Meatballs over Lemon Cauliflower Rice  |  Lemon & Mocha

Since I made first these, we’ve eaten them right from the oven, reheated in the microwave and even baked from frozen. Every time they taste so damn good! Ground turkey can tend to be dry, but the basil pesto keeps the meatballs incredibly moist, while also imparting a strong garlic, herb and Parmesan flavor. I added a little olive oil to the ground turkey mixture because I wanted to make sure they would be moist enough.

Baked Pesto Turkey Meatballs over Lemon Cauliflower Rice  |  Lemon & Mocha

I love that once you make a bunch they are such a quick and easy meal. I included instructions for freezing them in the recipe below. As delicious as these Pesto Turkey Meatballs are, I need to talk about this Lemon Cauliflower Rice. As you all know, I’m obsessed with lemon and it pairs really well with pesto. Remember way back when to the Kale and Walnut Pesto Pasta with Lemon Shrimp?

Baked Pesto Turkey Meatballs over Lemon Cauliflower Rice  |  Lemon & Mocha

I wanted to keep the meal healthy and veggie-centric so I decided to use cauliflower rice. How awesome is it that you can get frozen or fresh riced cauliflower (and other veggies!) in pretty much every grocery store now? It is such a healthy and fun way to switch up your usual meals. The Lemon Cauliflower Rice is so simple it’s ridiculous, but like a super addictive and flavorful ridiculous. You sauté garlic and the riced cauliflower together then stir in lemon zest, lemon juice, salt and pepper. Done!

Baked Pesto Turkey Meatballs over Lemon Cauliflower Rice  |  Lemon & Mocha

I served these with some steamed broccoli and it was definitely two nights of silent dinner – also known as we didn’t say anything because we were too busy stuffing our faces!

Baked Pesto Turkey Meatballs over Lemon Cauliflower Rice  |  Lemon & Mocha

Baked Pesto Turkey Meatballs over Lemon Cauliflower Rice
 
Yield: 4 servings
Ingredients
for the pesto turkey meatballs
  • 16 ounces ground turkey
  • ¼ cup basil pesto
  • 2 tablespoons olive oil
  • ¼ teaspoon salt
  • ¼ teaspoon ground black pepper
for the lemon cauliflower rice
  • 2 cloves garlic
  • 1 tablespoon olive oil
  • 16 ounces riced cauliflower, about 4 cups
  • ½ lemon, zested
  • 1 tablespoon lemon juice
  • ¼ teaspoon salt
  • ¼ teaspoon pepper
Directions
for the pesto turkey meatballs
  1. Preheat the oven to 400 degrees F. Line a baking pan with nonstick aluminum foil or spray with nonstick spray. Set aside.
  2. In a medium mixing bowl, combine the ground turkey, pesto, olive oil, salt and pepper. Try not to over-mix. Form the mixture into 16 meatballs and place on the prepared baking sheet. I like to divide the mixture in the bowl into 4 sections, then make 4 even-sized meatballs out of each section. Bake for 20 minutes or until they reach an internal temperature of 165 degrees F. Serve over the cauliflower rice with steamed broccoli.
for the lemon cauliflower rice
  1. Mince the garlic. Heat the olive oil in a sauté pan over medium-high heat. Add the garlic and sauté until fragrant, about 1 minute. Add the riced cauliflower and cook until almost tender. Add the lemon zest, lemon juice, salt and pepper. Stir to combine and remove from the heat when the cauliflower rice is tender.
Notes
This is what I did to freeze the meatballs. I lined a small baking sheet that would fit in my freezer with wax paper. Then I formed the meatballs and placed them on the prepared baking sheet. Put them in the freezer and leave them in there until they harden then remove and put them all into a freezer bag. I baked them right from frozen and just added a couple minutes onto the baking time. Just temp them and make sure they reach 165 degrees F.
You can use fresh or frozen riced cauliflower for this recipe. I used the Trader Joe’s frozen riced cauliflower.


Homemade Basil Pesto

Homemade Basil Pesto  |  Lemon & Mocha

A couple years ago, Matt and I got a raised garden bed to grow vegetables and herbs. We have yet to discover the best combination for the garden bed, mostly because we I get overexcited by the prospect of having fresh produce in our backyard and over-do it. The first year we did starters, mostly lettuce and some herbs, and everything grew fairly well. Except for the random bell pepper plant I threw in there that never came to be.

Homemade Basil Pesto  |  Lemon & Mocha

The next year we tried seeds and it did not go well. I was worried not all the seeds would take so to be sure I poured the whole packet into the little trench. FYI – do not do this. I tried to grow lettuce, radishes, broccoli and beets all in our little raised garden bed. When the radish seeds started to sprout it looked like a thick mohawk in the dirt. Definitely too many seeds! Basically, nothing grew that year.

Homemade Basil Pesto  |  Lemon & Mocha

This year, we went back to starters and for the most part it’s been our best year yet! We have basil, parsley, thyme and mint that are all thriving. We have a grape tomato plant that was probably not a good idea for our raised bed since, not even kidding, it’s over five feet tall now, but at least it’s growing tomatoes. We also added a cucumber starter without doing any research and every day it is trying to take over the whole garden bed with its little tendrils.

Homemade Basil Pesto  |  Lemon & Mocha

If you’ve never seen a cucumber plant grow it spreads out these little tendrils that wrap around whatever they can get attached to – stakes, netting, other plants – and then continue growing from there. There’s been a few times the cucumber tendrils have almost yanked over our entire stake and netting set up, but at least we almost have some mature cucumbers! Do any of you grow your own vegetables or herbs?

Homemade Basil Pesto  |  Lemon & Mocha

So back to the thriving herbs. Our basil plant was really full so I decided to whip up a batch of pesto. My basil pesto only requires basil, pine nuts, garlic, salt, Parmesan or pecorino cheese and some olive oil. The ingredients and the recipe are so simple, but there are few foods that rival the taste of fresh pesto. There are hundreds of ways to use pesto, but the two recipes I’m posting on Wednesday and Friday will show you how I chose to use ours. Our basil plant is already full again so looks like I need to make another batch! What is your favorite way to use pesto?

Homemade Basil Pesto  |  Lemon & Mocha

Homemade Basil Pesto
 
Yield: About 1¼ cups
Ingredients
  • 4 cups fresh basil
  • ½ cup grated Parmesan or pecorino cheese
  • ⅓ cup toasted pine nuts
  • 1 garlic clove
  • ½ teaspoon salt
  • ½ cup extra virgin olive oil
Directions
  1. In a food processor, pulse together the basil, pine nuts, garlic, salt and pecorino until finely chopped. Add the olive oil and pulse until smooth. Use immediately or store in the fridge in an airtight container for a week. My favorite way to freeze is in a small freezer bag. I lay it flat to freeze; then it doesn’t take up much space in the freezer and it’s easy to break off a piece when you need it.