


Chocolate Raspberry Heart Cookie Pops

I’m posting the February cookies early so you have plenty of time to make them for Valentine’s Day next week. Which you will definitely want to do because how cute are these heart cookie pops? They are also game-changer cookies, but I’ll get into that in a bit. I have to admit that I was a little nervous about making these cookies because the recipe called for two things I’ve never done before; making cookie pops and making royal icing. I am happy to report that both were easier than I anticipated and there is no reason to be intimidated about making these Chocolate Raspberry Heart Cookie Pops!
The dough could not be easier to make since you whip it up in a food processor. I know not everyone has a food processor (if you are thinking of getting one I highly recommend the 14-cup Cuisinart I have), but I imagine you could use a stand mixer instead. The butter gets cubed up and added into the dough while it’s cold, just like when making a pastry crust, so there’s no waiting around for your butter to come to room temperature. Since the dough is cold from the chilled butter, it’s very easy to roll out without any stickiness.

I had to re-roll my dough because I initially rolled it too thin. You need the dough to be about 3/8-inch to 1/2-inch thick in order to insert the lollipop stick, which is thicker than you would think so break out that measuring tape! Since the dough was so thick, inserting the lollipop sticks was easy – first challenge complete! When I was cutting out the circles of dough I cut them tightly together so I was able to get all twelve circles from the initial rolled dough. The recipe says to gather, refrigerate and re-roll the scraps to cut out more cookies. Twelve cookie pops was already plenty for me so instead I just baked the scraps as is after I was done baking the cookie pops. They looked like funny bat winged cookies, but they still tasted delicious!

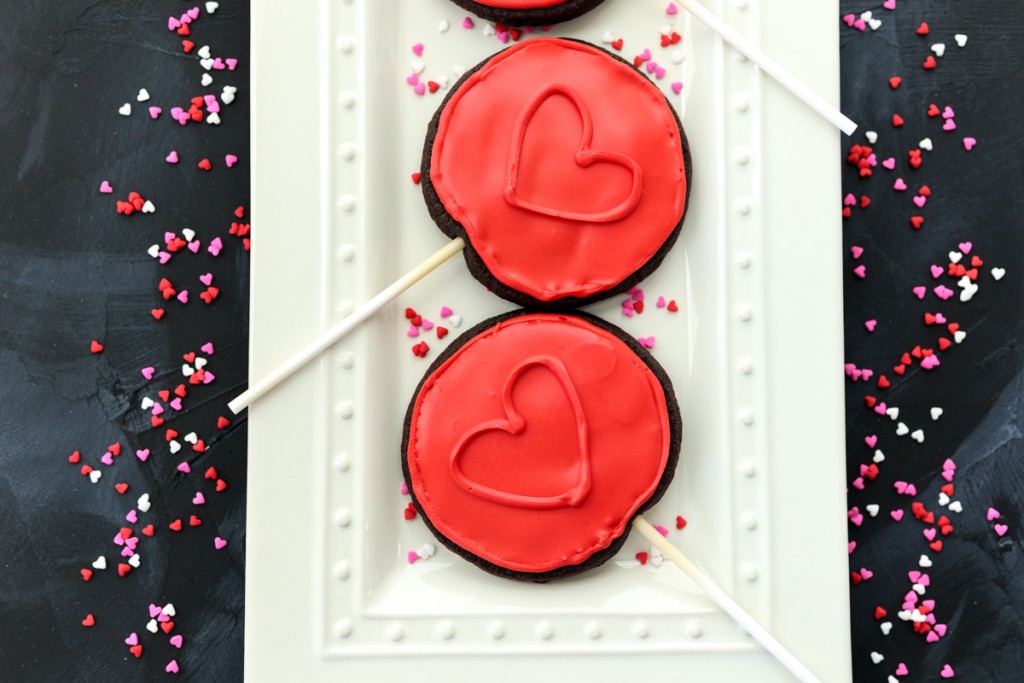
Next up was the royal icing. Basically, the recipe has you make an icing that’s pretty stiff, which you pipe around the edge of the cookie. You then thin the icing and fill in the rest of the cookie within the piped line. I found it a little difficult to pipe a smooth line around the edge of the cookies, but after a few wonky lines I had it down. I don’t think I’ll become a cookier anytime soon, but they look so nice when they’re done. I went with a little heart on top instead of the swirl rose design on the original Food Network Magazine recipe.

Okay, now back to that game-changer comment I made earlier. These Chocolate Raspberry Heart Cookie Pops taste so good! As in, both Matt and I called them dangerous and tried to hide them. Matt hit the flavor spot on – they taste like a buttery version of that Sheila G’s Brownie Brittle. I couldn’t find cherry extract in my grocery store, which the original recipe calls for, so I went with raspberry extract and I’m happy I did because the flavor was subtle, fruity and complements the chocolate cookie perfectly. There’s also something really satisfying about eating a cookie off a lollipop stick. This chocolate cookie base is definitely going to be a new regular in my cookie rotation. Next time I’m going to try chilling it in a log to make slice and bake cookies. And I might even slice them thick enough to stick lollipop sticks in them again. Yum!

- 2 cups all-purpose flour
- ¾ cup powdered sugar
- ⅓ cup unsweetened Dutch-process cocoa powder (I used Hershey’s Special Dark cocoa powder)
- ¼ cup granulated sugar
- ½ teaspoon salt
- 2½ sticks cold unsalted butter, cut into cubes
- 2 teaspoons vanilla extract
- 2½ cups powdered sugar
- 1 tablespoon plus 2 teaspoons meringue powder
- ¼ cup water, plus more as needed
- ½ teaspoon raspberry extract
- Red gel food coloring
- Prepare two sheets of parchment paper that are sized to line a baking sheet. Set aside. In a food processor, pulse together the flour, powdered sugar, cocoa powder, granulated sugar and salt. Once combined, add the cold butter cubes and the vanilla extract. Pulse until the mixture looks like it has larger crumbs and will hold together when pinched. Transfer the dough to a large bowl or clean work surface and press the dough into a ball. Knead the dough a few times. Place the dough ball on one of the pieces of parchment paper then top with the other sheet. Press the dough to flatten then roll out the dough until it’s ⅜-inch to ½-inch thick. Refrigerate the dough slab for about 1 hour, or until firm.
- Make sure oven racks are positioned in the lower and upper thirds of the oven. Preheat to 325 degrees F. Using a 3-inch round cookie cutter or biscuit cutter, cut out 12 cookies and arrange 2 inches apart on 2 baking sheets lined with parchment paper. Carefully insert a 6-inch lollipop stick about ¾ of the way into each round cookie. If needed, form the scraps into a ball, refrigerate and re-roll to cut out more cookies. Or, refrigerate the scraps as is to bake as odd shaped scrap cookies once the other cookies are done baking.
- Bake the cookies until they are set for 25-30 minutes, switching the pans from top to bottom and front to back halfway through. Mine took closer to 30 minutes. Let cookies cool for 10 minutes on the pan on a wire cooling rack then transfer cookies to the wire cooling rack to cool completely.
- In a large bowl or the bowl of a stand mixer, whisk together the powdered sugar and the meringue powder. Add the water and raspberry extract then beat with a hand mixer or in a stand mixer on medium speed for about 3 minutes, or until there are soft glossy peaks. Tint the icing with the red food coloring. I found that I needed a lot of gel food coloring to achieve a red color (almost half a tube). The icing should be able to be piped without being runny. If the icing is too thick add up to 1 more tablespoon of water. I needed to add about 2 teaspoons more water.
- Put ½ cup of icing into a pastry bag or resealable plastic bag and snip a corner. If you wanted to be more precise you could use a small round pastry tip (I didn’t do this, but I would probably do it next time). Apply firm and even pressure to pipe the icing around the edge of each cookie. I found it piped cleaner when I made sure I didn’t have the tip of the bag too close to the cookie. Set the piping bag aside for decorating the heart detail later.
- Add 1 teaspoon of water at a time to thin the remaining icing in the bowl until it is the consistency of runny yogurt. Put the icing into a new pastry bag or resealable plastic bag (no need for a pastry tip) and pipe a bunch of icing within the outline of 6 of the cookies. Use an offset spatula or the back of a spoon to smooth out the icing and bring it all the way to the piped edge. You want to pipe enough icing that it’s easy to smooth, but not so much that it is spilling over the piped outline. Repeat with the remaining 6 cookies then let set at room temperature for about 1 hour. Use the reserved original piping bag of icing to pipe the heart details onto the cookies.
Recipe from January/February 2019 issue of Food Network Magazine.
Some of the links above are affiliate links, which means I may receive a small commission for my referral. This does not affect the retail cost of the item. Thank you for supporting Lemon & Mocha!
02.06.19 @ 8:44 am
Look 👍
02.06.19 @ 8:52 am
Look great
02.07.19 @ 3:21 pm
Thank you, Julie!
02.06.19 @ 10:43 pm
these look so cute and delicious. i’ve never heard of meringue powder – what is it please? cheers sherry
02.07.19 @ 3:32 pm
Thanks, Sherry! Meringue powder is an egg white substitute used mainly in cookie and cake decorating. It mostly consists of dried egg whites with some cornstarch. I did a quick Google search and it seems there is something called Actiwhite and something else called Pavlova Magic that may be the Australian equivalents? I hope you find some so you can make these yummy cookies!
02.08.19 @ 12:22 am
thank you lauren. feel free to join us for an In My Kitchen post (on my blog) if you like. it’s open till 13th of the month. cheers sherry